
Maybe you have bought you like me an Raspberry Pi4 with 4GB RAM and think about what nice things you could do with it. Since the beginning I got the idea to use it as an lightweight home server. Of course you can easily use a mini computer with more power and obviously more energy consumption too. Not a nice idea for a device is running 24/7. As long you don’t plan to mine your own bitcoins or host a high frequented shop system, a PI device should be sufficient.
I was wanted to increase the network security for my network. For this reason I found the application AdGuard which blocks many spy software from internet services you use on every device is connected to the network where AdGuard is running. Sounds great and is not so difficult to do. Let me share with you my experience.
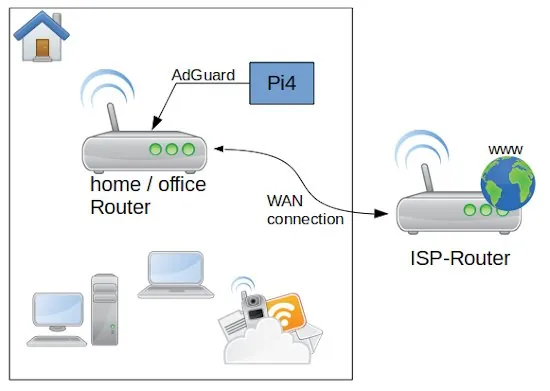
As first let’s have a look to the overall system and perquisites. After the Router from my Internet Service Provider I connected direct by wire my own Network router an Archer C50. On my Rapsbery PI4 with 4GB RAM run as operation system Ubuntu Linux Server x64 (ARM Architecture). The memory card is a 64 GB ScanDisk Ultra. In the case you need a lot of storage you can connect an external SSD or HDD with an USB 3 – SATA adapter. Be aware that you use a storage is made for permanent usage. Western Digital for example have an label called NAS, which is made for this purpose. If you use standard desktop versions they could get broken quite soon. The PI is connected with the router direct by LAN cable.
The first step you need to do is to install on the Ubuntu the Docker service. this is a simple command: apt-get install docker. if you want to get rid of the sudo you need to add the user to the docker group and restart the docker service. If you want to get a bit more familiar with Docker you can check my video Docker basics in less than 10 minutes.
sudo apt-get install docker
sudo gpasswd -a <user> docker
sudo dockerd
After this is done you need to create a network where the AdGuard container is reachable from your router to a static IP address on your PI.
docker network create -d macvlan -o parent=eth0 \
--subnet=192.168.0.0/16 \
--ip-range=192.168.0.4/25 \
--gateway=192.168.0.1 \
lanBefore you just copy and past the listing above, you need to change the IP addresses to the ones your network is using. for all the installation, this is the most difficult part. As first the network type we create is macvlan bounded to the network card eth0. eth0 is for the PI4 standard. The name of the network we gonna to create is lan. To get the correct values for subnet, ip-range and gateway you need to connect to your router administration.
To understand the settings, we need a bit of theory. But don’t worry is not much and not that complicated. Mostly your router is reachable by an IP address similar to 192.168.0.1 – this is a static address and something equal we want to have for AdGuard on the PI. The PI itself is in my case reachable by 192.168.0.12, but this IP we can not use for AdGuard. The plan is to make the AdGuard web interface accessible by the IP 192.168.0.2. OK let’s do it. First we have to switch on our router administration to the point DHCP settings. In the Screenshot you can see my configuration. After you changed your adaptions don’t forget to reboot the router to take affect of the changes.
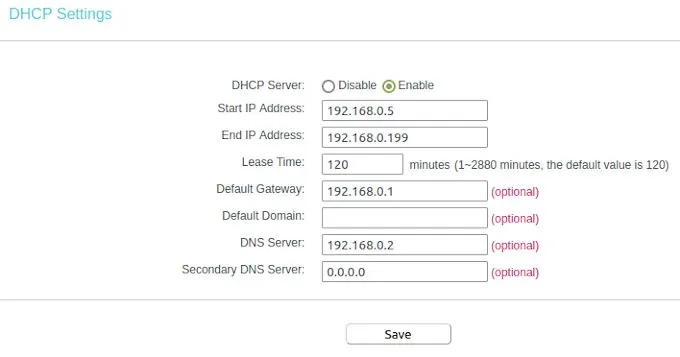
I configured the dynamic IP range between 192.168.0.5 to 192.168.0.199. This means the first 4 numbers before 192.168.0.5 can be used to connect devices with a static IP. Here we see also the entry for our default gateway. Whit this information we are able to return to our network configuration. the subnet IP is like the gateway just the digits in the last IP segment have to change to a zero. The IP range we had limited to the 192.168.0.4 because is one number less than where we configured where the dynamic IP range started. That’s all we need to know to create our network in Docker on the PI.
Now we need to create in the home directory of our PI the places were AdGuard can store the configuration and the data. This you can do with a simple command in the ssh shell.
mkdir /home/ubuntu/adguard/work
mkdir /home/ubuntu/adguard/confAs next we have to pull the official AdGuard container from the Docker Hub and create a image. This we do by just one command.
docker run -d --name adguard --restart=always \
-p 3000:3000/tcp --net lan --ip 192.168.0.2 \
-p 53/tcp -p 53/udp -p 67/udp -p 68/udp -p 80/tcp \
-p 784/udp -p 8853/udp \
-p 443/tcp -p 443/udp \
-p 853/tcp -p 853/udp \
-p 5443/tcp -p 5443/udp \
-v /home/ubuntu/adguard/work:/opt/adguardhome/work \
-v /home/ubuntu/adguard/conf:/opt/adguardhome/conf \
adguard/adguardhome:latestThe container we create is called adguard and we connect this image to our own created network lan with the IP address 192.168.0.2. Then we have to open a lot of ports AdGuard need to do the job. And finally we connect the two volumes for the configuration and data directory inside of the container. As restart policy we set the container to always, this secure that the service is up again after the server or docker was rebooted.
After the execution of the docker run command you can reach the AdGuard configuration page with your browser under: http://192.168.0.2:3000. Here you can create the primary setup to create a login user and so on. After the first setup you can reach the web interface by http://192.168.0.2.
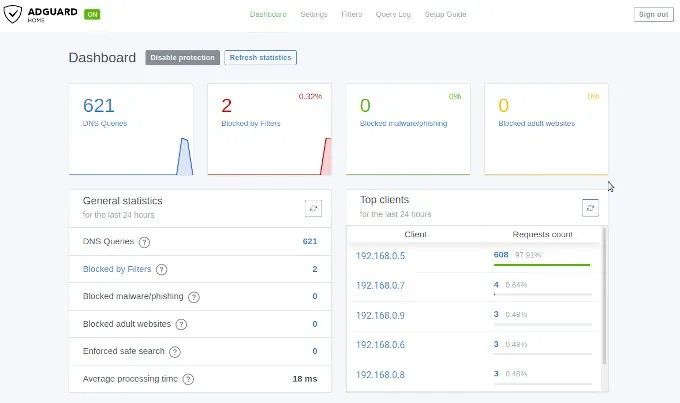
The IP address 192.168.0.2 you need now to past into the field DNS Server for the DHCP settings. Save the entries and restart your router to get all changes working. When the router is up open on your browser any web page from the internet to see that everything is working fine. After this you can login into the AdGuard web console to see if there appearing data on the dashboard. If this is happened then you are don e and your home or office network is protected.
If you think this article was helpful and you like it, you can support my work by sharing this post or leave a like. If you have some suggestions feel free to drop a comment.
Leave a Reply
You must be logged in to post a comment.