About Frank Vogt

Frank Vogt is a quality-oriented IT specialist with more than 35 years of experience. He is a proven expert in IT consulting, IT management and system installations. Since 2020, he has focused on IT security with his company Care-IT, with topics such as encrypted communication, secure operating systems, Google-free smartphones and the secure storage of data in Nextclouds.

Backup and Transfer your Thunderbird Profile to another Computer

As an IT service provider, we often have to support our clients to reinstall old Windows systems. The most often challenge we have to face by this activity is to backup old files and restore them on the new system. Not only private persons, also companies using the email client Thunderbird. So we decided to publish this short guide how your Thunderbird profile can be backup and restore. To prevent a data loss – you should do backups regularly in the case your hardware or operating system got fully crashed.

backup

  1. Connect an pen drive or hard disk (USB medium) on your computer.
  2. Create a directory of your choice on the USB medium to back up your profile. Choose a name you are able to recognize later the content. (e.g. 2022-01-19_Thunderbird-profile)
  3. Keep the „Explorer window“ open and make sure, that the directory is active.
  4. Open Thunderbird on the computer you want to backup.
  5. To find the old profile, click on the “three bars” in the top right-hand corner.
  6. In the next windows that opens, click on the „Open Folder“.
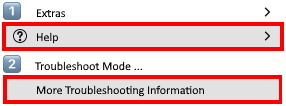
  7. A new “Explorer window” pop up and shows you all the files in your profile.
  8. Mark all files by clicking – click on the “1st file”, then hold down the <Shift> key on your keyboard and at the same time press the “Arrow down” key until the grey „scroll bar“ in the window reaches the bottom. Once all files are selected (marked in blue), click with the “right mouse button” on any file and select the menu item “Copy“.
  9. Go back to your other “Explorer window“, click the right mouse button and then “Paste“.
  10. Once the copying process is complete, you can close your Thunderbird.

restore

  1. Connect your „USB medium“ to the computer (destination) where you like to transfer your Thunderbird profile.
  2. Open the “Explorer” and create the following directories: „Data“ ➡️ „ Thunderbird“ ➡️ „Post-Office xxx“ (C:\Data\Thunderbird\Post-Office xxx\ „xxx“ you need to replace for your Thunderbird profile name)
  3. Hence your directories are created you can copy your profile data from your USB medium into the newly created directory „Post-Office xxx“.
  4. After completing the copying process, you still need to set up your new profile directory in Thunderbird.
  5. Press the keys <Windows Key>+<R> on your keyboard. The “Run” dialogue opens. Enter the following command: thunderbird -p  as you can see in the screenshot and press “OK“.
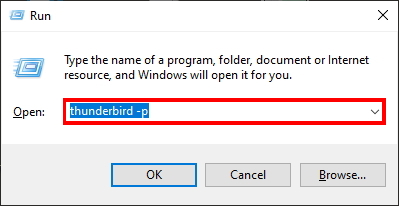
  6. In the newly opened Popup “Thunderbird – Choose User Profile“, click on “Create Profile…” to start the wizard.
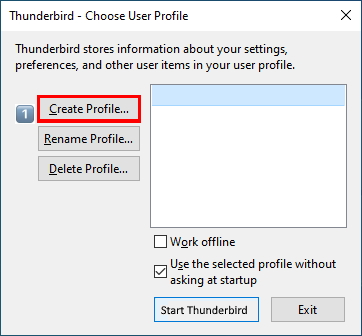
  7. In the 1st window of the “Profile Wizard – Welcome” click on “Next“.
  8. In the 2nd window of the “Profile Wizard – Finish” enter the “Profile Name” (Post-Office xxx) under “1” you can see in the screenshot. Under “2” select the profile path by clicking on “Choose Folder“. (C:\Data\Thunderbird\Post-Office xxx)”.
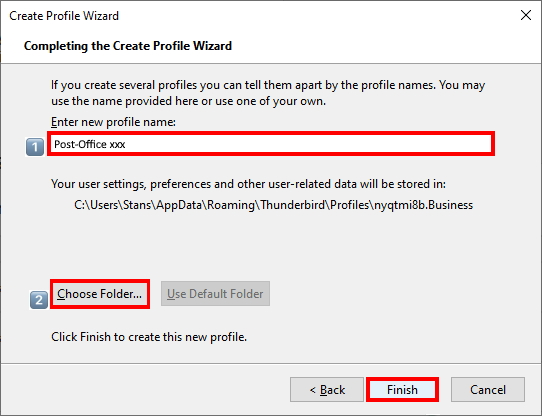
  9. To finish the process,you just have to press the “Finish” button.

You can now start Thunderbird normally from the start bar – all your emails & settings are restored. If you have questions or suggestions you can write us an e-mail or leave a comment. If you like this guide feel free to share this article.

Network spy protection with AdGuard Home on a Raspberry Pi and Docker

In this short tutorial I describe how you are able to setup AdGuard Home on…

Goodbye privacy, goodbye liberty

The more often it has to be repeated how good our freedom of speech is…

Computer Science Library – My personal Top 10 IT Books (2019)

As I considered to write an article about my top 10 books, related to computer…

Preventing SQL Injections in Java with JPA and Hibernate

Preventing SQL Injections in Java using SQL Parameters with the Java Persistence API (JPA) and…

Installing NextCloud with Docker on a Linux Server

For business it’s sometime important to have a central place where employees and clients are able to interact together. NextCloud is a simple and extendable PHP solution with a huge set of features you can host by yourself, to keep full control of your data. A classical Groupware ready for your own cloud.

If you want to install NextCloud on your own server you need as first a well working PHP installation with a HTTP Server like Apache. Also a Database Management System is mandatory. You can chose between MySQL, MariaDB and PostgreSQL servers. The classical way to install and configure all those components takes a lot of time and the maintenance is very difficult. To overcome all this we use a modern approach with the virtualization tool docker.

The system setup is as the following: Ubuntu x64 Server, PostgreSQL Database, pgAdmin DBMS Management and NextCloud.

Agenda

  • Docker Basics
  • Installing Docker on a Ubuntu server
  • prepare your database
  • putting all together and make it run
  • insights to operate NextCloud

Docker Container Instructions

# create network
docker network create -d bridge --subnet=172.18.0.0/16 service

# postures database server
docker run -d --name postgres --restart=always \
--net service --ip 172.18.0.2 \
-e POSTGRES_PASSWORD=s3cr3t \
-e PGPASSWORD=s3cr3t \
-v /home/ed/postgres/data:/var/lib/postgresql/data \
postgres:11.1

# copy files from container to host system
docker cp postgres:/var/lib/postgresql/data /home/ed/postgres

# pgAdmin administration tool
docker run -d --name pgadmin --restart=no \
-p 8004:80 --net services --ip 172.18.0.3 \
-e PGADMIN_DEFAULT_EMAIL=account@sample.com \
-e PGADMIN_DEFAULT_PASSWORD=s3cr3t \
dpage/pgadmin4:5.4

# nextcloud container
docker run -d --name nextcloud --restart=always \
-p 8080:80 --net services --ip 172.18.0.4 \
-v /home/ed/_TEMP_/nextcloud:/var/www/html \
-e POSTGRES_DB=nextcloud \
-e POSTGRES_USER=nextcloud \
-e POSTGRES_PASSWORD=nextcloud \
-e POSTGRES_HOST=172.18.0.2 \
nextcloud:22.2.0-apache
Bash

If you have any question feel free to leave a comment. May you need help to install and operate your own NextCloud installation secure, don’t hesitate to contact us by the contact form. In the case you like the video level a thumbs up and share it.

Resources

Links sind nur für eingeloggte Nutzer sichtbar.