
The PHP programming language has been the first choice for many developers in the field of web applications for decades. Since the introduction of object-oriented language features with version 5, PHP has come of age. Large projects can now be implemented in a clean and, above all, maintainable architecture. A striking difference between commercial software development and a hobbyist who has assembled and maintains a club’s website is the automated verification that the application adheres to specified specifications. This brings us into the realm of automated software testing.
A key principle of automated software testing is that it verifies, without additional interaction, that the application exhibits a predetermined behavior. Software tests cannot guarantee that an application is error-free, but they do increase quality and reduce the number of potential errors. The most important aspect of automated software testing is that behavior already defined in tests can be quickly verified at any time. This ensures that if developers extend an existing function or optimize its execution speed, the existing functionality is not affected. In short, we have a powerful tool for ensuring that we haven’t broken anything in our code without having to laboriously click through all the options manually each time.
To be fair, it’s also worth mentioning that the automated tests have to be developed, which initially takes time. However, this ‘supposed’ extra effort quickly pays off once the test cases are run multiple times to ensure that the status quo hasn’t changed. Of course, the created test cases also have to be maintained.
If, for example, an error is detected, you first write a test case that replicates the error. The repair is then successfully completed if the test case(s) pass. However, changes in the behavior of existing functionality always require corresponding adaptation of the associated tests. This concept of writing tests in parallel to implement the function is feasible in many programming languages and is called test-driven development. From my own experience, I recommend taking a test-driven approach even for relatively small projects. Small projects often don’t have the complexity of large applications, which also require some testing skills. In small projects, however, you have the opportunity to develop your skills within a manageable framework.
Test-driven software development is nothing new in PHP either. Sebastian Bergmann’s unit testing framework PHPUnit has been around since 2001. The PEST testing framework, released around 2021, builds on PHPUnit and extends it with a multitude of new features. PEST stands for PHP Elegant Testing and defines itself as a next-generation tool. Since many agencies, especially smaller ones, that develop their software in PHP generally limit themselves to manual testing, I would like to use this short article to demonstrate how easy it is to use PEST. Of course, there is a wealth of literature on the topic of test-driven software development, which focuses on how to optimally organize tests in a project. This knowledge is ideal for developers who have already taken their first steps with testing frameworks. These books teach you how to develop independent, low-maintenance, and high-performance tests with as little effort as possible. However, to get to this point, you first have to overcome the initial hurdle: installing the entire environment.
A typical environment for self-developed web projects is the Laravel framework. When creating a new Laravel web project, you can choose between PHPUnit and PEST. Laravel takes care of all the necessary details. A functioning PHP environment is required as a prerequisite. This can be a Docker container, a native installation, or the XAMPP server environment from Apache Friends. For our short example, I’ll use the PHP CLI on Debian Linux.
sudo apt-get install php-cli php-mbstring php-xml php-pcov
After executing the command in the console, you can test the installation success using the php -v command. The next step is to use a package manager to deploy other PHP libraries for our application. Composer is one such package manager. It can also be quickly deployed to the system with just a few instructions.
php -r "copy('https://getcomposer.org/installer', 'composer-setup.php');"
php -r "if (hash_file('sha384', 'composer-setup.php') === 'ed0feb545ba87161262f2d45a633e34f591ebb3381f2e0063c345ebea4d228dd0043083717770234ec00c5a9f9593792') { echo 'Installer verified'.PHP_EOL; } else { echo 'Installer corrupt'.PHP_EOL; unlink('composer-setup.php'); exit(1); }"
php composer-setup.php
php -r "unlink('composer-setup.php');"This downloads the current version of the composer.phar file to the current directory in which the command is executed. The correct hash is also automatically checked. To make Composer globally available via the command line, you can either include the path in the path variable or link composer.phar to a directory whose path is already integrated into Bash. I prefer the latter option and achieve this with:
ln -d composer.phar $HOME/.local/bin/composer
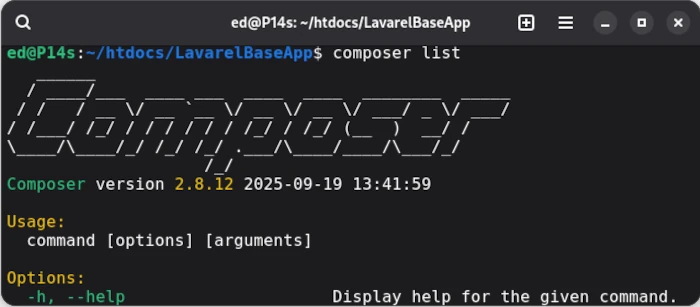
If everything was executed correctly, composer list should now display the version, including the available commands. If this is the case, we can install the Lavarel installer globally in the Composer repository.
php composer global require laravel/installer
To install Lavarel via Bash, the path variable COMPOSER_HOME must be set. To find out where Composer created the repository, simply use the command composer config -g home. The resulting path, which in my case is /home/ed/.config/composer, is then bound to the variable COMPOSER_HOME. We can now run
php $COMPOSER_HOME/vendor/bin/laravel new MyApp
in an empty directory to create a new Laravel project. The corresponding console output looks like this:
ed@P14s:~/Downloads/test$ php $COMPOSER_HOME/vendor/bin/laravel new MyApp

   _                               _
  | |                             | |
  | |     __ _ _ __ __ ___   _____| |
  | |    / _` |  __/ _` \ \ / / _ \ |
  | |___| (_| | | | (_| |\ V /  __/ |
  |______\__,_|_|  \__,_| \_/ \___|_|


 ┌ Which starter kit would you like to install? ────────────────┐
 │ None                                                         │
 └──────────────────────────────────────────────────────────────┘

 ┌ Which testing framework do you prefer? ──────────────────────┐
 │ Pest                                                         │
 └──────────────────────────────────────────────────────────────┘

Creating a "laravel/laravel" project at "./MyApp"
Installing laravel/laravel (v12.4.0)
  - Installing laravel/laravel (v12.4.0): Extracting archive
Created project in /home/ed/Downloads/test/MyApp
Loading composer repositories with package information
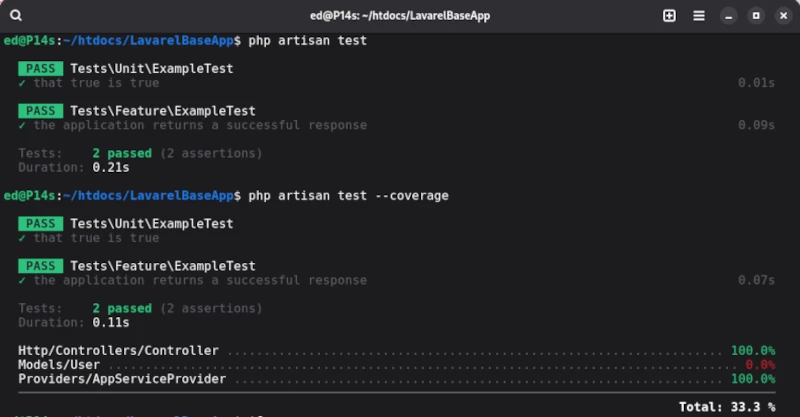
The directory structure created in this way contains the tests folder, where the test cases are stored, and the phpunit.xml file, which contains the test configuration. Laravel defines two test suites: Unit and Feature, each of which already contains a demo test. To run the two demo test cases, we use the artisan command-line tool [1] provided by Laravel. To run the tests, simply enter the php artisan test command in the root directory.
In order to assess the quality of the test cases, we need to determine the corresponding test coverage. We also obtain the coverage using artisan with the test statement, which is supplemented by the --coverage parameter.
php artisan test --coverage
The output for the demo test cases provided by Laravel is as follows:
Unfortunately, artisan’s capabilities for executing test cases are very limited. To utilize PEST’s full functionality, the PEST executor should be used right from the start.
php ./vendor/bin/pest -h
The PEST executor can be found in the vendor/bin/pest directory, and the -h parameter displays help. In addition to this detail, we’ll focus on the tests folder, which we already mentioned. In the initial step, two test suites are preconfigured via the phpunit.xml file. The test files themselves should end with the suffix Test, as in the ExampleTest.php example.
Compared to other test suites, PEST attempts to support as many concepts of automated test execution as possible. To maintain clarity, each test level should be stored in its own test suite. In addition to classic unit tests, browser tests, stress tests, architecture tests, and even the newly emerging mutation testing are supported. Of course, this article can’t cover all aspects of PEST, and there are now many high-quality tutorials available for writing classic unit tests in PEST. Therefore, I’ll limit myself to an overview and a few less common concepts.
Architecture test
The purpose of architectural tests is to provide a simple way to verify whether developers are adhering to the specifications. This includes, among other things, ensuring that classes representing data models are located in a specified directory and may only be accessed via specialized classes.
test('models')
->expect('App\Models')
->toOnlyBeUsedOn('App\Repositories')
->toOnlyUse('Illuminate\Database');
Mutation-Test
This form of testing is something new. The purpose of the exercise is to create so-called mutants by making changes, for example, to the conditions of the original implementation. If the tests assigned to the mutants continue to run correctly instead of failing, this can be a strong indication that the test cases may be faulty and lack meaningfulness.
Original: if(TRUE) → Mutant: if(FALSE)
Stress-Test
Another term for stress tests is penetration testing, which focuses specifically on the performance of an application. This allows you to ensure that the web app, for example, can handle a defined number of accesses.
Of course, there are many other helpful features available. For example, you can group tests and then run the groups individually.
// definition
pest()->extend(TestCase::class)
->group('feature')
->in('Feature');

// calling
php ./vendor/bin/pest --group=feature
For those who don’t work with the Lavarel framework but still want to test in PHP with PEST, you can also integrate the PEST framework into your application. All you need to do is define PEST as a corresponding development dependency in the Composer project configuration. Then, you can initiate the initial test setup in the project’s root directory.
php ./vendor/bin/pest --init
As we’ve seen, the options briefly presented here alone are very powerful. The official PEST documentation is also very detailed and should generally be your first port of call. In this article, I focused primarily on minimizing the entry barriers for test-driven development in PHP. PHP now also offers a wealth of options for implementing commercial software projects very efficiently and reliably.
Ressourcen
- [1] Artisan Cheat Sheat: https://artisan.page
- [2] PEST Homepage: https://pestphp.com


Leave a Reply
You must be logged in to post a comment.