
Windows 11 integrates an ominous history feature that records all interactions with the computer and most likely transmits them to Microsoft via telemetry. The countless laws passed by the EU and implemented by Germany to monitor citizens are also giving many people cause to rethink data protection and privacy. Our world is constantly evolving, and the digital world is changing considerably faster. It’s up to each individual how they want to deal with these changes. This article is intended to inspire you to learn more about Linux and security. Perhaps you’ll even feel like trying out the Kodachi Linux presented here for yourself. There are several ways you can try Kodachi Linux.
- Virtual machine: Simply create a virtual machine with Kodachi Linux using the ISO file and the VirtualBox or VMWare program. You can also create and use these virtual machines from a Windows computer.
- Booting from a USB stick: Tools like Disks (Linux) or Rufus (Windows) allow you to create bootable USB sticks. This allows you to boot your PC directly from the USB drive with Kodachi without affecting the operating system installed on the hard drive.
- Native installation: You can also use the bootable USB stick to permanently install Kodachi Linux on your computer. This method is recommended if you already have experience with Kodachi.
Kodachi OS is, as the name suggests, a Japanese Linux distribution with a customized XFCE desktop. Kodachi are actually classic Japanese samurai swords, which already suggests a reference to security. Kodachi OS itself is a Xubuntu derivative and thus a grandchild of Ubuntu and a great-grandchild of Debian Linux. Kodachi Linux offers a highly secure, anti-forensic, and anonymous computing environment. It was designed with privacy in mind, with all the necessary features to ensure user trust and security.

- Automatically established VPN connection
- Pre-configured TOR connection
- Running DNSCrypt service
The current version of Kodachi can be downloaded free of charge from the website [1]. With the downloaded ISO, you can now either create a bootable USB stick or install Kodachi in a virtual machine. We chose the option of creating a virtual machine with VMware.
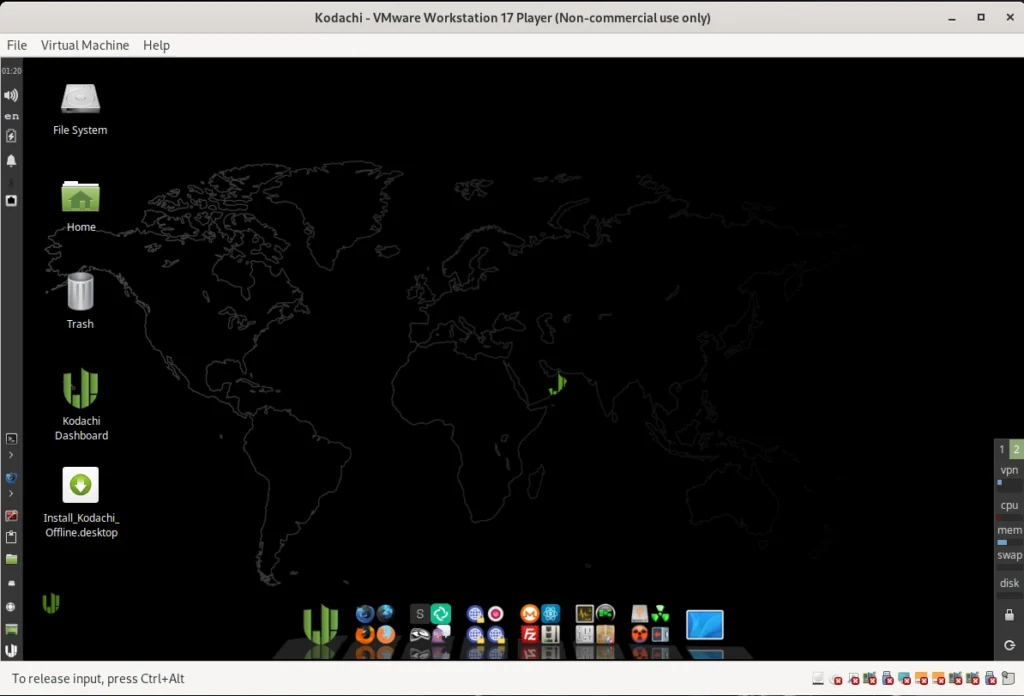
Installation is completed in just a few minutes thanks to the VMware Ubuntu template. For our test, we gave the VM 20 GB of hard drive space. To ensure smooth operation, we increased the RAM to 8 GB. If you don’t have that much RAM available, you can also work with 4 GB. After starting the VM, you will see the Kodachi OS desktop as shown in the screenshot below, version 8.27. For all Linux nerds, it should be noted that this version uses kernel 6.2. According to the website, they are already hard at work on the new version 9.
To keep the installation as simple as possible, even for beginners, user accounts have already been set up. The user is kodachi and has the password r@@t00 (00 are zeros). The administrator account is called root, as is usual in Linux, and also has the password r@@t00. Anyone who decides to permanently install Kodachi on their machine should at least change the passwords.

Unfortunately, the highest possible level of anonymity can only be achieved at the expense of browsing speed. Kodachi Linux therefore offers several profiles to choose from for different requirements.
- Maximum Anonymity (Slower)
- ISP → Router VPN → Kodachi VPN (VM NAT) → Torified System → Tor DNS → Kodachi Loaded Browser
- Highly Anonymous (Slow)
- ISP → Kodachi VPN → TOR Endpoint → Tor DNS → Kodachi Loaded Browser
- Anonymous & Fast
- ISP → Kodachi VPN → TOR Endpoint → Tor DNS → Kodachi Lite Browser
- Moderate Anonymity
- ISP → Kodachi VPN with Forced VPN Traffic → Tor DNS → Kodachi Loaded Browser
- Standard Anonymity
- ISP → Kodachi VPN → Torified System → Tor DNS → Kodachi Loaded Browser
- Enhanced Anonymity with Double TOR
- ISP → Kodachi VPN with Forced VPN Traffic → Tor Browser → Tor Browser
- Double TOR Alternative
- ISP → Kodachi VPN → Tor Browser → Tor Browser → Tor DNS
- Highly Secure Setup
- ISP → Host machine (XMR VPN) → Kodachi VPN (VM) with forced VPN traffic → Kodachi browser → DNScrypt
- Secure and fast
- ISP → Kodachi VPN with forced VPN traffic → Kodachi loaded browser → DNScrypt
- Increased security
- ISP → Kodachi VPN with forced VPN traffic → Kodachi loaded browser → Tor DNS
- High speed and security
- ISP → Kodachi VPN with forced VPN traffic → Kodachi lite browser → Tor DNS
- Double security with DNScrypt
- ISP → Kodachi VPN with forced VPN traffic → Tor browser → DNScrypt
- Double security with Tor DNS
- ISP → Kodachi VPN with forced VPN traffic → Tor browser → Tor DNS
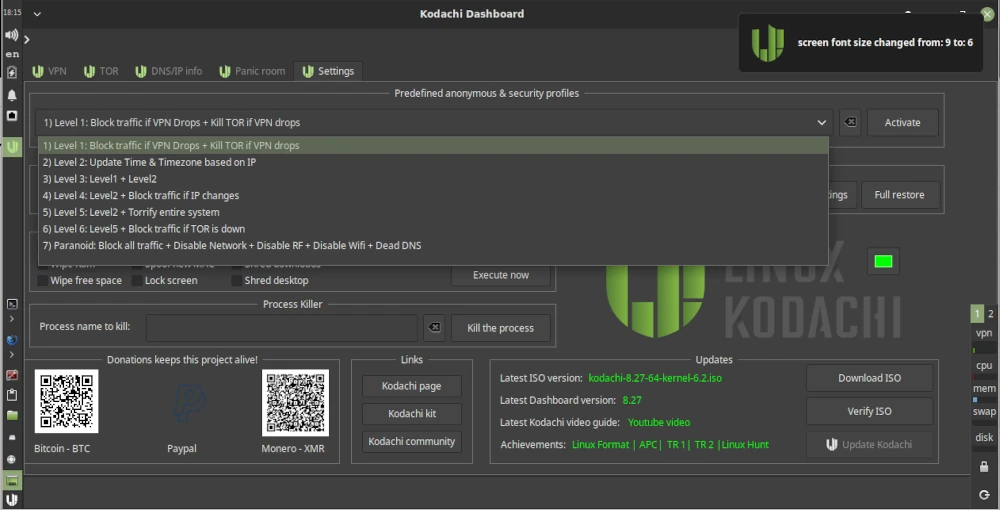
Now let’s get to the basics of using Kodachi. To do this, we open the dashboard, which we find as a shortcut on the desktop. After launching, we’ll see various tabs such as VPN, TOR, and Settings. Under Settings, we have the option to activate several profiles relevant to online security and privacy. As shown in the screenshot below, we select Level 1 and activate the profile.
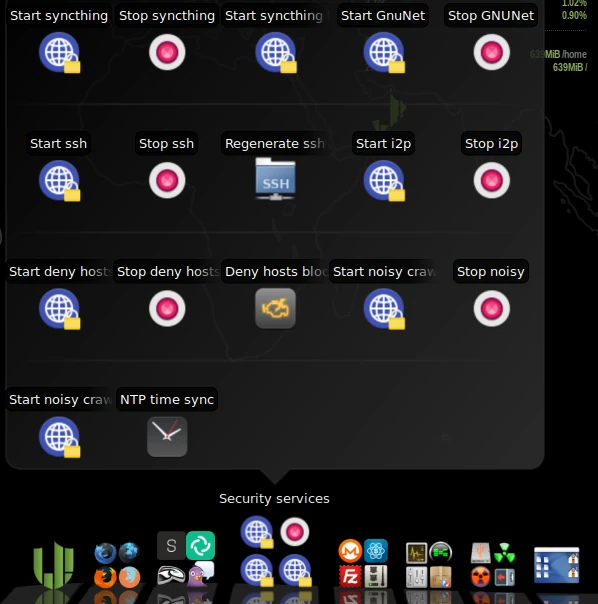
In the lower panel, in the Security Services section, you’ll find various services that can be enabled, such as GnuNet. There are several options here that you can easily try out. GnuNet, for example, redirects all traffic to the TOR network. This, of course, means that pages take longer to fully load.
With Kodachi Linux’s built-in tools, you can significantly improve your security and anonymity while surfing the internet. While it may be a bit unusual to use at first, you’ll quickly get used to it. If you choose to use it as a live system or a virtual machine, you can easily familiarize yourself with the various programs and settings without damaging the guest operating system. Especially for beginners, using a VM eliminates the fear of breaking something while trying out different configurations.
If you do a little research on Kodachi Linux online, you’ll quickly find an article [2] from 2021 that is quite critical of Kodachi. The main criticism is that Kodachi is more of an Ubuntu distro with a customized look and feel, spiced up with a few shell scripts, than a standalone Linux. This criticism can’t be completely dismissed. If you take a closer look at the criticism, you’ll find that Kadochi does have some practical anonymization features. Nevertheless, it’s far from being a so-called hacker’s toolbox. The author of the review took another look at Kadochi in 2025 [3] and his conclusion for the current version is no different than his conclusion in 2021. Whether the upcoming version 9 of Kadochi Linux will take the points raised to heart remains to be seen.
Resources
Abonnement / Subscription
[English] This content is only available to subscribers.
[Deutsch] Diese Inhalte sind nur für Abonnenten verfügbar.


Leave a Reply
You must be logged in to post a comment.