Working with mass storage devices such as hard disks (HDDs), solid-state drives (SSDs), USB drives, memory cards, or network-attached storage devices (NAS) isn’t as difficult under Linux as many people believe. You just have to be able to let go of old habits you’ve developed under Windows. In this compact course, you’ll learn everything you need to master potential problems on Linux desktops and servers.
Before we dive into the topic in depth, a few important facts about the hardware itself. The basic principle here is: Buy cheap, buy twice. The problem isn’t even the device itself that needs replacing, but rather the potentially lost data and the effort of setting everything up again. I’ve had this experience especially with SSDs and memory cards, where it’s quite possible that you’ve been tricked by a fake product and the promised storage space isn’t available, even though the operating system displays full capacity. We’ll discuss how to handle such situations a little later, though.
Another important consideration is continuous operation. Most storage media are not designed to be switched on and used 24 hours a day, 7 days a week. Hard drives and SSDs designed for laptops quickly fail under constant load. Therefore, for continuous operation, as is the case with NAS systems, you should specifically look for such specialized devices. Western Digital, for example, has various product lines. The Red line is designed for continuous operation, as is the case with servers and NAS. It is important to note that the data transfer speed of storage media is generally somewhat lower in exchange for an increased lifespan. But don’t worry, we won’t get lost in all the details that could be said about hardware, and will leave it at that to move on to the next point.
A significant difference between Linux and Windows is the file system, the mechanism by which the operating system organizes access to information. Windows uses NTFS as its file system, while USB sticks and memory cards are often formatted in FAT. The difference is that NTFS can store files larger than 4 GB. FAT is preferred by device manufacturers for navigation systems or car radios due to its stability. Under Linux, the ext3 or ext4 file systems are primarily found. Of course, there are many other specialized formats, which we won’t discuss here. The major difference between Linux and Windows file systems is the security concept. While NTFS has no mechanism to control the creation, opening, or execution of files and directories, this is a fundamental concept for ext3 and ext4.
Storage devices formatted in NTFS or FAT can be easily connected to Linux computers, and their contents can be read. To avoid any risk of data loss when writing to network storage, which is often formatted as NTFS for compatibility reasons, the SAMBA protocol is used. Samba is usually already part of many Linux distributions and can be installed in just a few moments. No special configuration of the service is required.
Now that we’ve learned what a file system is and what it’s used for, the question arises: how to format external storage in Linux? The two graphical programs Disks and Gparted are a good combination for this. Disks is a bit more versatile and allows you to create bootable USB sticks, which you can then use to install computers. Gparted is more suitable for extending existing partitions on hard drives or SSDs or for repairing broken partitions.
Before you read on and perhaps try to replicate one or two of these tips, it’s important that I offer a warning here. Before you try anything with your storage media, first create a backup of your data so you can fall back on it in case of disaster. I also expressly advise you to only attempt scenarios you understand and where you know what you’re doing. I assume no liability for any data loss.
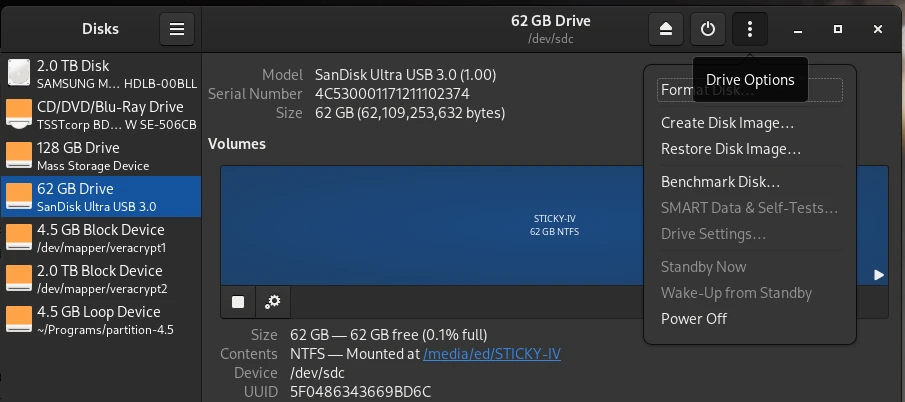
Bootable USB & Memory Cards with Disks
One scenario we occasionally need is the creation of bootable media. Whether it’s a USB flash drive for installing a Windows or Linux operating system, or installing the operating system on an SD card for use on a Raspberry Pi, the process is the same. Before we begin, we need an installation medium, which we can usually download as an ISO from the operating system manufacturer’s website, and a corresponding USB flash drive.
Next, open the Disks program and select the USB drive on which we want to install the ISO file. Then, click the three dots at the top of the window and select Restore Disk Image from the menu that appears. In the dialog that opens, select our ISO file for the Image to Restore input field and click Start Restoring. That’s all you need to do.
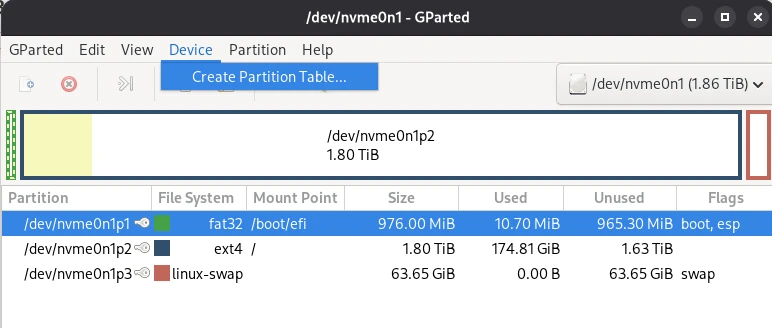
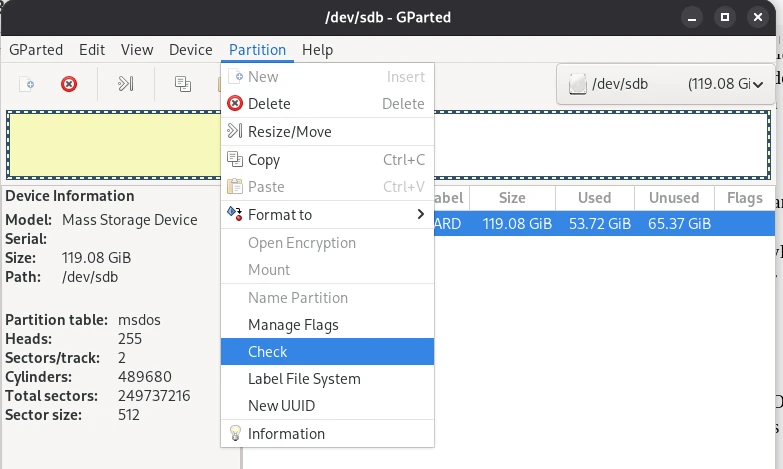
Repairing Partitions and MTF with Gparted
Another scenario you might encounter is that data on a flash drive, for example, is unreadable. If the data itself isn’t corrupted, you might be lucky and be able to solve the problem with GParted. In some cases, (A) the partition table may be corrupted and the operating system simply doesn’t know where to start. Another possibility is (B) the Master File Table (MFT) may be corrupted. The MTF contains information about the memory location in which a file is located. Both problems can be quickly resolved with GParted.
Of course, it’s impossible to cover the many complex aspects of data recovery in a general article.
Now that we know that a hard drive consists of partitions, and these partitions contain a file system, we can now say that all information about a partition and the file system formatted on it is stored in the partition table. To locate all files and directories within a partition, the operating system uses an index, the so-called Master File Table, to search for them. This connection leads us to the next point: the secure deletion of storage media.
Data Shredder – Secure Deletion
When we delete data on a storage medium, only the entry where the file can be found is removed from the MFT. The file therefore still exists and can still be found and read by special programs. Securely deleting files is only possible if we overwrite the free space multiple times. Since we can never know where a file was physically written on a storage medium, we must overwrite the entire free space multiple times after deletion. Specialists recommend three write processes, each with a different pattern, to make recovery impossible even for specialized labs. A Linux program that also sweeps up and deletes “data junk” is BleachBit.
Securely overwriting deleted files is a somewhat lengthy process, depending on the size of the storage device, which is why it should only be done sporadically. However, you should definitely delete old storage devices completely when they are “sorted out” and then either disposed of or passed on to someone else.
Mirroring Entire Hard Drives 1:1 – CloneZilla
Another scenario we may encounter is the need to create a copy of the hard drive. This is relevant when the existing hard drive or SSD for the current computer needs to be replaced with a new one with a higher storage capacity. Windows users often take this opportunity to reinstall their system to keep up with the practice. Those who have been working with Linux for a while appreciate that Linux systems run very stably and the need for a reinstallation only arises sporadically. Therefore, it is a good idea to copy the data from the current hard drive bit by bit to the new drive. This also applies to SSDs, of course, or from HDD to SSD and vice versa. We can accomplish this with the free tool CloneZilla. To do this, we create a bootable USB with CloneZilla and start the computer in the CloneZilla live system. We then connect the new drive to the computer using a SATA/USB adapter and start the data transfer. Before we open up our computer and swap the disks after finishing the installation, we’ll change the boot order in the BIOS and check whether our attempt was successful. Only if the computer boots smoothly from the new disk will we proceed with the physical replacement. This short guide describes the basic procedure; I’ve deliberately omitted a detailed description, as the interface and operation may differ from newer Clonezilla versions.
SWAP – The Paging File in Linux
At this point, we’ll leave the graphical user interface and turn to the command line. We’ll deal with a very special partition that sometimes needs to be expanded. It’s the SWAP file. The SWAP file is what Windows calls the swap file. This means that the operating system writes data that no longer fits into RAM to this file and can then read this data back into RAM more quickly when needed. However, it can happen that this swap file is too small and needs to be expanded. But that’s not rocket science, as we’ll see shortly.
Abonnement / Subscription
[English] This content is only available to subscribers.
[Deutsch] Diese Inhalte sind nur für Abonnenten verfügbar.
We’ve already discussed quite a bit about handling storage media under Linux. In the second part of this series, we’ll delve deeper into the capabilities of command-line programs and look, for example, at how NAS storage can be permanently mounted in the system. Strategies for identifying defective storage devices will also be the subject of the next part. I hope I’ve piqued your interest and would be delighted if you would share the articles from this blog.

Recover privacy with Kodachi Linux on the Internet
Anyone who attaches particular importance to anonymous surfing on the Internet is well advised with the Japanese Linux Kodachi. Kodachi…


Leave a Reply
You must be logged in to post a comment.