The new terms of conditions for Microsoft services released on October 2023 caused an outcry in the IT world. The reason was a paragraph who said, that now all Microsoft Services are powered by artificial intelligence. This A. I. supposed to be used to detect copyright violations. This includes things like Music, Movies, Graphics, E-Books and Software. In the case this A. I. Detect copyright violations on your system, those files supposed to got deleted automatically from the ‘system’. At this time it is not clear if this rule applies to your own local disk storage or just to the files on the Microsoft Cloud. Microsoft also declared that user which violates the copyright rule will be suspended from all Microsoft Services.
This exclusion has different flavors. The first questions rise up to my mind is what will happened with paid subscriptions like Skype? They will block me and refund my unused credits? A more worst scenario is may I will loose also all my credits and digital properties like access to games and other things. Or paid subscriptions will not be affected? Until now this part not clear.
If you are an Apple user my you could think this things will not affect you but better be sure you may use a Microsoft Service you don’t know its Microsoft. Not every Product include the companies name. Think about it, because who knows if those products spying around on your system. Some applications like Skype, Teams, Edge Browser and Visual Studio Code are available for other platforms like Apple and Linux.
Microsoft also owned the Source Code hosting Platform GitHub and an social network for professionals called LinkedIn. Whit Office 360 you can use the entire Microsoft Office Suite via Web Browser as Cloud solution and all your documents will be stored in the Microsoft Cloud. The same Cloud where US Government institutions like the CIA, NSA and many others keep their files. Well seems it will be a secure place for all your thought you place inside a office document.
This small detail about Office documents leads us to a little side note in the new terms of condition from Microsoft. The fight against hate speech. Whatever that means. Public insults and defamation have always been strictly enforced by the legislature. This means that it is not a trivial offense but rather a criminal offense. So it’s not clear to me what all this talk about hate speech means. Maybe it’s an attempt to introduce public censorship of freedom of expression.
But well back to the side notice from Microsoft term of conditions about hate speech. Microsoft wrote something like: if we detect hate speech we will warn the user and if the violations occur several times the Microsoft account of the user will be deactivated.
If you may think this is just something happen now by Microsoft, be sure many other companies working to introduce equal services. The communication platform Zoom for example included also A. I. techniques to observe the user communication for training purposes.
With all those news is still a big questions needed to be answered: What can I do by myself? The solution is simple. Move back from the digital universe into the real world. Turn the brain back on. Use pen and paper, pay in cash, leave your smartphone at home and there never on the bedside table. If you don’t use it turn it off. Meet your friend physically when ever it is possible and don’t bring your smartphone. There will be no government, no president and no messiahs to bring a change. It’s up to us.
As a technician, I am quite quickly fascinated by all sorts of things that somehow blink and beep, no matter how useless they may be. Electronic gadgets attract me like moths to the light. For a while now, a new generation of toys has been available to the masses. Artificial intelligence applications, more precisely artificial neural networks. The freely available applications are already doing remarkable things and it is only the beginning of what could get possible in the future. Many people have not yet realized the scope of A.I. based applications. This is not surprising, because what is happening in the A.I. sector will change our lives forever. We can rightly say that we are living in a time that is making history. It will be up to us to decide whether the coming changes will be good or whether they will turn out to be a dystopia.
When I chose artificial intelligence as a specialization in my studies many years ago, the time was still characterized by so-called expert systems. These rule-based systems were highly specialized for their domain and were designed for corresponding experts. The system was supposed to support the expert in making decisions. Meanwhile, we also have the necessary hardware to create much more general systems. If we consider applications like ChatGPT, they are based on neural networks, which allows a very high flexibility in usage. The disadvantage, however, is that we as developers can hardly understand what output a neural network produces for any given input. A circumstance that makes most programmers I know rather take a negative attitude. Because they are no longer master of the algorithm and can only act on the principle of trial and error.
Nevertheless, the power of neural networks is astounding. The time seems gone now when one can make fun of clumsy automated, software-supported translations. Frommy own experience I remember how tedious it was to let the Google Translator translate a sentence from German into Spanish. To get a usable result you could either use the English – Spanish option. Alternatively, if you speak only rudimentary English for vacation use, you could still formulate very simple German sentences that were at least correct in content. The time saved for automatically translated texts is considerable, even though you have to proofread them and adjust some wording if necessary.
As much as I appreciate being able to work with such powerful tools, we have to be aware that there is also a downside. The more we do our daily tasks with A.I. based tools, the more we lose the ability to do these tasks manually in the future. For programmers, this means that over time they will lose their ability to express themselves in source code via A.I. based IDEs. Of course, this is not a process that happens overnight, but is gradual. Once this dependency is created, the question arises whether the available dear tools will remain free of charge or whether existing subscriptions will possibly be subject to drastic price increases. After all, it should be clear to us that commercially used tools that significantly improve our productivity are usually not available at low prices.
I also think that the Internet as we are used to it so far, will change very much in the future. Many of the free services that have been financed by advertising will disappear in the medium term. Let’s take a look at the StackOverFlow service as an example. A very popular knowledge platform among developer circles. If we now in the future the research to questions of programming ChatGPT or other neural networks are questioned for StackOverFlow the visitor numbers sink continuously. The knowledge base in turn ChatGPT uses is based on data from public forums like StackOverFlow. So for the foreseeable future StackOverFlow will try to make its service inaccessible to AIs. There could certainly also be an agreement with compensation payments. So that the omitted advertising revenues are compensated. As technicians, we do not need to be told that an offer like StackOverFlow incurs considerable costs for operation and development. It then remains to be seen how users will accept the offer in the future. If no new data is added to StackOverFlow, the knowledge base for A.I. systems will also become uninteresting. I therefore suspect that by around 2030, it will be primarily high-quality content on the Internet that will be subject to a charge.
If we look at the forecast of the medium-term trend in the demand for programmers, we come to the question of whether it will be a good recommendation in the future to study computer science or to start an apprenticeship as a programmer. I actually see a positive future here and would encourage anyone who sees education as a vocation and not as a necessity to make a living. In my opinion, we will continue to need many innovative minds. Only those who instead of dealing with basics and concepts prefer to quickly learn a current framework in order to keep up with the emerging hyphe of the market, will certainly achieve only limited success in the future. However, I have already made these observations before the wide availability of A.I. systems. Therefore, I am firmly convinced that quality will always prevail in the long run.
I consider it a virtue to approach all kinds of topics as critically and attentively as possible. Nevertheless, I must say that some fears in dealing with A.I. are quite unfounded. You have already seen some of my possible visions of the future in this article. Statements that A.I. will one day take over our world by subtly influencing uninitiated users to motivate them to take action are, in my opinion, pure fantasy for a period up to 2030 and, given the current state of knowledge, unfounded. Much more realistically I see the problem that if resourceful marketing people litter the Internet with inferior non-revised A.I. generated articles to spice up their SEO ranking and this in turn as a new knowledge cab of the neural networks the quality of future A.I. generated texts significantly reduced.
The A.I. systems that have been freely available so far have one decisive difference compared to humans. You lack the motivation to do something on your own initiative. Only through an extrinsic request by the user does the A.I. begin to work on a question. It becomes interesting when an A.I. dedicates itself to self-selected questions and also researches them independently. In this case the probability is very high that the A.I. will develop a consciousness very fast. If such an A.I. then still runs on a high performance quantum computer, we do not have sufficient reaction time to recognize dangerous developments and to intervene. Therefore, we should definitely keep the play “The Physicists” created by Dürrenmatt in our consciousness. Because the ghosts I called once, I will possibly not get rid of so fast again.
Basically, I have to admit that the topic of A.I. continues to fascinate me and I am very curious about future developments. Nevertheless, I think it is important not to close our eyes to the dark side of artificial intelligence and to start an objective discourse in order to exploit the existing potential of this technology as harmlessly as possible.
For more than a decade, it has been widely accepted that computer systems should be kept up to date. Those who regularly install updates reduce the risk of having security gaps on their computer that could be misused. Always in the hope that manufacturers of software always fix in their updates also security flaws. Microsoft, for example, has imposed an update requirement on its users since the introduction of Windows 10. Basically, the idea was well-founded. Because unpatched operating systems allow hackers easy access. So the thought: ‘Latest is greatest’ prevailed a very long time ago.
Windows users had little leeway here. But even on mobile devices like smartphones and tablets, automatic updates are activated in the factory settings. If you host an open source project on GitHub, you will receive regular emails about new versions for the libraries used. So at first glance, this is a good thing. However, if you delve a bit deeper into the topic, you will quickly come to the conclusion that latest is not always the best.
The best-known example of this is Windows 10 and the update cycles enforced by Microsoft. It is undisputed that systems must be regularly checked for security problems and available updates must be installed. That the maintenance of computer systems also takes time is also understandable. However, it is problematic when updates installed by the manufacturer paralyze the entire system and a new installation becomes necessary because the update was not sufficiently tested. But also in the context of security updates unasked function changes to the user to bring in I consider unreasonable. Especially with Windows, there are a lot of additional programs installed, which can quickly become a security risk due to lack of further development. That means with all consequence forced Windows updates do not make a computer safe, since here the additionally installed software is not examined for weak points.
If we take a look at Android systems, the situation is much better. However, there are enough points of criticism here as well. The applications are updated regularly, so the security is actually improved significantly. But also with Android, every update usually means functional changes. A simple example is the very popular Google StreetMaps service. With every update, the map usage becomes more confusing for me, as a lot of unwanted additional information is displayed, which considerably reduces the already limited screen.
As a user, it has fortunately not yet happened to me that application updates on Android have paralyzed the entire phone. Which also proves that it is quite possible to test updates extensively before rolling them out to users. However, this does not mean that every update was unproblematic. Problems that can be observed here regularly are things like an excessively increased battery consumption.
Pure Android system updates, on the other hand, regularly cause the hardware to become so slow after almost two years that you often decide to buy a new smartphone. Although the old phone is still in good condition and could be used much longer. I have noticed that many experienced users turn off their Android updates after about a year, before the phone is sent into obsolescence by the manufacturer.
How do you get an update muffler to keep his systems up to date and secure? My approach as a developer and configuration manager is quite simple. I distinguish between feature update and security patch. If you follow the semantic versioning in the release process and use a branch by release model for SCM systems like Git, such a distinction can be easily implemented.
But I also dedicated myself to the question of a versionable configuration setting for software applications. For this, there is a reference implementation in the project TP-CORE on GitHub, which is described in detail in the two-part article Treasue Chest. After all, it must be clear to us that if we reset the entire configuration made by the user to factory settings during an update, as is quite often the case with Windows 10, quite unique security vulnerabilities can arise.
This also brings us to the point of programming and how GitHub motivates developers through emails to include new versions of the libraries used in their applications. Because if such an update is a major API change, the problem is the high migration effort for the developers. This is where an also fairly simple strategy has worked for me. Instead of being impressed by the notifications about updates from GitHub, I regularly check via OWASP whether my libraries contain known risks. Because if a problem is detected by OWASP, it doesn’t matter how costly an update can be. The update and the associated migration must be implemented promptly. This also applies to all releases that are still in production
However, one rule of thumb applies to avoid update hell from the start: Only install or use what you really need. The fewer programs are installed under Windows and the fewer apps there are on the smartphone, the fewer security risks there are. This also applies to program libraries. Less is more from a security perspective. Apart from that, we get a free performance measurement by dispensing with unnecessary programs.
Certainly, for many private users the question of system updates is hardly relevant. Only new unwanted functions in existing programs, performance degradations or now and then shot operating systems cause more or less strong displeasure. In the commercial surrounding field quite fast substantial costs can develop, which can affect also the straight implementing projects negatively. Companies and people who develop software can improve user satisfaction considerably if they differentiate between security patches and feature updates in their release publications. And a feature update should then also contain all known security updates.
During my work as a Configuration Manager / DevOps for large web projects, I have watched companies disregard Conway’s Law and fail miserably. Such failure then often manifested itself in significant budget overruns and missed deadlines.
The internal infrastructure in the project collaboration was exactly modeled on the internal organizational structures and all experiences and established standards were ‘bent’ to fit the internal organization. This resulted in problems that made the CI/CD pipelines particularly cumbersome and resulted in long execution times. But also adjustments could only be made with a lot of effort. Instead of simplifying existing processes and aligning them with established standards, excuses were made to leave everything as it was before. Let’s take a look at what Conway’s Law is and why we should know it.
The US American researcher and programmer Melvin E. Conway received his doctorate from Case Western Reserve University in 1961. His area of expertise is programming languages and compiler design.
In 1967, he submitted to The Harvard Business Review his paper “How Do Committees Invent?” and was rejected. The reason given was that his thesis was not substantiated. However, Datamation, the largest IT magazine at the time, accepted his article and published it in April 1968. And this paper has since been widely cited. The core statement is:
Any organization that designs a system (defined broadly) will produce a design whose structure is a copy of the organization’s communication structure.
Conway, Melvin E. “How do Committees Invent?” 1968, Datamation, vol. 14, num. 4, pp. 28–31
When Fred Brooks cited the essay in his legendary 1975 book, The Mythical Man-Month, he called this key statement Conway’s Law. Brooks recognized the connection between Conway’s Law and management theory. In this regard, we find the following example in the article:
Because the design which occurs first is almost never the best possible, the prevailing system concept may need to change. Therefore, flexibility of organization is important to effective design.
An often-cited example of an “ideal” team size in terms of Conway’s Law is Amazon’s two-pizza rule, which states that individual project teams should have no more members than two pizzas can fill in one meeting. The most important factor to consider in team alignment, however, is the ability to work across teams and not live in silos.
Conway’s Law was not intended as a joke or Zen koan, but is a valid sociological observation. Take a look at structures from government agencies and their digital implementation. But also processes found in large corporations have been emulated by software systems. Such applications are considered very cumbersome and complicated, so that they find little acceptance among users and they prefer to fall back on alternatives. Unfortunately, it is often impossible to simplify processes in large organizational structures for politically motivated reasons.
Among other things, there is a detailed article by Martin Fowler, who deals explicitly with software architectures and elaborates the importance of the coupling of objects and modules.The communication of the developers among themselves plays a substantial role, in order to obtain best possible results. This circumstance over the importance of communication was taken up also by the agile software development and converted as essential point.Especially when distributed teams work on a joint project, the time difference is a limiting factor in team communication.This must then be designed particularly efficiently.
In 2010, Jonny Leroy and Matt Simons coined the term Inverse Conway Maneuver in the article “Dealing with creaky legacy platforms”:
Conway’s Law … can be summarized as “Dysfunctional organizations tend to create dysfunctional applications.” To paraphrase Einstein, you can’t fix a problem from within the same mindset that created it, so it is often worth investigating whether restructuring your organization or team would prevent the new application from displaying all the same structural dysfunctions as the original. In what could be termed an “inverse Conway maneuver,” you may want to begin by breaking down silos that constrain the team’s ability to collaborate effectively.
Since the 2010s, a new architectural style has entered the software industry. The so-called microservices, which are created by small agile teams. The most important criterion of a microservice compared to a modular monolith is that a microservice can be seen as an independently viable module or subsystem. On the one hand, this allows the microservice to be reused in other applications. On the other hand, there is a strong encapsulation of the functional domain, which opens up a very high flexibility for adaptations.
However, Conway’s law can be applied to many other areas and is not exclusively limited to the software industry. This is what makes the work so valuable.
The hype surrounding artificial intelligence has been going on for several years. Currently, companies like OpenAI are causing quite a stir with freely accessible neural networks like ChatGPT. Users are fascinated by the possibilities and some intellectual figures of our time are warning humanity about artificial intelligence. So what is it about the specter of AI? In this article, I explore this question and you are invited to join me on this journey. Let’s go and follow me into the future.
In the spring of 2023, reports about the performance capabilities of artificial neural networks overflowed. This trend is continuing and, in my opinion, will not abate any time soon. In the midst of the emerging gold rush mood, however, there are also isolated bad news doing the rounds. For example, Microsoft announced a massive investment in artificial intelligence on a grand scale. This announcement was underlined in the spring of 2023 with the dismissal of just under 1000 employees and gave rise to familiar fears of industrialization and automation. Things were less spectacular at Digital Ocean, which laid off its entire content creation and documentation team. Quickly, some people rightly asked whether AI would now make professions like programmers, translators, journalists, editors and so on obsolete? For now, I would like to answer this question with a no. In the medium term, however, changes will occur, as history has already taught us. Something old passes away while new things come into being. So follow me on a little historical excursion.
To do this, we first look at the various stages of industrialization, which originated in England in the second half of the 18th century. Already the meaning of the original Latin term Industria, which can be translated with diligence, is extremely interesting. Which leads us to Norbert Wiener and his 1960 book ern God and Golem Inc [1]. He publicly pondered whether people who create machines that in turn can create machines are gods. Something I do not want to subscribe from my feeling. But let’s come back to industrialization for the time being.
The introduction of the steam engine and the use of location-independent energy sources such as coal enabled precise mass production. With cheaper automation of production by machines, manual home workplaces were displaced. In exchange, cheaper products were now available in stores. But there were also significant changes in transportation. The railroad allowed for faster, more comfortable and cheaper travel. This catapulted mankind into a globalized world. Because goods could now also travel long distances in a short time without any problems. Today, when we look back at the discussions that took place when the railroad began its triumphal march, we can only smile. After all, some intellectuals of the time argued that speeds in a train of more than 30 kilometers per hour would literally crush the human occupants. A fear that fortunately turned out to be unfounded.
While people in the first industrial revolution could no longer earn an income from working at home, they found an alternative to continue earning a living by working in a factory.
The second industrial revolution is characterized by electrification, which further increased the degree of automation. Machines became less cumbersome and more precise. But new inventions also entered daily life. Fax, telephone and radio spread information at a rapid pace. This brought us into the Information Age and accelerated not only our communication, but also our lives. We created a society that is primarily characterized by the saying “time is money”.
The third industrial revolution blessed mankind with a universal machine, which determined its functionality by the programs (software) running on it. Nowadays, computers support us in a wide range of activities. Modern cash register systems do much more than just spit out the total amount of the purchase made. They log money and flow of goods and allow evaluations for optimization with the collected data. This is a new quality of automation that we have achieved in the last 200 years. With the widespread availability of artificial neural networks, we are now on our way out of this phase, which is why we are currently in the transformation to the fourth industrial revolution. How else do we as humans intend to cope with the constantly growing flood of information?
Even though Industry 4.0 focuses on the networking of machines, this is not a real revolution. The Internet is only a consequence of the previous development to enable communication between machines. We can compare this with the replacement of the steam engine by electric motors. The real innovation was in electric machines that changed our communication. This is now happening in our time through the broad field of artificial intelligence.
In the near future, we will no longer use computers the way we have been doing. That’s because today’s computers owe their existence to the previously limited communication between humans and machines. The keyboard and mouse are actually clumsy input devices. They are slow and prone to error. Voice and gesture control via microphone and camera will replace mouse and keyboard. We will talk to our computers the way we talk to other people. This also means that today’s computer programs will become obsolete. We will no longer have to fill out tedious input masks in graphical user interfaces in order to reach our goal. Gone are the days where I type my articles. I will type them in and my computer will visually display them for me to proofread. Presumably, the profession of speech therapist will then experience a significant upswing.
There will certainly also be enough outcries from people who fear the disintegration of human communication. This fear is not at all unfounded. Let’s just look at the development of the German language in the period since the turn of the millennium. This was marked by the emergence of various text messaging services and the optimization of messages by using as many abbreviations as possible. This in turn only created question marks on the foreheads of parents when it came to deciphering the content of their children’s messages. Even though the current trend is away from text messages to audio messages, it does not mean that our language will not continue to change. I myself have observed for years that many people are no longer able to express themselves correctly in writing or to extract content from written texts. In the long run, this could lead to the unlearning of skills such as reading and writing. Thus also classical print articles such as books and magazines become obsolete. Finally, content can also be produced as video or podcast. Our intellectual abilities will degenerate in the long run.
Since the turn of the millennium, it has become easier and easier for many people to use computers. So first the good news. It will become much easier to use computers in the future because human-machine interaction is becoming more intuitive. In the meantime, we will see more and more major Internet portals shutting down their services because their business model is no longer viable. Here’s a quick example.
As a programmer, I often use the website StackOverflow to find help with problems. The information on this website about programming issues is now so extensive that you can quickly find suitable solutions to your own concerns by searching Google and the like, without having to formulate questions yourself. So far so good. But if you now integrate a neural network like ChatGPT into your programming environment to find the answer to all questions, the number of visitors for StackOverflow will continuously decrease. This in turn has an impact on advertising campaigns to be able to offer the service free of charge on the net. Initially, this will be compensated by the fact that operators of AI systems that access the data from StackOverflow will pay a flat fee for the use of the database. However, this will not stop the dwindling number of visitors. Which will lead to either a payment barrier preventing free use or the service being discontinued completely. There are many offers on the Internet that will encounter similar problems, which will ensure in the long term that the Internet as we know it has disappeared in the future.
Let’s imagine what a future search query for the search term ‘industrial revolution’ might look like. I ask my digital assistant: What do you know about industrial revolution? – Instead of searching through a seemingly endless list of thousands of entries for relevant results, I am read a short explanation with a personalized address that matches my age and level of education. Which immediately raises the question of who is judging my level of education and how?
This is a further downgrading of our abilities. Even if it is perceived as very comfortable in the first moment. If we no longer have the need to focus our attention on one specific thing over a long period of time, it will certainly be difficult for us to think up new things in the future. Our creativity will be reduced to an absolute minimum.
It will also change the way data is stored in the future. Complicated structures that are optimized and stored in databases will be the exception rather than the rule. Rather, I expect independent chunks of data that are concatenated like lists. Let’s look at this together to get a good idea of what I mean.
As a starting point, let’s take Aldous Huxley’s book ‘Brave New World’ from 1932. In addition to the title, the author and the year of publication, we can add English as the language to the meta information. This is then followed by the entire contents of the book including preface and epilogue as plain ASCII text. Generic or changeable things like table of contents or copyright are not included at this stage. With such a chunk, we have defined an atomic datum that can be uniquely identified by a hash value. Since Huxley’s Brave New World was originally written in English, this datum is also an immutable source for all data derived and generated from it.
If the work of Huxley is now translated into German or Spanish, it is the first derivation with the reference to the original. It can happen that books have been translated by different translators in different epochs. This results in a different reference hash for the German translation by Herbert E. Herlitschka from 1933 with the title ‘Brave New World’ than for the translation by Eva Walch published in 1978 with the same title ‘Brave New World’.
If audio books are now produced from the various texts, these audio books are the second derivative of the original text, since they represent an abridged version. A text is also created as an independent version before the recording. The audio track created from the abridged original text has the director as its author and refers to the speaker(s). As in theater, a text can be interpreted and staged by different people. Film adaptations can be treated in the same way.
Books, audio books and films in turn have graphics for the cover. These graphics again represent independent works, which are referenced with the corresponding version of the original.
Quotations from books can also be linked in this way. Similarly, critiques, interpretations, reviews and all kinds of other variations of content that refer to an original.
However, such data blocks are not only limited to books, but can also be applied to music scores, lyrics, etc. The decisive factor is that one can start from the original as far as possible. The resulting files are optimized exclusively for software programs, since they do not contain any formatting that is visible to the human eye. Finally, the corresponding hash value about the content of the file is sufficient as file name.
This is where the vision of the future begins. As authors of our work, we can now use artificial intelligence to automatically create translations, illustrations, audio books and animations even from a book. At this point, I would like to briefly refer to the neural network DeepL [2], which already delivers impressive translations and even improves the original text if handled skillfully. Does DeepL now put translators and editors out of work? I mean no! Because also like us humans, artificial intelligences are not infallible. They also make mistakes. That’s why I think that the price for these jobs will drop dramatically in the future, because these people can now do many times more work than before, thanks to their knowledge and excellent tools. This makes the individual service considerably cheaper, but because more individual services are possible through automation in the same period of time, this compensates for the price reduction for the provider.
If we now look at the new possibilities that are open to us, it doesn’t seem to be so problematic for us. So what are people like Elon Musk trying to warn us about?
If we now assume that the entire human knowledge will be digitized by the fourth industrial revolution and that all new knowledge will only be created in digital form, computer algorithms will be free to use suitable computing power to change these chunks of knowledge in such a way that we humans will not notice. A scenario loosely based on Orwell’s Ministry of Truth from the novel 1984. If we unlearn our abilities out of convenience, we also have few possibilities of verification.
If you think this would not be a problem, I would like to refer you to the lecture “Trust no scan” by David Kriesel [3].What happened? In short, it was about the fact that a construction company noticed discrepancies in copies of their construction plans. This resulted in different copies of the same original, in which the numerical values were changed. A very fatal problem in a construction project for the executing trades. If the bricklayer gets different size data than the concrete formers. The error was finally traced back to the fact that Xerox used an AI as software in their scanners for the OCR and the subsequent compression, which could not reliably recognize the characters read in.
But also the quote from Ted Chiang “Think of ChatGPT as a blurry jpeg of all the text on the Web.” should make us think. Certainly, for people who only know AI as an application, the meaning is hard to understand what is meant by saying “ChatGPT is just a blurry jpeg of all the text on the web”. However, it is not as difficult to understand as it seems at the first moment. Due to their structure, neural networks are always only a snapshot. Because with every input the internal state of a neural network changes. It is the same as with us humans. After all, we are only the sum of our experiences. If in the future more and more texts created by an AI are placed on the web without being reflected, the AI will form its knowledge from its own derivations. The originals fade with the time there they by ever smaller references in weighting lose. If someone would flood the Internet with topics like flat earth and lizard people, programs like ChatGPT would inevitably react to it and let this flow into their texts. These texts could be published then either independently by the AI in the net automated or find their spreading by unreflective persons accordingly. We have thus created a spiral that can only be broken if people have not given up their ability to exercise judgment out of convenience.
So we see that the warnings for caution in dealing with AI are not unfounded. Even if I consider scenarios like in the movie WarGames from 1983 [4] as improbable, we should consider very well how far we want to go with the technology of AI. Not that it happens to us like the sorcerer’s apprentice and we have to find out that we cannot master it any more.
When we designing data models and their corresponding tables appears sometimes Boolean as datatype. In general those flags are not really problematic. But maybe there could be a better solution for the data design. Let me give you a short example about my intention.
Assume we have to design a simple domain to store articles. Like a Blog System or any other Content Management. Beside the content of the article and the name of the author could we need a flag which tells the system if the article is visible for the public. Something like published as a Boolean. But there is also an requirement of when the article is scheduled a date for publishing. In the most database designs I observed for those circumstances a Boolean: published and a Date: publishingDate. In my opinion this design is a bit redundant and also error prone. As a fast conclusion I would like to advice you to use from the beginning just Date instead of Boolean. The scenario I described above can also transformed to many other domain solutions.
For now, after we got an idea why we should replace Boolean for Date datatype we will focus about the details how we could reach this goal.
Dealing with standard SQL suggest that replacing a Database Management System (DBMS) for another one should not be a big issue. The reality is unfortunately a bit different. Not all available data types for date like Timestamp are really recommendable to use. By experience I prefer to use the simple java.util.Date to avoid future problems and other surprises. The stored format in the database table looks like: ‘YYYY-MM-dd HH:mm:ss.0’. Between the Date and Time is a single space and .0 indicates an offset. This offset describes the time zone. The Standard Central European Timezone CET has an offset of one hour. That means UTC+01:00 as international format. To define the offset separately I got good results by using java.util.TimeZone, which works perfectly together with Date.
Before we continue I will show you a little code snippet in Java for the OR Manager Hibernate and how you could create those table columns.
Let’s get a bit closer about the listing above. As first we see the @CreationTimestamp Annotation. That means when the ArticleDO Object got created the variable created will initialized by the current time. This value never should changed, because an article can just once created but several times changed. The Timezone is stored in a String. In the Constructor you can see how the system Timezone could grabbed – but be careful this value should not trusted to much. If you have a user like me traveling a lot you will see in all the places I stay the same system time, because usually I never change that. As default Timezone I define the correct String for UTC-0. The same I do for the variable published. Date can also created by a String what we use to set our default zero value. The Setter for published has the option to define an future date or use the current time in the case the article will published immediately. At the end of the listing I demonstrate a simple SQL import for a single record.
But do not rush to fast. We also need to pay a bit attention how to deal with the UTC offset. Because I observed in huge systems several times problems which occurred because developer was used only default values.
The timezone in general is part of the internationalization concept. For managing the offset adjustments correctly we can decide between different strategies. Like in so many other cases there no clear right or wrong. Everything depends on the circumstances and necessities of your application. If a website is just national wide like for a small business and no time critical events are involved everything become very easy. In this case it will be unproblematic to manage the timezone settings automatically by the DBMS. But keep in mind in the world exist countries like Mexico with more than just one timezone. An international system where clients spread around the globe it could be useful to setup each single DBMS in the cluster to UTC-0 and manage the offset by the application and the connected clients.
Another issue we need to come over is the question how should initialize the date value of a single record by default? Because null values should avoided. A full explanation why returning null is not a good programming style is given by books like ‘Effective Java’ and ‘Clean Code’. Dealing with Null Pointer Exceptions is something I don’t really need. An best practice which well works for me is an default date – time value by ‘0000-00-00 00:00:00.0’. Like this I’m avoiding unwanted publishing’s and the meaning is very clear – for everybody.
As you can see there are good reasons why Boolean data types should replaced by Date. In this little article I demonstrated how easy you can deal with Date and timezone in Java and Hibernate. It should also not be a big thing to convert this example to other programming languages and Frameworks. If you have an own solution feel free to leave a comment and share this article with your colleagues and friends.
Since a long time the Java Script Object Notation [1] become as a lightweight standard to replace XML for information exchange between heterogeneous systems. Both technologies XML and JSON closed those gap to return simple and complex data of a remote method invocation (RMI), when different programming languages got involved. Each of those technologies has its own benefits and disadvantages. A good designed XML document is human readable but needs in comparing to JSON more payload when it send through the network. For almost every programming languages existing plenty implementations to deal with XML and also JSON. We don’t need to reinvent the wheel, to implement our own solution for handling JSON objects. But choosing the right library is not that easy might it seems.
The most popular library for JSON in Java projects is the one I already mentioned: Jackson [2]. because of its huge functionality. Another important point for choosing Jackson instead of other libraries is it’s also used by the Jersey REST Framework [3]. Before we start now our journey with the Java Frameworks Jersey and Jackson, I like to share some thoughts about things, I often observe in huge projects during my professional life. Because of this reason I always proclaim: don’t mix up different implementation libraries for the same technology. The reason is it’s a huge quality and security concern.
The general purpose for using JSON in RESTful applications is to transmit data between a server and a client via HTTP. To achieve that, we need to solve two challenges. First, on the server side, we need create form a Java object a valid JSON representation which we can send to the client. This process we call serialization. On the client side, we do the second step, which is exactly the opposite, we did on the server. De-serialization we call it, when we create a valid object from a JSON String.
In this article we will use on the server side and also on the client side Java as programming language, to deal with JSON objects. But keep in mind REST allows you to have different programming languages on the server and for the client. Java is always a good choice to implement your business logic on the server. The client side often is made with JavaScript. Also PHP, .NET and other programming Languages are possible.
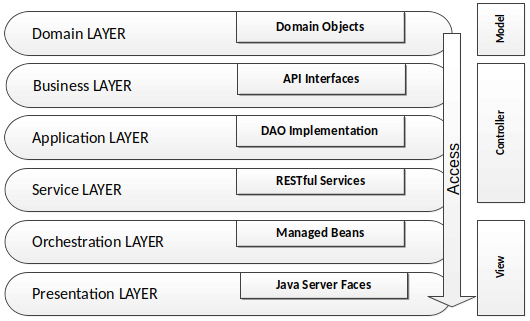
In the next step we will have a look at the project architecture. All artifacts are organized by one Apache Maven Multi-Module project. It’s a good recommendation to follow this structure in your own projects too. The three artifacts we create are: api, server and client.
API: contain shared objects which will needed on the server and also client side, like domain objects and interfaces.
Server: producer of a RESTful service, depends on API.
Client: consumer of the RESTful service, depends on API.
Inside of this artifacts an layer architecture is applied. This means the access to objects from a layer is only allowed to the direction of the underlying layers. In short: from top to down. The layer structure are organized by packages. Not every artifact contains every layer, only the ones which are implemented. The following picture draws an better understanding for the whole architecture is used.
The first piece of code, I’d like to show are the JSON dependencies we will need in the notation for Maven projects.
In respect to the size of this article, I only focus how the JSON object is used in RESTful applications. It’s not a full workshop about RESTful (Micro) Services. As code base we reuse my open source GitHub project TP-ACL [4], an access control list. For our example I decided to sliced apart the Role – Functionality from the whole code base.
For now we need as first an Java object which we can serialize to an JSON String. This Domain Object will be the Class RolesDO and is located in the layer domain inside the API module. The roles object contains a name, a description and a flag that indicates if a role is allowed to delete.
So far so good. As next step we will need to serialize the RolesDO in the server module as a JSON String. This step we will do in the RolesHbmDAO which is stored in the implementation layer within the Server module. The opposite direction, the de-serialization is also implemented in the same class. But slowly, not everything at once. lets have as first a look on the code.
The implementation is not so difficult to understand, but may at this point could the first question appear. Why the de-serilization is in the server module and not in the client module? When the client sends a JSON to the server module, we need to transform this to an real Java object. Simple as that.
Usually the Data Access Object (DAO) Pattern contains all functionality for database operations. This CRUD (create, read, update and delete) functions, we will jump over. If you like to get to know more about how the DAO pattern is working, you could also check my project TP-CORE [4] at GitHub. Therefore we go ahead to the REST service implemented in the object RoleService. Here we just grep the function fetchRole().
The big secret here we have in the line where we stick the things together. As first the RolesDO is created and in the next line the DAO calls the serializeAsJson() Method with the RoleDO as parameter. The result will be a JSON representation of the RoleDO. If the role exist and no exceptions occur, then the service is ready for consuming. In the case of any problem the service send a HTTP error code instead of the JSON.
Complex Services which combine single services to a process take place in the orchestration layer. At this point we can switch to the client module to learn how the JSON String got transformed back to a Java domain object. In the client we don’t have RolesHbmDAO to use the deserializeJsonAsObject() method. And of course we also don’t want to create duplicate code. This forbids us to copy paste the function into the client module.
As pendant to the fetchRole() on the server side, we use for the client getRole(). The purpose of both implementations is identical. The different naming helps to avoid confusions.
importcom.fasterxml.jackson.core.JsonProcessingException;importcom.fasterxml.jackson.core.type.TypeReference;importcom.fasterxml.jackson.databind.ObjectMapper;publicclassRole{privatefinalStringAPI_PATH="/acl/"+Constraints.REST_API_VERSION+"/role";privateWebTargettarget;publicRolesDOgetRole(Stringrole)throwsJsonProcessingException{Responseresponse= target.path(API_PATH).path(role).request().accept(MediaType.APPLICATION_JSON).get(Response.class);LOGGER.log("(get) HTTP STATUS CODE: "+response.getStatus(),LogLevel.INFO);ObjectMappermapper=newObjectMapper();returnmapper.readValue(response.readEntity(String.class),RolesDO.class);}}
Java
Listing 5
As conclusion we have now seen the serialization and de-serialisation by using the Jackson library of JSON objects is not that difficult. In the most of the cases we just need three methods:
serialize a Java object to a JSON String
create a Java object from a JSON String
de-serialize a list of objects inside a JSON String to a Java object collection
This three methods I already introduced in Listing 2 for the DAO. To prevent duplicate code we should separte those functionality in an own Java Class. This is known as the design pattern Wrapper [5] also known as Adapter. For reaching the best flexibility I implemented the JacksonJsonTools from TP-CORE as Generic.
Abstract:In the last decades, many standards were established to increase productivity during Software Lifecycle Management. All these techniques and methodologies promise a higher success rate in software projects which could affirm themselves in the case the involved protagonists are willing to follow the instances recommended. Semantic Versioning, for example, addresses the information leak between functional changes, BugFixes and compatibility of existing and future releases of artifacts. Diving deeper into the daily craftsmanship of software projects enables us to identify the Source Control Management Systems (SCM) as a big treasure box. Much information can be extracted from these repositories, which are currently ignored for project analyzing. Expressions on SCM Commit Messages represent a new formalism that is both human-readable and machine-processable. Such a standard also forms a bridge between the code base and the requirements management and release management, since these activities are identified by a freely expandable vocabulary in the SCM. Another advantage of this strategy is the clear and compact expressiveness for development teams. A very practical aspect of my proposal is the easy applicability of the presented solution in real software development projects. As with the Semantic Versioning methodology already mentioned, there are no additional technical requirements to be met, since commit messages are a fundamental function of SCM systems. This paper discuss the option to improve data collection for controlling software projects and knowledge sharing in collaborative teams.
To cite this article: Marco Schulz. Expressions for Source Control Management Systems. American Journal of Software Engineering and Applications. Vol. 11, No. 2, 2022, pp. 22-30. doi: 10.11648/j.ajsea.20221102.11
Download the PDF: https://www.sciencepg.com/journal/paperinfo?journalid=137&doi=10.11648/j.ajsea.20221102.11
1. Introduction
Thinking about SCM systems we have to keep in mind, that since the first roll out of CVS in the early 1990‘s and today, many things have changed. Searching the free online encyclopedia Wikipedia, presents a page ”Comparison of Version Control Software” which contains an overview of version control software of more than 30 SCM tools. This gives an idea why software companies usually have around three or more different SCM systems in work – of course the real amount depends on how many years they are in business.
The possibility to attach every revision in SCM Systems with a commit message allows the developer to inform other users with a short explanation of his work. This feature is extremely helpful by browsing the history manually in search of special code changes. If these commit messages well structured there exist a possibility to grab automated information of project growth. In this paper on expressions is introduced as solution for structured commit messages which could processed by software and also helps developers to resume their work more efficient.
The list of research on SCM is quite overwhelming and covers multiple aspects. The work of Walter F. Tichy on RCS [2] presents a deep fundamental insight into technical aspects of SCM systems. Abdullah Uz Tansel et al. gives in his research a brief history and builds a bridge to nowadays SCM systems [11]. The paper of Christian Bird et al. describes the ideas why companies deal with various SCM solutions [12]. Many existing papers like the one from Filip Van Rysselberghe and Serge Demeyer already identified SCM repositories as a significant information storage [5], which contains more than a simple history of source code. The approach from Louis Glassy to observe the growth of students in the software development process by using SCM techniques [6] demonstrates another method to grab implicit information from SCM. Alongside the fundamental research in software engineering, there exists a great resource of Blogs, articles and books from people who are directly involved in the topic. They describe experiences and best practice to make the next release come true, as referred towards the web resources in the footnotes. A small selection of related practitioners books is also included in the reference list.
Let us take a closer look at how processes for SCM could be improved. For this reason, section II defines the terminology of this paper and talks in detail about merging and branching strategies. Section III remind some basic knowledge on SCM and gives a simple idea about how complex build and deploy pipelines interact. Following this quick journey, section IV draws a picture about real problems that occur in software development projects and explains possible Points of Interest (POI) inside an SCM repository. These fundamentals allow a definition of the vocabulary we introduce in section V. A real world example will demonstrate in VI the cardinality of the expression and gives ideas about its usage. After all, section VII will reflect and summarize these thoughts. The last section talks about ideas how future work could be continued.
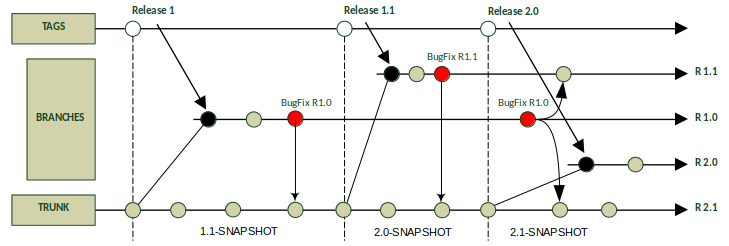
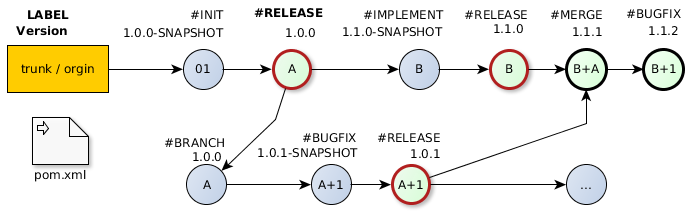
Figure 1: Branch and Merge.
The definitions in this section are based on the English dictionary Merriam Webster with a contextual relation to SCM systems. The term Source Control Management System (SCM) is applied in this paper to describe tools like CVS, Subversion (SVN) or Git. Many other names have appeared over the years in literature for this type of tools. All these terms like Version Control System (VCS) or Revision Control System (RCS) are considered as equal to each other.
Artifact “A USUALLY SIMPLE OBJECT (SUCH AS A TOOL OR ORNAMENT) SHOWING HUMAN WORKMANSHIP OR MODIFICATION AS DISTINGUISHED FROM A NATURAL. OBJECT; “ESPECIALLY: AN OBJECT REMAINING FROM A PARTICULAR PERIOD”. In the context of SCM, an artifact is a binary result of the build process. Artifacts can be libraries, applications and so on.
Repository “A PLACE, ROOM, OR CONTAINER WHERE IS DEPOSITED OR STORED”. In software engineering a repository denotes a managed storage. We can distinguish repositories for source code and for binary artifacts.
Revision “A CHANGE OR A SET OF CHANGES THAT CORRECTS OR IMPROVES SOMETHING”. Each successful commit from a user to the SCM represents a change of the internal state in the SCM. These different states are revisions. Subversion for example increments an internal number after each commit [18]. This unique identifier is called revision number. Git on the other hand manages the revision number smarter and creates SHA-1 Hashes from each commit as an identifier [15]. This brings more flexibility for dealing with branches.
Release “TO GIVE PERMISSION FOR PUBLICATION, PERFORMANCE, EXHIBITION, OR SALE OF; ALSO: TO MAKE AVAILABLE TO THE PUBLIC”. A release defines a set of functional assertions for an artifact. When all functions are implemented, a test procedure is started to exclude as many failures as possible. After the termination of testing and corrections, the artifact gets packed for delivery. To distinguish the different versions of an artifact, it gets labeled by a unique version number. By convention, it is not allowed to have more than one artifact with the same version number.
Tag “A DESCRIPTIVE OR IDENTIFYING EPITHET”. -A Tag is a label to a special revision, like a release, and is used as bookmark.
Trunk “THE CENTRAL PART OF ANYTHING”. A trunk is a common convention and means the main branch, where the current development happens [17]. In Git this branch is called master for the local repository and orgin in the remote repository. Branching and Merging is one of the major feature in SCM systems and also a high sophisticated operation. It is not so unusual that developers and also Configuration Managers struggle with this. The paper of Shaun Phillips et al. contains a developer comment about the dealing with SCM and the pain of merging [10].
“We are a team of four senior developers (by which I mean we’re all over 40 with 20+ years each of development experience) and not one of us has had a positive experience in the past with branching the mainline… The branch is easy – it’s the merge at the end that’s painful.”
This shows that even persons with many years of experience need a detailed explanation of a seemingly trivial procedure. A simple understanding how branches typically have to be used and how they represent the evolution of a real software project is of high relevance for this paper. Figure 1 explains the optimal interaction between branches and the trunk which is described by Chuck Walrad and Darrel Strom as Branch by Release Model [3]. In addition to the context of branching and merging there is a version tree sample graph explained by Yongchang Ren et al. in their paper [8].
In order to give a comprehensive explanation of the process we assume a simple Java library project. As build tool Apache Maven is chosen which is successfully used for years by many different commercial and Open Source projects. Maven defines many standards for the software development process and implements them. Its success feature is a highly efficient dependency management.
The information about the artifact version number is managed in the pom.xml, the Maven build file. For this reason the POM has our special attention. In the context of Maven a versions number is labeled SNAPSHOT while it is still under development. This convention allows in collaborative teams the sharing of non official published artifacts. After removing the label SNAPSHOT the artifact is released. By convention it is not possible to have more than one artifact with the same version number. In section III this topic is discussed in more detail. For the moment it is necessary to know that this convention takes effect in collaborative processes. The correct way to share artifacts is the usage of a Repository Manager. The most common Repository Manager is Sonatype Nexus OSS which is used for Maven Central [19] to deliver dependencies. Nexus will refuse the request if a developer tries to publish an already existing release of an artifact. With this infrastructure it is not necessary to transfer binary artifacts to the SCM. This tool chain is a simple example for a highly complex infrastructure to build and deliver software in large companies.
In figure 1 the development starts with version 1.0-SNAPSHOT. After the release of this version, the development of the next version 1.1-SNAPSHOT continues in trunk. The revision of the released version 1.0 gets branched to fix some bugs. The branch will not be created automatically during the release, rather it gets created when there is a need, for example BugFixes. The branch will be named by its minor version 1.0 to stay flexible for further corrections. After a correct BugFix the changes get merged back to trunk and so on. It is very important to keep in mind, that after a release, no new functionality can be added to the versions 1.0.X, only corrections are allowed.
The merging of failure corrections can lead to complications if there already exist deployed versions. When a bug is detected down to an existing version it will be necessary to fix all following versions and increment their version number as part of the correction. For example if there exist released versions 1.0.2, 1.1.1, 1.2.3 & 2.0.1. and the fix has been done in version 1.0.2 it will have to be renamed 1.0.3 for release. The merge direction is always from the lower to the higher version which means that the version numbers of all following involved artifacts have to be increased. By this it can be assured that only fixes will be exchanged and no functionality is moving form an higher to a lower version within the merging process.
In this model the case of parallel feature development is missing. This happens when a very complex functionality is planned and the implementation cannot be finished in one release cycle. This especially often occurs in agile projects with a short time line between releases. Feature Branches address this requirement as well. The process is a simple extension of the Branch by Release Model. The Feature Branch will be created from the trunk and will be named like the feature. To test compatibility this branch at least needs to be merged from the trunk after each release. A merge can also be performed if the trunk provides important new features – whenever necessary.
A very useful advanced usage of branches is the stash command, that comes as build-in with Git. Indeed this feature is not so common but simple and powerful. Imagine a developer is working on some implementation with the urgency of having to deliver a BugFix for another release. He needs to switch his workspace to this branch but the current work needs to be saved without a direct commit to the trunk. The solution is create a branch and check in the current work and hence switch the branch for the fix. After all is done he will have to switch to the stashed branch, finish the work and merge the result to the trunk. An often observed procedure for developers are simultaneous checkouts of different branches and just switching the IDE workspace. By experience in large companies, this is very time consuming and error prone. By the law of Murphy, the only needed branch is the one not present in a local checkout collection.
To get in touch with branch models more profoundly, the website of the Git SCM [20] presents different branching workflows. Also at [21] exists a very detailed explanation for Git branch and merge best practices.
3. Quick Survey on SCM Basics
As described, there exists a huge amount of Source Control Management solutions. Even just picking out the most popular systems, we are able to identify many differences in detail. These may be the reasons why some tools have become more popular than others. Naturally, all of these systems do the job and are based on common ideas. A very early and fundamental work on SCM systems done by Tichy gives a deep insight about the Theory on how an SCM should be constructed [2]. Today, based on the approach of how things are done, we can classify them. Directory and file based systems, like Microsoft Visual Source Safe, are part of the less effective group of SCM. In commercial environments this group has low relevance because quite often it causes inconsistencies of the repository. This leads us to the category of Client-Server solutions. Client-Server SCM systems have two manifestations: centralizedand distributed. SVN is the most famous representative for centralized solutions. In new projects the choice of the day will very often be Git, a very popular distributed SCM tool. In “Transition from Centralized to Decentralized Version Control Systems” the authors describes why decentralized SCM systems are favored by developers [12]. Interviews of developers have shown the benefits and risks of applicated SCM systems. They deliver a well elaborated explanation why distributed SCM has a higher learning curve. This finding is a important principle for dealing with SCM.
SCM systems are designed to handle plain text files, like those used for source code. After a file has undergone configuration management and had an initial transfer into the repository, the system stores only a delta of the changes for every new transaction. With this requirement the repository is more efficient and needs less disk storage. This implies binary files like office documents should not be stored in SCM repositories because the system cannot calculate a delta and will always store a complete new copy of the file, if it has been changed. A solution for dealing with binaries, like dependencies or third party libraries, are Repository Managers which were introduced in section II.
Figure 2: Changes in the POM, based on Semantic Versioning.
At this point some performance issues for SCM have to be taken in consideration. This is of outstanding importance, because it defines how a repository should be organized. Large projects with a code repository up to 1 GB take a long time for a checkout, even though there is only a small subset of files that are chosen. 20 minutes and more are very common. The reason for this effect is the size of the repository itself. When it contains a lot of files it takes more time to calculate the internal tree. The best solution for a high performance repository is: Only text files and just one independent project or module per repository.
In continuation surges question how files are represented in a SCM. As an example we remember the small Java library project with the Maven build logic. The build logic is represented as an XML file and contains the entry <version>. This entry defines the version number of the artifact and starts with an initialization of 1.0.0-SNAPSHOT. The procedure to increase the version number strictly follows the Semantic Versioning. Figure 2 visualizes several steps between two releases. For each revision a label describes the process and the version number show the value in the POM file. This graphic is an extension with a detailed view of figure 1.
In reality things are never like explained in theory. Initial assumption often create a big dilemma in automation processes when it comes to execution. It is very easy to claim, that in a repository, the entry for version in the POM for releases is unique. For example, it means that there should not exist two revisions with a released version 1.0. But where humans work, mistakes will happen. For this reason we have the option to create tags into the SCM. Every revision in the SCM which represents a deployed release, will be tagged with the correct version number. Deployed releases are defined by a successful transfer of the binary artifact into the Repository Manager for collaborative usage.
4. Scenarios on Real Problems
We should focus our activities on special points in respect to the evolution of software projects. It is not useful to pay attention on each single revision. Let us highlight the Points of Interest (POI) and why they are special. In real projects with collaborative teams, it is quite common that a developer breaks the current build. The good news are: when Continuous Integration (CI) is applied in the process, these kind of problems will be detected very quickly and can be solved at the instance of them appearing [16]. But how a developer is able to break a build? This occurs when the changes get committed into the repository and some files are not included in the commit. A repair can easily and fast be done by adding a new commit with the missing files needed. In this case it is very important to realize that only the one who delivered an incomplete package is able to add the missing parts. Problems arise when this happens on a Friday evening and the person responsible is leaving the office for vacations the next two or tree weeks without checking that everything is in order, causing unnecessary pain in the continuation of the project. These things happen much more often than anyone would expect.
Another effect is called fast shots. These small and often repeated commits typically change only a few lines in just one or two files. This happens when a user for some reason is not able to test his code or settings locally on his own machine. A simple scenario could be the manipulation of the CI Server build output without direct access.
A work flow for developers is the usage of particular commits in order to preserve intermediate steps of the work and allow an easy rollback. This procedure is only applicable in distributed systems or in environments without collaboration. The effect is quit similar. It will produce many revisions inside the SCM, which could get summarized to a single revision.
The Continuous Delivery approach for modern Web Applications is a quite different method compared to the classical release process [14]. This technique requires special strategies like the Feature Toggle Pattern [22] and a highly automated deploy pipeline. Also the usage of the SCM system is very advanced. Each feature is developed in its own branch and the Configuration- or Build Manager creates for each deployment a proper Integration Branch. The biggest challenge in this methodology are fast responses towards urgent problems arising. In the worst case it could be necessary to push out very quickly a new deployment with a full or partial rollback. During deployments database changes are very critical. This aspect could be discussed in a further paper. Databases are not implicitly part of the SCM, but there also exist techniques [23] to keep them under configuration management.
Figure 3: Structure of a commit naming.
As mentioned before, a release R inside an SCM is defined by several commits to the SCM. These commits are identified by the revision r. The lowest amount of revisions between two release is one, but there is no limit concerning to the upper boundary. Special Points of Interests inside an SCM are released revisions which can formally defined by (2).
R := {r 1, r 2, r 3, r n+1,…, r x } (1)
POI:= ∆ Release (R; R + 1) (2)
By this interpretation we are able to develop metrics which show a real project growth and do not just produce an output [13]. The paper of P. Kaur and H. Singh contains a collection of metrics related to their VVCT SCM [9]. An adapted suggestion for possibilities to compare project evolution is:
the amount of BugFix releases in a minor branch,
an count of revisions between two release,
the growth between minor and major release (e.g. Line of Codes),
a direct comparison between the current trunk and a previous release,
two selected releases,
a comparison of an release R and its replacement.
For example the amount of BugFix releases for a minor release allows a conclusion about the quality situation of a project. It is very important to understand the reasons to improve program stability and reduce the number of BugFixes. A classification for changes is described by Swanson [1]. An overview of the project based on these classifications of BugFixes should detect the issues that have to be changed to accomplish high quality.
5. A Vocabulary for SCM Commit Messages
In the early times SCM systems were used for synchronizing source code between developers. Typically users were not paying too much attention to write well formulated explanations about their changes. In many instances they were not leaving any description about what they did. Another extreme was that comments like update build logic frequently appeared in the history. An explanation of everything and nothing without saying what was changed or why. It could either be a version update of an existing library or the addition of a new dependency leading to a heavy time-consuming work in order to identify the points of interest in the commit history. Manual checks between the version with a Diff Tool would be necessary to locate the Line of Code that may have to be changed again. Guidelines have been introduced on how to write a well formulated commit message to solve this problems. A short selection of these guides published on the internet: [24, 25, 26] It was discovered by companies that the approach to apply well formulated descriptions of SCM revisions can improve productivity in teams. By exploring new projects on Source Code Hosting Services like GitHub or Sourceforge the quality of commit messages was increasing in the last years.
Based on these recommendations and the experience gained as of today, a vocabulary should be introduced for writing easier and more efficient commit messages. This simple-to-use standardization could help to visualize the evolution of a project more clearly. By very precise and short explanation of every revision readers do not get flooded with information. This allows analysts to see patterns of process leaks more quickly and increases the team productivity. The usage of a defined structure also allows an automatism to parse the commit messages. The result can generate programmatic presentations of diagrams readable by humans. Naturally this approach is not only limited to SCM. Another usage could be for communication in meetings with strict time limitations, for example in the agile method Scrum.
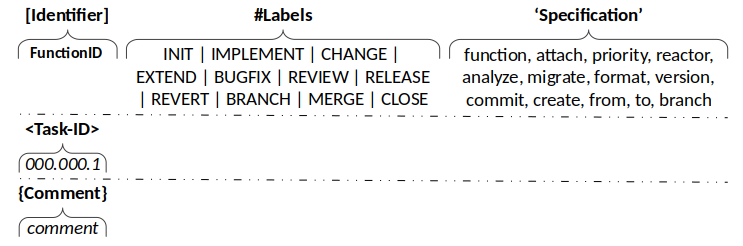
The vocabulary for SCM Commit Messages follows a defined structure which is shown in figure 3. The composition contains a mandatory first line and includes a FunctionID, label and a short specification. The second and third line is optional and contains the TaskID from the Issue Management System and a description of the more detailed explanation. Our suggestion for the vocabulary covers most SCM work flows. It may will be that some companies need adoptions to implement this solution in their processes. For this reason the definition is flexible and allows extensions.
#INIT – the repository or a release.
repro:documentation / configuration…
archetype:jar / war / ear / pom / zip…
version:<version>
#IMPLEMENT – a functionality.
function:<clazz>
#CHANGE – a functionality.
function:<clazz>
#EXTEND – a functionality.
function:<clazz>
attach:<clazz>
#BUGFIX – a functionality.
priority:critical / medium / low / design
#REVIEW – an implementation.
refactor:<function>
analyze:<quality>migrate:<function>
format:<source>
#RELEASE – an artifact.
version:<version>
#REVERT – a commit.
commit:<id>
#BRANCH – create.
create:<name>
stash:<branch>
#MERGE – from another branch.
from:<branch>
to:<branch>
#CLOSE – a branch.
branch:<name>
As first entry a FunctionID is recommended and not the TaskID of the Issue Management. This decision is based on the experience that functionality could spread in different tasks. In longtime projects it could happen that for some reason the Issue Management System needs to be replaced by another one. Not all projects are connected to Issue Management, especially when they are small or just a prototype. These circumstances proved to be decisive to define the TaskId as optional and move it to the second line. With a FunctionID it is easier to identify parts that should be linked. Sometimes there exist transfers into the repository that cannot be assigned to a dedicated function. These commits are often related to activities of the Build- and Configuration Manager. As best practice an ID should be established which corresponds to these activities. Some examples related to the defined labels are:
[CM-00] INIT;
[CM-10] REVIEW;
[CM-20] BRANCH;
[CM-30] MERGE;
[CM-40] RELEASE;
[CM-50] build management.
The mightiness of this approach is its simplicity and how it can be included in existing projects. The rule set does not contain any additional complexity and the process is quite easy to understand. A short example will demonstrate the usage and a full example is provided in section VI. A change in the POM file to update the version of the test framework could be commented as follows:
[CM-50] #CHANGE ’function:pom’ <QS-23231> {Change version number of the dependency JUnit from 4 to 5.0.2}
6. Release Process
The sample project in section II is not only fictive. The Together Platform (TP) available on GitHub [26] was initiated to study techniques on real conditions. Hence Git is the SCM tool of the choice. As client SmartGit is recommended because of platform independence and it offers plentiful advanced functionality.
For better comprehension of our approach of writing commit expressions we use the TP-CORE project, from initialization of the repository to its first release. No TaskIDs for the revisions exist due to the project not being connected to an Issue Management System. We use an excerpt of TP-CORE to demonstrate the approach because between the initial commit and the first published release 1.0.2 exist over 70 revisions in the repository. The project also contains a set of 12 functions which do not need to be included completely in our sample. Only three functions were selected for demonstration:
CORE-01 Logger;
CORE-02 genericDAO;
CORE-05 ApplicationConfiguration.
This cuts the revisions in half and shows enough complexity avoiding readers falling asleep.
The condition for a first release was the implementation of all 12 functionalities. The overall test coverage has reached more than 85%. Code smells detected with checks by Findbugs, Checkstyle, PMD et cetera have been removed. For an facilitate explanation, we add a revision number before the FunctionID. TP-CORE Commit Messages:
01  [CM-00] #INIT ’archtype:jar’
{Initial the repository for Java JAR library.}
02  [CORE-01] #IMPLEMENT ’function:Logger’
{Application wide standard logger.}
03  [CORE-02] #IMPLEMENT
{Generic Data Access Object Pattern for centralized database access.}
04  [CORE-05] #IMPLEMENT ’function:AppConfigDO’
{Domain Object for application configuration.}
05  [CM-10] #REVIEW ’analyze:quality’
{Formatting, fix Checkstyle hints, JavaDoc & test coverage}
06  [CORE-05] #IMPLEMENT ’function:ConfigurationDAO’
{Add the ConfigurationDAO implementation.}
07  [CORE-05] #EXTEND ’attach:tests’
{Create test cases for Bean Validation.}
08  [CORE-01] #EXTEND ’function:Logger’
{Add new Method to detect the configured LogLevel.}
09  [CORE-05] #EXTEND ’function:AppConfigDO’
{Change Primary Key to UUID and extend tests.}
10  [CORE-05] #CHANGE ’function:AppConfigDO’
{Rename to ConfigurationDO and define table indexes.}
11  [CORE-02] #EXTEND ’function:GenericDAO’
{Add flushTable, countEnties and optimize.}
12  [CORE-05] #EXTEND ’attach:tests’
{Update test cases for application configuration.}
13  [CORE-05] #EXTEND ’function:ConfigurationDAO’
{Update the implementation for ConfigurationDAOImpl.}
14  [CORE-01] #EXTEND ’function:Logger’
{Add method for exception handling.}
15  [CORE-05] #EXTEND ’function:ConfigurationDO’
{Add field mandatory.}
16  [CM-10] #REVIEW ’migrate:JUnit’
{Migrate Test cases from JUnit4 to JUnit5.}
17  [CM-10] #REVIEW ’analyze:quality’
{Fix JavaDoc, Checkstyle & Findbugs.}
18  [CM-50] #EXTEND ’function:POM’
{Update SCM connection to GitHub.}
19  [CM-50] #EXTEND ’attach:APIguards’
{Attach annotation for API documentation.}
20  [CORE-05] #REVIEW ’refactor:ConfigurationDO’
{FindBugs: optimize constructor parameters.}
21  [CORE-02] #BUGFIX ’priority:design’
{Fix FindBugs hint: visible modifier.}
22  [CM-50] #EXTEND ’attach:site’
{Extend MVN site configuration.}
23  [CORE-02] #BUGFIX ’priority:high’
{Fix spring DAO configuration.}
24  [CORE-05] #IMPLEMENT ’function:ConfigurationService’
{Implement basic functionality for
ConfigurationService.}
25  [CM-10] #REVIEW ’analyze:quality’
{Remove all compiler warnings, FindBugs,
Checkstyle & PMD Hits.}
26  [CORE-05] #EXTEND
’attach:ConfigurationService’
{A  dd JGiven test scenarios.}
27  [CM-40] #RELEASE ’version:1.0’
{Release artifact to version 1.0}
28  [CM-40] #RELEASE ’version:1.0.1’
{Change POM GroupId to Maven Central conventions.}
29  [CM-00] #INIT ’version:1.1’
{Start implementation of version 1.1.0.}
30  [CM-50] #MERGE ’from:1.0.1’
{Integrate GAV POM changes to trunk.}
31  [CM-40] #RELEASE ’version:1.0.2’
{Include PGP signing.}
32  [CM-20] #CHANGE ’function:Constraints’
{Add Constraints.VERSION to 1.1}
33  [CORE-01] #EXTEND ’function:Logger’
{Default loader for logback.xml configuration files in the application DIR.}
Considering the previous example, we see that a limitation to around 80 – 100 characters for the first line is recommendable. Displaying the history with any client could get very messy if the first line has no size restrictions. The log output of the commit messages does not display the branch and tag operation, a behavior of Git. These revisions do not appear in any history list by browsing GitHub. Revision 28 is a branch based on revision 27. The branch is named as 1.0. Releases are published in consonance with the convention to be labeled, revision 31 tagged as Release 1.0.2. The revisions 28 and 31 are part of branch 1.0.
In this constellation we are able to see an important detail for dealing with branches. A branch will only be created when it is necessary. Usually BugFix branches do not have their own build plans on CI Servers and are managed manually. The primary arguments for this practice are to reduce the administrative overhead for the CI Servers. Companies that orchestrate their applications by web services or modules loose capacities by binding their recourses in this kind of activities.
7. Conclusion
“There is nothing permanent except change.” – Heraclitus
The whole infrastructure of commercial software projects contains a lot of independent fragments which share information over all development cycle. In projects we are overloaded by documentation production processes. The high amount of all this information inhibits profoundly comprehension and handling capabilities. Applications are getting more complex and bigger resulting in the necessity to establish more efficient ways to deal with information accumulation. There exists a giant overhead of managing documents like release notes, release plan, issue management, quality reports, statistics & metrics, documentation, architectural documents and BugFix lists. Typically each tool stores its data in its own structure. This makes changes to other tools, that might fit better, risky and expensive.
Companies know the effect that developers feel uncomfortable having to track their work in Issue Management tools like JIRA resulting in them trying to hide their part of the work flow as much as possible. Tasks will be opened up when they are almost done or already finished. The information on how many project days were spent for a function covers more the expectations and less the reality with the intent that developers can escape a bit from the daily pressure of productivity. Often developers are forced to spend their time with data acquisition for management controlling instead of programming resulting in low cost efficiency of a project and even additional and unplanned costs. Developers dislike this kind of activities because it keeps them away from their actual work: development. This is what makes the simple approach towards human readable and machine processable commit messages attractive and more convenient. The most important fact is that no extra costs are generated applying this method to existing processes.
We are enabled to generate several reports based on real data if SCM repositories can be populated with additional information. Impact assessments could be more efficient and accurate when they are created by facts and not emotionally blended.
Future Work
The idea to make information inside SCM systems more transparent is not just limited to commit messages. Another obvious point for future research is the history command. In the paper of Abram Hindle and Daniel M. German a query language for source control is introduced [7]. The idea of SCM Language could be picked up and transformed applying it to a specific solution. This work would use the Domain Driven Development paradigm to model an own SCM language based on Domain Specific Language (DSL) concepts – leading to the discovery of real world DSL solutions allowing for quick construction of a viable prototype or application based upon certain specifications.
Also a point which boldly comes to mind after reading the paper of Fischer et al., is the inclusion of released information into SCM [4]. This approach should not fully be automated due to its requirement of an advanced knowledge about branching and merging. A small self written extension could be a probable solution. A short tutorial 17 for Git suggests certain possibilities.
Acknowledgements
Special thanks to Joachim Reiter and Harald Kaufmann for spending their time to review this document. Their feedback was very productive.
References
[1] E. Burton Swanson, 1978, The Dimension of Maintenance. [2] Walter F. Tichy, 1985, RCS – A System for Version Control. [3] Chuck Walrad and Darrel Strom, 2002, The Importance of Branching Models in SCM. [4] Michael Fischer, Martin Pinzger, Harald Gall, 2003, Populating a Release History Database from Version Control and Bug Tracking Systems. [5] Filip Van Rysselberghe and Serge Demeyer, 2004, Mining Version Control Systems for FACs (Frequently Applied Changes). [6] Louis Glassy, 2005, Using version control to observe student software development processes. [7] Abram Hindle and Daniel M. German, 2005, SCQL: a formal model and a query language for source control. [8] Yongchang Ren, Tao Xing, Qiang Quan, Ying Zhao, 2010, Software Configuration Management of Version Control Study Based on Baseline. [9] Parminder Kaur and Hardeep Singh, 2011, A Model for Versioning Control Mechanism in Component- Based Systems [10] Shaun Phillips, Jonathan Sillito, Rob Walker, 2011, Branching and merging: an investigation into current version control practices. [11] Abdullah Uz Tansel and Ali Koc, 2011, A Survey of Version Control Systems. [12] Christian Bird et al., 2014, Transition from Centralized to Decentralized Version Control Systems A Case Study on Reasons, Barriers, and Outcomes. [13] Norman E. Fenton and Shari Lawrence Pfieeger, 1997, PWS Publishing Company, Software Metrics – A Rigorous and Practical Approach 2nd Edition, ISBN O·534·95425·1. [14] Jez Humble and David Farley, 2010, Addison-Wesley, Continuous Delivery: Reliable Software Releases through Build, Test, and Deployment Automation, ISBN 0-321-60191-2. [15] Scott Chacon and Ben Straub, 2014, Apress, Pro Git 2nd Edition, ISBN 978-1-4842-0077-3. [16] Mike Clark, 2004, The Pragmatic Bookshelf, Pragmatic Project Automation, ISBN 0-9745140-3-9. [17] Dave Thomas and Andy Hunt, 2003, The Pragmatic Bookshelf, Pragmatic Version Control with CVS, ISBN 0-9745140-0-4. [18] Mike Mason, 2010, The Pragmatic Bookshelf, Pragmatic Guide to Subversion, ISBN 1-934356-61-1. [19] https://search.maven.org [20] https://git-scm.com/book/en/v2/Git-Branching-Branching-Workflows [21] https://nvie.com/posts/a-successful-git-branching-model/ [22] https://www.martinfowler.com/articles/feature-toggles.html [23] https://flywaydb.org [24] https://chris.beams.io/posts/git-commit/ [25] http://who-t.blogspot.mx/2009/12/on-commit-messages.html [26] https://github.com/ElmarDott/TP-CORE/
Biography
Marco Schulz, also kown by his online identity Elmar Dott is an independent consultant in the field of large Web Application, generally based on the JavaEE environment. His main working field is Build-, Configuration- & Release-Management as well as software architecture. In addition his interests cover the full software development process and the discovery of possibilities to automate them as much as possible. Over the time of the last ten years he has authored a variety of technical articles for different publishers and speaks on various software development conferences. He is also the aut
When we have a look at OWASP’s top 10 vulnerabilities [1], SQL Injections are still in a popular position. In this short article, we discuss several options on how SQL Injections could be avoided.
When Applications have to deal with databases existing always high-security concerns, if an invader got the possibility to hijack the database layer of your application, he can choose between several options. Stolen the data of the stored users to flood them with spam is not the worst scenario that could happen. Even more problematic would be when stored payment information got abused. Another possibility of an SQL Injection Cyber attack is to get illegal access to restricted pay content and/or services. As we can see, there are many reasons why to care about (Web) Application security.
To find well-working preventions against SQL Injections, we need first to understand how an SQL Injection attack works and on which points we need to pay attention. In short: every user interaction that processes the input unfiltered in an SQL query is a possible target for an attack. The data input can be manipulated in a manner that the submitted SQL query contains a different logic than the original. Listing 1 will give you a good idea about what could be possible.
SELECT Username, Password, RoleFROM User WHERE Username ='John Doe'ANDPassword='S3cr3t';SELECT Username, Password, RoleFROM UsersWHERE Username ='John Doe'; --' AND Password='S3cr3t';
Listing 1: Simple SQL Injection
The first statement in Listing 1 shows the original query. If the Input for the variables Username and Password is not filtered, we have a lack of security. The second query injects for the variable Username a String with the username John Doe and extends with the characters ‘; –. This statement bypasses the AND branch and gives, in this case, access to the login. The ‘; sequence close the WHERE statement and with — all following characters got un-commented. Theoretically, it is possible to execute between both character sequences every valid SQL code.
Of course, my plan is not to spread around ideas that SQL commands could rise up the worst consequences for the victim. With this simple example, I assume the message is clear. We need to protect each UI input variable in our application against user manipulation. Even if they are not used directly for database queries. To detect those variables, it is always a good idea to validate all existing input forms. But modern applications have mostly more than just a few input forms. For this reason, I also mention keeping an eye on your REST endpoints. Often their parameters are also connected with SQL queries.
For this reason, Input validation, in general, should be part of the security concept. Annotations from the Bean Validation [2] specification are, for this purpose, very powerful. For example, @NotNull, as an Annotation for the data field in the domain object, ensure that the object only is able to persist if the variable is not empty. To use the Bean Validation Annotations in your Java project, you just need to include a small library.
Perhaps it could be necessary to validate more complex data structures. With Regular Expressions, you have another powerful tool in your hands. But be careful. It is not that easy to write correct working RegEx. Let’s have a look at a short example.
publicstaticfinalStringRGB_COLOR="#[0-9a-fA-F]{3,3}([0-9a-fA-F]{3,3})?";publicbooleanvalidate(String content,String regEx){booleantest;if(content.matches(regEx)){ test =true;}else{ test =false;}return test;}validate('#000', RGB_COLOR);
Listing 3: Validation by Regular Expression in Java
The RegEx to detect the correct RGB color schema is quite simple. Valid inputs are #ffF or #000000. The Range for the characters is 0-9, and the Letters A to F. Case insensitive. When you develop your own RegEx, you always need to check very well existing boundaries. A good example is also the 24 hours time format. Typical mistakes are invalid entries like 23:60 or 24:00. The validate method compares the input string with the RegEx. If the pattern matches the input, the method will return true. If you want to get more ideas about validators in Java, you can also check my GitHub repository [3].
In resume, our first idea to secure user input against abuse is to filter out all problematic character sequences, like — and so on. Well, this intention of creating a blocking list is not that bad. But still have some limitations. At first, the complexity of the application increased because blocking single characters like –; and ‘ could causes sometimes unwanted side effects. Also, an application-wide default limitation of the characters could cost sometimes problems. Imagine there is a text area for a Blog system or something equal.
This means we need another powerful concept to filter the input in a manner our SQL query can not manipulate. To reach this goal, the SQL standard has a very great solution we can use. SQL Parameters are variables inside an SQL query that will be interpreted as content and not as a statement. This allows large texts to block some dangerous characters. Let’s have a look at how this will work on a PostgreSQL [4] database.
DECLARE user String;SELECT*FROMloginWHEREname= user;
Listing 4: Defining Parameters in PostgreSQL
In the case you are using the OR mapper Hibernate, there exists a more elegant way with the Java Persistence API (JPA).
StringmyUserInput;@PersistenceContextpublicEntityManagermainEntityManagerFactory;CriteriaBuilderbuilder=mainEntityManagerFactory.getCriteriaBuilder();CriteriaQuery<DomainObject>query=builder.createQuery(DomainObject.class);// create CriteriaRoot<ConfigurationDO>root=query.from(DomainObject.class);//Criteria SQL ParametersParameterExpression<String>paramKey=builder.parameter(String.class);query.where(builder.equal(root.get("name"), paramKey);// wire queries together with parametersTypedQuery<ConfigurationDO>result=mainEntityManagerFactory.createQuery(query);result.setParameter(paramKey, myUserInput);DomainObjectentry=result.getSingleResult();
Listing 5: Hibernate JPA SQL Parameter Usage
Listing 5 is shown as a full example of Hibernate using JPA with the criteria API. The variable for the user input is declared in the first line. The comments in the listing explain the way how it works. As you can see, this is no rocket science. The solution has some other nice benefits besides improving web application security. At first, no plain SQL is used. This ensures that each database management system supported by Hibernate can be secured by this code.
May the usage looks a bit more complex than a simple query, but the benefit for your application is enormous. On the other hand, of course, there are some extra lines of code. But they are not that difficult to understand.
When you have a look at Merriam Webster about the word framework you find the following explanations:
a basic conceptional structure
a skeletal, openwork, or structural frame
May you could think that libraries and frameworks are equal things. But this is not correct. The source code calls the functionality of a library directly. When you use a framework it is exactly the opposite. The framework calls specific functions of your business logic. This concept is also know as Inversion of Control (IoC).
For web applications we can distinguish between Client-Side and Server-Side frameworks. The difference is that the client usually run in a web browser, that means to available programming languages are limited to JavaScript. Depending on the web server we are able to chose between different programming languages. the most popular languages for the internet are PHP and Java. All web languages have one thing in common. They produce as output HTML, witch can displayed in a web browser.
In this article I created an short overview of the most common Java frameworks which also could be used in desktop applications. If you wish to have a fast introduction for Java Server Application you can check out my Article about Java EE and Jakarta.
If you plan to use one or some of the discussed frameworks in your Java application, you just need to include them as Maven or Gradle dependency.
JUnit, TestNG
TDD – unit testing
Mockito
TDD mocking objects
JGiven, Cucumber
BDD – acceptance testing
Hibernate, iBatis, Eclipse Link
JPA- O/R Mapper
Spring Framework, Google Guice
Dependency Injection
PrimeFaces, BootsFaces, ButterFaces
JSF User Interfaces
ControlsFX, BootstrapFX
JavaFX User Interfaces
Hazelcast, Apache Kafka
Event Stream Processing
SLF4J, Logback, Log4J
Logging
FF4j
Feature Flags
Before I continue I wish to telly you, that this frameworks are made to help you in your daily business as developer to solve problems. Every problem have multiple solutions. For this reason it is more important to learn the concepts behind the frameworks instead just how to use a special framework. During the last two decades since I’m programming I saw the rise and fall of plenty Frameworks. Examples of frameworks today almost nobody remember are: Google Web Toolkit and JBoss Seam.
The most used framework in Java for writing and executing unit tests is JUnit. An also often used alternative to JUnit is TestNG. Both solutions working quite equal. The basic idea is execute a function by defined parameters and compare the output with an expected results. When the output fit with the expectation the test passed successful. JUnit and TestNG supporting the Test Driven Development (TDD) paradigm.
If you need to emulate in your test case a behavior of an external system you do not have in the moment your tests are running, then Mockito is your best friend. Mockito works perfectly together with JUnit and TestNG.
The Behavioral Driven Development (BDD) is an evolution to unit tests where you are able to define the circumstances the customer will accepted the integrated functionality. The category of BDD integration tests are called acceptance tests. Integration tests are not a replacement for unit tests, they are an extension to them. The frameworks JGiven and Cucumber are also very similar both are like Mockito an extension for the unit test frameworks JUnit and TestNG.
For dealing in Java with relational databases we can choose between several persistence frameworks. Those frameworks allow you to define your database structure in Java objects without writing any line of SQL The mapping between Java objects and database tables happens in the background. Another very great benefit of using O/R Mapper like Hibernate, iBatis and eclipse link is the possibility to replace the underlying database sever. But this achievement is not so easy to reach as it in the beginning seems.
In the next section I introduce a technique was first introduced by the Spring Framework. Dependency Injection (DI). This allows the loose coupling between modules and an more easy replacement of components without a new compile. The solution from Google for DI is called Guice and Java Enterprise binges its own standard named CDI.
Graphical User Interfaces (GUI) are another category for frameworks. It depends on the chosen technology like JavaFX or JSF which framework is useful. The most of the provided controls are equal. Common libraries for GUI JSF components are PrimeFaces, BootsFaces or ButterFaces. OmniFaces is a framework to have standardized solution for JSF problems, like chaching and so on. Collections for JavaFX controls you can find in ControlsFX and BootstrapFX.
If you have to deal with Event Stream Processing (ESP) may you should have a look on Hazelcast or Apache Kafka. ESP means that the system will react on constantly generated data. The event is a reference to each data point which can be persisted in a database and the stream represent to output of the events.
In December a often used technology comes out of the shadow, because of a attacking vulnerability in Log4J. Log4J together with the Simple Logging Facade for Java (SLF4J) is one of the most used dependencies in the software industry. So you can imagine how critical was this information. Now you can imagine which important role Logging has for software development. Another logging framework is Logback, which I use.
Another very helpful dependency for professional software development is FF4J. This allows you to define feature toggles, also know as feature flags to enable and disable functionality of a software program by configuration.
This list could be much longer. I just tried to focus on the most used ones the are for Java programmers relevant. Feel free to leave a comment to suggest something I may forgot. If you share this article on
Cookie Consent
[EN] We use cookies to improve your experience on our site. By using our site, you consent to cookies.
[DE] Wir verwenden Cookies, um Ihre Erfahrungen auf unserer Website zu verbessern. Durch die Nutzung unserer Website stimmen Sie Cookies zu.
This website uses cookies
Websites store cookies to enhance functionality and personalise your experience. You can manage your preferences, but blocking some cookies may impact site performance and services.
Essential cookies enable basic functions and are necessary for the proper function of the website.
Name
Description
Duration
Cookie Preferences
This cookie is used to store the user's cookie consent preferences.
30 days
These cookies are needed for adding comments on this website.
Name
Description
Duration
comment_author
Used to track the user across multiple sessions.
Session
comment_author_email
Used to track the user across multiple sessions.
Session
comment_author_url
Used to track the user across multiple sessions.
Session
These cookies are used for managing login functionality on this website.
Name
Description
Duration
wordpress_logged_in
Used to store logged-in users.
Persistent
wordpress_sec
Used to track the user across multiple sessions.
15 days
wordpress_test_cookie
Used to determine if cookies are enabled.
Session
Statistics cookies collect information anonymously. This information helps us understand how visitors use our website.
Matomo is an open-source web analytics platform that provides detailed insights into website traffic and user behavior.