
Tag Archives: Security
Secure passwords with hash functions
Goodbye privacy, goodbye liberty
Reply
The new terms of conditions for Microsoft services released on October 2023 caused an outcry in the IT world. The reason was a paragraph who said, that now all Microsoft Services are powered by artificial intelligence. This A. I. supposed to be used to detect copyright violations. This includes things like Music, Movies, Graphics, E-Books and Software. In the case this A. I. Detect copyright violations on your system, those files supposed to got deleted automatically from the ‘system’. At this time it is not clear if this rule applies to your own local disk storage or just to the files on the Microsoft Cloud. Microsoft also declared that user which violates the copyright rule will be suspended from all Microsoft Services.
This exclusion has different flavors. The first questions rise up to my mind is what will happened with paid subscriptions like Skype? They will block me and refund my unused credits? A more worst scenario is may I will loose also all my credits and digital properties like access to games and other things. Or paid subscriptions will not be affected? Until now this part not clear.
If you are an Apple user my you could think this things will not affect you but better be sure you may use a Microsoft Service you don’t know its Microsoft. Not every Product include the companies name. Think about it, because who knows if those products spying around on your system. Some applications like Skype, Teams, Edge Browser and Visual Studio Code are available for other platforms like Apple and Linux.
Microsoft also owned the Source Code hosting Platform GitHub and an social network for professionals called LinkedIn. Whit Office 360 you can use the entire Microsoft Office Suite via Web Browser as Cloud solution and all your documents will be stored in the Microsoft Cloud. The same Cloud where US Government institutions like the CIA, NSA and many others keep their files. Well seems it will be a secure place for all your thought you place inside a office document.
This small detail about Office documents leads us to a little side note in the new terms of condition from Microsoft. The fight against hate speech. Whatever that means. Public insults and defamation have always been strictly enforced by the legislature. This means that it is not a trivial offense but rather a criminal offense. So it’s not clear to me what all this talk about hate speech means. Maybe it’s an attempt to introduce public censorship of freedom of expression.
But well back to the side notice from Microsoft term of conditions about hate speech. Microsoft wrote something like: if we detect hate speech we will warn the user and if the violations occur several times the Microsoft account of the user will be deactivated.
If you may think this is just something happen now by Microsoft, be sure many other companies working to introduce equal services. The communication platform Zoom for example included also A. I. techniques to observe the user communication for training purposes.
With all those news is still a big questions needed to be answered: What can I do by myself? The solution is simple. Move back from the digital universe into the real world. Turn the brain back on. Use pen and paper, pay in cash, leave your smartphone at home and there never on the bedside table. If you don’t use it turn it off. Meet your friend physically when ever it is possible and don’t bring your smartphone. There will be no government, no president and no messiahs to bring a change. It’s up to us.

Latest won’t always be greatest
For more than a decade, it has been widely accepted that computer systems should be kept up to date. Those who regularly install updates reduce the risk of having security gaps on their computer that could be misused. Always in the hope that manufacturers of software always fix in their updates also security flaws. Microsoft, for example, has imposed an update requirement on its users since the introduction of Windows 10. Basically, the idea was well-founded. Because unpatched operating systems allow hackers easy access. So the thought: ‘Latest is greatest’ prevailed a very long time ago.
Windows users had little leeway here. But even on mobile devices like smartphones and tablets, automatic updates are activated in the factory settings. If you host an open source project on GitHub, you will receive regular emails about new versions for the libraries used. So at first glance, this is a good thing. However, if you delve a bit deeper into the topic, you will quickly come to the conclusion that latest is not always the best.
The best-known example of this is Windows 10 and the update cycles enforced by Microsoft. It is undisputed that systems must be regularly checked for security problems and available updates must be installed. That the maintenance of computer systems also takes time is also understandable. However, it is problematic when updates installed by the manufacturer paralyze the entire system and a new installation becomes necessary because the update was not sufficiently tested. But also in the context of security updates unasked function changes to the user to bring in I consider unreasonable. Especially with Windows, there are a lot of additional programs installed, which can quickly become a security risk due to lack of further development. That means with all consequence forced Windows updates do not make a computer safe, since here the additionally installed software is not examined for weak points.
If we take a look at Android systems, the situation is much better. However, there are enough points of criticism here as well. The applications are updated regularly, so the security is actually improved significantly. But also with Android, every update usually means functional changes. A simple example is the very popular Google StreetMaps service. With every update, the map usage becomes more confusing for me, as a lot of unwanted additional information is displayed, which considerably reduces the already limited screen.
As a user, it has fortunately not yet happened to me that application updates on Android have paralyzed the entire phone. Which also proves that it is quite possible to test updates extensively before rolling them out to users. However, this does not mean that every update was unproblematic. Problems that can be observed here regularly are things like an excessively increased battery consumption.
Pure Android system updates, on the other hand, regularly cause the hardware to become so slow after almost two years that you often decide to buy a new smartphone. Although the old phone is still in good condition and could be used much longer. I have noticed that many experienced users turn off their Android updates after about a year, before the phone is sent into obsolescence by the manufacturer.
How do you get an update muffler to keep his systems up to date and secure? My approach as a developer and configuration manager is quite simple. I distinguish between feature update and security patch. If you follow the semantic versioning in the release process and use a branch by release model for SCM systems like Git, such a distinction can be easily implemented.
But I also dedicated myself to the question of a versionable configuration setting for software applications. For this, there is a reference implementation in the project TP-CORE on GitHub, which is described in detail in the two-part article Treasue Chest. After all, it must be clear to us that if we reset the entire configuration made by the user to factory settings during an update, as is quite often the case with Windows 10, quite unique security vulnerabilities can arise.
This also brings us to the point of programming and how GitHub motivates developers through emails to include new versions of the libraries used in their applications. Because if such an update is a major API change, the problem is the high migration effort for the developers. This is where an also fairly simple strategy has worked for me. Instead of being impressed by the notifications about updates from GitHub, I regularly check via OWASP whether my libraries contain known risks. Because if a problem is detected by OWASP, it doesn’t matter how costly an update can be. The update and the associated migration must be implemented promptly. This also applies to all releases that are still in production
However, one rule of thumb applies to avoid update hell from the start: Only install or use what you really need. The fewer programs are installed under Windows and the fewer apps there are on the smartphone, the fewer security risks there are. This also applies to program libraries. Less is more from a security perspective. Apart from that, we get a free performance measurement by dispensing with unnecessary programs.
Certainly, for many private users the question of system updates is hardly relevant. Only new unwanted functions in existing programs, performance degradations or now and then shot operating systems cause more or less strong displeasure. In the commercial surrounding field quite fast substantial costs can develop, which can affect also the straight implementing projects negatively. Companies and people who develop software can improve user satisfaction considerably if they differentiate between security patches and feature updates in their release publications. And a feature update should then also contain all known security updates.

WordPress REST API is unreachable
Preventing SQL Injections in Java with JPA and Hibernate
When we have a look at OWASP’s top 10 vulnerabilities [1], SQL Injections are still in a popular position. In this short article, we discuss several options on how SQL Injections could be avoided.
When Applications have to deal with databases existing always high-security concerns, if an invader got the possibility to hijack the database layer of your application, he can choose between several options. Stolen the data of the stored users to flood them with spam is not the worst scenario that could happen. Even more problematic would be when stored payment information got abused. Another possibility of an SQL Injection Cyber attack is to get illegal access to restricted pay content and/or services. As we can see, there are many reasons why to care about (Web) Application security.
To find well-working preventions against SQL Injections, we need first to understand how an SQL Injection attack works and on which points we need to pay attention. In short: every user interaction that processes the input unfiltered in an SQL query is a possible target for an attack. The data input can be manipulated in a manner that the submitted SQL query contains a different logic than the original. Listing 1 will give you a good idea about what could be possible.
SELECT Username, Password, Role FROM User
   WHERE Username = 'John Doe' AND Password = 'S3cr3t';
SELECT Username, Password, Role FROM Users
WHERE Username = 'John Doe'; --' AND Password='S3cr3t';Listing 1: Simple SQL Injection
The first statement in Listing 1 shows the original query. If the Input for the variables Username and Password is not filtered, we have a lack of security. The second query injects for the variable Username a String with the username John Doe and extends with the characters ‘; –. This statement bypasses the AND branch and gives, in this case, access to the login. The ‘; sequence close the WHERE statement and with — all following characters got un-commented. Theoretically, it is possible to execute between both character sequences every valid SQL code.
Of course, my plan is not to spread around ideas that SQL commands could rise up the worst consequences for the victim. With this simple example, I assume the message is clear. We need to protect each UI input variable in our application against user manipulation. Even if they are not used directly for database queries. To detect those variables, it is always a good idea to validate all existing input forms. But modern applications have mostly more than just a few input forms. For this reason, I also mention keeping an eye on your REST endpoints. Often their parameters are also connected with SQL queries.
For this reason, Input validation, in general, should be part of the security concept. Annotations from the Bean Validation [2] specification are, for this purpose, very powerful. For example, @NotNull, as an Annotation for the data field in the domain object, ensure that the object only is able to persist if the variable is not empty. To use the Bean Validation Annotations in your Java project, you just need to include a small library.
<dependency>
    <groupId>org.hibernate.validator</groupId>
    <artifactId>hibernate-validator</artifactId>
    <version>${version}</version>
</dependency>Listing 2: Maven Dependency for Bean Validation
Perhaps it could be necessary to validate more complex data structures. With Regular Expressions, you have another powerful tool in your hands. But be careful. It is not that easy to write correct working RegEx. Let’s have a look at a short example.
public static final String RGB_COLOR = "#[0-9a-fA-F]{3,3}([0-9a-fA-F]{3,3})?";

public boolean validate(String content, String regEx) {
    boolean test;
    if (content.matches(regEx)) {
        test = true;
    } else {
        test = false;
    }
    return test;
}

validate('#000', RGB_COLOR);Listing 3: Validation by Regular Expression in Java
The RegEx to detect the correct RGB color schema is quite simple. Valid inputs are #ffF or #000000. The Range for the characters is 0-9, and the Letters A to F. Case insensitive. When you develop your own RegEx, you always need to check very well existing boundaries. A good example is also the 24 hours time format. Typical mistakes are invalid entries like 23:60 or 24:00. The validate method compares the input string with the RegEx. If the pattern matches the input, the method will return true. If you want to get more ideas about validators in Java, you can also check my GitHub repository [3].
In resume, our first idea to secure user input against abuse is to filter out all problematic character sequences, like — and so on. Well, this intention of creating a blocking list is not that bad. But still have some limitations. At first, the complexity of the application increased because blocking single characters like –; and ‘ could causes sometimes unwanted side effects. Also, an application-wide default limitation of the characters could cost sometimes problems. Imagine there is a text area for a Blog system or something equal.
This means we need another powerful concept to filter the input in a manner our SQL query can not manipulate. To reach this goal, the SQL standard has a very great solution we can use. SQL Parameters are variables inside an SQL query that will be interpreted as content and not as a statement. This allows large texts to block some dangerous characters. Let’s have a look at how this will work on a PostgreSQL [4] database.
DECLARE user String;
SELECT * FROM login WHERE name = user; Listing 4: Defining Parameters in PostgreSQL
In the case you are using the OR mapper Hibernate, there exists a more elegant way with the Java Persistence API (JPA).
String myUserInput;

@PersistenceContext
public EntityManager mainEntityManagerFactory;

CriteriaBuilder builder =
    mainEntityManagerFactory.getCriteriaBuilder();

CriteriaQuery<DomainObject> query =
    builder.createQuery(DomainObject.class);

// create Criteria
Root<ConfigurationDO> root =
    query.from(DomainObject.class);

//Criteria SQL Parameters
ParameterExpression<String> paramKey =
    builder.parameter(String.class);

query.where(builder.equal(root.get("name"), paramKey);

// wire queries together with parameters
TypedQuery<ConfigurationDO> result =
    mainEntityManagerFactory.createQuery(query);

result.setParameter(paramKey, myUserInput);
DomainObject entry = result.getSingleResult();Listing 5: Hibernate JPA SQL Parameter Usage
Listing 5 is shown as a full example of Hibernate using JPA with the criteria API. The variable for the user input is declared in the first line. The comments in the listing explain the way how it works. As you can see, this is no rocket science. The solution has some other nice benefits besides improving web application security. At first, no plain SQL is used. This ensures that each database management system supported by Hibernate can be secured by this code.
May the usage looks a bit more complex than a simple query, but the benefit for your application is enormous. On the other hand, of course, there are some extra lines of code. But they are not that difficult to understand.
Resources

Network spy protection with AdGuard Home on a Raspberry Pi & Docker
Maybe you have bought you like me an Raspberry Pi4 with 4GB RAM and think about what nice things you could do with it. Since the beginning I got the idea to use it as an lightweight home server. Of course you can easily use a mini computer with more power and obviously more energy consumption too. Not a nice idea for a device is running 24/7. As long you don’t plan to mine your own bitcoins or host a high frequented shop system, a PI device should be sufficient.
I was wanted to increase the network security for my network. For this reason I found the application AdGuard which blocks many spy software from internet services you use on every device is connected to the network where AdGuard is running. Sounds great and is not so difficult to do. Let me share with you my experience.
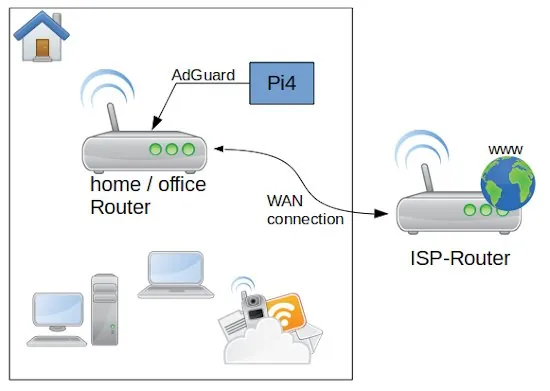
As first let’s have a look to the overall system and perquisites. After the Router from my Internet Service Provider I connected direct by wire my own Network router an Archer C50. On my Rapsbery PI4 with 4GB RAM run as operation system Ubuntu Linux Server x64 (ARM Architecture). The memory card is a 64 GB ScanDisk Ultra. In the case you need a lot of storage you can connect an external SSD or HDD with an USB 3 – SATA adapter. Be aware that you use a storage is made for permanent usage. Western Digital for example have an label called NAS, which is made for this purpose. If you use standard desktop versions they could get broken quite soon. The PI is connected with the router direct by LAN cable.
The first step you need to do is to install on the Ubuntu the Docker service. this is a simple command: apt-get install docker. if you want to get rid of the sudo you need to add the user to the docker group and restart the docker service. If you want to get a bit more familiar with Docker you can check my video Docker basics in less than 10 minutes.
sudo apt-get install docker
sudo gpasswd -a <user> docker
sudo dockerd
After this is done you need to create a network where the AdGuard container is reachable from your router to a static IP address on your PI.
docker network create -d macvlan -o parent=eth0 \
--subnet=192.168.0.0/16 \
--ip-range=192.168.0.4/25 \
--gateway=192.168.0.1 \
lanBefore you just copy and past the listing above, you need to change the IP addresses to the ones your network is using. for all the installation, this is the most difficult part. As first the network type we create is macvlan bounded to the network card eth0. eth0 is for the PI4 standard. The name of the network we gonna to create is lan. To get the correct values for subnet, ip-range and gateway you need to connect to your router administration.
To understand the settings, we need a bit of theory. But don’t worry is not much and not that complicated. Mostly your router is reachable by an IP address similar to 192.168.0.1 – this is a static address and something equal we want to have for AdGuard on the PI. The PI itself is in my case reachable by 192.168.0.12, but this IP we can not use for AdGuard. The plan is to make the AdGuard web interface accessible by the IP 192.168.0.2. OK let’s do it. First we have to switch on our router administration to the point DHCP settings. In the Screenshot you can see my configuration. After you changed your adaptions don’t forget to reboot the router to take affect of the changes.
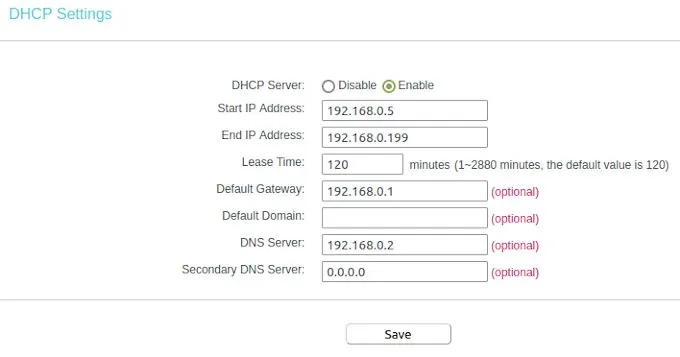
I configured the dynamic IP range between 192.168.0.5 to 192.168.0.199. This means the first 4 numbers before 192.168.0.5 can be used to connect devices with a static IP. Here we see also the entry for our default gateway. Whit this information we are able to return to our network configuration. the subnet IP is like the gateway just the digits in the last IP segment have to change to a zero. The IP range we had limited to the 192.168.0.4 because is one number less than where we configured where the dynamic IP range started. That’s all we need to know to create our network in Docker on the PI.
Now we need to create in the home directory of our PI the places were AdGuard can store the configuration and the data. This you can do with a simple command in the ssh shell.
mkdir /home/ubuntu/adguard/work
mkdir /home/ubuntu/adguard/confAs next we have to pull the official AdGuard container from the Docker Hub and create a image. This we do by just one command.
docker run -d --name adguard --restart=always \
-p 3000:3000/tcp --net lan --ip 192.168.0.2 \
-p 53/tcp -p 53/udp -p 67/udp -p 68/udp -p 80/tcp \
-p 784/udp -p 8853/udp \
-p 443/tcp -p 443/udp \
-p 853/tcp -p 853/udp \
-p 5443/tcp -p 5443/udp \
-v /home/ubuntu/adguard/work:/opt/adguardhome/work \
-v /home/ubuntu/adguard/conf:/opt/adguardhome/conf \
adguard/adguardhome:latestThe container we create is called adguard and we connect this image to our own created network lan with the IP address 192.168.0.2. Then we have to open a lot of ports AdGuard need to do the job. And finally we connect the two volumes for the configuration and data directory inside of the container. As restart policy we set the container to always, this secure that the service is up again after the server or docker was rebooted.
After the execution of the docker run command you can reach the AdGuard configuration page with your browser under: http://192.168.0.2:3000. Here you can create the primary setup to create a login user and so on. After the first setup you can reach the web interface by http://192.168.0.2.
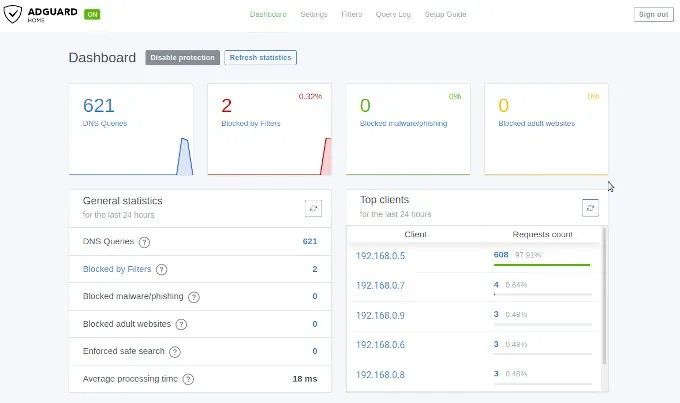
The IP address 192.168.0.2 you need now to past into the field DNS Server for the DHCP settings. Save the entries and restart your router to get all changes working. When the router is up open on your browser any web page from the internet to see that everything is working fine. After this you can login into the AdGuard web console to see if there appearing data on the dashboard. If this is happened then you are don e and your home or office network is protected.
If you think this article was helpful and you like it, you can support my work by sharing this post or leave a like. If you have some suggestions feel free to drop a comment.