The paradigms now established in software engineering, such as Test-Driven Development (TDD) and Behavior-Driven Development (BDD), along with correspondingly easy-to-use tools, have opened up a new, pragmatic perspective on the topic of software testing. Automated tests are a crucial factor in commercial software projects. Therefore, in this context, a successful testing strategy is one in which test execution proceeds without human intervention.
Test automation forms the basis for achieving stability and reducing risk in critical tasks. Such critical tasks include, in particular, refactoring, maintenance, and bug fixes. All these activities share one common goal: preventing new errors from creeping into the code.
In his 1972 article “The Humble Programmer,” Edsger W. Dijkstra stated the following:
„Program testing can be a very effective way to show the presence of bugs, but is hopelessly inadequate for showing their absence.“
Therefore, simply automating test execution is not sufficient to ensure that changes to the codebase do not have unintended effects on existing functionality. For this reason, the quality of the test cases must be evaluated. Proven tools already exist for this purpose.
Before we delve deeper into the topic, let’s first consider what automated testing actually means. This question is quite easy to answer. Almost every programming language has a corresponding unit test framework. Unit tests call a method with various parameters and compare the return value with an expected value. If both values match, the test is considered passed. Additionally, it can also be checked whether an exception was thrown.
If a method has no return value or does not throw an error, it cannot be tested directly. Methods marked as private, or inner classes, are also not easily testable, as they cannot be called directly. These must be tested indirectly through public methods that call the ‘hidden’ methods.
When dealing with methods marked as private, it is not an option to access and test the functionality they represent using techniques such as the Reflection API. We must be aware that such methods are often also used to encapsulate code fragments to avoid duplication.
Therefore, to effectively write automated tests, it is necessary to follow a certain coding style. The preceding Listing 1 simply demonstrates what testable code can look like.
Since developers also write the corresponding component tests for their own implementations, the problem of difficult-to-test code is largely eliminated in projects that follow a test-driven approach. The motivation to test now lies with the developer, as this paradigm allows them to determine whether their implementation behaves as intended. However, we must ask ourselves: Is that all we need to do to develop good and stable software?
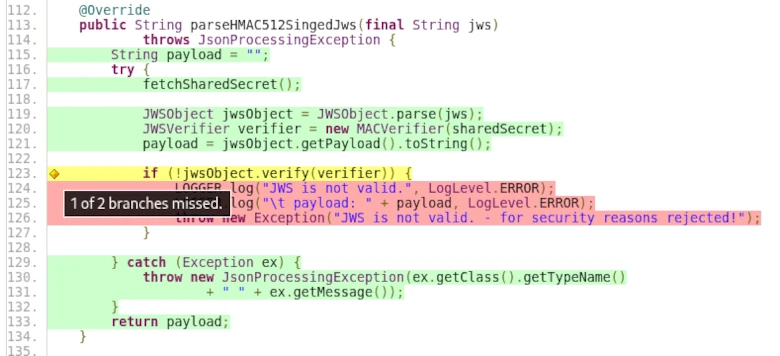
As we might expect with such questions, the answer is no. An essential tool for evaluating the quality of tests is achieving the highest possible test coverage. A distinction is made between branch and line coverage. To illustrate the difference more clearly, let’s briefly look at the pseudocode in Listing 2.
Our goal is to execute every line of code if possible. To achieve this, we already need two separate test cases: one for entering the IF branch and one for entering the ELSE branch. However, to achieve 100% branch coverage, we must cover all variations of the IF branch. In this example, that means one test that makes Expression A true, and another test that makes Expression B true. This results in a total of three different test cases.
The screenshot from the TP-CORE project shows what such test coverage can look like in ‘real-world’ projects.
Of course, this example is very simple, and in real life, there are often constructs where, despite all efforts, it’s impossible to reach all lines or branches. Exceptions from third-party libraries that need to be caught but cannot be triggered under normal circumstances are a typical example.
For this reason, while we strive to achieve the highest possible test coverage and naturally aim for 100%, there are many cases where this is not feasible. However, a test coverage of 90% is quite achievable. The industry standard for commercial projects is 85% test coverage. Based on these observations, we can say that test coverage correlates with the testability of an application. This means that test coverage is a suitable measure of testability.
However, it must also be acknowledged that the test coverage metric has its limitations. Regular expressions and annotations for data validation are just a few simple examples of where test coverage alone is not a sufficient indicator of quality.
Without going too much into the implementation details, let’s imagine we had to write a regular expression to validate input against a correct 24-hour time format. If we don’t keep the correct interval in mind, our regular expression might be incorrect. The correct interval for the 24-hour format is 00:00 – 23:59. Examples of invalid values are 24:00 or 23:60. If we are unaware of this fact, errors can remain hidden in our application despite test cases, only to surface and cause problems when the application is actually used.
„… In a few cases, participants were unable to think of alternative solutions …“
The question here was whether error correction always represents the optimal solution. Beyond that, it would be necessary to clarify what constitutes an optimal solution in commercial software development projects. The statement that there are cases in which developers only know or understand one way of doing things is very illustrative. This is also reflected in our example of regular expressions (RegEx). Software development is a thought process that cannot be accelerated. Our thinking is determined by our imagination, which in turn is influenced by our experience.
This already shows us another example of sources of errors in test cases. A classic example is incorrect comparisons in collections, such as comparing arrays. The problem we are dealing with here is how variables are accessed: call by value or call by reference. With arrays, access is via call by reference, i.e., directly to the memory location. If you now assign an array to a new variable and compare both variables, they will always be the same because you are comparing the array with itself. This is an example of a test case that is essentially meaningless. However, if the implementation is correct, this faulty test case will never cause any problems.
This realization shows us that blindly striving for complete test coverage is not conducive to quality. Of course, it’s understandable that this metric is highly valued by management. However, we have also been able to demonstrate that one cannot rely on it alone. We therefore see that there is also a need for code inspections and refactorings for test cases. Since it’s impossible to read and understand all the code from beginning to end due to time constraints, it’s important to focus on problematic areas. But how can we find these problem areas? A relatively new technique helps us here. The theoretical work on this is already somewhat older; it just took a while for corresponding implementations to become available.
The PHP programming language has been the first choice for many developers in the field of web applications for decades. Since the introduction of object-oriented language features with version 5, PHP has come of age. Large projects can now be implemented in a clean and, above all, maintainable architecture. A striking difference between commercial software development and a hobbyist who has assembled and maintains a club’s website is the automated verification that the application adheres to specified specifications. This brings us into the realm of automated software testing.
A key principle of automated software testing is that it verifies, without additional interaction, that the application exhibits a predetermined behavior. Software tests cannot guarantee that an application is error-free, but they do increase quality and reduce the number of potential errors. The most important aspect of automated software testing is that behavior already defined in tests can be quickly verified at any time. This ensures that if developers extend an existing function or optimize its execution speed, the existing functionality is not affected. In short, we have a powerful tool for ensuring that we haven’t broken anything in our code without having to laboriously click through all the options manually each time.
To be fair, it’s also worth mentioning that the automated tests have to be developed, which initially takes time. However, this ‘supposed’ extra effort quickly pays off once the test cases are run multiple times to ensure that the status quo hasn’t changed. Of course, the created test cases also have to be maintained.
If, for example, an error is detected, you first write a test case that replicates the error. The repair is then successfully completed if the test case(s) pass. However, changes in the behavior of existing functionality always require corresponding adaptation of the associated tests. This concept of writing tests in parallel to implement the function is feasible in many programming languages and is called test-driven development. From my own experience, I recommend taking a test-driven approach even for relatively small projects. Small projects often don’t have the complexity of large applications, which also require some testing skills. In small projects, however, you have the opportunity to develop your skills within a manageable framework.
Test-driven software development is nothing new in PHP either. Sebastian Bergmann’s unit testing framework PHPUnit has been around since 2001. The PEST testing framework, released around 2021, builds on PHPUnit and extends it with a multitude of new features. PEST stands for PHP Elegant Testing and defines itself as a next-generation tool. Since many agencies, especially smaller ones, that develop their software in PHP generally limit themselves to manual testing, I would like to use this short article to demonstrate how easy it is to use PEST. Of course, there is a wealth of literature on the topic of test-driven software development, which focuses on how to optimally organize tests in a project. This knowledge is ideal for developers who have already taken their first steps with testing frameworks. These books teach you how to develop independent, low-maintenance, and high-performance tests with as little effort as possible. However, to get to this point, you first have to overcome the initial hurdle: installing the entire environment.
A typical environment for self-developed web projects is the Laravel framework. When creating a new Laravel web project, you can choose between PHPUnit and PEST. Laravel takes care of all the necessary details. A functioning PHP environment is required as a prerequisite. This can be a Docker container, a native installation, or the XAMPP server environment from Apache Friends. For our short example, I’ll use the PHP CLI on Debian Linux.
After executing the command in the console, you can test the installation success using the php -v command. The next step is to use a package manager to deploy other PHP libraries for our application. Composer is one such package manager. It can also be quickly deployed to the system with just a few instructions.
This downloads the current version of the composer.phar file to the current directory in which the command is executed. The correct hash is also automatically checked. To make Composer globally available via the command line, you can either include the path in the path variable or link composer.phar to a directory whose path is already integrated into Bash. I prefer the latter option and achieve this with:
ln -d composer.phar $HOME/.local/bin/composer
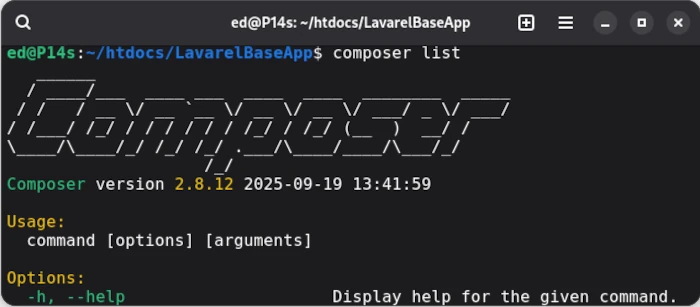
If everything was executed correctly, composer list should now display the version, including the available commands. If this is the case, we can install the Lavarel installer globally in the Composer repository.
php composer global require laravel/installer
To install Lavarel via Bash, the path variable COMPOSER_HOME must be set. To find out where Composer created the repository, simply use the command composer config -g home. The resulting path, which in my case is /home/ed/.config/composer, is then bound to the variable COMPOSER_HOME. We can now run
php $COMPOSER_HOME/vendor/bin/laravel new MyApp
in an empty directory to create a new Laravel project. The corresponding console output looks like this:
ed@P14s:~/Downloads/test$ php $COMPOSER_HOME/vendor/bin/laravel newMyApp _ _|||||| __ _ _ __ __ ___ _____||||/ _` | __/ _` \ \ // _ \ |||___|(_||||(_||\ V / __/||______\__,_|_| \__,_| \_/ \___|_| ┌ Which starter kit would you like to install? ────────────────┐ │ None │ └──────────────────────────────────────────────────────────────┘ ┌ Which testing framework do you prefer? ──────────────────────┐ │ Pest │ └──────────────────────────────────────────────────────────────┘Creating a "laravel/laravel" project at "./MyApp"Installing laravel/laravel (v12.4.0)- Installing laravel/laravel (v12.4.0): Extracting archiveCreated project in /home/ed/Downloads/test/MyAppLoading composer repositories with package information
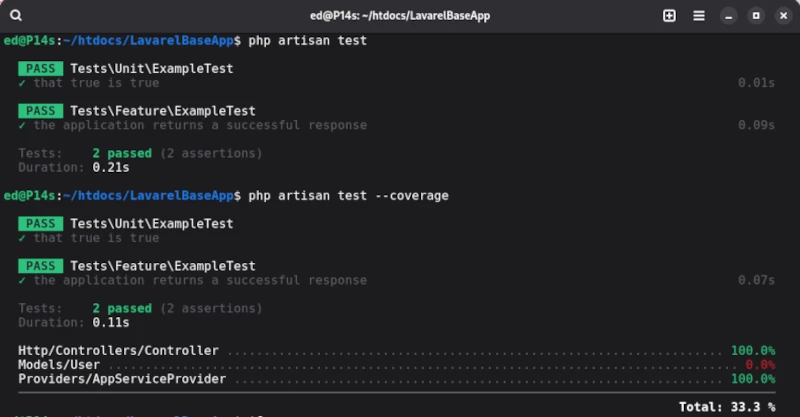
The directory structure created in this way contains the tests folder, where the test cases are stored, and the phpunit.xml file, which contains the test configuration. Laravel defines two test suites: Unit and Feature, each of which already contains a demo test. To run the two demo test cases, we use the artisan command-line tool [1] provided by Laravel. To run the tests, simply enter the php artisan test command in the root directory.
In order to assess the quality of the test cases, we need to determine the corresponding test coverage. We also obtain the coverage using artisan with the test statement, which is supplemented by the --coverage parameter.
php artisan test --coverage
The output for the demo test cases provided by Laravel is as follows:
Unfortunately, artisan’s capabilities for executing test cases are very limited. To utilize PEST’s full functionality, the PEST executor should be used right from the start.
php ./vendor/bin/pest -h
The PEST executor can be found in the vendor/bin/pest directory, and the -h parameter displays help. In addition to this detail, we’ll focus on the tests folder, which we already mentioned. In the initial step, two test suites are preconfigured via the phpunit.xml file. The test files themselves should end with the suffix Test, as in the ExampleTest.php example.
Compared to other test suites, PEST attempts to support as many concepts of automated test execution as possible. To maintain clarity, each test level should be stored in its own test suite. In addition to classic unit tests, browser tests, stress tests, architecture tests, and even the newly emerging mutation testing are supported. Of course, this article can’t cover all aspects of PEST, and there are now many high-quality tutorials available for writing classic unit tests in PEST. Therefore, I’ll limit myself to an overview and a few less common concepts.
Architecture test
The purpose of architectural tests is to provide a simple way to verify whether developers are adhering to the specifications. This includes, among other things, ensuring that classes representing data models are located in a specified directory and may only be accessed via specialized classes.
This form of testing is something new. The purpose of the exercise is to create so-called mutants by making changes, for example, to the conditions of the original implementation. If the tests assigned to the mutants continue to run correctly instead of failing, this can be a strong indication that the test cases may be faulty and lack meaningfulness.
Original: if(TRUE) → Mutant: if(FALSE)
Stress-Test
Another term for stress tests is penetration testing, which focuses specifically on the performance of an application. This allows you to ensure that the web app, for example, can handle a defined number of accesses.
Of course, there are many other helpful features available. For example, you can group tests and then run the groups individually.
For those who don’t work with the Lavarel framework but still want to test in PHP with PEST, you can also integrate the PEST framework into your application. All you need to do is define PEST as a corresponding development dependency in the Composer project configuration. Then, you can initiate the initial test setup in the project’s root directory.
php ./vendor/bin/pest --init
As we’ve seen, the options briefly presented here alone are very powerful. The official PEST documentation is also very detailed and should generally be your first port of call. In this article, I focused primarily on minimizing the entry barriers for test-driven development in PHP. PHP now also offers a wealth of options for implementing commercial software projects very efficiently and reliably.
When I started test-driven programming over 10 years ago, I was aware of many different concepts in theory. But this approach of first writing test cases and then implementing them was somehow not the way I got on well with. To be honest, this is still the case today. So I found an adaptation of Kent Beck’s TDD paradigm that works for me. But first things first. Perhaps my approach is also quite helpful for one or the other.
I originally come from environments for highly scalable web applications to which all the great theories from the university cannot be easily applied in practice. The main reason for this is the high complexity of such applications. On the one hand, various additional systems such as in-memory cache, database and identity and access management (IAM) are part of the overall system. On the other hand, many modern frameworks such as OR Mapper hide complexity behind different access layers. As developers, we need to master all of these things. That is why there are robust, and practice proven solutions that are well known but rarely used. Kent Beck is one of the most important voices for the practical use of automated software testing.
If we want to get involved with the concept of TDD, it is important not to put too much weight on every character. Not everything is set in stone. What is important is the result at the end of the day. For this reason, it is essential to keep the objective of all efforts in mind in order to achieve personal added value. So let’s start by looking at what we want to achieve in the first place.
Success proves us right
When I first started out as a developer, I needed constant feedback on whether what I was putting together was really working. I mostly generated this feedback by spreading during my implementation countless console outputs on the one hand and on the other hand I always tried to integrate everything into a user interface and then ‘click through’ manually. Basically a very cumbersome test setup, which then has to be removed again at the end. If later bug fixes had to be made, the whole procedure started all over again. Everything was somehow unsatisfactory and far removed from a productive way of working. Somehow this had to be improved without having to reinvent yourself every time.
Finally, my original approach has exactly two significant weaknesses. The most obvious one is the commenting in and out of debug information via the console.
But the second point is much more serious. Because all the knowledge acquired about this particular implementation is not preserved. It is therefore in danger of fading over time and ultimately being lost. However, such specialized knowledge is extremely valuable for many subsequent process steps in software development. By this I explicitly mean the topic of quality. Refactoring, code reviews, bug fixes and change requests are just some of the possible examples where in-depth detailed knowledge is required.
For me personally, there is also the fact that monotonously repetitive work quickly tires me out and I would like to avoid it. Clicking through an application again and again with the same test procedure is a far away from what constitutes a fulfilling working day for me. I want to discover new things. But I can only do that if I’m not trapped in the past.
But they dare to do something
But before I go into how I have spiced up my day-to-day development work with TDD, I have to say a few words about responsibility and courage. In conversations others told me frequently that I am right, but they can’t take action to follow my recommendations because the project manager or some other superior doesn’t give a green light.
Such an attitude is extremely unprofessional in my eyes. I don’t ask an marketing manager which algorithm terminate as best. He simply has no idea what I’m talking about, because it is not his area of responsibility. A project manager who speaks out against test-driven work in the development team has also missed his job. Nowadays, test frameworks are so well integrated into the build environment that even inexperienced people can prepare for TDD in a matter of moments. It is therefore not necessary to make a big deal of the project. I can promise that even the first attempts will not take any longer than with the original approach. On the contrary, there will be a noticeable increase in productivity very quickly.
The first stage of evolution
As already mentioned, logging is a central part of test-driven development for me. Whenever it makes sense, I try to output the status of objects or variables on the console. If we use the means provided by the programming language used for this, this means that we must at least comment out this system output after the work has been done and comment it in again later when searching for errors. A redundant and error-prone procedure.
If, on the other hand, we use a logging framework right from the start, we can confidently leave the debug information in the code and deactivate it later in productive operation via the setting log level.
I also use logging as a tracer. This means that each constructor of a class writes a corresponding log entry by the log level info while it is being called. This allows me to see the order in which objects are instantiated. From time to time I have also become aware of the excessively frequent instantiation of a single object. This is helpful for performance and memory optimization measures.
I log errors that are thrown during exception handling as errors or warnings, depending on the context. This is a very helpful tool for tracking down errors later in operation.
So if I have a database access, I write a log output in the log level debug as the associated SQL was assembled. If this SQL leads to an exception because it contains an error, this exception is written with the log level error. If, on the other hand, a simple search query with correct SQL syntax takes place and the result set is empty, this event is classified as either Debug or Warning, depending on requirements. For example, if it is a login request with an incorrect user name or password, I tend to opt for the Log Level Warning, as this may contain security-related aspects during operation.
In the overall context, I tend to configure the logging for the test case execution very loquaciously and limit myself to a pure console output. During operation, the logging information is written to a log file.
The chicken or egg
Once we have laid the foundations for an additional feedback loop with logging, the next step is to decide what to do next. As already mentioned, I find it very difficult to first write a test case and then find a suitable implementation for it. Many other developers who start with TDD also face this problem.
One thing I can already anticipate is the problem of making sure that an implementation is testable. Once I have the test case, I immediately realize whether what I am creating is really testable. Experienced TDD developers have quickly learned in flesh and blood how testable code should look like. The most important point here is that methods should always have a return value that is preferably not null. This can be achieved, for example, by returning an empty list instead of null.
The requirement to have a return value is due to the way unit test frameworks work. A test case compares the return value of a method with an expected value. The test assertion has different characteristics and can therefore be: equal, unequal, true or false. Of course, there are also different variations here. For example, it may be possible to test methods that have no return value by using exceptions. All these details become clear in a very short time during using TDD. So that everyone can get started immediately without lengthy preparations.
When reading the book Test Driven Development by Example by Kent Beck, we also quickly find an explanation as to why the test cases should be written first. It is a psychological factor. It should help us to cope better with the usual stress that arises in the project. It creates a mental state in us about the status and progress of the current work. It guides us in an iterative process to expand and improve the existing solution step by step via the various test cases.
For those who, like me, have no concrete idea of the final result at the start of an implementation, this approach is difficult to implement. The intended effect of relaxation turns into a negative one. As we humans are all different, we have to find out what makes us tick in order to achieve the best possible result. It’s the same with learning strategies. Some people process information better visually, others more haptically and still others extract everything important from spoken words. So let’s try not to bend ourselves against our nature in order to produce mediocre or poor results.
Drawing the first line
A topic only becomes clear to me while I’m working on it. So I try my hand at an implementation until I need some initial feedback. That’s when I write the first test. This approach automatically gives rise to questions, each of which is worth its own test case. Can I find all available results? What happens if the result set is empty? How can the result set be narrowed down? These are all points that can be noted on a piece of paper and ticked off step by step. I had the idea of writing down a to-do list on a piece of paper a long time before I rode about it in the book by Kent Beck mentioned above. It helps me to preserve quick thoughts without being distracted from what I am currently doing. It also gives me a sense of accomplishment at the end of the day.
Since I don’t wait until I’ve implemented everything to write the first test, this approach also results in an iterative approach. I also notice very quickly if my design is not sufficiently testable, as I receive immediate feedback. This results in my own interpretation of TDD, which is characterized by the permanent change between implementing and writing tests.
As a result of my early TDD attempts, I already noticed a speeding up of my working methods in the first week. I also became more confident. But the way I program also started to change very early on. I have noticed that my code has become more compact and robust. Things that had only become apparent over time emerged during activities such as refactoring and extensions. Failed test cases have saved me from unpleasant surprises.
Start without overzealousness
If we decide to use TDD in an existing project, it is a bad idea to start writing test cases for existing functionality. Apart from the time that has to be planned for this, the result will not fulfill the high expectations.
One of the problems is that you now have to familiarize yourself with each functionality and this is very time-consuming. The quality of the resulting test cases is also inadequate. The problem also arises from missing experience. When the experience is first built up, the quality of the test cases is also not quite optimal and code may also have to be rewritten to make it testable. This creates a lot of risks that are problematic for day-to-day project business.
A proven procedure for introducing TDD is simply to use it for the current implementation you are currently working on. The current state of the current problem is documented by automated tests. Since you are already in familiar territory, you do not have to familiarize yourself with a new topic, so you can concentrate fully on formulating meaningful tests. Apart from the fact that you take responsibility for other people’s work without being asked when you implement test cases for them.
Existing functionality is only supplemented with test cases when errors are corrected. For the correction, you have to deal with the implementation details anyway, so that there is sufficient knowledge here of how a functionality should behave. The resulting tests also document the correction and ensure that the behavior does not change in the future during optimization work.
If you follow this procedure in a disciplined manner, you will not lose yourself in so-called hectic activity, which in turn is the opposite of productivity. In addition, you quickly acquire knowledge of how effective and meaningful tests can be implemented. Only when sufficient experience has been gained and possibly extensive refactoring are planned you can consider how test coverage can be gradually improved for the entire project.
Quality level
Just because test cases are available does not mean that they are meaningful. Nor does a high test coverage prove that a program is error-free. A high test coverage only ensures that a program behaves within the scope of the tests.
So how can you ensure that the existing tests are really an enrichment and have good informative value? The first and, in my opinion, most important point is to keep test cases as short as possible. In concrete terms, this means that a test only answers one explicit question, e.g. What happens if the result set is empty? The test method is then named according to the question. The added value of this approach arises when the test case fails. If the test is very short, it is often possible to get to know from the test method what the problem is without having to spend a lot of time familiarizing yourself with a test case.
Another important point in the TDD procedure is to check the test coverage for lines of code as well as for branches for my implemented functionality. If, for example, I cannot simulate the occurrence of a single condition in an IF statement, this condition can be deleted without hesitation.
Of course, you also have enough dependencies on external libraries in your own project. Now it can happen that a method from this library throws an exception that cannot be simulated by any test case. This is exactly the reason why you should strive for high test coverage but not despair if 100% cannot be achieved. Especially when introducing TDD, a good measure of test coverage greater than 85% is common. As the development team gains experience, this value can be increased up to 95%.
Finally, however, it should be noted that you should not get too carried away. Because it can quickly become excessive and then all the advantages gained are quickly lost. The point is that you don’t write tests that in turn test tests. This is where the cat bites its own tail. This also applies to third-party libraries. No tests are written for these either. Kent Beck is very clear about this: “Even if there are good reasons to distrust other people’s code, don’t test it. External code requires more of your own implementation logic”.
Lessons learned
The lessons that can be learned when trying to achieve the highest possible test coverage are the ones that will have an impact on future programming. The code becomes more compact and robust.
Productivity increases simply due to the fact that error-prone and monotonous work is avoided through automation. There are no additional work steps because old habits are replaced by newer, better ones.
One effect that I have observed time and again is that when individual members of the team have opted for TDD, their successes are quickly recognized. Within a few weeks, the entire team had developed TDD. Each individual according to their own abilities. Some with Test First, others as I have just described. In the end, it’s the result that counts and it was uniformly excellent. When the work is easier and at the end of the day each individual has the feeling that they have also achieved something, this gives the team an enormous motivation boost, which gives the project and the working atmosphere a huge boost. So what are you waiting for? Try it out for yourself right away.
In the software industry, it is a common agreement that the code base has sufficient test automation. Because this is necessary for a stable DevOps process and secure refactoring. But the reality is completely different. Almost every project I joined during my career didn’t have any lines of test code. If we think about the fact that after more than 40 years, 80% of all commercial software projects fail, we should not be surprised. But this doesn’t have to be like this. In this talk, we demonstrate how easy it is to introduce, even in huge projects, a test-driven approach. The technical setup is a standard Java project with Apache Maven and JUnit 5.
If you whish to discover a way how to turn negative vibes between testers and developers into something positive – here is a great solution for that. The thing I like to introduce is quite old but even today in our brave new DevOps world an evergreen.
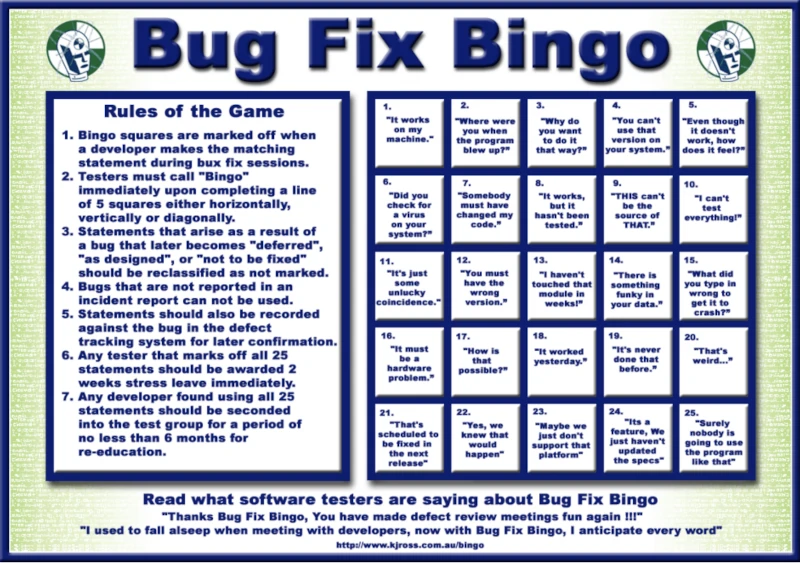
Many years ago in the world wide web I stumbled over a PDF called Bug Fix Bingo. A nice funny game for IT professionals. This little funny game originally was invent by the software testing firm K. J. Ross & Associates. Unfortunately the original site disappeared long ago so I decided to conserve this great idea in this blog post.
I can recommend this game also for folks they are not so deep into testing, but have to participate in a lot of IT meetings. Just print the file, bring some copies to your next meeting and enjoy whats gonna happen. I did it several times. Beside the fun we had it changed something. So let’s have a look into the concept and rules.
Bug Fix Bingo is based on a traditional Bingo just with a few adaptions. Everyone can join the game easily without a big preparation, because its really simple. Instead of numbers the Bingo uses statements from developers in defect review meetings to mark off squares.
Rules:
Bingo squares are marked off when a developer makes the matching statement during bug fix sessions.
Testers must call “Bingo” immediately upon completing a line of 5 squares either horizontally, vertically or diagonally.
Statements that arise as result of a bug that later becomes “deferred”, “as designed”, or “not to fixed” should be classified as not marked.
Bugs that are not reported in an incident report can not be used.
Statements should also be recorded against the bug in the defect tracking system for later confirmation.
Any tester marks off all 25 statements should be awarded 2 weeks stress leave immediately.
Any developer found using all 25 statements should be seconded into the test group for a period of no less than 6 months for re-education.
“It works on my machine.”
“Where were you when the program blew up?”
“Why do you want to do it in that way?”
“You can’t use that version on your system.”
“Even thought it doesn’t work, how does it feel.”
“Did you check for a virus on your system?”
“Somebody must have changed my code.”
“It works, but it hasn’t been tested.”
“THIS can’t be the source of that module in weeks!”
“I can’t test anything!”
“It’s just some unlucky coincidence.”
“You must have the wrong version.”
“I haven’t touched that module in weeks.”
“There is something funky in your data.”
“What did you type in wrong to get it to crash?”
“It must be a hardware problem.”
“How is that possible?”
“It worked yesterday.”
“It’s never done that before.”
“That’s weird …”
“That’s scheduled to be fixed in the next release.”
“Yes, we knew that would happen.”
“Maybe we just don’t support that platform.”
“It’s a feature. We just haven’t updated the specs.”
“Surly nobody is going to use the program like that.”
The BuxFix Bingo Gamecard
Incidentally, developers have a game like this too. They score points every time a QA person tries to raise a defect on functionality that is working as specified.
The BuxFix Bingo Gamecard
Cookie Consent
[EN] We use cookies to improve your experience on our site. By using our site, you consent to cookies.
[DE] Wir verwenden Cookies, um Ihre Erfahrungen auf unserer Website zu verbessern. Durch die Nutzung unserer Website stimmen Sie Cookies zu.
This website uses cookies
Websites store cookies to enhance functionality and personalise your experience. You can manage your preferences, but blocking some cookies may impact site performance and services.
Essential cookies enable basic functions and are necessary for the proper function of the website.
Name
Description
Duration
Cookie Preferences
This cookie is used to store the user's cookie consent preferences.
30 days
These cookies are needed for adding comments on this website.
Name
Description
Duration
comment_author
Used to track the user across multiple sessions.
Session
comment_author_email
Used to track the user across multiple sessions.
Session
comment_author_url
Used to track the user across multiple sessions.
Session
These cookies are used for managing login functionality on this website.
Name
Description
Duration
wordpress_logged_in
Used to store logged-in users.
Persistent
wordpress_sec
Used to track the user across multiple sessions.
15 days
wordpress_test_cookie
Used to determine if cookies are enabled.
Session
Statistics cookies collect information anonymously. This information helps us understand how visitors use our website.
Matomo is an open-source web analytics platform that provides detailed insights into website traffic and user behavior.