The Future of Build Management

It’s not just high-level languages, which need to convert source code into machine code to make it executable, that require build tools. These tools are now also available for modern scripting languages ​​like Python, Ruby, and PHP, as their scope of responsibility continues to expand. Looking back at the beginnings of this tool category, one inevitably encounters make, the first official representative of what we now call a build tool. Make’s main task was to generate machine code and package the files into a library or executable. Therefore, build tools can be considered automation tools. It’s logical that they also take over many other recurring tasks that arise in a developer’s daily work. For example, one of the most important innovations responsible for Maven’s success was the management of dependencies on other program libraries.

Another class of automation tools that has almost disappeared is the installer. Products like Inno Setup and Wise Installer were used to automate the installation process for desktop applications. These installation routines are a special form of deployment. The deployment process, in turn, depends on various factors. First and foremost, the operating system used is, of course, a crucial criterion. But the type of application also has a significant influence. Is it, for example, a web application that requires a defined runtime environment (server)? We can already see here that many of the questions being asked now fall under the umbrella of DevOps.

As a developer, it’s no longer enough to simply know how to write program code and implement functions. Anyone wanting to build a web application must first get the corresponding server running on which the application will execute. Fortunately, there are now many solutions that significantly simplify the provisioning of a working runtime. But especially for beginners, it’s not always easy to grasp the whole topic. I still remember questions in relevant forums about downloading Java Enterprise, but only finding that the application server was included.

Where automation solutions were lacking in the early 2000s, the challenge today is choosing the right tool. There’s an analogy here from the Java universe. When the Gradle build tool appeared on the market, many projects migrated from Maven to Gradle. The argument was that it offered greater flexibility. Often, the ability to define orchestrated builds was needed—that is, the sequence in which subprojects are created. Instead of acknowledging that this requirement represented an architectural shortcoming and addressing it, complex and difficult-to-manage build logic was built in Gradle. This, in turn, made customizations difficult to implement, and many projects were migrated back to Maven.

From DevOps automations, so-called pipelines have become established. Pipelines can also be understood as processes, and these processes can, in turn, be standardized. The best example of a standardized process is the build lifecycle defined in Maven, also known as the default lifecycle. This process defines 23 sequential steps, which, broadly speaking, perform the following tasks:

  • Resolving and deploying dependencies
  • Compiling the source code
  • Compiling and running unit tests
  • Packaging the files into a library or application
  • Deploying the artifact locally for use in other local development projects
  • Running integration tests
  • Deploying the artifacts to a remote repository server.

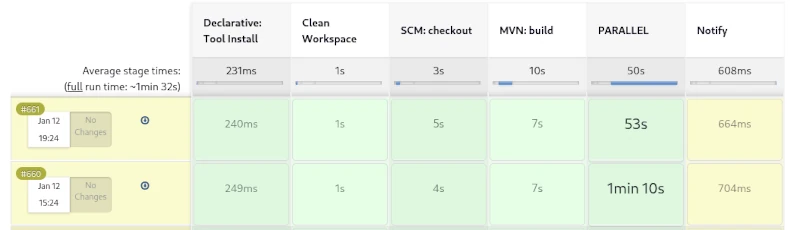
This process has proven highly effective in countless Java projects over the years. However, if you run this process as a pipeline on a CI server like Jenkins, you won’t see much. The individual steps of the build lifecycle are interdependent and cannot be triggered individually. It’s only possible to exit the lifecycle prematurely. For example, after packaging, you can skip the subsequent steps of local deployment and running the integration tests.

A weakness of the build process described here becomes apparent when creating web applications. Web frontends usually contain CSS and JavaScript code, which is also automatically optimized. To convert variables defined in SCSS into correct CSS, a SASS preprocessor must be used. Furthermore, it is very useful to compress CSS and JavaScript files as much as possible. This obfuscation process optimizes the loading times of web applications. However, there are already countless libraries for CSS and JavaScript that can be managed with the NPM tool. NPM, in turn, provides so-called development libraries like Grunt, which enable CSS processing and optimization.

We can see how complex the build process of modern applications can become. Compilation is only a small part of it. An important feature of modern build tools is the optimization of the build process. An established solution for this is creating incremental builds. This is a form of caching where only changed files are compiled or processed.

Jenkins Pipelines

But what needs to be done during a release? This process is only needed once an implementation phase is complete, to prepare the artifact for distribution. While it’s possible to include all the steps involved in a release in the build process, this would lead to longer build times. Longer local build times disrupt the developer’s workflow, making it more efficient to define a separate process for this.

An important condition for a release is that all used libraries must also be in their final release versions. If this isn’t the case, it cannot be guaranteed that subsequent releases of this version are identical. Furthermore, all test cases must run correctly, and a failure will abort the process. Additionally, a corresponding revision tag should be set in the source control repository. The finished artifacts must be signed, and API documentation must be created. Of course, the rules described here are just a small selection, and some of the tasks can even be parallelized. By using sophisticated caching, creating a release can be accomplished quickly, even for large monoliths.

Furthermore, by utilizing sophisticated caching, creating a release can be accomplished quickly, even for large monoliths. For Maven, for example, no complete release process, similar to the build process, has been defined. Instead, the community has developed a special plugin that allows for the semi-automation of simple tasks that arise during a release.

If we take a closer look at the topic of documentation and reporting, we find ample opportunities to describe a complete process. Creating API documentation would be just one minor aspect. Far more compelling about standardized reporting are the various code inspections, some of which can even be performed in parallel.

Of course, deployment is also essential. Due to the diversity of potential target environments, a different strategy is appropriate here. One possible approach would be broad support for configuration tools like Ansible, Chef, and Puppet. Virtualization technologies such as Docker and LXC containers are also standard in the age of cloud computing. The main task of deployment would then be provisioning the target environment and deploying the artifacts from a repository server. A wealth of different deployment templates would significantly simplify this process.

If we consistently extrapolate from these assumptions, we conclude that there can be different types of projects. These would be classic development projects, from which artifacts for libraries and applications are created; test projects, which in turn contain the created artifacts as dependencies; and, of course, deployment projects for providing the infrastructure. The area of ​​automated deployment is also reflected in the concepts of Infrastructure as Code and GitOps, which can be taken up and further developed here.


Cookbook: Maven Source Code Samples

Our Git repository contains an extensive collection of various code examples for Apache Maven projects. Everything is clearly organized by topic.

Back to table of contents: Apache Maven Master Class

  1. Token Replacement
  2. Compiler Warnings
  3. Excecutable JAR Files
  4. Enforcments
  5. Unit & Integration Testing
  6. Multi Module Project (JAR / WAR)
  7. BOM – Bill Of Materials (Dependency Management)
  8. Running ANT Tasks
  9. License Header – Plugin
  10. OWASP
  11. Profiles
  12. Maven Wrapper
  13. Shade Ueber JAR (Plugin)
  14. Java API Documantation (JavaDoc)
  15. Java Sources & Test Case packaging into JARs
  16. Docker
  17. Assemblies
  18. Maven Reporting (site)
  19. Flatten a POM
  20. GPG Signer

Apache Maven Master Class

Apache Maven (Maven for short) was first released on March 30, 2002, as an Apache Top-Level Project under the free Apache 2.0 License. This license also allows free use by companies in a commercial environment without paying license fees.

The word Maven comes from Yiddish and means something like “collector of knowledge.”

Maven is a pure command-line program developed in the Java programming language. It belongs to the category of build tools and is primarily used in Java software development projects. In the official documentation, Maven describes itself as a project management tool, as its functions extend far beyond creating (compiling) binary executable artifacts from source code. Maven can be used to generate quality analyses of program code and API documentation, to name just a few of its diverse applications.

Benefits


  Online Course (yearly subsciption / 365 days)

Maven Master Class
m 3.47 Milli-Bitcoin

Target groups

This online course is suitable for both beginners with no prior knowledge and experienced experts. Each lesson is self-contained and can be individually selected. Extensive supplementary material explains concepts and is supported by numerous references. This allows you to use the Apache Maven Master Class course as a reference. New content is continually being added to the course. If you choose to become an Apache Maven Master Class member, you will also have full access to exclusive content.

Developer

  • Maven Basics
  • Maven on the Command Line
  • IDE Integration
  • Archetypes: Creating Project Structures
  • Test Integration (TDD & BDD) with Maven
  • Test Containers with Maven
  • Multi-Module Projects for Microservices

Build Manager / DevOps

  • Release Management with Maven
  • Deploy to Maven Central
  • Sonatype Nexus Repository Manager
  • Maven Docker Container
  • Creating Docker Images with Maven
  • Encrypted Passwords
  • Process & Build Optimization

Quality Manager

  • Maven Site – The Reporting Engine
  • Determine and evaluate test coverage
  • Static code analysis
  • Review coding style specifications

In-Person Live Training – Build Management with Apache Maven

Index & Abbreviations

[A]

[B]

[C]

[D]

[E]

[F]

[G]

[H]

[I]

[J]

[K]

[L]

[M]

[N]

[O]

[P]

[Q]

[R]

[S]

[T]

[U]

[V]

[W]

[Y]

[Z]

[X]

return to the table of content: Apache Maven Master Class

A

B

C

D

E

F

G

H

I

J

K

L

M

N

O

P

Q

R

S

T

U

V

W

X

Y

Z

[A]

[B]

[C]

[D]

[E]

[F]

[G]

[H]

[I]

[J]

[K]

[L]

[M]

[N]

[O]

[P]

[Q]

[R]

[S]

[T]

[U]

[V]

[W]

[Y]

[Z]

[X]

return to the table of content: Apache Maven Master Class

PDF generation with TP-CORE

PDF is arguably the most important interoperable document format between operating systems and devices such as computers, smartphones, and tablets. The most important characteristic of PDF is the immutability of the documents. Of course, there are limits, and nowadays, pages can easily be removed or added to a PDF document using appropriate programs. However, the content of individual pages cannot be easily modified. Where years ago expensive specialized software such as Adobe Acrobat was required to work with PDFs, many free solutions are now available, even for commercial use. For example, the common office suites support exporting documents as PDFs.

Especially in the business world, PDF is an excellent choice for generating invoices or reports. This article focuses on this topic. I describe how simple PDF documents can be used for invoicing, etc. Complex layouts, such as those used for magazines and journals, are not covered in this article.

Technically, the freely available library openPDF is used. The concept is to generate a PDF from valid HTML code contained in a template. Since we’re working in the Java environment, Velocity is the template engine of choice. TP-CORE utilizes all these dependencies in its PdfRenderer functionality, which is implemented as a facade. This is intended to encapsulate the complexity of PDF generation within the functionality and facilitate library replacement.

While I’m not a PDF generation specialist, I’ve gained considerable experience over the years, particularly with this functionality, in terms of software project maintainability. I even gave a conference presentation on this topic. Many years ago, when I decided to support PDF in TP-CORE, the only available library was iText, which at that time was freely available with version 5. Similar to Linus Torvalds with his original source control management system, I found myself in a similar situation. iText became commercial, and I needed a new solution. Well, I’m not Linus, who can just whip up Git overnight, so after some waiting, I discovered openPDF. OpenPDF is a fork of iText 5. Now I had to adapt my existing code accordingly. This took some time, but thanks to my encapsulation, it was a manageable task. However, during this adaptation process, I discovered problems that were already causing me difficulties in my small environment, so I released TP-CORE version 3.0 to achieve functional stability. Therefore, anyone using TP-CORE version 2.x will still find iText5 as the PDF solution. But that’s enough about the development history. Let’s look at how we can currently generate PDFs with TP-CORE 3.1. Here, too, my main goal is to achieve the highest possible compatibility.

Before we can begin, we need to include TP-CORE as a dependency in our Java project. This example demonstrates the use of Maven as the build tool, but it can easily be switched to Gradle.

<dependency>
    <groupId>io.github.together.modules</groupId>
    <artifactId>core</artifactId>
    <version>3.1.0</version>
</dependency>

To generate an invoice, for example, we need several steps. First, we need an HTML template, which we create using Velocity. The template can, of course, contain placeholders for names and addresses, enabling mail merge and batch processing. The following code demonstrates how to work with this.

<h1>HTML to PDF Velocity Template</h1>

<p>Lorem ipsum dolor sit amet, consetetur sadipscing elitr, sed diam nonumy eirmod tempor invidunt ut labore et dolore magna aliquyam erat, sed diam voluptua. At vero eos et accusam et justo duo dolores et ea rebum. Stet clita kasd gubergren, no sea takimata sanctus est Lorem ipsum dolor sit amet. Lorem ipsum dolor sit amet.</p>

<p>Duis autem vel eum iriure dolor in hendrerit in vulputate velit esse molestie consequat, vel illum dolore eu feugiat nulla facilisis at vero eros et accumsan et iusto odio dignissim qui blandit praesent luptatum zzril delenit augue duis dolore te feugait nulla facilisi. Lorem ipsum dolor sit amet, consectetuer adipiscing elit, sed diam nonummy nibh euismod tincidunt ut laoreet dolore magna aliquam erat volutpat.</p>

<h2>Lists</h2>
<ul>
    <li><b>bold</b></li>
    <li><i>italic</i></li>
    <li><u>underline</u></li>
</ul>

<ol>
    <li>Item</li>
    <li>Item</li>
</ol>

<h2>Table 100%</h2>
<table border="1" style="width: 100%; border: 1px solid black;">
    <tr>
        <td>Property 1</td>
        <td>$prop_01</td>
        <td>Lorem ipsum dolor sit amet,</td>
    </tr>
    <tr>
        <td>Property 2</td>
        <td>$prop_02</td>
        <td>Lorem ipsum dolor sit amet,</td>
    </tr>
    <tr>
        <td>Property 3</td>
        <td>$prop_03</td>
        <td>Lorem ipsum dolor sit amet,</td>
    </tr>
</table>

<img src="path/to/myImage.png" />

<h2>Links</h2>
<p>here we try a simple <a href="https://together-platform.org/tp-core/">link</a></p>

template.vm

The template contains three properties: $prop_01, $prop_02, and $prop_03, which we need to populate with values. We can do this with a simple HashMap, which we insert using the TemplateRenderer, as the following example shows.

Map<String, String> properties = new HashMap<>();
properties.put("prop_01", "value 01");
properties.put("prop_02", "value 02");
properties.put("prop_03", "value 03");

TemplateRenderer templateEngine = new VelocityRenderer();
String directory = Constraints.SYSTEM_USER_HOME_DIR + "/";
String htmlTemplate = templateEngine
                .loadContentByFileResource(directory, "template.vm", properties);

The TemplateRenderer requires three arguments:

  • directory – The full path where the template is located.
  • template – The name of the Velocity template.
  • properties – The HashMap containing the variables to be replaced.

The result is valid HTML code, from which we can now generate the PDF using the PdfRenderer. A special feature is the constant SYSTEM_USER_HOME_DIR, which points to the user directory of the currently logged-in user and handles differences between operating systems such as Linux and Windows.

PdfRenderer pdf = new OpenPdfRenderer();
pdf.setTitle("Title of my own PDF");
pdf.setAuthor("Elmar Dott");
pdf.setSubject("A little description about the PDF document.");
pdf.setKeywords("pdf, html, openPDF");
pdf.renderDocumentFromHtml(directory + "myOwn.pdf", htmlTemplate);

The code for creating the PDF is clear and quite self-explanatory. It’s also possible to hardcode the HTML. Using the template allows for a separation of code and design, which also makes later adjustments flexible.

The default format is A4 with the dimensions size: 21cm 29.7cm; margin: 20mm 20mm; and is defined as inline CSS. This value can be customized using the setFormat(String format); method. The first value represents the width and the second value the height.

The PDF renderer also allows you to delete individual pages from a document.

PdfRenderer pdf = new OpenPdfRenderer();
PdfDocument original = pdf.loadDocument( new File("document.pdf") );
PdfDocument reduced = pdf.removePage(original, 1, 5);
pdf.writeDocument(reduced, "reduced.pdf");

We can see, therefore, that great emphasis was placed on ease of use when implementing the PDF functionality. Nevertheless, there are many ways to create customized PDF documents. This makes the solution of defining the layout via HTML particularly appealing. Despite the PdfRenderer’s relatively limited functionality, Java’s inheritance mechanism makes it very easy to extend the interface and its implementation with custom solutions. This possibility also exists for all other implementations in TP-CORE.

TP-CORE is also free for commercial use and has no restrictions thanks to the Apache 2 license. The source code can be found at https://git.elmar-dott.com and the documentation, including security and test coverage, can be found at https://together-platform.org/tp-core/.