PHP Elegant Testing with Laravel

The PHP programming language has been the first choice for many developers in the field of web applications for decades. Since the introduction of object-oriented language features with version 5, PHP has come of age. Large projects can now be implemented in a clean and, above all, maintainable architecture. A striking difference between commercial software development and a hobbyist who has assembled and maintains a club’s website is the automated verification that the application adheres to specified specifications. This brings us into the realm of automated software testing.

A key principle of automated software testing is that it verifies, without additional interaction, that the application exhibits a predetermined behavior. Software tests cannot guarantee that an application is error-free, but they do increase quality and reduce the number of potential errors. The most important aspect of automated software testing is that behavior already defined in tests can be quickly verified at any time. This ensures that if developers extend an existing function or optimize its execution speed, the existing functionality is not affected. In short, we have a powerful tool for ensuring that we haven’t broken anything in our code without having to laboriously click through all the options manually each time.

To be fair, it’s also worth mentioning that the automated tests have to be developed, which initially takes time. However, this ‘supposed’ extra effort quickly pays off once the test cases are run multiple times to ensure that the status quo hasn’t changed. Of course, the created test cases also have to be maintained.

If, for example, an error is detected, you first write a test case that replicates the error. The repair is then successfully completed if the test case(s) pass. However, changes in the behavior of existing functionality always require corresponding adaptation of the associated tests. This concept of writing tests in parallel to implement the function is feasible in many programming languages ​​and is called test-driven development. From my own experience, I recommend taking a test-driven approach even for relatively small projects. Small projects often don’t have the complexity of large applications, which also require some testing skills. In small projects, however, you have the opportunity to develop your skills within a manageable framework.

Test-driven software development is nothing new in PHP either. Sebastian Bergmann’s unit testing framework PHPUnit has been around since 2001. The PEST testing framework, released around 2021, builds on PHPUnit and extends it with a multitude of new features. PEST stands for PHP Elegant Testing and defines itself as a next-generation tool. Since many agencies, especially smaller ones, that develop their software in PHP generally limit themselves to manual testing, I would like to use this short article to demonstrate how easy it is to use PEST. Of course, there is a wealth of literature on the topic of test-driven software development, which focuses on how to optimally organize tests in a project. This knowledge is ideal for developers who have already taken their first steps with testing frameworks. These books teach you how to develop independent, low-maintenance, and high-performance tests with as little effort as possible. However, to get to this point, you first have to overcome the initial hurdle: installing the entire environment.

A typical environment for self-developed web projects is the Laravel framework. When creating a new Laravel web project, you can choose between PHPUnit and PEST. Laravel takes care of all the necessary details. A functioning PHP environment is required as a prerequisite. This can be a Docker container, a native installation, or the XAMPP server environment from Apache Friends. For our short example, I’ll use the PHP CLI on Debian Linux.

sudo apt-get install php-cli php-mbstring php-xml php-pcov

After executing the command in the console, you can test the installation success using the php -v command. The next step is to use a package manager to deploy other PHP libraries for our application. Composer is one such package manager. It can also be quickly deployed to the system with just a few instructions.

php -r "copy('https://getcomposer.org/installer', 'composer-setup.php');"
php -r "if (hash_file('sha384', 'composer-setup.php') === 'ed0feb545ba87161262f2d45a633e34f591ebb3381f2e0063c345ebea4d228dd0043083717770234ec00c5a9f9593792') { echo 'Installer verified'.PHP_EOL; } else { echo 'Installer corrupt'.PHP_EOL; unlink('composer-setup.php'); exit(1); }"
php composer-setup.php
php -r "unlink('composer-setup.php');"

This downloads the current version of the composer.phar file to the current directory in which the command is executed. The correct hash is also automatically checked. To make Composer globally available via the command line, you can either include the path in the path variable or link composer.phar to a directory whose path is already integrated into Bash. I prefer the latter option and achieve this with:

ln -d composer.phar $HOME/.local/bin/composer

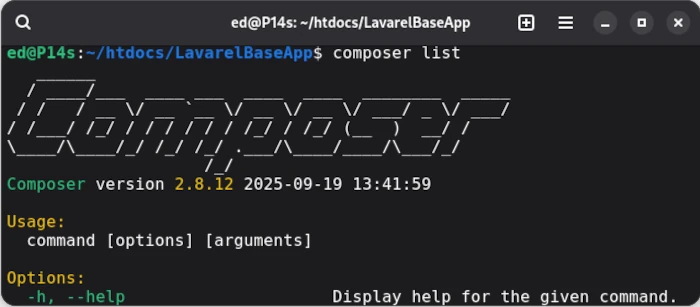
If everything was executed correctly, composer list should now display the version, including the available commands. If this is the case, we can install the Lavarel installer globally in the Composer repository.

php composer global require laravel/installer

To install Lavarel via Bash, the path variable COMPOSER_HOME must be set. To find out where Composer created the repository, simply use the command composer config -g home. The resulting path, which in my case is /home/ed/.config/composer, is then bound to the variable COMPOSER_HOME. We can now run

php $COMPOSER_HOME/vendor/bin/laravel new MyApp

in an empty directory to create a new Laravel project. The corresponding console output looks like this:

ed@P14s:~/Downloads/test$ php $COMPOSER_HOME/vendor/bin/laravel new MyApp

   _                               _
  | |                             | |
  | |     __ _ _ __ __ ___   _____| |
  | |    / _` |  __/ _` \ \ / / _ \ |
  | |___| (_| | | | (_| |\ V /  __/ |
  |______\__,_|_|  \__,_| \_/ \___|_|


 ┌ Which starter kit would you like to install? ────────────────┐
 │ None                                                         │
 └──────────────────────────────────────────────────────────────┘

 ┌ Which testing framework do you prefer? ──────────────────────┐
 │ Pest                                                         │
 └──────────────────────────────────────────────────────────────┘

Creating a "laravel/laravel" project at "./MyApp"
Installing laravel/laravel (v12.4.0)
  - Installing laravel/laravel (v12.4.0): Extracting archive
Created project in /home/ed/Downloads/test/MyApp
Loading composer repositories with package information

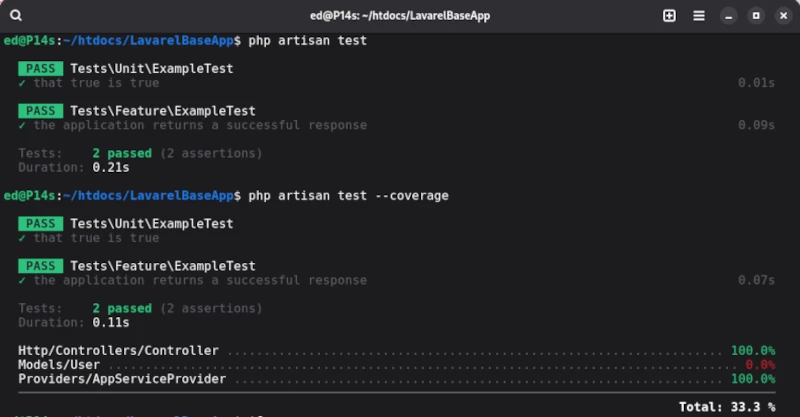
The directory structure created in this way contains the tests folder, where the test cases are stored, and the phpunit.xml file, which contains the test configuration. Laravel defines two test suites: Unit and Feature, each of which already contains a demo test. To run the two demo test cases, we use the artisan command-line tool [1] provided by Laravel. To run the tests, simply enter the php artisan test command in the root directory.

In order to assess the quality of the test cases, we need to determine the corresponding test coverage. We also obtain the coverage using artisan with the test statement, which is supplemented by the --coverage parameter.

php artisan test --coverage

The output for the demo test cases provided by Laravel is as follows:

Unfortunately, artisan’s capabilities for executing test cases are very limited. To utilize PEST’s full functionality, the PEST executor should be used right from the start.

php ./vendor/bin/pest -h

The PEST executor can be found in the vendor/bin/pest directory, and the -h parameter displays help. In addition to this detail, we’ll focus on the tests folder, which we already mentioned. In the initial step, two test suites are preconfigured via the phpunit.xml file. The test files themselves should end with the suffix Test, as in the ExampleTest.php example.

Compared to other test suites, PEST attempts to support as many concepts of automated test execution as possible. To maintain clarity, each test level should be stored in its own test suite. In addition to classic unit tests, browser tests, stress tests, architecture tests, and even the newly emerging mutation testing are supported. Of course, this article can’t cover all aspects of PEST, and there are now many high-quality tutorials available for writing classic unit tests in PEST. Therefore, I’ll limit myself to an overview and a few less common concepts.

Architecture test

The purpose of architectural tests is to provide a simple way to verify whether developers are adhering to the specifications. This includes, among other things, ensuring that classes representing data models are located in a specified directory and may only be accessed via specialized classes.

test('models')
->expect('App\Models')
->toOnlyBeUsedOn('App\Repositories')
->toOnlyUse('Illuminate\Database');

Mutation-Test

This form of testing is something new. The purpose of the exercise is to create so-called mutants by making changes, for example, to the conditions of the original implementation. If the tests assigned to the mutants continue to run correctly instead of failing, this can be a strong indication that the test cases may be faulty and lack meaningfulness.

Original: if(TRUE) → Mutant: if(FALSE)

Stress-Test

Another term for stress tests is penetration testing, which focuses specifically on the performance of an application. This allows you to ensure that the web app, for example, can handle a defined number of accesses.

Of course, there are many other helpful features available. For example, you can group tests and then run the groups individually.

// definition
pest()->extend(TestCase::class)
->group('feature')
->in('Feature');

// calling
php ./vendor/bin/pest --group=feature

For those who don’t work with the Lavarel framework but still want to test in PHP with PEST, you can also integrate the PEST framework into your application. All you need to do is define PEST as a corresponding development dependency in the Composer project configuration. Then, you can initiate the initial test setup in the project’s root directory.

php ./vendor/bin/pest --init

As we’ve seen, the options briefly presented here alone are very powerful. The official PEST documentation is also very detailed and should generally be your first port of call. In this article, I focused primarily on minimizing the entry barriers for test-driven development in PHP. PHP now also offers a wealth of options for implementing commercial software projects very efficiently and reliably.

Ressourcen

Successful validation of ISBN validation of ISBN numbers

Developers are regularly faced with the task of checking user input for accuracy. A considerable number of standardized data formats now exist that make such validation tasks easy to master. The International Standard Book Number, or ISBN for short, is one such data format. ISBN comes in two versions: a ten-digit and a 13-digit version. From 1970 to 2006, the ten-digit version of the ISBN was used (ISBN-10), which was replaced by the 13-digit version (ISBN-13) in January 2007. Nowadays, it is common practice for many publishers to provide both versions of the ISBN for titles. It is common knowledge that books can be uniquely identified using this number. This, of course, also means that these numbers are unique. No two different books have the same ISBN (Figure 1).

The theoretical background for determining whether a sequence of numbers is correct comes from coding theory. Therefore, if you would like to delve deeper into the mathematical background of error-detecting and error-correcting codes, we recommend the book “Coding Theory” by Ralph Hardo Schulz [1]. It teaches, for example, how error correction works on compact disks (CDs). But don’t worry, we’ll reduce the necessary mathematics to a minimum in this short workshop.

The ISBN is an error-detecting code. Therefore, we can’t automatically correct a detected error. We only know that something is wrong, but we don’t know the specific error. So let’s get a little closer to the matter.

Why exactly 13 digits were agreed upon for ISBN-13 remains speculation. At least the developers weren’t influenced by any superstition. The big secret behind validation is the determination of the residual classes [2]. The algorithms for ISBN-10 and ISBN-13 are quite similar. So let’s start with the older standard, ISBN-10, which is calculated as follows:

1x1 + 2x2 + 3x3 + 4x4 + 5x5 + 6x6 + 7x7 + 8x8 + 9x9 + 10x10 = k modulo 11

Don’t worry, you don’t have to be a SpaceX rocket engineer to understand the formula above. We’ll lift the veil of confusion with a small example for ISBN 3836278340. This results in the following calculation:

(1*3) + (2*8) + (3*3) + (4*6) + (5*2) + (6*7) + (7*8) + (8*3) + (9*4) + (10*0) = 220
220 modulo 11 = 0

The last digit of the ISBN is the check digit. In the example given, this is 0. To obtain this check digit, we multiply each digit by its value. This means that the fourth position is a 6, so we calculate 4 * 6. We repeat this for all positions and add the individual results together. This gives us the amount 220. The 220 is divided by 11 using the remainder operation modulo 11. Since 11 fits exactly 20 times into 220, there is a remainder of zero. The result of 220 modulo 11 is 0 and matches the check digit, which tells us that we have a valid ISBN-10.

However, there is one special feature to note. Sometimes the last digit of the ISBN ends with X. In this case, the X must be replaced with 10.

As you can see, the algorithm is very simple and can easily be implemented using a simple for loop.

boolean success = false;
int[] isbn;
int sum = 0;

for(i=0; i<10; i++) {
sum += i*isbn[i];
}

if(sum%11 == 0) {
success = true;
}

To keep the algorithm as simple as possible, each digit of the ISBN-10 number is stored in an integer array. Based on this preparation, it is only necessary to iterate through the array. If the sum check using the modulo 11 then returns 0, everything is fine.

To properly test the function, two test cases are required. The first test checks whether an ISBN is correctly recognized. The second test checks for so-called false positives. This provokes an expected error with an incorrect ISBN. This can be quickly accomplished by changing any digit of a valid ISBN.

Our ISBN-10 validator still has one minor flaw. Digit sequences that are shorter or longer than 10, i.e., do not conform to the expected format, could be rejected beforehand. The reason for this can be seen in the example: The last digit of the ISBN-10 is a 0 – thus, the character result is also 0. If the last digit is forgotten and a check for the correct format isn’t performed, the error won’t be detected. Something that has no effect on the algorithm, but is very helpful as feedback for user input, is to gray out the input field and disable the submit button until the correct ISBN format has been entered.

The algorithm for ISBN-13 is similarly simple.

x1 + 3x2 + x3 + 3x4 + x5 + 3x6 + x7 + 3x8 + x9 + 3x10 + x11 + 3x12 + x13 = k modulo 10

As with ISBN-10, xn represents the numerical value at the corresponding position in the ISBN-13. Here, too, the partial results are summed and divided by a modulo. The main difference is that only the even-numbered positions—positions 2, 4, 6, 8, 10, and 12—are multiplied by 3, and the result is then divided by modulo 10. As an example, we calculate the ISBN-13: 9783836278348.

9 + (3*7) + 8 + (3*3) + 8 + (3*3) + 6 + (3*2) + 7 + (3*8) + 3 + (3*4) + 8 = 130
130 modulo 10 = 0

The algorithm can also be implemented for the ISBN-13 in a simple for loop.

boolean success = false;
int[] isbn;
int sum = 0;

for(i=0; i<13; i++) {
if(i%2 == 0) {
sum += 3*isbn[i];
} else {
sum += isbn[i];
}
}

if(sum%10 == 0) {
success = true;
}

The two code examples for ISBN-10 and ISBN-13 differ primarily in the if condition. The expression i % 2 calculates the modulo value 2 for the respective iteration. If the result is 0 at this point, it means it is an even number. The corresponding value must then be multiplied by 3.

This shows how useful the modulo operation % can be for programming. To keep the implementation as compact as possible, the so-called triple operator can be used instead of the if-else condition. The expression sum += (i%2) ? isbn[i] : 3 * isbn[3] is much more compact, but also more difficult to understand.

Below you will find a fully implemented class for checking the ISBN in the programming languages: Java, PHP, and C#.

Abonnement / Subscription

[English] This content is only available to subscribers.

[Deutsch] Diese Inhalte sind nur für Abonnenten verfügbar.

While the solutions presented in the examples all share the same core approach, they differ in more than just syntactical details. The Java version, for example, offers a more comprehensive variant that distinguishes more generically between ISBN-10 and ISBN-13. This demonstrates that there are many ways to Rome. It also aims to show less experienced developers different approaches and encourage them to make their own adaptations. To simplify understanding, the source code has been enriched with comments. PHP, as an untyped language, eliminates the need to convert strings to numbers. Instead, a RegEx function is used to ensure that the entered characters are type-safe.

Lessons Learned

As you can see, verifying whether an ISBN is correct isn’t rocket science. The topic of validating user input is, of course, much broader. Other examples include credit card numbers. But regular expressions also provide valuable services in this context.

Ressourcen

  • [1] Ralph-Hardo Schulz, Codierungstheorie: Eine Einführung, 2003, ISBN 978-3-528-16419-5
  • [2] Concept of modular aritmetic on Wikipedia, https://en.wikipedia.org/wiki/Modular_arithmetic

Installing NextCloud with Docker on a Linux Server

For business it’s sometime important to have a central place where employees and clients are able to interact together. NextCloud is a simple and extendable PHP solution with a huge set of features you can host by yourself, to keep full control of your data. A classical Groupware ready for your own cloud.

If you want to install NextCloud on your own server you need as first a well working PHP installation with a HTTP Server like Apache. Also a Database Management System is mandatory. You can chose between MySQL, MariaDB and PostgreSQL servers. The classical way to install and configure all those components takes a lot of time and the maintenance is very difficult. To overcome all this we use a modern approach with the virtualization tool docker.

The system setup is as the following: Ubuntu x64 Server, PostgreSQL Database, pgAdmin DBMS Management and NextCloud.

Agenda

  • Docker Basics
  • Installing Docker on a Ubuntu server
  • prepare your database
  • putting all together and make it run
  • insights to operate NextCloud

Docker Container Instructions

Abonnement / Subscription

[English] This content is only available to subscribers.

[Deutsch] Diese Inhalte sind nur für Abonnenten verfügbar.

If you have any question feel free to leave a comment. May you need help to install and operate your own NextCloud installation secure, don’t hesitate to contact us by the contact form. In the case you like the video level a thumbs up and share it.

Resources

Abonnement / Subscription

[English] This content is only available to subscribers.

[Deutsch] Diese Inhalte sind nur für Abonnenten verfügbar.