When we look at images, we find those particularly aesthetically pleasing whose elements follow a specific ratio of lengths to areas. This principle of harmony is called the “Golden Ratio” and is widely used in nature.
One might think that in the age of graphics rendered by artificial intelligence, we no longer need the many fundamentals of graphic design. However, this is short-sighted, because on the one hand, we have to select the best option from the generated images. To make good decisions here, knowledge of proportions and aesthetics is essential. Furthermore, we must be able to clearly articulate our wishes in order to achieve an optimal result. Only things that we truly understand can we formulate clearly and unambiguously. Therefore, sound expertise is indispensable, especially when working with generative AI.
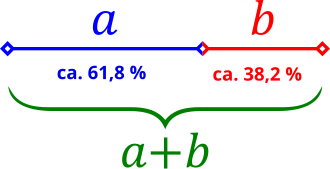
Geometrically, the Golden Ratio means that a line segment AB is divided into two segments of different lengths (a and b). If we now set a/b equal to the sum (a+b)/a, we obtain φ with the value 1.618. Incidentally, the exact value of φ is the square root of 5 (√5). The ratios of the lengths are approximately 3:2. The following graphic illustrates this relationship.
To apply the “Golden Ratio” to shapes, you don’t need to have passed advanced math courses in high school. All we need is the number φ. If we have a rectangle with a side length of one centimeter and multiply 1 by 1.618, we get 1.618. Now we can draw a rectangle with side lengths a = 1 and b = 1.618. The resulting ratio is perfect harmony and is called the “Golden Ratio.”
If we place our square with a side length of one centimeter inside this rectangle, we get a rectangular area B that can be divided according to the same pattern. If we repeat this process a few times, we get a tiled pattern. If we now draw an arc with a radius equal to the side length inside each of the resulting squares, we get a spiral. The shape in Figure 2 should already be familiar to most, and now you also know how it is created.
The spiral just described is also found in the so-called Fibonacci sequence. The Fibonacci sequence is a simple recursive addition of the two preceding numbers. Figure 3 shows how quickly the Fibonacci sequence can be calculated. As we can see, no advanced mathematical studies are necessary.
Where do we find the Golden Ratio used? Besides proportions in logos and other graphics, the Golden Ratio is often used in typography. The height ratios of small to large letters often follow a ratio of 1:1.618.
A typical scenario for applying the Golden Ratio is the positioning of objects within a graphic. To create a good illusion of depth, the objects need a corresponding ratio of heights to each other. But the way objects are positioned relative to each other also makes an image appear calm and harmonious or agitated and restless. So we have two ways of creating a mood in the viewer using the Golden Ratio. By deliberately disrupting the proportions, we achieve a certain restlessness, which can also be desirable. Such an inverted strategy can be used, for example, in advertising to stand out from the crowd and thus attract the viewer’s attention.
In everyday language, we use the word “coincidence” rather unreflectively. Phrases like, “I happened to be passing by here” or “What a coincidence to meet you here” are familiar to everyone. But what do we mean by that? What we’re actually trying to say is that we didn’t expect the current situation.
Coincidence is actually a mathematical term that we’ve adopted into everyday language. Coincidence means something unpredictable. Things like the exact location of any electron in an atom at a given moment. While the path I take to reach a particular destination can be arbitrary, preferences can be derived from probabilities, which then make the choice quite predictable.
Circumstances for such a scenario can be distance, personal well-being (time pressure, discomfort, or boredom), or external circumstances (weather: sunshine, rain). If I’m bored AND the sun is shining, I choose an unknown route for a bit of distraction and curiosity. If I’m short on time AND it’s raining, I choose the shortest route I know, or a route that’s as sheltered as possible. This means that the better you know a person’s habits, the more predictable their decisions are. But predictability contradicts the concept of chance.
It’s nothing new that mathematical terms with very strict definitions are temporarily adopted into our everyday language as a fad. I’d like to briefly address a very popular example, one already cited by Joseph Weizenbaum: the term chaos. In mathematical terms, chaos actually describes the fact that a very small change over very long distances significantly distorts the result, so that it can’t even be used as an estimate or approximation. A typical application is astronomy. If I point a laser beam from Earth to the moon, a deviation of just a few millimeters causes the laser beam to miss the moon by kilometers. To explain such facts to a broader audience in popular science, an association was used that if a butterfly flaps its wings in Tokyo, it can cause a storm in Berlin. Unfortunately, there are quite a few pseudoscientists who seize on this image and sell it to their peers as fact. This is, of course, nonsense. The flapping of a butterfly’s wings cannot create a storm on the other side of the globe. Just think of the impact this would have on our world, just all the birds that take to the air every day.
“Why did the mathematician’s marriage fail? His wife was unpredictable.”
But why is randomness so important in mathematics? Specifically, it’s about the broad topic of cryptography. If we choose combinations for encryption that are easy to guess, the protection is quickly lost. Here’s a small example.
Internet pages are stateless. This means that after a website is accessed and a link is clicked to go to the next page, all information from the previous page is lost. To still be able to provide things like an online shop, a shopping cart, and all the other necessary shopping functions, there is the option of storing data on the server in so-called sessions. This data often includes the user’s login. To distinguish between sessions, they have an identification (ID). The programmer then specifies how this ID is generated. One property of these IDs is that they must be unique; no ID can occur twice.
Now, one might think of using the timestamp, including the milliseconds, to generate a hash. The hash prevents anyone from immediately recognizing that the ID is created from a timestamp. A patient hacker, with a little diligence, uncovered this secret relatively quickly. Added to that is the probability that two users could create a session at the same time, which would lead to an error.
Now, one might come up with the idea of assembling the SessionID from various segments such as timestamps + usernames and other details. Although increasing complexity offers a certain degree of protection, this is not true security. Professionals have methods with manageable effort to guess these ‘avoidable’ secrets. The only real protection is the use of cryptographically secure randomness. As a segment that cannot be guessed, no matter how much effort is put into it.
Before I reveal how we can address the problem, I would like to briefly discuss the typical attack vector and the damage it causes to SessionIDs. If the SessionID has been guessed by an attacker and this session is still active, the hacker can take over this session in their browser. This process is called session hijacking or session riding. The attacker who has managed to take over an active session is logged into an online service as a foreign user with a profile that does not belong to them. This allows them to perform all the actions that a legitimate user can do. It would therefore be possible to place an order in an online shop and have the goods shipped to a different address. This is a situation that must be prevented at all costs.
There are various strategies used to prevent the theft of an active session. Each of these strategies offers a certain level of protection, but the full strength is only achieved by combining the various options, as hackers are constantly evolving and looking for new opportunities. In this short article, we will only consider the aspect of how to generate a cryptographically secure session ID.
Almost all common programming languages have a random() function that generates a random number. The implementation of this random number varies. Unfortunately, these generated numbers are not as random as they should be for attackers. Therefore, developers should always avoid this simple random function. Instead, there are cryptographically secure implementations for random numbers for backend languages such as PHP and Java.
For Java programs, you can use the java.security.SecureRandom class. An important feature of this class is the ability to choose from various cryptographic algorithms [1]. Additionally, the starting value can be specified using the so-called seed. To demonstrate its use, here is a short code snippet:
As we can see, its use is quite simple and can be easily adapted. Generating randomness is even easier in PHP. To do so, simply call the function random_int ( $min, $max ); [2]. The interval can be specified optionally. Thus, we see that the assumption of many people that our world is largely computable is not entirely true. In many areas of the natural sciences, there are processes that we cannot calculate. These, in turn, form the basis for generating ‘true’ randomness. For applications that require very strong protection, hardware is often used. These might be devices that measure the radioactive decay of a low-radiation isotope.
The fields of cryptography and web application security are, of course, much more extensive. This article is intended to draw attention to the necessity of this topic using a fairly simple example. In doing so, I have avoided confusing and ultimately alienating potential interested parties with complicated mathematics.
The PHP programming language has been the first choice for many developers in the field of web applications for decades. Since the introduction of object-oriented language features with version 5, PHP has come of age. Large projects can now be implemented in a clean and, above all, maintainable architecture. A striking difference between commercial software development and a hobbyist who has assembled and maintains a club’s website is the automated verification that the application adheres to specified specifications. This brings us into the realm of automated software testing.
A key principle of automated software testing is that it verifies, without additional interaction, that the application exhibits a predetermined behavior. Software tests cannot guarantee that an application is error-free, but they do increase quality and reduce the number of potential errors. The most important aspect of automated software testing is that behavior already defined in tests can be quickly verified at any time. This ensures that if developers extend an existing function or optimize its execution speed, the existing functionality is not affected. In short, we have a powerful tool for ensuring that we haven’t broken anything in our code without having to laboriously click through all the options manually each time.
To be fair, it’s also worth mentioning that the automated tests have to be developed, which initially takes time. However, this ‘supposed’ extra effort quickly pays off once the test cases are run multiple times to ensure that the status quo hasn’t changed. Of course, the created test cases also have to be maintained.
If, for example, an error is detected, you first write a test case that replicates the error. The repair is then successfully completed if the test case(s) pass. However, changes in the behavior of existing functionality always require corresponding adaptation of the associated tests. This concept of writing tests in parallel to implement the function is feasible in many programming languages and is called test-driven development. From my own experience, I recommend taking a test-driven approach even for relatively small projects. Small projects often don’t have the complexity of large applications, which also require some testing skills. In small projects, however, you have the opportunity to develop your skills within a manageable framework.
Test-driven software development is nothing new in PHP either. Sebastian Bergmann’s unit testing framework PHPUnit has been around since 2001. The PEST testing framework, released around 2021, builds on PHPUnit and extends it with a multitude of new features. PEST stands for PHP Elegant Testing and defines itself as a next-generation tool. Since many agencies, especially smaller ones, that develop their software in PHP generally limit themselves to manual testing, I would like to use this short article to demonstrate how easy it is to use PEST. Of course, there is a wealth of literature on the topic of test-driven software development, which focuses on how to optimally organize tests in a project. This knowledge is ideal for developers who have already taken their first steps with testing frameworks. These books teach you how to develop independent, low-maintenance, and high-performance tests with as little effort as possible. However, to get to this point, you first have to overcome the initial hurdle: installing the entire environment.
A typical environment for self-developed web projects is the Laravel framework. When creating a new Laravel web project, you can choose between PHPUnit and PEST. Laravel takes care of all the necessary details. A functioning PHP environment is required as a prerequisite. This can be a Docker container, a native installation, or the XAMPP server environment from Apache Friends. For our short example, I’ll use the PHP CLI on Debian Linux.
After executing the command in the console, you can test the installation success using the php -v command. The next step is to use a package manager to deploy other PHP libraries for our application. Composer is one such package manager. It can also be quickly deployed to the system with just a few instructions.
This downloads the current version of the composer.phar file to the current directory in which the command is executed. The correct hash is also automatically checked. To make Composer globally available via the command line, you can either include the path in the path variable or link composer.phar to a directory whose path is already integrated into Bash. I prefer the latter option and achieve this with:
ln -d composer.phar $HOME/.local/bin/composer
If everything was executed correctly, composer list should now display the version, including the available commands. If this is the case, we can install the Lavarel installer globally in the Composer repository.
php composer global require laravel/installer
To install Lavarel via Bash, the path variable COMPOSER_HOME must be set. To find out where Composer created the repository, simply use the command composer config -g home. The resulting path, which in my case is /home/ed/.config/composer, is then bound to the variable COMPOSER_HOME. We can now run
php $COMPOSER_HOME/vendor/bin/laravel new MyApp
in an empty directory to create a new Laravel project. The corresponding console output looks like this:
ed@P14s:~/Downloads/test$ php $COMPOSER_HOME/vendor/bin/laravel newMyApp _ _|||||| __ _ _ __ __ ___ _____||||/ _` | __/ _` \ \ // _ \ |||___|(_||||(_||\ V / __/||______\__,_|_| \__,_| \_/ \___|_| ┌ Which starter kit would you like to install? ────────────────┐ │ None │ └──────────────────────────────────────────────────────────────┘ ┌ Which testing framework do you prefer? ──────────────────────┐ │ Pest │ └──────────────────────────────────────────────────────────────┘Creating a "laravel/laravel" project at "./MyApp"Installing laravel/laravel (v12.4.0)- Installing laravel/laravel (v12.4.0): Extracting archiveCreated project in /home/ed/Downloads/test/MyAppLoading composer repositories with package information
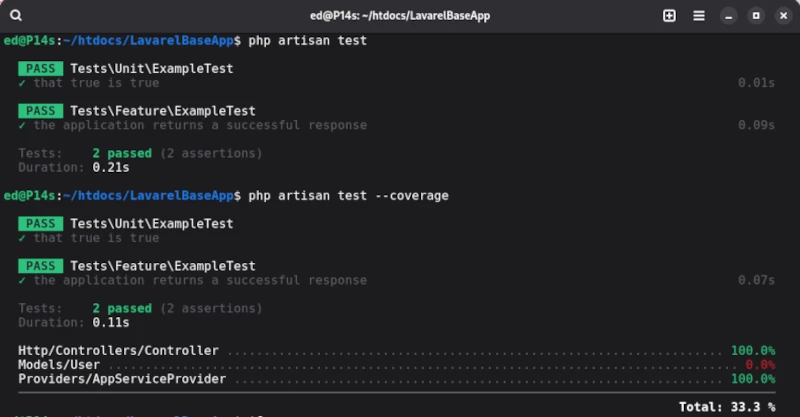
The directory structure created in this way contains the tests folder, where the test cases are stored, and the phpunit.xml file, which contains the test configuration. Laravel defines two test suites: Unit and Feature, each of which already contains a demo test. To run the two demo test cases, we use the artisan command-line tool [1] provided by Laravel. To run the tests, simply enter the php artisan test command in the root directory.
In order to assess the quality of the test cases, we need to determine the corresponding test coverage. We also obtain the coverage using artisan with the test statement, which is supplemented by the --coverage parameter.
php artisan test --coverage
The output for the demo test cases provided by Laravel is as follows:
Unfortunately, artisan’s capabilities for executing test cases are very limited. To utilize PEST’s full functionality, the PEST executor should be used right from the start.
php ./vendor/bin/pest -h
The PEST executor can be found in the vendor/bin/pest directory, and the -h parameter displays help. In addition to this detail, we’ll focus on the tests folder, which we already mentioned. In the initial step, two test suites are preconfigured via the phpunit.xml file. The test files themselves should end with the suffix Test, as in the ExampleTest.php example.
Compared to other test suites, PEST attempts to support as many concepts of automated test execution as possible. To maintain clarity, each test level should be stored in its own test suite. In addition to classic unit tests, browser tests, stress tests, architecture tests, and even the newly emerging mutation testing are supported. Of course, this article can’t cover all aspects of PEST, and there are now many high-quality tutorials available for writing classic unit tests in PEST. Therefore, I’ll limit myself to an overview and a few less common concepts.
Architecture test
The purpose of architectural tests is to provide a simple way to verify whether developers are adhering to the specifications. This includes, among other things, ensuring that classes representing data models are located in a specified directory and may only be accessed via specialized classes.
This form of testing is something new. The purpose of the exercise is to create so-called mutants by making changes, for example, to the conditions of the original implementation. If the tests assigned to the mutants continue to run correctly instead of failing, this can be a strong indication that the test cases may be faulty and lack meaningfulness.
Original: if(TRUE) → Mutant: if(FALSE)
Stress-Test
Another term for stress tests is penetration testing, which focuses specifically on the performance of an application. This allows you to ensure that the web app, for example, can handle a defined number of accesses.
Of course, there are many other helpful features available. For example, you can group tests and then run the groups individually.
For those who don’t work with the Lavarel framework but still want to test in PHP with PEST, you can also integrate the PEST framework into your application. All you need to do is define PEST as a corresponding development dependency in the Composer project configuration. Then, you can initiate the initial test setup in the project’s root directory.
php ./vendor/bin/pest --init
As we’ve seen, the options briefly presented here alone are very powerful. The official PEST documentation is also very detailed and should generally be your first port of call. In this article, I focused primarily on minimizing the entry barriers for test-driven development in PHP. PHP now also offers a wealth of options for implementing commercial software projects very efficiently and reliably.
Over the course of the many hours they spend in front of this amazing device, almost every computer user will find themselves in need of saving the screen content as a graphic. The process of creating an image of the monitor’s contents is what seasoned professionals call taking a screenshot.
As with so many things, there are many ways to achieve a screenshot. Some very resourceful people solve the problem by simply pointing their smartphone at the monitor and taking a photo. Why not? As long as you can still recognize something afterwards, everything’s fine. But this short guide doesn’t end there; we’ll take a closer look at the many ways to create screenshots. Even professionals who occasionally write instructions, for example, have to overcome one or two pitfalls.
Before we get to the nitty-gritty, it’s important to mention that it makes a difference whether you want to save the entire screen, the browser window, or even the invisible area of a website as a screenshot. The solution presented for the web browser works pretty much the same for all web browsers on all operating systems. Screenshots intended to cover the monitor area and not a web page use the technologies of the existing operating system. For this reason, we also differentiate between Linux and Windows. Let’s start with the most common scenario: browser screenshots.
Browser
Especially when ordering online, many people feel more comfortable when they can additionally document their purchase with a screenshot. It’s also not uncommon to occasionally save instructions from a website for later use. When taking screenshots of websites, one often encounters the problem that a single page is longer than the area displayed on the monitor. Naturally, the goal is to save the entire content, not just the displayed area. For precisely this case, our only option is a browser plugin. Fireshot is a plug-in available for all common browsers, such as Brave, Firefox, and Microsoft Edge, that allows us to create screenshots of websites, including hidden content. Fireshot is a browser extension that has been on the market for a very long time. Fireshot comes with a free version, which is already sufficient for the scenario described. Anyone who also needs an image editor when taking screenshots, for example, to highlight areas and add labels, can use the paid Pro version. The integrated editor has the advantage of significantly accelerating workflows in professional settings, such as when creating manuals and documentation. Of course, similar results can be achieved with an external photo editor like GIMP. GIMP is a free image editing program, similarly powerful and professional as the paid version of Photoshop, and is available for Windows and Linux.
Linux
If we want to take screenshots outside of the web browser, we can easily use the operating system’s built-in tools. In Linux, you don’t need to install any additional programs; everything you need is already there. Pressing the Print key on the keyboard opens the tool. You simply have to drag the mouse around the area you want to photograph and press Capture in the control field that appears. It’s not a problem if the control area is in the visible area of the screenshot; it won’t be shown in the screenshot. On German keyboards, you often find the Print key instead of Print. The finished screenshot then ends up in the Screenshots folder with a timestamp in the file name. This folder is a subfolder of Pictures in the user directory.
Windows
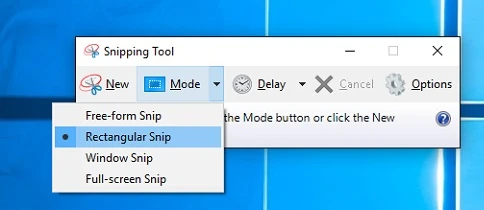
The easiest way to take screenshots in Windows is to use the Snipping Tool, which is usually included with your Windows installation. It’s also intuitive to use.
Another very old way in Windows, without a dedicated screenshot creation program, is to press the Ctrl and Print Screen keys simultaneously. Then, open a graphics program, such as Paint, which is included in every Windows installation. In the drawing area, press Ctrl + V simultaneously, and the screenshot appears and can be edited immediately.
These screenshots are usually created in JPG format. JPG is a lossy compression method, so you should check the readability after taking the screenshot. Especially with current monitors with resolutions around 2000 pixels, using the image on a website requires manual post-processing. One option is to reduce the resolution from just under 2000 pixels to the usual 1000 pixels on a website. Ideally, the scaled and edited graphic should be saved in the new WEBP format. WEBP is a lossless graphics compression method that further reduces the file size compared to JPG, which is very beneficial for website loading times.
This already covers a good range of possibilities for taking screenshots. Of course, more could be said about this, but that falls into the realm of graphic design and the efficient use of image editing software.
The desire of website operators to obtain as much information as possible about their users is as old as the internet itself. Simple counters for page views or the recognition of the web browser and screen resolution are the simplest applications of user tracking. Today, website operators are no longer solely dependent on Google to collect information about their visitors. There are sufficient free tools available to maintain their own tracking server. In this article, I will briefly discuss the historical background, technologies, and social aspects.
As more and more companies ventured into the vastness of the internet around the turn of the millennium, interest in finding out more about website visitors began. Initially, they were content with placing so-called visitor counters on the homepage. These visitor counters often displayed quite outrageous numbers. The ego of website operators certainly played a role, as many visitors to the homepage have an external impact and also make a certain impression on visitors. However, anyone who seriously wanted to make money through their website quickly realized that fictitious numbers didn’t generate revenue. So, more reliable methods were needed.
To prevent users from being counted multiple times each time they accessed the homepage, they began storing the IP address and setting a one-hour timeout before counting again. This was then called a reload block. Of course, this wasn’t a reliable detection method. At that time, connections over the telephone network were common via modem, and it often happened that the connection would drop, requiring a new connection. Then, a new IP address was also assigned. The accuracy of this solution therefore had a lot of potential for improvement.
When web space with PHP and MySQL databases became affordable around 2005, the trend shifted to storing visited pages in small text files called cookies in the browser. These analyses were already very informative and helped companies see which articles people were interested in. The only problem was when suspicious users deleted their cookies at every opportunity. Therefore, the trend shifted to storing all requests on the server, in so-called sessions. In most use cases, the accuracy achieved in this way is sufficient to better match supply to demand.
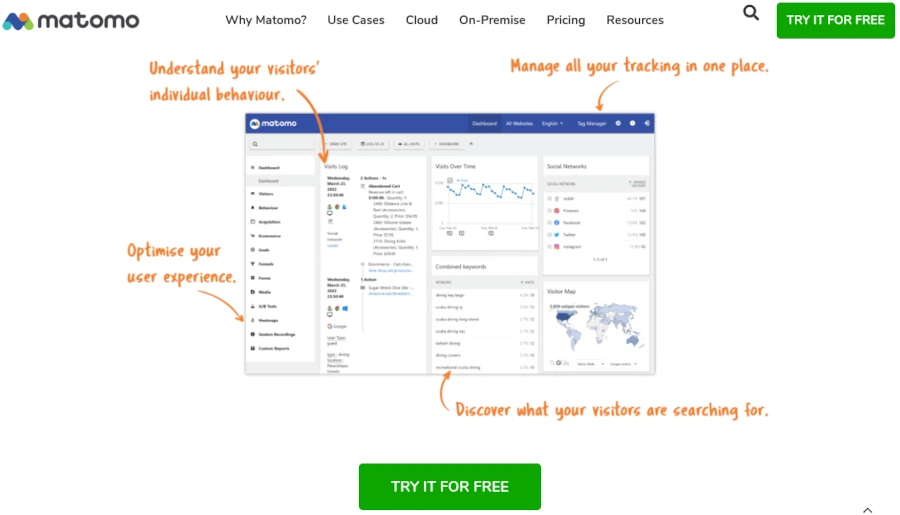
A popular tool for user tracking is Matomo, written in PHP. This self-hosted open source software allows you to bypass Google and also achieves better GDPR compliance, as the collected data is not shared with third parties. Furthermore, personalized data can be anonymized after a specified period of time, for example, at the beginning of the month. In this case, information such as IP addresses is replaced with random identifiers.
The whole issue is immediately taken to a whole new level when money is involved. In the past, it was companies that placed advertising banners on well-visited websites and then paid a small amount for every 1,000 ads. Nowadays, streaming services like Spotify or YouTube are interested in determining exactly how often a particular piece of content was viewed, or for how long a track was watched. Because the moment money is involved, there is a great interest in using small or large tricks to swindle a little more money than one is actually entitled to. This is precisely why companies like Google and Co. are constantly busy finding out how many users consume the content and for how long. In addition to tracking functions in the applications, these companies also use complex monitoring that can access original data from server logs and network traffic. This is where tools like the ELK stack or Prometheus and Grafana come into play.
Taking YouTube as an example, this service has several hurdles to overcome. Many people use YouTube as a TV replacement, as they can choose the content that interests them from a vast pool of content. A typical scenario is the automatic playback of ambient music for hours on end. If enough people do this without really paying attention to the content, it simply places a pointless burden on the server infrastructure and incurs considerable costs for the operator. This automatic autoplay function in the preview isn’t really interactive and is intended more as a teaser.
There are currently two strategies to keep users constantly engaged. One of these is short videos that run in a continuous loop until they manually move on to the next one. This allows you to mix in short advertising videos, but also to include news or opinion pieces. Of course, user tracking has to remove the repetitions during a monetized short on a continuous loop. This naturally leads to adjustments to the impression display. Another strategy used very excessively with long videos is disproportionately long ad breaks at relatively short intervals. This forces users to actively click away these ads each time, thus demanding attention.
Now, there are topics where services like YouTube, but also X or Facebook, have an interest in influencing their users in a certain direction. This could be the formation of opinions on political issues or simply commercialism. Now, one might think it would be a common strategy to suppress the visibility of undesirable opinions by adjusting the view count of the posts downwards. However, this wouldn’t be beneficial, because people have already seen the post. Therefore, a different strategy is much more effective. In the first step, the channel or post would be exempt from monetization, so the operator receives no additional compensation. In the next step, the number of views is increased, so that the content creator believes they are reaching a broad audience and takes fewer measures to gain more visibility. Additionally, using DevOps methods like A/B testing, feature flags, and load balancers, content views can be directed to posts only those who explicitly search for them. This avoids suspicion of censorship and significantly reduces visibility. Of course, unwanted posts only appear in recommendations for people who have explicitly subscribed to channels.
In the Netflix production “The Social Dilemma,” it is also lamented that bubbles are forming in which people with specific interests gather. This is an effect of so-called recommender systems. These recommenders are algorithms from the field of artificial intelligence. They function quite statically via statistical evaluations. Existing content is classified into categories, and then it is examined which groups of people are interested in a particular category and with what weighting. Content is then displayed accordingly, in proportion to the interests from that category. The content collected in this way can, of course, easily be marked with additional labels such as “well-suited” or “unsuitable.” Depending on the meta tags, unwanted content can then be buried in the depths of the database.
For all these measures to be effective, it is necessary to collect as much information about users as possible. This brings us back to user tracking. Tracking has become so sophisticated that browser settings that regularly delete cookies or the basic use of incognito mode are completely ineffective.
The only way to free yourself from dependence on the major platform providers is to consciously decide to no longer provide them with content. One step in this direction would be to operate your own website with appropriate monitoring for user tracking. Extensive content such as video and audio can be outsourced to several unknown platforms and embedded into the website. In this case, you should not upload all content to a single platform such as Odysee or Rumble, but rather cleverly distribute the content across multiple platforms without duplicating them. Such measures bind visitors to your own website and not to the respective platform operators.
Those with a little more financial freedom can also resort to free software such as PeerTube and host their own video platform. There are a number of options available here, but they require a great deal of effort and technical know-how from the operators.
[EN] We use cookies to improve your experience on our site. By using our site, you consent to cookies.
[DE] Wir verwenden Cookies, um Ihre Erfahrungen auf unserer Website zu verbessern. Durch die Nutzung unserer Website stimmen Sie Cookies zu.
This website uses cookies
Websites store cookies to enhance functionality and personalise your experience. You can manage your preferences, but blocking some cookies may impact site performance and services.
Essential cookies enable basic functions and are necessary for the proper function of the website.
Name
Description
Duration
Cookie Preferences
This cookie is used to store the user's cookie consent preferences.
30 days
These cookies are needed for adding comments on this website.
Name
Description
Duration
comment_author
Used to track the user across multiple sessions.
Session
comment_author_email
Used to track the user across multiple sessions.
Session
comment_author_url
Used to track the user across multiple sessions.
Session
These cookies are used for managing login functionality on this website.
Name
Description
Duration
wordpress_logged_in
Used to store logged-in users.
Persistent
wordpress_sec
Used to track the user across multiple sessions.
15 days
wordpress_test_cookie
Used to determine if cookies are enabled.
Session
Statistics cookies collect information anonymously. This information helps us understand how visitors use our website.
Matomo is an open-source web analytics platform that provides detailed insights into website traffic and user behavior.