When you own a big collection of PDF files the used storage space can increasing quite high. Sometimes I own PDF documents with more than 100 MB. Well nowadays this storage capacities are not a big issue. But if you want to backup those files to other mediums like USB pen drives or a DVD it would be great to reduce the file size of you PDF collection.
Long a go I worked with a little scrip that allowed me to reduce the file size of a PDF document significantly. This script called a interactive tool called PDF Sam with some command line parameters. Unfortunately many years ago the software PDF Sam become with this option commercial, so I was needed a new solution.
Before I go closer to my approach I will discuss some basic information about what happens in the background. As first, when your PDF blew up to a huge file is the reason because of the included graphics. If you scanned you handwritten notes to save them in one single archive you should be aware that every scan is a image file. By default the PDF processor already optimize those files. This is why the file size almost don’t get reduced when you try to compress them by a tool like zip.
Scanned images can optimized before to include them to a PDF document by a graphic tool like Gimp. Actions you can perform are reduce the image quality and increase the contrast. Specially for scanned handwritten notes are this steps important. If the contrast is very low and maybe you plan to print those documents, it could happens they are not readable. Another problem in this case is that you can’t apply a text search over the document. A solution to this problem is the usage of an OCR tool to transform text in images back to real text.
We resume shortly the previous minds. When we try to reduce the file size of a PDF we need to reduce the quality of the included images. This can be done by reducing the amount of dots per inch (dpi). Be aware that after the compression the image is still readable. As long you do not plan to do a high quality print like a magazine or a book, nothing will get affected.
When we wanna reduce plenty PDF files in a short time we can’t do all those actions by hand. For instance we need an automated solution. To reach the goal it is important that the tool we use support the command line. The we can create a simple batch job to perform the task without any hands on.
We have several options to optimize the images inside a PDF. If it is a great idea to perform all options, depend on the purpose of the usage.
change the image file to the PNG format
reduce the graphic dimensions to the real printable area
reduce the DPI
change the image color profile to gray-scale
As Ubuntu Linux user I have all of the things I need already together. And now comes the part that I explain you my well working solution.
Ghostscript
GPL Ghostscript is used for PostScript/PDF preview and printing. Usually as a back-end to a program such as ghostview, it can display PostScript and PDF documents in an X11 environment.
If you don’t have Ghostscript installed on you system, you can do this very fast.
sudoapt-getupdatesudoapt-get-yinstallghostscript
Bash
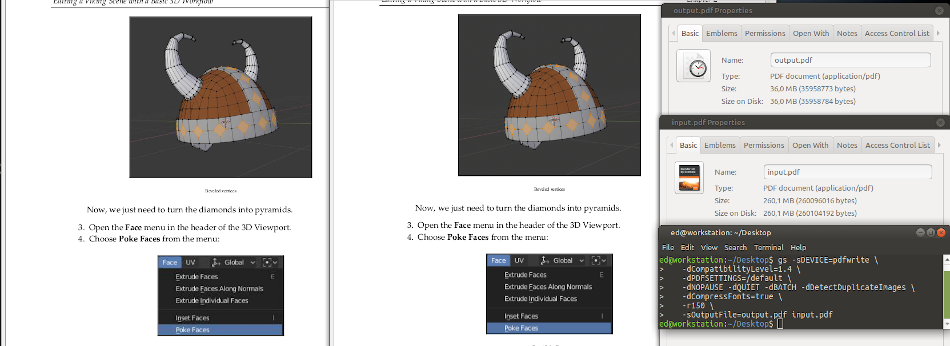
Before you execute any script or command be aware you do not overwrite with the output the existing files. In the case something get wrong you loose all originals to try other options. Before you start to try out anything backup your files or generate the compressed PDF in a separate folder.
The important parameter is r150, which reduce the output resolution to 150 dpi. In the manage you can check for more parameters to compress the result more stronger. The given command you are able to place in a script, were its surrounded by a FOR loop to fetch all PDF files in a directory, to write them reduced in another directory.
The command I used for a original file with 260 MB and 640 pages. After the operation was done the size got reduced to around 36 MB. The shrunken file is almost 7 times smaller than the original. A huge different. As you can see in the screenshot, the quality of the pictures is almost identical.
As alternative, in the case you won’t come closer to the command line there is a online PDF compression tool in German and English language for free use available.
PDF Workbench
Linux Systems have many powerful tools to deal with PDF documents. For example the Libreoffice Suite have a button where you can generate for every document a proper PDF file. But sometimes you wish to create a PDF in the printing dialog of any other application in your system. With the cups PDF print driver you enable this functionality on your system.
sudoapt-getinstallprinter-driver-cups-pdf
Bash
As I already explained, OCR allows you to extract from graphics text to make a document searchable. When you need to work with this type of software be aware that the result is good, but you cant avoid mistakes. Even when you perform an OCR on a scanned book page, you will find several mistakes. OCRFeeder is a free and very powerful solution for Linux systems.
Another powerful helper is the tool PDF Arranger which allows you to add or remove pages to an existing PDF. You are also able to change the order of the pages.
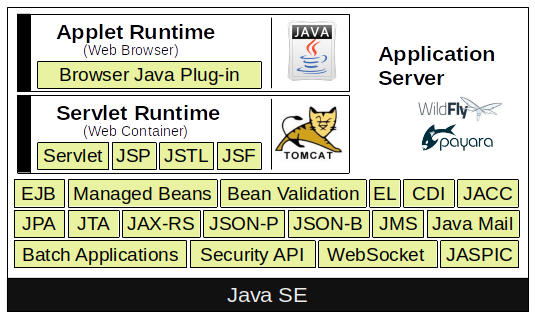
If you plan to get in touch with Java Enterprise, may in the beginning it’s a bit overwhelmed and confusing. But don’t worry It’s not so worst like it seems. To start with it, you just need to know some basics about the ideas and concepts.
As first Java EE is not a tool nor a compiler you download and use it in the same manner like Java Development Kit (JDK) also known as Software Development Kit (SDK). Java Enterprise is a set of specifications. Those specifications are supported by an API and the API have a reference implementation. The reference implementation is a bundle you can download and it’s called Application Server.
Since Java EE 8 the Eclipse Foundation maintain Java Enterprise. Oracle and the Eclipse Foundation was not able to find a common agreement for the usage of the Java Trademark, which is owned by Oracle. The short version of this story is that the Eclipse Foundation renamed JavaEE to JakartaEE. This has also an impact to old projects, because the package paths was also changed in Jakarta EE 9 from javax to jakarta. Jakarta EE 9.1 upgrade all components from JDK 8 to JDK 11.
If you want to start with developing Jakarta Enterprise [1] applications you need some prerequisites. As first you have to choose the right version of the JDK. The JDK already contains the runtime environment Java Vitual Machine (JVM) in the same version like the JDK. You don’t need to install the JVM separately. A good choice for a proper JDK is always the latest LTS Version. Java 17 JDK got released 2021 and have support for 3 years until 2024. Here you can find some information about the Java release cycle.
If you wish to overcome the Oracle license restrictions you may could switch to an free Open Source implementation of the JDK. One of the most famous free available variant of the JDK is the OpenJDK from adoptium [2]. Another interesting implementation is GraalVM [3] which is build on top of the OpenJDK. The enterprise edition of GraalVM can speed up your application 1.3 times. For production system a commercial license of the enterprise edition is necessary. GraalVM includes also an own Compiler.
Version
Year
JSR
Servlet
Tomcat
JavaSE
J2EE – 1.2
1999
J2EE – 1.3
2001
JSR 58
J2EE – 1.4
2003
JSR 151
Java EE 5
2006
JSR 244
Java EE 6
2009
JSR 316
Java EE 7
2013
JSR 342
Java EE 8
2017
JSR 366
Jakarta 8
2019
4.0
9.0
8
Jakarta 9
2020
5.0
10.0
8 & 11
Jakarta 9.1
2021
5.0
10.0
11
Jakarta 10
2022
6.0
11.0
11
Jakarta 11
2023
under development
The table above is not complete but the most important current versions are listed. Feel free to send me an message if you have some additional information are missing in this overview.
You need to be aware, that the Jakarta EE Specification needs a certain Java SDK and the Application Server maybe need as a runtime another Java JDK. Both Java Versions don’t have to be equal.
In the next step you have to choose the Jakarta EE environment implementation. This means decide for an application server. It’s very important that the application server you choose can operate on the JVM version you had installed on your system. The reason is quite simple, because the application server is implemented in Java. If you plan to develop a Servlet project, it’s not necessary to operate a full application server, a simple Servlet Container like Apache Tomcat (Catalina) or Jetty contains everything is required.
Jakarta Enterprise reference implementations are: Payara (fork of Glassfish), WildFly (formerly known as JBoss), Apache Geronimo, Apache TomEE, Apache Tomcat, Jetty and so on.
May you heard about Microprofile [4]. Don’t get confused about it, it’s not that difficult like it seems in the beginnin. In general you can understand Microprofiles as a subset of JakartaEE to run Micro Services. Microprofiles got extended by some technologies to trace, observe and monitor the status of the service. Version 5 was released on December 2021 and is full compatible to JakartaEE 9.
Core Technologies
Plain Old Java Beans
POJOs are simplified Java Objects without any business logic. This type of Java Beans only contains attributes and its corresponding getters and setters. POJOs do not:
Extend pre-specified classes: e. g. public class Test extends javax.servlet.http.HttpServlet is not considered to be a POJO class.
Contain pre-specified annotations: e. g. @javax.persistence.Entity public class Test is not a POJO class.
Implement pre-specified interfaces: e. g. public class Test implements javax.ejb.EntityBean is not considered to be a POJO class.
(Jakarta) Enterprise Java Beans
An EJB component, or enterprise bean, is a body of code that has fields and methods to implement modules of business logic. You can think of an enterprise bean as a building block that can be used alone or with other enterprise beans to execute business logic on the Java EE server.
Enterprise beans are either (stateless or stateful) session beans or message-drivenbeans. Stateless means, when the client finishes executing, the session bean and its data are gone. A message-driven bean combines features of a session bean and a message listener, allowing a business component to receive (JMS) messages asynchronously.
(Jakarta) Servlet
Java Servlet technology lets you define HTTP-specific Servlet classes. A Servlet class extends the capabilities of servers that host applications accessed by way of a request-response programming model. Although Servlets can respond to any type of request, they are commonly used to extend the applications hosted by web servers.
(Jakarta) Server Pages
JSP is a UI technology and lets you put snippets of Servlet code directly into a text-based document. JSP files transformed by the compiler to a Java Servlet.
(Jakarta) Server Pages Standard Tag Library
The JSTL encapsulates core functionality common to many JSP applications. Instead of mixing tags from numerous vendors in your JSP applications, you use a single, standard set of tags. JSTL has iterator and conditional tags for handling flow control, tags for manipulating XML documents, internationalization tags, tags for accessing databases using SQL, and tags for commonly used functions.
(Jakarta) Server Faces
JSF technology is a user interface framework for building web applications. JSF was introduced to solve the problem of JSP, where program logic and layout was extremely mixed up.
(Jakarta) Managed Beans
Managed Beans, lightweight container-managed objects (POJOs) with minimal requirements, support a small set of basic services, such as resource injection, lifecycle callbacks, and interceptors. Managed Beans represent a generalization of the managed beans specified by Java Server Faces technology and can be used anywhere in a Java EE application, not just in web modules.
(Jakarta) Persistence API
The JPA is a Java standards–based solution for persistence. Persistence uses an object/relational mapping approach to bridge the gap between an object-oriented model and a relational database. The Java Persistence API can also be used in Java SE applications outside of the Java EE environment. Hibernate and Eclipse Link are some reference Implementation for JPA.
(Jakarta) Transaction API
The JTA provides a standard interface for demarcating transactions. The Java EE architecture provides a default auto commit to handle transaction commits and rollbacks. An auto commit means that any other applications that are viewing data will see the updated data after each database read or write operation. However, if your application performs two separate database access operations that depend on each other, you will want to use the JTA API to demarcate where the entire transaction, including both operations, begins, rolls back, and commits.
(Jakarta) API for RESTful Web Services
The JAX-RS defines APIs for the development of web services built according to the Representational State Transfer (REST) architectural style. A JAX-RS application is a web application that consists of classes packaged as a servlet in a WAR file along with required libraries.
(Jakarta) Dependency Injection for Java
Dependency Injection for Java defines a standard set of annotations (and one interface) for use on injectable classes like Google Guice or the Sprig Framework. In the Java EE platform, CDI provides support for Dependency Injection. Specifically, you can use injection points only in a CDI-enabled application.
(Jakarta) Contexts & Dependency Injection for Java EE
CDI defines a set of contextual services, provided by Java EE containers, that make it easy for developers to use enterprise beans along with Java Server Faces technology in web applications. Designed for use with stateful objects, CDI also has many broader uses, allowing developers a great deal of flexibility to integrate different kinds of components in a loosely coupled but typesafe way.
(Jakarta) Bean Validation
The Bean Validation specification defines a metadata model and API for validating data in Java Beans components. Instead of distributing validation of data over several layers, such as the browser and the server side, you can define the validation constraints in one place and share them across the different layers.
(Jakarta) Message Service API
JMS API is a messaging standard that allows Java EE application components to create, send, receive, and read messages. It enables distributed communication that is loosely coupled, reliable, and asynchronous.
(Jakarta) EE Connector Architecture
The Java EE Connector Architecture is used by tools vendors and system integrators to create resource adapters that support access to enterprise information systems that can be plugged in to any Java EE product. A resource adapter is a software component that allows Java EE application components to access and interact with the underlying resource manager of the EIS. Because a resource adapter is specific to its resource manager, a different resource adapter typically exists for each type of database or enterprise information system.
The Java EE Connector Architecture also provides a performance-oriented, secure, scalable, and message-based transactional integration of Java EE platform–based web services with existing EISs that can be either synchronous or asynchronous. Existing applications and EISs integrated through the Java EE Connector Architecture into the Java EE platform can be exposed as XML-based web services by using JAX-WS and Java EE component models. Thus JAX-WS and the Java EE Connector Architecture are complementary technologies for enterprise application integration (EAI) and end-to-end business integration.
(Jakarta) Mail API
Java EE applications use the JavaMail API to send email notifications. The JavaMail API has two parts:
An application-level interface used by the application components to send mail
A service provider interface
The Java EE platform includes the JavaMail API with a service provider that allows application components to send Internet mail.
(Jakarta) Authorization Contract for Containers
The JACC specification defines a contract between a Java EE application server and an authorization policy provider. All Java EE containers support this contract. The JACC specification defines java.security.Permission classes that satisfy the Java EE authorization model. The specification defines the binding of container-access decisions to operations on instances of these permission classes. It defines the semantics of policy providers that use the new permission classes to address the authorization requirements of the Java EE platform, including the definition and use of roles.
(Jakarta) Authentication Service Provider Interface for Containers
The JASPIC specification defines a service provider interface (SPI) by which authentication providers that implement message authentication mechanisms may be integrated in client or server message-processing containers or runtimes. Authentication providers integrated through this interface operate on network messages provided to them by their calling containers. The authentication providers transform outgoing messages so that the source of each message can be authenticated by the receiving container, and the recipient of the message can be authenticated by the message sender. Authentication providers authenticate each incoming message and return to their calling containers the identity established as a result of the message authentication.
(Jakarta) EE Security API
The purpose of the Java EE Security API specification is to modernize and simplify the security APIs by simultaneously establishing common approaches and mechanisms and removing the more complex APIs from the developer view where possible. Java EE Security introduces the following APIs:
SecurityContext interface: Provides a common, uniform access point that enables an application to test aspects of caller data and grant or deny access to resources.
HttpAuthenticationMechanism interface: Authenticates callers of a web application, and is specified only for use in the servlet container.
IdentityStore interface: Provides an abstraction of an identity store and that can be used to authenticate users and retrieve caller groups.
(Jakarta) Java API for WebSocket
WebSocket is an application protocol that provides full-duplex communications between two peers over TCP. The Java API for WebSocket enables Java EE applications to create endpoints using annotations that specify the configuration parameters of the endpoint and designate its lifecycle callback methods.
(Jakarta) Java API for JSON Processing
The JSON-P enables Java EE applications to parse, transform, and query JSON data using the object model or the streaming model.
JavaScript Object Notation (JSON) is a text-based data exchange format derived from JavaScript that is used in web services and other connected applications.
(Jakarta) Java API for JSON Binding
The JSON-B provides a binding layer for converting Java objects to and from JSON messages. JSON-B also supports the ability to customize the default mapping process used in this binding layer through the use of Java annotations for a given field, JavaBean property, type or package, or by providing an implementation of a property naming strategy. JSON-B is introduced in the Java EE 8 platform.
(Jakarta) Concurrency Utilities for Java EE
Concurrency Utilities for Java EE is a standard API for providing asynchronous capabilities to Java EE application components through the following types of objects: managed executor service, managed scheduled executor service, managed thread factory, and context service.
(Jakarta) Batch Applications for the Java Platform
Batch jobs are tasks that can be executed without user interaction. The Batch Applications for the Java Platform specification is a batch framework that provides support for creating and running batch jobs in Java applications. The batch framework consists of a batch runtime, a job specification language based on XML, a Java API to interact with the batch runtime, and a Java API to implement batch artifacts.
Resources
Links are only visible for logged in users.
Notice: I try to keep this post up to date, but mistakes could happen. Please feel free to drop me a message, if you detected some mistakes or if you have some suggestions. If you like this article it would be great to leave a thumbs up and share with friends and colleges.
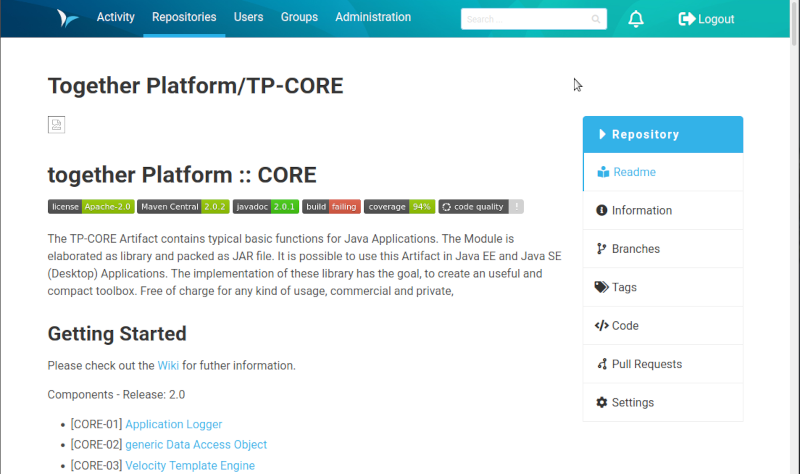
In the previous part of the article treasure chest, I described how the database connection for the TP-CORE library got established. Also I gave a insight to the internal structure of the ConfiguartionDO. Now in the second part I explain the ConfiguartionDAO and its corresponding service. With all this knowledge you able to include the application configuration feature of TP-CORE in your own project to build your own configuration registry.
Lets resume in short the architectural design of the TP-CORE library and where the fragments of the features located. TP-CORE is organized as layer architecture as shown in the graphic below.
As you can see there are three relevant packages (layer) we have to pay attention. As first the business layer resides like all other layers in an equal named package. The whole API of TP-CORE is defined by interfaces and stored in the business layer. The implementation of the defined interfaces are placed in the application layer. Domain Objects are simple data classes and placed in the domain layer. Another important pattern is heavily used in the TP-CORE library is the Data Access Object (DAO).
Now the days micro services and RESTful application are state of the art. Especially in TP-CORE the defined services aren’t REST. This design decision is based on the mind that TP-CORE is a dependency and not a standalone service. Maybe in future, after I got more feedback how and where this library is used, I could rethink the current concept. For now we treat TP-CORE as what it is, a library. That implies for the usage in your project, you can replace, overwrite, extend or wrap the basic implementation of the ConfigurationDAO to your special necessities.
To keep the portability of changing the DBMS Hibernate (HBM) is used as JPA implementation and O/R mapper. The Spring configuration for Hibernate uses the EntityManager instead of the Session, to send requests to the DBMS. Since version 5 Hibernate use the JPA 2 standard to formulate queries.
As I already mentioned, the application configuration feature of TP-CORE is implemented as DAO. The domain object and the database connection was topic of the first part of this article. Now I discuss how to give access to the domain object with the ConfigurationDAO and its implementation ConfigurationHbmDAO. The domain object ConfigurationDO or a list of domain objects will be in general the return value of the DAO. Actions like create are void and throw just an exception in the case of a failure. For a better style the return type is defined as Boolean. This simplifies also writing unit tests.
Sometimes it could be necessary to overwrite a basic implementation. A common scenario is a protected delete. For example: a requirement exist that a special entry is protected against a unwanted deletion. The most easy solution is to overwrite the delete whit a statement, refuses every time a request to delete a domain object whit a specific UUID. Only adding a new method like protectedDelete() is not a god idea, because a developer could use by accident the default delete method and the protected objects are not protected anymore. To avoid this problem you should prefer the possibility of overwriting GenericDAO methods.
As default query to fetch an object, the identifier defined as primary key (PK) is used. A simple expression fetching an object is written in the find method of the GenericHbmDAO. In the specialization as ConfigurationHbmDAO are more complex queries formulated. To keep a good design it is important to avoid any native SQL. Listing 1 shows fetch operations.
The readability of these few lines of source is pretty easy. The query we formulated for getAllConfigurationSetEntries() returns a list of ConfigurationDO objects from the same module whit equal version of a configSet. A module is for example the library TP-CORE it self or an ACL and so on. The configSet is a namespace that describes configuration entries they belong together like a bundle and will used in a service like e-mail. The version is related to the service. If in future some changes needed the version number have increase. Lets get a bit closer to see how the e-mail example will work in particular.
We assume that a e-mail service in the module TP-CORE contains the configuration entries: mailer.host, mailer.port, user and password. As first we define the module=core, configSet=email and version=1. If we call now getAllConfigurationSetEntries(core, 1, email); the result is a list of four domain objects with the entries for mailer.host, mailer.port, user and password. If in a newer version of the email service more configuration entries will needed, a new version will defined. It is very important that in the database the already exiting entries for the mail service will be duplicated with the new version number. Of course as effect the registry table will grow continual, but with a stable and well planned development process those changes occur not that often. The TP-CORE library contains an simple SMTP Mailer which is using the ConfigurationDAO. If you wish to investigate the usage by the MailClient real world example you can have a look on the official documentation in the TP-CORE GitHub Wiki.
The benefit of duplicate all existing entries of a service, when the service configuration got changed is that a history is created. In the case of update a whole application it is now possible to compare the entries of a service by version to decide exist changes they take effect to the application. In practical usage this feature is very helpful, but it will not avoid that updates could change our actual configuration by accident. To solve this problem the domain object has two different entries for the configuration value: default and configuration.
The application configuration follows the convention over configuration paradigm. Each service need by definition for all existing configuration entries a fix defined default value. Those default values can’t changed itself but when the value in the ConfigurationDO is set then the defaultValue entry will ignored. If an application have to be updated its also necessary to support a procedure to capture all custom changes of the updated configuration set and restore them in the new service version. The basic functionality (API) for application configuration in TP-CORE release 3.0 is:
The following listing gives you an idea how a implementation in your own service could look like. This snipped is taken from the JavaMailClient and shows how the internal processing of the fetched ConfigurationDO objects are managed.
privatevoidprocessConfiguration(){ListconfigurationEntries=configurationDAO.getAllConfigurationSetEntries("core",1,"email");for(ConfigurationDOentry: configurationEntries){Stringvalue;if(StringUtils.isEmpty(entry.getValue())){ value =<strong>entry.getDefaultValue</strong>();}else{ value =<strong>entry.getValue</strong>();}if(entry.getKey().equals(cryptoTools.calculateHash("mailer.host",HashAlgorithm.SHA256))){configuration.replace("mailer.host", value);}elseif(entry.getKey().equals(cryptoTools.calculateHash("mailer.port",HashAlgorithm.SHA256))){configuration.replace("mailer.port", value);}elseif(entry.getKey().equals(cryptoTools.calculateHash("user",HashAlgorithm.SHA256))){configuration.replace("mailer.user", value);}elseif(entry.getKey().equals(cryptoTools.calculateHash("password",HashAlgorithm.SHA256))){configuration.replace("mailer.password", value);}}}
Java
Another functionality of the application configuration is located in the service layer. The ConfigurationService operates on the module perspective. The current methods resetModuleToDefault() and filterMandatoryFieldsOfConfigSet() already give a good impression what that means.
If you take a look on the MailClientService you detect the method updateDatabaseConfiguration(). May you wonder why this method is not part of the ConfigurationService? Of course this intention in general is not wrong, but in this specific implementation is the update functionality specialized to the MailClient configuration. The basic idea of the configuration layer is to combine several DAO objects to a composed functionality. The orchestration layer is the correct place to combine services together as a complex process.
Resume
The implementation of the application configuration inside the small library TP-CORE allows to define an application wide configuration registry. This works also in the case the application has a distribute architecture like micro services. The usage is quite simple and can easily extended to own needs. The proof that the idea is well working shows the real world usage in the MailClient and FeatureToggle implementation of TP-CORE.
I hope this article was helpful and may you also like to use TP-CORE in your own project. Feel free to do that, because of the Apache 2 license is also no restriction for commercial usage. If you have some suggestions feel free to leave a comment or give a thumbs up. A star on my TP-CORE GitHub project s also welcome.
Through the years, different techniques to storage configuration settings for applications got established. We can choose between database, property files, XML or YAML, just to give a few impressions of the options we could choose from. But before we jumping into all technical details of a possible implementation, we need to get a bit familiar of some requirements.
Many times in my professional life I touched this topic. Problems occur periodically after an application was updated. My peak of frustration, I reached with Windows 10. After every major update many settings for security and privacy switched back to default, apps I already uninstalled messed up my system again and so on. This was reasons for me to chose an alternative to stop suffering. Now after I switched to Ubuntu Mate I’m fine, because those problems got disappear.
Several times I also had to maintain legacy projects and needed to migrate data to newer versions. A difficult and complex procedure. Because of those activities I questioned myself how this problem could handled in a proper way. My answer you can find in the open source project TP-CORE. The feature application configuration is my way how to avoid the effect of overwriting important configuration entries during the update procedure.
TP-CORE is a free available library with some useful functionality written in Java. The source code is available on GitHub and the binaries are published on Maven Central. To use TP-CORE in your project you can add it as dependency.
The feature of application configuration is implemented as ConfigurationDAO and use a database. My decision for a database approach was driven by the requirement of having a history. Off course the choice have also some limitations. Obviously has the configuration for the database connection needed to be stored somewhere else.
TP-CORE use Spring and Hibernate (JPA) to support several DBMS like PostgreSQL, Oracle or MariaDB. My personal preference is to use PostgreSQL, so we can as next step discuss how to setup our database environment. The easiest way running a PostgreSQL Server is to use the official Docker image. If you need a brief overview how to deal with Docker and PostgreSQL may you like to check my article: Learn to walk with Docker and PostgreSQL. Below is a short listing how the PostgreSQL container could get instantiated in Docker.
May you need to make some changes on the listing above to fit it for your system. After your DBMS is running well we have to create the schemata and the user with a proper password. In our case the schema is called together. the user is also called together and the password will be together too.
To establish the connection from your application to the PostgreSQL DBMS we use a XML configuration from the Spring Framework. The GitHub repository of TP-CORE contains already a working configuration file called spring-dao.xml. The Spring configuration includes some other useful features like transactions and a connection pool. All necessary dependencies are already included. You just need to replace the correct entries for the connection variables:
In the next step you need to tell your application how to instanciate the Spring context, using the configuration file spring-dao.xml. Depending on your application type you have two possibilities. For a standard Java app, you can add the following line to your main method:
The creation of the database table will managed by Hibernate during the application start. When you discover the GitHub repository of the TP-CORE project you will find in the directory /src/main/filters the file database.properties. This file contains more connection strings to other database systems. In the case you wish to compile TP-CORE by your own, you can modify database.properties to your preferred configuration. The full processed configuration file with all token replacements you will find in the target directory.
In the next paragraph we will have a closer look on the Domain Object ConfigurationDO.
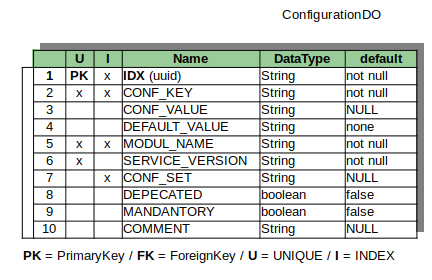
The most columns you see in the image above, is very clear, for what they got used. As first point we need to clarify, what makes an entry unique? Of course the UUID as primary key fits this requirement as well. In our case the UUID is the primary key and is auto generated by the application, when a new row will created. But using in an application all the time a non human readable id as key, to grab a value is heavily error prone and uncomfortable. For this use case I decided a combination of configuration key, module name and service version to define a unique key entry.
To understand the benefit of this construction I will give a simple example. Imagine you have functionality of sending E-Mails in your application. This functionality requires several configuration entries like host, user and password to connect with an SMTP server. to group all those entries together in one bundle we have the CONFIG_SET. If your application deals with an modular architecture like micro services, it could be also helpful to organize the configuration entries by module or service name. For this reason the MODULE_NAME was also included into this data structure. Both entries can be used like name spaces to fetch relevant information more efficient.
Now it could be possible that some changes of the functionality create new configuration entries or some entries got obsolete. To enable a history and allow a backward compatibility the data structure got extended by SERVICE_VERSION.
Every entry contains a mandatory default value and an optional configuration value. The application can overwrite the default value by filling the configuration value field. This allows updates without effect the custom configuration, as long the developer respect to not fill entries for configuration values and always use the default entry. This definition is the convention over configuration paradigm.
The flags deprecated and mandatory for a configuration key are very explicit and descriptive. Also the column comment don’t need as well any further explanation.
If there are changes of one or more configuration entries for a service, the whole configuration set has to be duplicated with the new service version. As example you can have a look on the MailClient functionality of TP-CORE how the application configuration is used.
A very important information is that the configuration key is in the DBMS stored as SHA-512 hash. This is a simple protection against a direct manipulation of the configuration in the DBMS, outside of the application. For sure this is not a huge security, but minimum it makes the things a bit uncomfortable. In the application code is a human readable key name used. The mapping is automatic, and we don’t need to worry about it.
Resume
In this first part I talked about why I had need my own implementation of a application registry to storage configuration settings. The solution I prefer is using a database and I showed how enable the database configuration in your own project. Shortly we also had a view on the data structure and how the Domain Object is working.
After I started my career in the software industry I needed to participate in a lot of different meetings. Since the most companies transformed to agile the amount of meetings increased. Many developers have equal perceptions about meetings like me. The most of those meetings are just time wasting.
Often the person who had send the meeting invitations was not thinking about the different between quality and quantity. This thoughts are not new. Long ago Tom DeMarco described this situations in his books. His solution works until today and you find it also in explanations about how agile communication should organized. Just put the persons together you really need to make decisions. Less is always better than to many.
Another thing about meetings I figured out by my own experience, is when technicians and non technicians try to communicate. If you just watch this as an external observer it could be a funny entertainment, like the parody in the video I placed below the article. But if you involved as an expert to help a CTO taking decisions and they do not understand what you talking about, it drives you into frustrations.
Yegor Bugayenko mentioned in his podcast Shift-M that a CTO is far away from hands on code. I had recognized the same. And often this persons also far away from a deep technical understanding. The same I can say about project managers. In my perception, I often got the idea this managers won’t to understand technical details as well, to take good decisions. Well sometimes technicians exaggerate also with the level of information they give. Not everybody need to get the full details of a topic. A realistic overall picture, maybe a bit more details than a simple synopsis could make the things for everybody more easy.
A very old story to illustrate this topic was in the early 2000, when the questions pop up to implement a fat or a thin client. For this decision-guys thin client was sounding more smart, also they took this option, without understanding the consequences. After a while the project was running, they start to blame around that the costs are exploding and the result was not what they expect. In a retrospective is very easy to understand why the problems occurred. The manager had not specified well the browser support for the thin client. To secure all the compatibility was extremely cost intense. Also to keep the UI up to date will produce in the future costs, because the browsers will not stay from today the same like 10 years in the future. The same discussions we always have in every time period. Not so long ago was the question monolith or microservice? Simon Brown answered this question very straight to the point: „If you can’t build a monolith, what makes your think microservices are the answer?“ And what are the drama topics in 2020? Of course cloud services, Kubernetes and serverless.
For me it would be great when the persons taking decisions, minimum want to understand technical things and their consequences. If we focus more on the soft skills mangers should have, less software projects would fail. In between we keep going to give developers rhetoric trainings, to give them the capability to talk unspecific like a salesman.
Maybe you have bought you like me an Raspberry Pi4 with 4GB RAM and think about what nice things you could do with it. Since the beginning I got the idea to use it as an lightweight home server. Of course you can easily use a mini computer with more power and obviously more energy consumption too. Not a nice idea for a device is running 24/7. As long you don’t plan to mine your own bitcoins or host a high frequented shop system, a PI device should be sufficient.
I was wanted to increase the network security for my network. For this reason I found the application AdGuard which blocks many spy software from internet services you use on every device is connected to the network where AdGuard is running. Sounds great and is not so difficult to do. Let me share with you my experience.
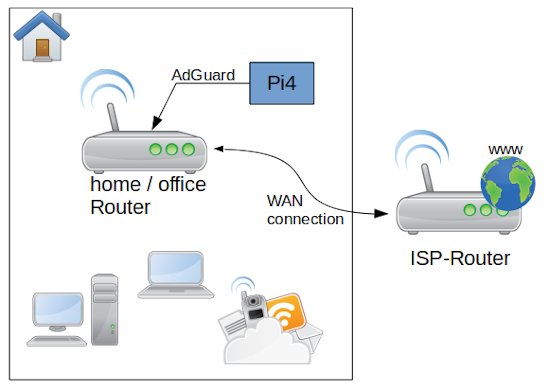
As first let’s have a look to the overall system and perquisites. After the Router from my Internet Service Provider I connected direct by wire my own Network router an Archer C50. On my Rapsbery PI4 with 4GB RAM run as operation system Ubuntu Linux Server x64 (ARM Architecture). The memory card is a 64 GB ScanDisk Ultra. In the case you need a lot of storage you can connect an external SSD or HDD with an USB 3 – SATA adapter. Be aware that you use a storage is made for permanent usage. Western Digital for example have an label called NAS, which is made for this purpose. If you use standard desktop versions they could get broken quite soon. The PI is connected with the router direct by LAN cable.
The first step you need to do is to install on the Ubuntu the Docker service. this is a simple command: apt-get install docker. if you want to get rid of the sudo you need to add the user to the docker group and restart the docker service. If you want to get a bit more familiar with Docker you can check my video Docker basics in less than 10 minutes.
Before you just copy and past the listing above, you need to change the IP addresses to the ones your network is using. for all the installation, this is the most difficult part. As first the network type we create is macvlan bounded to the network card eth0. eth0 is for the PI4 standard. The name of the network we gonna to create is lan. To get the correct values for subnet, ip-range and gateway you need to connect to your router administration.
To understand the settings, we need a bit of theory. But don’t worry is not much and not that complicated. Mostly your router is reachable by an IP address similar to 192.168.0.1 – this is a static address and something equal we want to have for AdGuard on the PI. The PI itself is in my case reachable by 192.168.0.12, but this IP we can not use for AdGuard. The plan is to make the AdGuard web interface accessible by the IP 192.168.0.2. OK let’s do it. First we have to switch on our router administration to the point DHCP settings. In the Screenshot you can see my configuration. After you changed your adaptions don’t forget to reboot the router to take affect of the changes.
I configured the dynamic IP range between 192.168.0.5 to 192.168.0.199. This means the first 4 numbers before 192.168.0.5 can be used to connect devices with a static IP. Here we see also the entry for our default gateway. Whit this information we are able to return to our network configuration. the subnet IP is like the gateway just the digits in the last IP segment have to change to a zero. The IP range we had limited to the 192.168.0.4 because is one number less than where we configured where the dynamic IP range started. That’s all we need to know to create our network in Docker on the PI.
Now we need to create in the home directory of our PI the places were AdGuard can store the configuration and the data. This you can do with a simple command in the ssh shell.
The container we create is called adguard and we connect this image to our own created network lan with the IP address 192.168.0.2. Then we have to open a lot of ports AdGuard need to do the job. And finally we connect the two volumes for the configuration and data directory inside of the container. As restart policy we set the container to always, this secure that the service is up again after the server or docker was rebooted.
After the execution of the docker run command you can reach the AdGuard configuration page with your browser under: http://192.168.0.2:3000. Here you can create the primary setup to create a login user and so on. After the first setup you can reach the web interface by http://192.168.0.2.
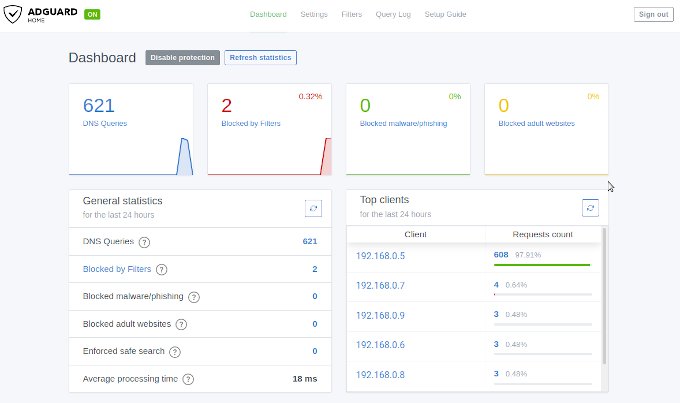
The IP address 192.168.0.2 you need now to past into the field DNS Server for the DHCP settings. Save the entries and restart your router to get all changes working. When the router is up open on your browser any web page from the internet to see that everything is working fine. After this you can login into the AdGuard web console to see if there appearing data on the dashboard. If this is happened then you are don e and your home or office network is protected.
If you think this article was helpful and you like it, you can support my work by sharing this post or leave a like. If you have some suggestions feel free to drop a comment.
If you whish to discover a way how to turn negative vibes between testers and developers into something positive – here is a great solution for that. The thing I like to introduce is quite old but even today in our brave new DevOps world an evergreen.
Many years ago in the world wide web I stumbled over a PDF called Bug Fix Bingo. A nice funny game for IT professionals. This little funny game originally was invent by the software testing firm K. J. Ross & Associates. Unfortunately the original site disappeared long ago so I decided to conserve this great idea in this blog post.
I can recommend this game also for folks they are not so deep into testing, but have to participate in a lot of IT meetings. Just print the file, bring some copies to your next meeting and enjoy whats gonna happen. I did it several times. Beside the fun we had it changed something. So let’s have a look into the concept and rules.
Bug Fix Bingo is based on a traditional Bingo just with a few adaptions. Everyone can join the game easily without a big preparation, because its really simple. Instead of numbers the Bingo uses statements from developers in defect review meetings to mark off squares.
Rules:
Bingo squares are marked off when a developer makes the matching statement during bug fix sessions.
Testers must call “Bingo” immediately upon completing a line of 5 squares either horizontally, vertically or diagonally.
Statements that arise as result of a bug that later becomes “deferred”, “as designed”, or “not to fixed” should be classified as not marked.
Bugs that are not reported in an incident report can not be used.
Statements should also be recorded against the bug in the defect tracking system for later confirmation.
Any tester marks off all 25 statements should be awarded 2 weeks stress leave immediately.
Any developer found using all 25 statements should be seconded into the test group for a period of no less than 6 months for re-education.
“It works on my machine.”
“Where were you when the program blew up?”
“Why do you want to do it in that way?”
“You can’t use that version on your system.”
“Even thought it doesn’t work, how does it feel.”
“Did you check for a virus on your system?”
“Somebody must have changed my code.”
“It works, but it hasn’t been tested.”
“THIS can’t be the source of that module in weeks!”
“I can’t test anything!”
“It’s just some unlucky coincidence.”
“You must have the wrong version.”
“I haven’t touched that module in weeks.”
“There is something funky in your data.”
“What did you type in wrong to get it to crash?”
“It must be a hardware problem.”
“How is that possible?”
“It worked yesterday.”
“It’s never done that before.”
“That’s weird …”
“That’s scheduled to be fixed in the next release.”
“Yes, we knew that would happen.”
“Maybe we just don’t support that platform.”
“It’s a feature. We just haven’t updated the specs.”
“Surly nobody is going to use the program like that.”
The BuxFix Bing Gamecard
Incidentally, developers have a game like this too. They score points every time a QA person tries to raise a defect on functionality that is working as specified.
For your pleasure I place the original file of the Bug Fix Bingo here, so you can download and print it out for your next meeting. Comments about your experiences playing this game are very welcomed and feel free to share if you like this post. Stay updated and subscribe my newsletter.
After some years the virtualization tool Docker proofed it’s importance for the software industry. Usually when you hear something about virtualization you may could think this is something for administrators and will not effect me as a developer as much. But wait. You’re might not right. Because having some basic knowledge about Docker as a developer will helps you in your daily business.
The network step is important, because it defines a permanent connection, how applications need to establish a connect with the PostgreSQL DBMS. If you don’t do this Docker manage the IP address and when you run multiple containers on your machine the IP addresses could changed after a system reboot. This depends mostly on the order how the containers got started.
Step 1: create the container and initialize the database
If you wish that your PostgreSQL is always up after you restart your system, you should change the restart policy form no to always. The second line configure the network connection we had define in step 0. After you created the instance pg-dbms of your PostgreSQL 11 Docker image, you need to cheek if it was success. This you can do by the
dockerps-a
Bash
command. When your container is after around 30 seconds still running you did everything right.
Step 2: copy the initialized database directory to a local directory on your host system
The biggest problem with the current container is, that all data will got lost, when you erase the container. This means wen need to find a way how to save this data permanently. The easiest way is to copy the data directory from your container to an directory to your host system. The copy command needs tow parameters source and destination. for the source you need to specify the container were you want to grab the files. in our case the container is named pg-dbms. The destination is a PostgreSQL folder in the home directory of the user ed. If you use Windows instead of Linux it works the same. Just adapt the directory path and try to avoid white-spaces. When the files appeared in the defined directory you’re done with this step.
Step 3: stop the current container
dockerstoppg-dbms
Bash
In the case you wish to start a container, just replace the word stop for the word start. The container we created to grab the initial files for the PostgreSQL DBMS we don’t need no longer, so we can erase it, but to do that as first the running container have to be stopped.
Step 4: start the current container
dockerstartpg-dbms
Bash
After the container is stopped we are able to erase it.
Step 5: recreate the container with an external volume
Now we can link the directory with the exported initial database to a new created PostgreSQL container. that’s all. The big benefit of this activities is, that now every database we create in PostgreSQL and the data of this database is outside of the docker container on our local machine. This allows a much more simpler backup and prevent losing information when a container has to be updated.
If you have instead of PostgreSQL other images where you need to grab files to reuse them you can use this tutorial too. just adapt to the image and the paths you need. The procedure is almost the same. If you like to get to know more facts about Docker you can watch also my video Docker Basics in less then 10 Minutes. In the case you like this short tutorial share it with your friends and colleagues. To stay informed don’t forget to subscribe to my newsletter.
If you and your team are dealing with tools like Git or Subversion, you may need an administrative layer where you are able to manage user access and repositories in a comfortable way, because source control management systems (SCM) don’t bring this functionality out of the box.
Perhaps you are already familiar with popular management solutions like GitHub, GitBlit or GitLab. The main reason for their success is their huge functionality. And of course, if you plan to create your own build and deploy pipeline with an automation server like Jenkins you will need to host your own repository manager too.
As great as the usage of GitLab and other solutions is, there is also a little bitter taste:
The administration is very complicated and requires some experience.
The minimal requirement of hardware resources to operate those programs with good performance is not that little.
To overcome all these hurdles, I will introduce a new star on the toolmaker’s sky SCM-Manager [1]. Fast, compact, extendable and simple, are the main attributes I would use to describe it.
Kick Starter: Installation
Let’s have a quick look at how easy the installation is. For fast results, you can use the official Docker container [2]. All it takes is a short command:
First, we create a container named scm based on the SCM-Manager image 2.22.0. Then, we tell the container to always restart when the host operating system is rebooted. Also, we open the ports 2222 and 8080 to make the service accessible. The last step is to mount a directory inside the container, where all configuration data and repositories are stored.
Another option to get the SCM-Manager running on a Linux server like Ubuntu is by using apt. The listing below shows how to do the installation.
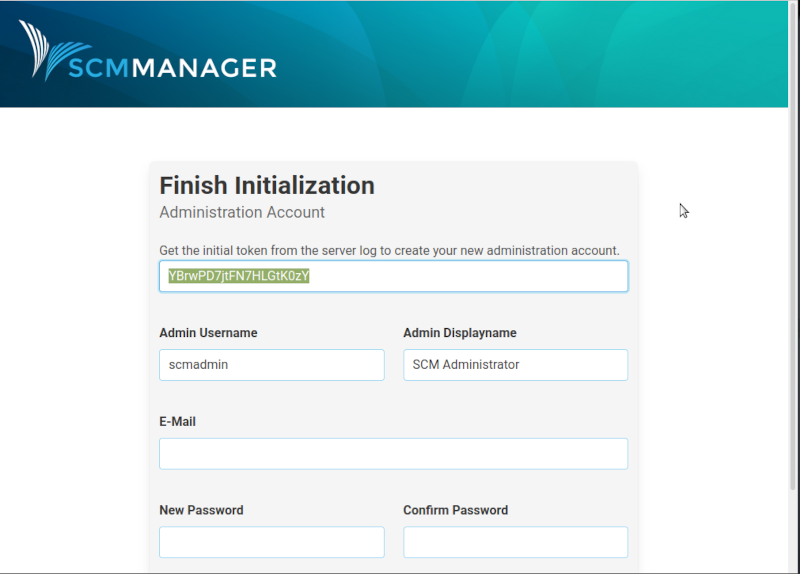
SCM-Manager can also be installed on systems like Windows or Apple. You can find information about the installations on additional systems on the download page [3]. When you perform an installation, you will find a log entry with a startup token in the console.
Startup token in the command line.
After this you can open your browser and type localhost:8080, where you can finish the installation by creating the initial administration account. In this form, you need to paste the startup token from the command line, as it is shown in image 2. After you submitted the initialization form, you get redirected to the login. That’s all and done in less than 5 minutes.
Initialization screen.
For full scripted untouched installations, there is also a way to bypass the Initialization form by using the system property scm.initalPassword. This creates a user named scmadmin with the given password.
In older versions of the SCM-Manager, the default login account was scmadmin with the password scmadmin. This old way is quite helpful but if the administrator doesn’t disable this account after the installation, there is a high-security risk. This security improvement is new since version 2.21.
Before we discover more together about the administration, let’s first get to some details about the SCM-Manager in general. SCM-Manager is open source under MIT license. This allows commercial usage. The Code is available on GitHub. The project started as research work. Since Version 2 the company Cloudogu took ownership of the codebase and manages the future development. This construct allows the offering of professional enterprise support for companies. Another nice detail is that the SCM-Manager is made in Germany.
Pimp Me Up: Plugins
One of the most exciting details of using the SCM-Manager is, that there is a simple possibility to extend the minimal installation with plugins to add more useful functions. But be careful, because the more plugins are installed, the more resources the SCM-Manager needs to be allocated. Every development team has different priorities and necessities, for this reason, I’m always a fan of customizing applications to my needs.
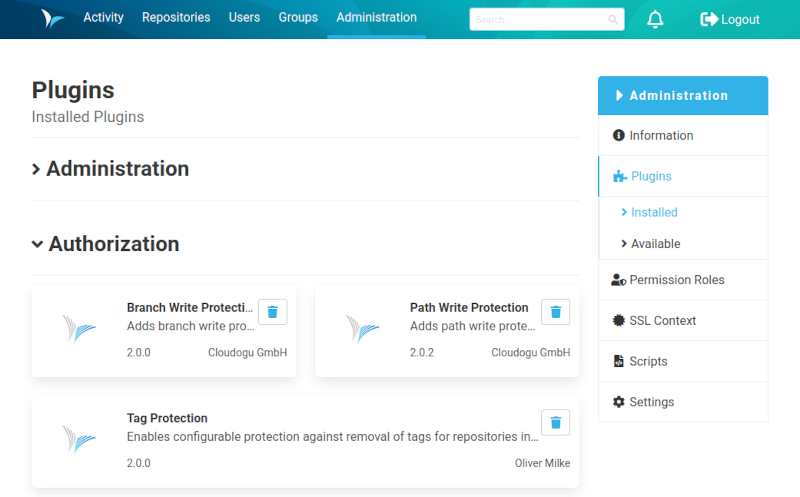
Installed Plugins.
The plugin installation section is reachable by the Administration tab. If you can’t see this entry you don’t have administration privileges. In the menu on the right side, you find the entry Plugins. The plugin menu is divided into two sections: installed and available. For a better overview, the plugins are organized by categories like Administration, Authorization, or Workflow. The short description for each plugin is very precise and gives a good impression of what they do.
Some of the preinstalled plugins like in the category Source Code Management for supported repository types Git, Subversion, and Mercurial can’t be uninstalled.
Some of my favorite plugins are located in the authorization section:
Those features are the most convenient for Build- and Configuration Managers. The usage is also as simple as the installation. Let’s have a look at how it works and for what it’s necessary.
Gate Keeper: Special Permissions
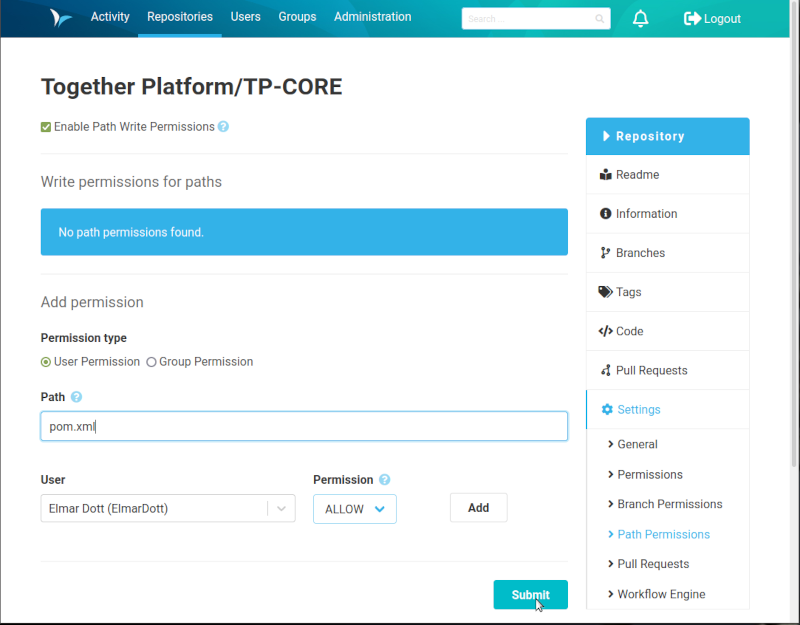
Imagine, your team deals for example whit a Java/Maven project. Perhaps it exists a rule that only selected people should be allowed to change the content of the pom.xml build logic. This can be achieved with the Path Write Protection Plugin. Once it is installed, navigate to the code repository and select the entry Settings in the menu on the right side. Then click on the option Path Permissions and activate the checkbox.
Configuring Path permissions.
As you can see in image 4, I created a rule that only the user Elmar Dott is able to modify the pom.xml. The opposite permission is exclude (deny) the user. If the file or a path expression doesn’t exist, the rule cannot be created. Another important detail is, that this permission covers all existing branches. For easier administration, existing users can be organized into groups.
In the same way, you are able to protect branches against unwanted changes. A scenario you could need this option is when your team uses massive branches or the git-flow branch model. Also, personal developer branches could have only write permission for the developer who owns the branch or the release branch where the CI /CD pipeline is running has only permissions for the Configuration Management team members.
Let’s move ahead to another interesting feature, the review plugin. This plugin enables pull requests for your repositories. After installing the review plugin, a new bullet point in the menu of your repositories appears, it’s called Pull Requests.
Divide and Conquer: Pull Requests
On the right hand, pull requests [4] are a very powerful workflow. During my career, I often saw the misuse of pull requests, which led to drastically reduced productivity. For this reason, I would like to go deeper into the topic.
Originally, pull requests were designed for open source projects to ensure code quality. Another name for this paradigm is dictatorship workflow [5]. Every developer submits his changes to a repository and the repository owner decides which revision will be integrated into the codebase.
If you host your project sources on GitHub, strangers can’t just collaborate in your project, they first have to fork the repository into their own GitHub space. After they commit some revisions to this forked repository, they can create a pull request to the original repository. As repository owner, you can now decide whether you accept the pull request.
The SCM tool IBM Synergy had a similar strategy almost 20 years ago. The usage got too complicated so that many companies decided to move to other solutions. These days, it looks like history is repeating itself.
The reason why I’m skeptical about using pull requests is very pragmatic. I often observed in projects that the manager doesn’t trust the developers. Then he decides to implement the pull request workflow and makes the lead developer or the architect accept the pull requests. These people are usually too busy and can’t really check all details of each single pull request. Hence, their solution is to simply merge each pull request to the code base and check if the CI pipeline still works. This way, pull requests are just a waste of time.
There is another way how pull requests can really improve the code quality in the project: if they are used as a code review tool. How this is going to work, will fill another article. For now, we leave pull requests and move to the next topic about the creation of repositories.
Treasure Chest: Repository Management
The SCM-Manager combines three different source control management repository types: Git, Subversion (SVN), and Mercurial. You could think that nobody uses Subversion anymore, but keep in mind that many companies have to deal with legacy projects managed with SVN. A migration from those projects to other technologies may be too risky or simply expensive. Therefore, it is great to have a solution that can manage more than one repository type.
If you are Configuration Manager and have to deal with SVN, keep in mind that some things are a bit different. Subversion organizes branches and tags in directories. An SVN repository usually gets initialized with the folders:
trunk — like the master branch in Git.
branches — references to revisions in the trunk were forked code changes can committed.
tags — like branches without new code revisions.
In Git you don’t need this folder structure, because how branches are organized is completely different. Git (and Mercurial) compared to Subversion is a distributed Source Control Management System and branches are lose coupled and can easily be deleted if they are obsolete. As of now, I don’t want to get lost in the basics of Source Control Management and jump to the next interesting SCM-Manager plugins.
Uncover Secrets
If a readme.md file is located in the root folder of your project, you could be interested in the readme plugin. Once this plugin is activated and you navigate into your repository the readme.md file will be rendered in HTML and displayed.
The rendered readme.md of a repository.
If you wish to have a readable visualization of the repository’s activities, the activity plugin could be interesting for you. It creates a navigation entry in the header menu called Activity. There you can see all commit log entries and you can enter into a detailed view of the selected revision.
The activity view.
This view also contains a compare and history browser, just like clients as TortoiseGit does.
The Repository Manager includes many more interesting details for the daily work. There is even a code editor, which allows you to modify files directly in the SCM-Manger user interface.
Next, we will have a short walk through the user management and user roles.
Staffing Office: User and Group Management
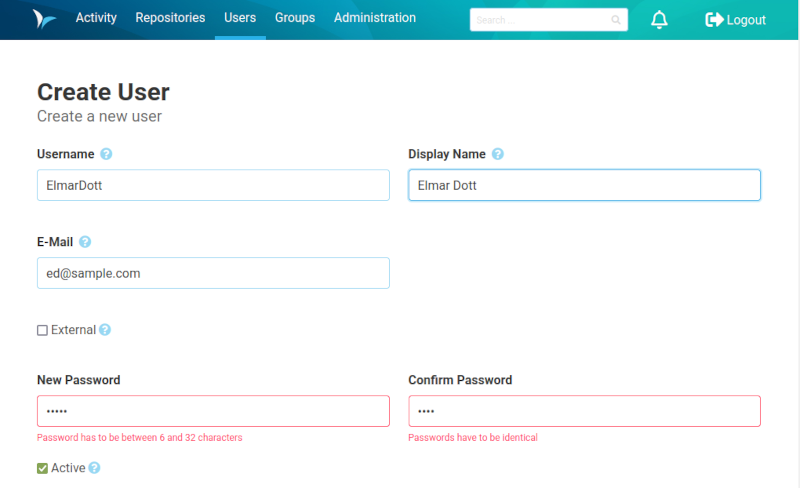
Creating new users is like almost every activity of the SCM-Manager a simple thing. Just switch to the Users tab and press the create user button. Once you have filled out the form and saved it, you will be brought back to the Users overview.
Creating a new user.
Here you can already see the newly created user. After this step, you will need to administrate the user’s permissions, because as of now it doesn’t have any privileges. To change that just click on the name of the newly created user. On the user’s detail page, you need to select the menu entry Settings on the right side. Now choose the new entry named Permissions. Here you can select from all available permissions the ones you need for the created account. Once this is done and you saved your changes, you can log out and log in with your new user, to see if your activity was a success.
If you need to manage a massive number of users it’s a good idea to organize them into groups. That means after a new user is created the permissions inside the user settings will not be touched and stay empty. Group permissions can be managed through the Groups menu entry in the header navigation. Create a new group and select Permission from the right menu. This configuration form is the same as the one of the user management. If you wish to add existing users to a group switch to the point General. In the text field Members, you can search for an existing user. If the right one is selected you need to press the Add Member button. After this, you need to submit the form and all changes are saved and the new permissions got applied.
To have full flexibility, it is allowed to add users to several groups (roles). If you plan to manage the SCM-Manager users by group permissions, be aware not to combine too many groups because then users could inherit rights you didn’t intend to give them. Currently, there is no compact overview to see in which groups a user is listed and which permissions are inherited by those groups. I’m quite sure in some of the future versions of the SCM-Manager this detail will be improved.
Besides the internal SCM-Manager user management exist some plugins where you are able to connect the application with LDAP.
Lessons Learned
If you dared to wish for a simpler life in the DevOps world, maybe your wish became true. The SCM-Manager could be your best friend. The application offers a lot of functionality that I briefly described here, but there are even more advanced features that I haven’t even mentioned in this short introduction: There is a possibility to create scripts and execute them with the SCM-Manager API. Also, a plugin for the Jenkins automation server is available. Other infrastructure tools like Jira, Timescale, or Prometheus metrics gathering have an integration to the SCM-Manager.
I hope that with this little article I was able to whet your appetite for this exciting tool and I hope you enjoy trying it out.
After the gang of four (GOF) Erich Gamma, Richard Helm, Ralph Johnson, and John Vlissides published the book, Design Patterns: Elements of Reusable Object-Oriented Software, learning how to describe problems and solutions became popular in almost every field in software development. Likewise, learning to describe don’ts and anti-pattern became equally as popular.
In publications that discussed these concepts, we find helpful recommendations for software design, project management, configuration management, and much more. In this article, I will share my experience dealing with version numbers for software artifacts.
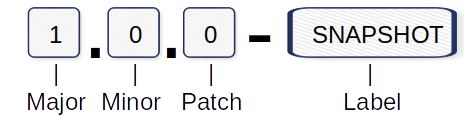
Most of us are already familiar with a method called semantic versioning, a powerful and easy-to-learn rule set for how version numbers have to be structured and how the segments should increase.
Version numbering example:
Major: Incompatible API changes.
Minor: Add new functionality.
Patch: Bugfixes and corrections.
Label: SNAPSHOT marking the “under development” status.
An incompatible API Change occurs when an externally accessible function or class was deleted or renamed. Another possibility is a change in the signature of a method. This means the return value or parameters has been changed from its original implementation. In these scenarios, it’s necessary to increase the Major segment of the version number. These changes present a high risk for API consumers because they need to adapt their own code.
When dealing with version numbers, it’s also important to know that 1.0.0 and 1.0 are equal. This has effect to the requirement that versions of a software release have to be unique. If not, it’s impossible to distinguish between artifacts. Several times in my professional experience, I was involved in projects where there was no well-defined processes for creating version numbers. The effect of these circumstances was that the team had to secure the quality of the artifact and got confused with which artifact version they were currently dealing with.
The biggest mistake I ever saw was the storage of the version of an artifact in a database together with other configuration entries. The correct procedure should be: place the version inside the artifact in a way that no one after a release can change from outside. The trap you could fall into is the process of how to update the version after a release or installation.
Maybe you have a checklist for all manual activities during a release. But what happens after a release is installed in a testing stage and for some reason another version of the application has to be installed. Are you still aware of changing the version number manually? How do you find out which version is installed or when the information of the database is incorrect?
Detect the correct version in this situation is a very difficult challenge. For that reason, we have the requirement to keep the version inside of the application. In the next step, we will discuss a secure and simple way on how to solve an automatic approach to this problem.
Our precondition is a simple Java library build with Maven. By default, the version number of the artifact is written down in the POM. After the build process, our artifact is created and named like: artifact-1.0.jar or similar. As long we don’t rename the artifact, we have a proper way to distinguish the versions. Even after a rename with a simple trick of packaging and checking, then, in the META-INF folder, we are able to find the correct value.
If you have the Version hardcoded in a property or class file, it would also work fine, as long you don’t forget to always update it. Maybe the branching and merging in SCM systems like Git could need your special attention to always have the correct version in your codebase.
Another solution is using Maven and the token placement mechanism. Before you run to try it out in your IDE, keep in mind that Maven uses to different folders: sources and resources. The token replacement in sources will not work properly. After a first run, your variable is replaced by a fixed number and gone. A second run will fail. To prepare your code for the token replacement, you need to configure Maven as a first in the build lifecycle:
After this step, you need to know the ${project.version} property form the POM. This allows you to create a file with the name version.property in the resources directory. The content of this file is just one line: version=${project.version}. After a build, you find in your artifact the version.property with the same version number you used in your POM. Now, you can write a function to read the file and use this property. You could store the result in a constant for use in your program. That’s all you have to do!