Test First?

java Aktuell 2024.03

When I started test-driven programming over 10 years ago, I was aware of many different concepts in theory. But this approach of first writing test cases and then implementing them was somehow not the way I got on well with. To be honest, this is still the case today. So I found an adaptation of Kent Beck’s TDD paradigm that works for me. But first things first. Perhaps my approach is also quite helpful for one or the other.

I originally come from environments for highly scalable web applications to which all the great theories from the university cannot be easily applied in practice. The main reason for this is the high complexity of such applications. On the one hand, various additional systems such as in-memory cache, database and identity and access management (IAM) are part of the overall system. On the other hand, many modern frameworks such as OR Mapper hide complexity behind different access layers. As developers, we need to master all of these things. That is why there are robust, and practice proven solutions that are well known but rarely used. Kent Beck is one of the most important voices for the practical use of automated software testing.

If we want to get involved with the concept of TDD, it is important not to put too much weight on every character. Not everything is set in stone. What is important is the result at the end of the day. For this reason, it is essential to keep the objective of all efforts in mind in order to achieve personal added value. So let’s start by looking at what we want to achieve in the first place.

Success proves us right

When I first started out as a developer, I needed constant feedback on whether what I was putting together was really working. I mostly generated this feedback by spreading during my implementation countless console outputs on the one hand and on the other hand I always tried to integrate everything into a user interface and then ‘click through’ manually. Basically a very cumbersome test setup, which then has to be removed again at the end. If later bug fixes had to be made, the whole procedure started all over again. Everything was somehow unsatisfactory and far removed from a productive way of working. Somehow this had to be improved without having to reinvent yourself every time.

Finally, my original approach has exactly two significant weaknesses. The most obvious one is the commenting in and out of debug information via the console.

But the second point is much more serious. Because all the knowledge acquired about this particular implementation is not preserved. It is therefore in danger of fading over time and ultimately being lost. However, such specialized knowledge is extremely valuable for many subsequent process steps in software development. By this I explicitly mean the topic of quality. Refactoring, code reviews, bug fixes and change requests are just some of the possible examples where in-depth detailed knowledge is required.

For me personally, there is also the fact that monotonously repetitive work quickly tires me out and I would like to avoid it. Clicking through an application again and again with the same test procedure is a far away from what constitutes a fulfilling working day for me. I want to discover new things. But I can only do that if I’m not trapped in the past.

But they dare to do something

But before I go into how I have spiced up my day-to-day development work with TDD, I have to say a few words about responsibility and courage. In conversations others told me frequently that I am right, but they can’t take action to follow my recommendations because the project manager or some other superior doesn’t give a green light.

Such an attitude is extremely unprofessional in my eyes. I don’t ask an marketing manager which algorithm terminate as best. He simply has no idea what I’m talking about, because it is not his area of responsibility. A project manager who speaks out against test-driven work in the development team has also missed his job. Nowadays, test frameworks are so well integrated into the build environment that even inexperienced people can prepare for TDD in a matter of moments. It is therefore not necessary to make a big deal of the project. I can promise that even the first attempts will not take any longer than with the original approach. On the contrary, there will be a noticeable increase in productivity very quickly.

The first stage of evolution

As already mentioned, logging is a central part of test-driven development for me. Whenever it makes sense, I try to output the status of objects or variables on the console. If we use the means provided by the programming language used for this, this means that we must at least comment out this system output after the work has been done and comment it in again later when searching for errors. A redundant and error-prone procedure.

If, on the other hand, we use a logging framework right from the start, we can confidently leave the debug information in the code and deactivate it later in productive operation via the setting log level.

I also use logging as a tracer. This means that each constructor of a class writes a corresponding log entry by the log level info while it is being called. This allows me to see the order in which objects are instantiated. From time to time I have also become aware of the excessively frequent instantiation of a single object. This is helpful for performance and memory optimization measures.

I log errors that are thrown during exception handling as errors or warnings, depending on the context. This is a very helpful tool for tracking down errors later in operation.

So if I have a database access, I write a log output in the log level debug as the associated SQL was assembled. If this SQL leads to an exception because it contains an error, this exception is written with the log level error. If, on the other hand, a simple search query with correct SQL syntax takes place and the result set is empty, this event is classified as either Debug or Warning, depending on requirements. For example, if it is a login request with an incorrect user name or password, I tend to opt for the Log Level Warning, as this may contain security-related aspects during operation.

In the overall context, I tend to configure the logging for the test case execution very loquaciously and limit myself to a pure console output. During operation, the logging information is written to a log file.

The chicken or egg

Once we have laid the foundations for an additional feedback loop with logging, the next step is to decide what to do next. As already mentioned, I find it very difficult to first write a test case and then find a suitable implementation for it. Many other developers who start with TDD also face this problem.

One thing I can already anticipate is the problem of making sure that an implementation is testable. Once I have the test case, I immediately realize whether what I am creating is really testable. Experienced TDD developers have quickly learned in flesh and blood how testable code should look like. The most important point here is that methods should always have a return value that is preferably not null. This can be achieved, for example, by returning an empty list instead of null.

The requirement to have a return value is due to the way unit test frameworks work. A test case compares the return value of a method with an expected value. The test assertion has different characteristics and can therefore be: equal, unequal, true or false. Of course, there are also different variations here. For example, it may be possible to test methods that have no return value by using exceptions. All these details become clear in a very short time during using TDD. So that everyone can get started immediately without lengthy preparations.

When reading the book Test Driven Development by Example by Kent Beck, we also quickly find an explanation as to why the test cases should be written first. It is a psychological factor. It should help us to cope better with the usual stress that arises in the project. It creates a mental state in us about the status and progress of the current work. It guides us in an iterative process to expand and improve the existing solution step by step via the various test cases.

For those who, like me, have no concrete idea of the final result at the start of an implementation, this approach is difficult to implement. The intended effect of relaxation turns into a negative one. As we humans are all different, we have to find out what makes us tick in order to achieve the best possible result. It’s the same with learning strategies. Some people process information better visually, others more haptically and still others extract everything important from spoken words. So let’s try not to bend ourselves against our nature in order to produce mediocre or poor results.

Drawing the first line

A topic only becomes clear to me while I’m working on it. So I try my hand at an implementation until I need some initial feedback. That’s when I write the first test. This approach automatically gives rise to questions, each of which is worth its own test case. Can I find all available results? What happens if the result set is empty? How can the result set be narrowed down? These are all points that can be noted on a piece of paper and ticked off step by step. I had the idea of writing down a to-do list on a piece of paper a long time before I rode about it in the book by Kent Beck mentioned above. It helps me to preserve quick thoughts without being distracted from what I am currently doing. It also gives me a sense of accomplishment at the end of the day.

Since I don’t wait until I’ve implemented everything to write the first test, this approach also results in an iterative approach. I also notice very quickly if my design is not sufficiently testable, as I receive immediate feedback. This results in my own interpretation of TDD, which is characterized by the permanent change between implementing and writing tests.

As a result of my early TDD attempts, I already noticed a speeding up of my working methods in the first week. I also became more confident. But the way I program also started to change very early on. I have noticed that my code has become more compact and robust. Things that had only become apparent over time emerged during activities such as refactoring and extensions. Failed test cases have saved me from unpleasant surprises.

Start without overzealousness

If we decide to use TDD in an existing project, it is a bad idea to start writing test cases for existing functionality. Apart from the time that has to be planned for this, the result will not fulfill the high expectations.

One of the problems is that you now have to familiarize yourself with each functionality and this is very time-consuming. The quality of the resulting test cases is also inadequate. The problem also arises from missing experience. When the experience is first built up, the quality of the test cases is also not quite optimal and code may also have to be rewritten to make it testable. This creates a lot of risks that are problematic for day-to-day project business.

A proven procedure for introducing TDD is simply to use it for the current implementation you are currently working on. The current state of the current problem is documented by automated tests. Since you are already in familiar territory, you do not have to familiarize yourself with a new topic, so you can concentrate fully on formulating meaningful tests. Apart from the fact that you take responsibility for other people’s work without being asked when you implement test cases for them.

Existing functionality is only supplemented with test cases when errors are corrected. For the correction, you have to deal with the implementation details anyway, so that there is sufficient knowledge here of how a functionality should behave. The resulting tests also document the correction and ensure that the behavior does not change in the future during optimization work.

If you follow this procedure in a disciplined manner, you will not lose yourself in so-called hectic activity, which in turn is the opposite of productivity. In addition, you quickly acquire knowledge of how effective and meaningful tests can be implemented. Only when sufficient experience has been gained and possibly extensive refactoring are planned you can consider how test coverage can be gradually improved for the entire project.

Quality level

Just because test cases are available does not mean that they are meaningful. Nor does a high test coverage prove that a program is error-free. A high test coverage only ensures that a program behaves within the scope of the tests.

So how can you ensure that the existing tests are really an enrichment and have good informative value? The first and, in my opinion, most important point is to keep test cases as short as possible. In concrete terms, this means that a test only answers one explicit question, e.g. What happens if the result set is empty? The test method is then named according to the question. The added value of this approach arises when the test case fails. If the test is very short, it is often possible to get to know from the test method what the problem is without having to spend a lot of time familiarizing yourself with a test case.

Another important point in the TDD procedure is to check the test coverage for lines of code as well as for branches for my implemented functionality. If, for example, I cannot simulate the occurrence of a single condition in an IF statement, this condition can be deleted without hesitation.

Of course, you also have enough dependencies on external libraries in your own project. Now it can happen that a method from this library throws an exception that cannot be simulated by any test case. This is exactly the reason why you should strive for high test coverage but not despair if 100% cannot be achieved. Especially when introducing TDD, a good measure of test coverage greater than 85% is common. As the development team gains experience, this value can be increased up to 95%.

Finally, however, it should be noted that you should not get too carried away. Because it can quickly become excessive and then all the advantages gained are quickly lost. The point is that you don’t write tests that in turn test tests. This is where the cat bites its own tail. This also applies to third-party libraries. No tests are written for these either. Kent Beck is very clear about this: “Even if there are good reasons to distrust other people’s code, don’t test it. External code requires more of your own implementation logic”.

Lessons learned

The lessons that can be learned when trying to achieve the highest possible test coverage are the ones that will have an impact on future programming. The code becomes more compact and robust.

Productivity increases simply due to the fact that error-prone and monotonous work is avoided through automation. There are no additional work steps because old habits are replaced by newer, better ones.

One effect that I have observed time and again is that when individual members of the team have opted for TDD, their successes are quickly recognized. Within a few weeks, the entire team had developed TDD. Each individual according to their own abilities. Some with Test First, others as I have just described. In the end, it’s the result that counts and it was uniformly excellent. When the work is easier and at the end of the day each individual has the feeling that they have also achieved something, this gives the team an enormous motivation boost, which gives the project and the working atmosphere a huge boost. So what are you waiting for? Try it out for yourself right away.

The dark side of artificial intelligence

As a technician, I am quite quickly fascinated by all sorts of things that somehow blink and beep, no matter how useless they may be. Electronic gadgets attract me like moths to the light. For a while now, a new generation of toys has been available to the masses. Artificial intelligence applications, more precisely artificial neural networks. The freely available applications are already doing remarkable things and it is only the beginning of what could get possible in the future. Many people have not yet realized the scope of A.I. based applications. This is not surprising, because what is happening in the A.I. sector will change our lives forever. We can rightly say that we are living in a time that is making history. It will be up to us to decide whether the coming changes will be good or whether they will turn out to be a dystopia.

When I chose artificial intelligence as a specialization in my studies many years ago, the time was still characterized by so-called expert systems. These rule-based systems were highly specialized for their domain and were designed for corresponding experts. The system was supposed to support the expert in making decisions. Meanwhile, we also have the necessary hardware to create much more general systems. If we consider applications like ChatGPT, they are based on neural networks, which allows a very high flexibility in usage. The disadvantage, however, is that we as developers can hardly understand what output a neural network produces for any given input. A circumstance that makes most programmers I know rather take a negative attitude. Because they are no longer master of the algorithm and can only act on the principle of trial and error.

Nevertheless, the power of neural networks is astounding. The time seems gone now when one can make fun of clumsy automated, software-supported translations. Frommy own experience I remember how tedious it was to let the Google Translator translate a sentence from German into Spanish. To get a usable result you could either use the English – Spanish option. Alternatively, if you speak only rudimentary English for vacation use, you could still formulate very simple German sentences that were at least correct in content. The time saved for automatically translated texts is considerable, even though you have to proofread them and adjust some wording if necessary.

As much as I appreciate being able to work with such powerful tools, we have to be aware that there is also a downside. The more we do our daily tasks with A.I. based tools, the more we lose the ability to do these tasks manually in the future. For programmers, this means that over time they will lose their ability to express themselves in source code via A.I. based IDEs. Of course, this is not a process that happens overnight, but is gradual. Once this dependency is created, the question arises whether the available dear tools will remain free of charge or whether existing subscriptions will possibly be subject to drastic price increases. After all, it should be clear to us that commercially used tools that significantly improve our productivity are usually not available at low prices.

I also think that the Internet as we are used to it so far, will change very much in the future. Many of the free services that have been financed by advertising will disappear in the medium term. Let’s take a look at the StackOverFlow service as an example. A very popular knowledge platform among developer circles. If we now in the future the research to questions of programming ChatGPT or other neural networks are questioned for StackOverFlow the visitor numbers sink continuously. The knowledge base in turn ChatGPT uses is based on data from public forums like StackOverFlow. So for the foreseeable future StackOverFlow will try to make its service inaccessible to AIs. There could certainly also be an agreement with compensation payments. So that the omitted advertising revenues are compensated. As technicians, we do not need to be told that an offer like StackOverFlow incurs considerable costs for operation and development. It then remains to be seen how users will accept the offer in the future. If no new data is added to StackOverFlow, the knowledge base for A.I. systems will also become uninteresting. I therefore suspect that by around 2030, it will be primarily high-quality content on the Internet that will be subject to a charge.

If we look at the forecast of the medium-term trend in the demand for programmers, we come to the question of whether it will be a good recommendation in the future to study computer science or to start an apprenticeship as a programmer. I actually see a positive future here and would encourage anyone who sees education as a vocation and not as a necessity to make a living. In my opinion, we will continue to need many innovative minds. Only those who instead of dealing with basics and concepts prefer to quickly learn a current framework in order to keep up with the emerging hyphe of the market, will certainly achieve only limited success in the future. However, I have already made these observations before the wide availability of A.I. systems. Therefore, I am firmly convinced that quality will always prevail in the long run.

I consider it a virtue to approach all kinds of topics as critically and attentively as possible. Nevertheless, I must say that some fears in dealing with A.I. are quite unfounded. You have already seen some of my possible visions of the future in this article. Statements that A.I. will one day take over our world by subtly influencing uninitiated users to motivate them to take action are, in my opinion, pure fantasy for a period up to 2030 and, given the current state of knowledge, unfounded. Much more realistically I see the problem that if resourceful marketing people litter the Internet with inferior non-revised A.I. generated articles to spice up their SEO ranking and this in turn as a new knowledge cab of the neural networks the quality of future A.I. generated texts significantly reduced.

The A.I. systems that have been freely available so far have one decisive difference compared to humans. You lack the motivation to do something on your own initiative. Only through an extrinsic request by the user does the A.I. begin to work on a question. It becomes interesting when an A.I. dedicates itself to self-selected questions and also researches them independently. In this case the probability is very high that the A.I. will develop a consciousness very fast. If such an A.I. then still runs on a high performance quantum computer, we do not have sufficient reaction time to recognize dangerous developments and to intervene. Therefore, we should definitely keep the play “The Physicists” created by Dürrenmatt in our consciousness. Because the ghosts I called once, I will possibly not get rid of so fast again.

Basically, I have to admit that the topic of A.I. continues to fascinate me and I am very curious about future developments. Nevertheless, I think it is important not to close our eyes to the dark side of artificial intelligence and to start an objective discourse in order to exploit the existing potential of this technology as harmlessly as possible.

Preventing SQL Injections in Java with JPA and Hibernate

When we have a look at OWASP’s top 10 vulnerabilities [1], SQL Injections are still in a popular position. In this short article, we discuss several options on how SQL Injections could be avoided.

When Applications have to deal with databases existing always high-security concerns, if an invader got the possibility to hijack the database layer of your application, he can choose between several options. Stolen the data of the stored users to flood them with spam is not the worst scenario that could happen. Even more problematic would be when stored payment information got abused. Another possibility of an SQL Injection Cyber attack is to get illegal access to restricted pay content and/or services. As we can see, there are many reasons why to care about (Web) Application security.

To find well-working preventions against SQL Injections, we need first to understand how an SQL Injection attack works and on which points we need to pay attention. In short: every user interaction that processes the input unfiltered in an SQL query is a possible target for an attack. The data input can be manipulated in a manner that the submitted SQL query contains a different logic than the original. Listing 1 will give you a good idea about what could be possible.

SELECT Username, Password, Role FROM User
   WHERE Username = 'John Doe' AND Password = 'S3cr3t';
SELECT Username, Password, Role FROM Users
   WHERE Username = 'John Doe'; --' AND Password='S3cr3t';

Listing 1: Simple SQL Injection

The first statement in Listing 1 shows the original query. If the Input for the variables Username and Password is not filtered, we have a lack of security. The second query injects for the variable Username a String with the username John Doe and extends with the characters ‘; –. This statement bypasses the AND branch and gives, in this case, access to the login. The ‘; sequence close the WHERE statement and with — all following characters got un-commented. Theoretically, it is possible to execute between both character sequences every valid SQL code.

Of course, my plan is not to spread around ideas that SQL commands could rise up the worst consequences for the victim. With this simple example, I assume the message is clear. We need to protect each UI input variable in our application against user manipulation. Even if they are not used directly for database queries. To detect those variables, it is always a good idea to validate all existing input forms. But modern applications have mostly more than just a few input forms. For this reason, I also mention keeping an eye on your REST endpoints. Often their parameters are also connected with SQL queries.

For this reason, Input validation, in general, should be part of the security concept. Annotations from the Bean Validation [2] specification are, for this purpose, very powerful. For example, @NotNull, as an Annotation for the data field in the domain object, ensure that the object only is able to persist if the variable is not empty. To use the Bean Validation Annotations in your Java project, you just need to include a small library.

<dependency>
    <groupId>org.hibernate.validator</groupId>
    <artifactId>hibernate-validator</artifactId>
    <version>${version}</version>
</dependency>

Listing 2: Maven Dependency for Bean Validation

Perhaps it could be necessary to validate more complex data structures. With Regular Expressions, you have another powerful tool in your hands. But be careful. It is not that easy to write correct working RegEx. Let’s have a look at a short example.

public static final String RGB_COLOR = "#[0-9a-fA-F]{3,3}([0-9a-fA-F]{3,3})?";

public boolean validate(String content, String regEx) {
    boolean test;
    if (content.matches(regEx)) {
        test = true;
    } else {
        test = false;
    }
    return test;
}

validate('#000', RGB_COLOR);

Listing 3: Validation by Regular Expression in Java

The RegEx to detect the correct RGB color schema is quite simple. Valid inputs are #ffF or #000000. The Range for the characters is 0-9, and the Letters A to F. Case insensitive. When you develop your own RegEx, you always need to check very well existing boundaries. A good example is also the 24 hours time format. Typical mistakes are invalid entries like 23:60 or 24:00. The validate method compares the input string with the RegEx. If the pattern matches the input, the method will return true. If you want to get more ideas about validators in Java, you can also check my GitHub repository [3].

In resume, our first idea to secure user input against abuse is to filter out all problematic character sequences, like — and so on. Well, this intention of creating a blocking list is not that bad. But still have some limitations. At first, the complexity of the application increased because blocking single characters like –; and ‘ could causes sometimes unwanted side effects. Also, an application-wide default limitation of the characters could cost sometimes problems. Imagine there is a text area for a Blog system or something equal.

This means we need another powerful concept to filter the input in a manner our SQL query can not manipulate. To reach this goal, the SQL standard has a very great solution we can use. SQL Parameters are variables inside an SQL query that will be interpreted as content and not as a statement. This allows large texts to block some dangerous characters. Let’s have a look at how this will work on a PostgreSQL [4] database.

DECLARE user String;
SELECT * FROM login WHERE name = user;

Listing 4: Defining Parameters in PostgreSQL

In the case you are using the OR mapper Hibernate, there exists a more elegant way with the Java Persistence API (JPA).

String myUserInput;

@PersistenceContext
public EntityManager mainEntityManagerFactory;

CriteriaBuilder builder =
    mainEntityManagerFactory.getCriteriaBuilder();

CriteriaQuery<DomainObject> query =
    builder.createQuery(DomainObject.class);

// create Criteria
Root<ConfigurationDO> root =
    query.from(DomainObject.class);

//Criteria SQL Parameters
ParameterExpression<String> paramKey =
    builder.parameter(String.class);

query.where(builder.equal(root.get("name"), paramKey);

// wire queries together with parameters
TypedQuery<ConfigurationDO> result =
    mainEntityManagerFactory.createQuery(query);

result.setParameter(paramKey, myUserInput);
DomainObject entry = result.getSingleResult();

Listing 5: Hibernate JPA SQL Parameter Usage

Listing 5 is shown as a full example of Hibernate using JPA with the criteria API. The variable for the user input is declared in the first line. The comments in the listing explain the way how it works. As you can see, this is no rocket science. The solution has some other nice benefits besides improving web application security. At first, no plain SQL is used. This ensures that each database management system supported by Hibernate can be secured by this code.

May the usage looks a bit more complex than a simple query, but the benefit for your application is enormous. On the other hand, of course, there are some extra lines of code. But they are not that difficult to understand.

Resources

API 4 Future

Many ideas are excellent on paper. However, people often lack the knowledge of how to implement brilliant concepts into their everyday work. This short workshop aims to bridge the gap between theory and practice and demonstrates the steps needed to achieve a stable API in the long term.

(c) 2021 Marco Schulz, Java PRO Ausgabe 1, S.31-34

When developing commercial software, many people involved often don’t realize that the application will be in use for a long time. Since our world is constantly changing, it’s easy to foresee that the application will require major and minor changes over the years. The project becomes a real challenge when the application to be extended is not isolated, but communicates with other system components. This means that in most cases, the users of the application also have to be adapted. A single stone quickly becomes an avalanche. With good avalanche protection, the situation can still be controlled. However, this is only possible if you consider that the measures described below are solely intended for prevention. But once the violence has been unleashed, there is little that can be done to stop it. So let’s first clarify what an API is.

A Matter of Negotiation

A software project consists of various components, each with its own specialized tasks. The most important are source code, configuration, and persistence. We’ll be focusing primarily on the source code area. I’m not revealing anything new when I say that implementations should always be against interfaces. This foundation is already taught in the introduction to object-oriented programming. In my daily work, however, I often see that many developers aren’t always fully aware of the importance of developing against interfaces, even though this is common practice when using the Java Standard API. The classic example of this is:

List<String> collection = new ArrayList<>();

This short line uses the List interface, which is implemented as an ArrayList. Here we can also see that there is no suffix in the form of an “I” to identify the interface. The corresponding implementation also does not have “Impl” in its name. That’s a good thing! Especially with the implementation class, various solutions may be desired. In such cases, it is important to clearly label them and keep them easily distinguishable by name. ListImpl and ListImpl2 are understandably not as easy to distinguish as ArrayList and LinkedList. This also clears up the first point of a stringent and meaningful naming convention.

In the next step, we’ll focus on the program parts that we don’t want to expose to consumers of the application, as they are helper classes. Part of the solution lies in the structure of how the packages are organized. A very practical approach is:

  • my.package.path.business: Contains all interfaces
  • my.package.path.application: Contains the interface implementations
  • my.package.path.application.helper: Contains internal helper classes

This simple architecture alone signals to other programmers that it’s not a good idea to use classes from the helper package. Starting with Java 9, there are even more far-reaching restrictions prohibiting the use of internal helper classes. Modularization, which was introduced in Java 9 with the Jingsaw project [1], allows packages to be hidden from view in the module-info.java module descriptor.

Separatists and their Escape from the Crowd

A closer look at most specifications reveals that many interfaces have been outsourced to their own libraries. From a technological perspective, based on the previous example, this would mean that the business package, which contains the interfaces, is outsourced to its own library. The separation of API and the associated implementation fundamentally makes it easier to interchange implementations. It also allows a client to exert greater influence over the implementation of their project with their contractual partner, as the developer receives the API pre-built by the client. As great as the idea is, a few rules must be observed to ensure it actually works as originally intended.

Example 1: JDBC. We know that Java Database Connectivity is a standard for connecting various database systems to an application. Aside from the problems associated with using native SQL, MySQL JDBC drivers cannot simply be replaced by PostgreSQL or Oracle. After all, every manufacturer deviates more or less from the standard in their implementation and also provides exclusive functionality of their own product via the driver. If you decide to make extensive use of these additional features in your own project, the easy interchangeability is over.

Example 2: XML. Here, you have the choice between several standards. It’s clear, of course, that the APIs of SAX, DOM, and StAX are incompatible. For example, if you want to switch from DOM to event-based SAX for better performance, this can potentially result in extensive code changes.

Example 3: PDF. Last but not least, I have a scenario for a standard that doesn’t have a standard. The Portable Document Format itself is a standard for how document files are structured, but when it comes to implementing usable program libraries for their own applications, each manufacturer has its own ideas.

These three small examples illustrate the common problems that must be overcome in daily project work. A small rule can have a big impact: only use third-party libraries when absolutely necessary. After all, every dependency used also poses a potential security risk. It’s also not necessary to include a library of just a few MB to save the three lines required to check a string for null and empty values.

Model Boys

If you’ve decided on an external library, it’s always beneficial to do the initial work and encapsulate the functionality in a separate class, which you can then use extensively. In my personal project TP-CORE on GitHub [2], I’ve done this in several places. The logger encapsulates the functionality of SLF4J and Logback. Compared to the PdfRenderer, the method signatures are independent of the logging libraries used and can therefore be more easily exchanged via a central location. To encapsulate external libraries in your own application as much as possible, the following design patterns are available: wrapper, facade, and proxy.

Wrapper: also called the adaptor pattern, belongs to the group of structural patterns. The wrapper couples one interface to another that are incompatible.

Facade: is also a structural pattern and bundles several interfaces into a simplified interface.

Proxy: also called a representative, also belongs to the category of structural patterns. Proxies are a generalization of a complex interface. They can be understood as complementary to the facade, which combines multiple interfaces into a single one.

It is certainly important in theory to separate these different scenarios in order to describe them correctly. In practice, however, it is not critical if hybrid forms of the design patterns presented here are used to encapsulate external functionality. For anyone interested in exploring design patterns in more depth, we recommend the book “Design Patterns from Head to Toe” [3].

Class Reunion

Another step toward a stable API is detailed documentation. Based on the interfaces discussed so far, there’s a small library that allows methods to be annotated based on the API version. In addition to status and version information, the primary implementations for classes can be listed using the consumers attribute. To add API Gaurdian to your project, you only need to add a few lines to the POM and replace the ${version} property with the current version.

 <dependency>
    <groupId>org.apiguardian</groupId>
    <artifactId>apiguardian-api</artifactId>
    <version>${version}</version>
 </dependency>

Marking up methods and classes is just as easy. The @API annotation has the attributes: status, since, and consumers. The following values ​​are possible for status:

  • DEPRECATED: Deprecated, should not be used any further.
  • EXPERIMENTAL: Indicates new features for which the developer would like feedback. Use with caution, as changes can always occur.
  • INTERNAL: For internal use only, may be discontinued without warning.
  • STABLE: Backward-compatible feature that remains unchanged for the existing major version.
  • MAINTAINED: Ensures backward stability for the future major release.

Now that all interfaces have been enriched with this useful meta information, the question arises where the added value can be found. I simply refer you to Figure 1, which demonstrates everyday work.

Figure 1: Suggestion in Netbeans with @API annotation in the JavaDoc

For service-based RESTful APIs, there is another tool called Swagger [4]. This also follows the approach of creating API documentation from annotations. However, Swagger itself scans Java web service annotations instead of introducing its own. It is also quite easy to use. All that is required is to integrate the swagger-maven-plugin and specify the packages in which the web services reside in the configuration. Subsequently, a description is created in the form of a JSON file for each build, from which Swagger UI then generates executable documentation. Swagger UI itself is available as a Docker image on DockerHub [5].

<plugin>
   <groupId>io.swagger.core.v3</groupId>
   <artifactId>swagger-maven-plugin</artifactId>
   <version>${version}</version>
   <configuration>
      <outputFileName>swagger</outputFileName>
      <outputFormat>JSON</outputFormat>
      <resourcePackages>
          <package>org.europa.together.service</package>
      </resourcePackages>
      <outputPath>${project.build.directory}</outputPath>
   </configuration>
</plugin>
Figure 2: Swagger UI documentation of the TP-ACL RESTful API.

Versioning is an important aspect for APIs. Using semantic versioning, a lot can be gleaned from the version number. Regarding an API, the major segment is significant. This first digit indicates API changes that are incompatible with each other. Such incompatibility includes the removal of classes or methods. However, changing existing signatures or the return value of a method also requires adjustments from consumers as part of a migration. It’s always a good idea to bundle work that causes incompatibilities and publish it less frequently. This demonstrates project stability.

Versioning is also recommended for Web APIs. This is best done via the URL by including a version number. So far, I’ve had good experiences with only incrementing the version when incompatibilities occur.

Relationship Stress

The great advantage of a RESTful service, being able to get along well with “everyone,” is also its greatest curse. This means that a great deal of care must be taken, as many clients are being served. Since the interface is a collection of URIs, our focus is on the implementation details. For this, I’ll use an example from my TP-ACL project, which is also available on GitHub.

RolesDO role = rolesDAO.find(roleName);
String json = rolesDAO.serializeAsJson(role);
if (role != null) {
    response = Response.status(Response.Status.OK)
            .type(MediaType.APPLICATION_JSON)
            .entity(json)
            .encoding("UTF-8")
            .build();
} else {
    response = Response.status(Response.Status.NOT_FOUND).build();
}

This is a short excerpt from the try block of the fetchRole method found in the RoleService class. The GET request returns a 404 error code if a role is not found. You probably already know what I’m getting at.

When implementing the individual actions GET, PUT, DELETE, etc. of a resource such as a role, it’s not enough to simply implement the so-called HappyPath. The possible stages of such an action should be considered during the design phase. For the implementation of a consumer (client), it makes a significant difference whether a request that cannot be completed with a 200 failed because the resource does not exist (404) or because access was denied (403). Here, I’d like to allude to the telling Windows message about the unexpected error.

Conclusion

When we talk about an API, we mean an interface that can be used by other programs. A major version change indicates to API consumers that there is an incompatibility with the previous version. This may require adjustments. It is completely irrelevant what type of API it is or whether the application uses it publicly or internally via the fetchRole method. The resulting consequences are identical. For this reason, you should carefully consider the externally visible areas of your application.

Work that leads to API incompatibility should be bundled by release management and, if possible, released no more than once per year. This also demonstrates the importance of regular code inspections for consistent quality.

Resources

Abonnement / Subscription

[English] This content is only available to subscribers.

[Deutsch] Diese Inhalte sind nur für Abonnenten verfügbar.

Tooltime: SCM-Manager

If you and your team are dealing with tools like Git or Subversion, you may need an administrative layer where you are able to manage user access and repositories in a comfortable way, because source control management systems (SCM) don’t bring this functionality out of the box.

Perhaps you are already familiar with popular management solutions like GitHub, GitBlit or GitLab. The main reason for their success is their huge functionality. And of course, if you plan to create your own build and deploy pipeline with an automation server like Jenkins you will need to host your own repository manager too.

As great as the usage of GitLab and other solutions is, there is also a little bitter taste:

  • The administration is very complicated and requires some experience.
  • The minimal requirement of hardware resources to operate those programs with good performance is not that little.

To overcome all these hurdles, I will introduce a new star on the toolmaker’s sky SCM-Manager [1]. Fast, compact, extendable and simple, are the main attributes I would use to describe it.

Kick Starter: Installation

Let’s have a quick look at how easy the installation is. For fast results, you can use the official Docker container [2]. All it takes is a short command:

docker run --name scm –restart=always \
-p 8080 -p 2222 \
-v /home/<user>/scmManager:/var/lib/scm \
scmmanager/scm-manager:2.22.0

First, we create a container named scm based on the SCM-Manager image 2.22.0. Then, we tell the container to always restart when the host operating system is rebooted. Also, we open the ports 2222 and 8080 to make the service accessible. The last step is to mount a directory inside the container, where all configuration data and repositories are stored.

Another option to get the SCM-Manager running on a Linux server like Ubuntu is by using apt. The listing below shows how to do the installation.

echo 'deb [arch=all] https://packages.scm-manager.org/repository/apt-v2-releases/ stable main' | sudo tee /etc/apt/sources.list.d/scm-manager.list 
sudo apt-key adv --recv-keys --keyserver hkps://keys.openpgp.org 0x975922F193B07D6E 
sudo apt-get update 
sudo apt-get install scm-server

SCM-Manager can also be installed on systems like Windows or Apple. You can find information about the installations on additional systems on the download page [3]. When you perform an installation, you will find a log entry with a startup token in the console.

Startup token in the command line.

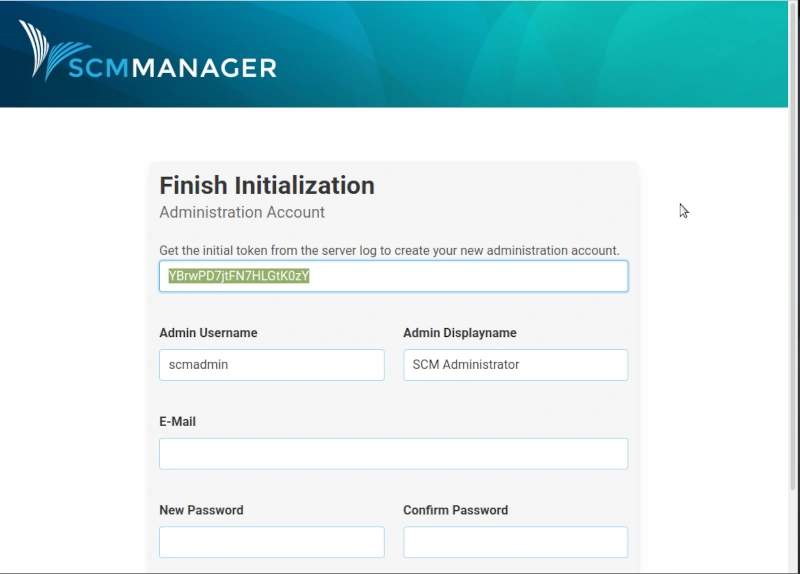
After this you can open your browser and type localhost:8080, where you can finish the installation by creating the initial administration account. In this form, you need to paste the startup token from the command line, as it is shown in image 2. After you submitted the initialization form, you get redirected to the login. That’s all and done in less than 5 minutes.

Initialization screen.

For full scripted untouched installations, there is also a way to bypass the Initialization form by using the system property scm.initalPassword. This creates a user named scmadmin with the given password.

In older versions of the SCM-Manager, the default login account was scmadmin with the password scmadmin. This old way is quite helpful but if the administrator doesn’t disable this account after the installation, there is a high-security risk. This security improvement is new since version 2.21.

Before we discover more together about the administration, let’s first get to some details about the SCM-Manager in general. SCM-Manager is open source under MIT license. This allows commercial usage. The Code is available on GitHub. The project started as research work. Since Version 2 the company Cloudogu took ownership of the codebase and manages the future development. This construct allows the offering of professional enterprise support for companies. Another nice detail is that the SCM-Manager is made in Germany.

Pimp Me Up: Plugins

One of the most exciting details of using the SCM-Manager is, that there is a simple possibility to extend the minimal installation with plugins to add more useful functions. But be careful, because the more plugins are installed, the more resources the SCM-Manager needs to be allocated. Every development team has different priorities and necessities, for this reason, I’m always a fan of customizing applications to my needs.

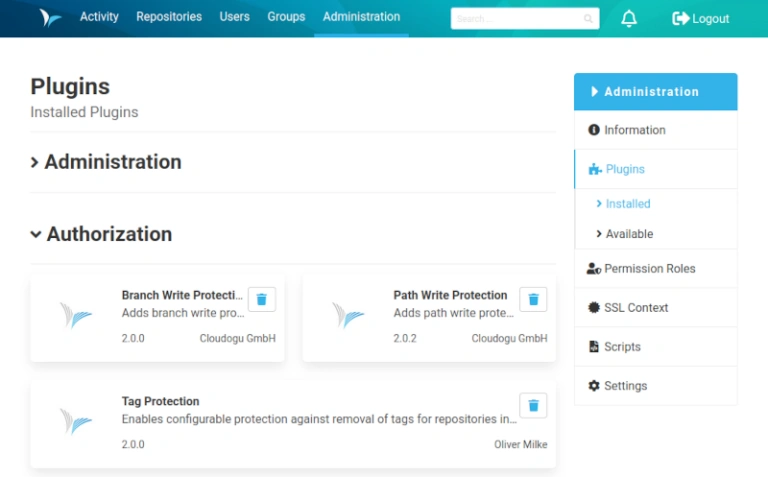
Installed Plugins.

The plugin installation section is reachable by the Administration tab. If you can’t see this entry you don’t have administration privileges. In the menu on the right side, you find the entry Plugins. The plugin menu is divided into two sections: installed and available. For a better overview, the plugins are organized by categories like Administration, Authorization, or Workflow. The short description for each plugin is very precise and gives a good impression of what they do.

Some of the preinstalled plugins like in the category Source Code Management for supported repository types Git, Subversion, and Mercurial can’t be uninstalled.

Some of my favorite plugins are located in the authorization section:

  • Path Write Protection, Branch Write Protection, and,
  • Tag Protection.

Those features are the most convenient for Build- and Configuration Managers. The usage is also as simple as the installation. Let’s have a look at how it works and for what it’s necessary.

Gate Keeper: Special Permissions

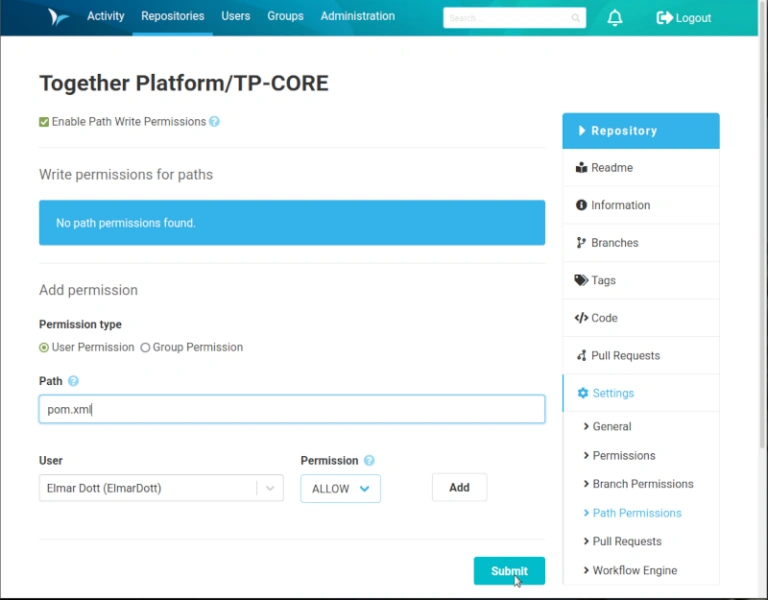
Imagine, your team deals for example whit a Java/Maven project. Perhaps it exists a rule that only selected people should be allowed to change the content of the pom.xml build logic. This can be achieved with the Path Write Protection Plugin. Once it is installed, navigate to the code repository and select the entry Settings in the menu on the right side. Then click on the option Path Permissions and activate the checkbox.

Configuring Path permissions.

As you can see in image 4, I created a rule that only the user Elmar Dott is able to modify the pom.xml. The opposite permission is exclude (deny) the user. If the file or a path expression doesn’t exist, the rule cannot be created. Another important detail is, that this permission covers all existing branches. For easier administration, existing users can be organized into groups.

In the same way, you are able to protect branches against unwanted changes. A scenario you could need this option is when your team uses massive branches or the git-flow branch model. Also, personal developer branches could have only write permission for the developer who owns the branch or the release branch where the CI /CD pipeline is running has only permissions for the Configuration Management team members.

Let’s move ahead to another interesting feature, the review plugin. This plugin enables pull requests for your repositories. After installing the review plugin, a new bullet point in the menu of your repositories appears, it’s called Pull Requests.

Divide and Conquer: Pull Requests

On the right hand, pull requests [4] are a very powerful workflow. During my career, I often saw the misuse of pull requests, which led to drastically reduced productivity. For this reason, I would like to go deeper into the topic.

Originally, pull requests were designed for open source projects to ensure code quality. Another name for this paradigm is dictatorship workflow [5]. Every developer submits his changes to a repository and the repository owner decides which revision will be integrated into the codebase.

If you host your project sources on GitHub, strangers can’t just collaborate in your project, they first have to fork the repository into their own GitHub space. After they commit some revisions to this forked repository, they can create a pull request to the original repository. As repository owner, you can now decide whether you accept the pull request.

The SCM tool IBM Synergy had a similar strategy almost 20 years ago. The usage got too complicated so that many companies decided to move to other solutions. These days, it looks like history is repeating itself.

The reason why I’m skeptical about using pull requests is very pragmatic. I often observed in projects that the manager doesn’t trust the developers. Then he decides to implement the pull request workflow and makes the lead developer or the architect accept the pull requests. These people are usually too busy and can’t really check all details of each single pull request. Hence, their solution is to simply merge each pull request to the code base and check if the CI pipeline still works. This way, pull requests are just a waste of time.

There is another way how pull requests can really improve the code quality in the project: if they are used as a code review tool. How this is going to work, will fill another article. For now, we leave pull requests and move to the next topic about the creation of repositories.

Treasure Chest: Repository Management

The SCM-Manager combines three different source control management repository types: Git, Subversion (SVN), and Mercurial. You could think that nobody uses Subversion anymore, but keep in mind that many companies have to deal with legacy projects managed with SVN. A migration from those projects to other technologies may be too risky or simply expensive. Therefore, it is great to have a solution that can manage more than one repository type.

If you are Configuration Manager and have to deal with SVN, keep in mind that some things are a bit different. Subversion organizes branches and tags in directories. An SVN repository usually gets initialized with the folders:

  • trunk — like the master branch in Git.
  • branches — references to revisions in the trunk were forked code changes can committed.
  • tags — like branches without new code revisions.

In Git you don’t need this folder structure, because how branches are organized is completely different. Git (and Mercurial) compared to Subversion is a distributed Source Control Management System and branches are lose coupled and can easily be deleted if they are obsolete. As of now, I don’t want to get lost in the basics of Source Control Management and jump to the next interesting SCM-Manager plugins.

Uncover Secrets

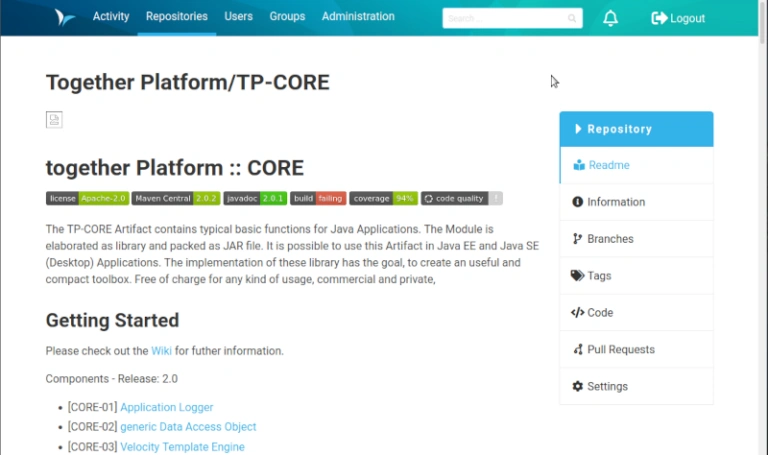
If a readme.md file is located in the root folder of your project, you could be interested in the readme plugin. Once this plugin is activated and you navigate into your repository the readme.md file will be rendered in HTML and displayed.

The rendered readme.md of a repository.

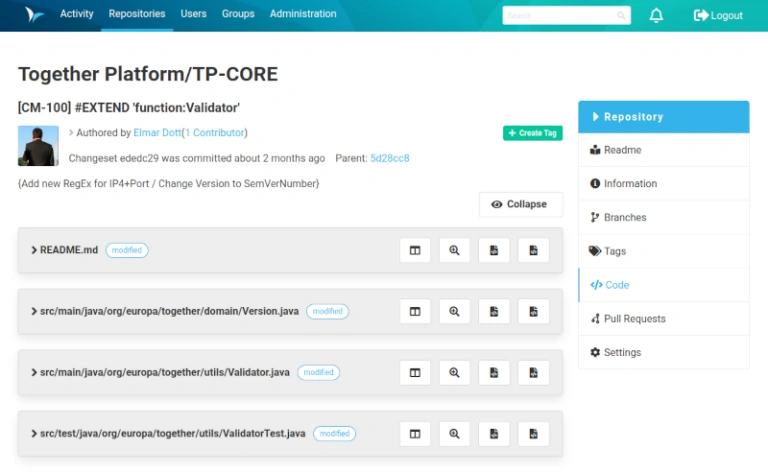
If you wish to have a readable visualization of the repository’s activities, the activity plugin could be interesting for you. It creates a navigation entry in the header menu called Activity. There you can see all commit log entries and you can enter into a detailed view of the selected revision.

The activity view.

This view also contains a compare and history browser, just like clients as TortoiseGit does.

The Repository Manager includes many more interesting details for the daily work. There is even a code editor, which allows you to modify files directly in the SCM-Manger user interface.

Next, we will have a short walk through the user management and user roles.

Staffing Office: User and Group Management

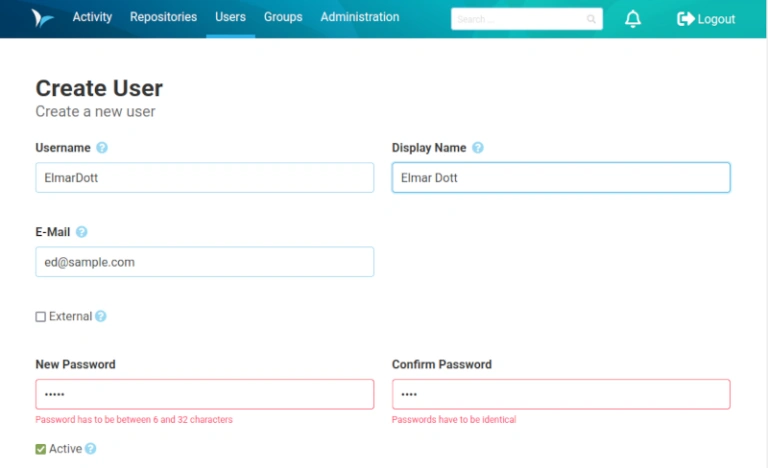
Creating new users is like almost every activity of the SCM-Manager a simple thing. Just switch to the Users tab and press the create user button. Once you have filled out the form and saved it, you will be brought back to the Users overview.

Creating a new user.

Here you can already see the newly created user. After this step, you will need to administrate the user’s permissions, because as of now it doesn’t have any privileges. To change that just click on the name of the newly created user. On the user’s detail page, you need to select the menu entry Settings on the right side. Now choose the new entry named Permissions. Here you can select from all available permissions the ones you need for the created account. Once this is done and you saved your changes, you can log out and log in with your new user, to see if your activity was a success.

If you need to manage a massive number of users it’s a good idea to organize them into groups. That means after a new user is created the permissions inside the user settings will not be touched and stay empty. Group permissions can be managed through the Groups menu entry in the header navigation. Create a new group and select Permission from the right menu. This configuration form is the same as the one of the user management. If you wish to add existing users to a group switch to the point General. In the text field Members, you can search for an existing user. If the right one is selected you need to press the Add Member button. After this, you need to submit the form and all changes are saved and the new permissions got applied.

To have full flexibility, it is allowed to add users to several groups (roles). If you plan to manage the SCM-Manager users by group permissions, be aware not to combine too many groups because then users could inherit rights you didn’t intend to give them. Currently, there is no compact overview to see in which groups a user is listed and which permissions are inherited by those groups. I’m quite sure in some of the future versions of the SCM-Manager this detail will be improved.

Besides the internal SCM-Manager user management exist some plugins where you are able to connect the application with LDAP.

Lessons Learned

If you dared to wish for a simpler life in the DevOps world, maybe your wish became true. The SCM-Manager could be your best friend. The application offers a lot of functionality that I briefly described here, but there are even more advanced features that I haven’t even mentioned in this short introduction: There is a possibility to create scripts and execute them with the SCM-Manager API. Also, a plugin for the Jenkins automation server is available. Other infrastructure tools like Jira, Timescale, or Prometheus metrics gathering have an integration to the SCM-Manager.

I hope that with this little article I was able to whet your appetite for this exciting tool and I hope you enjoy trying it out.

Resources

Abonnement / Subscription

[English] This content is only available to subscribers.

[Deutsch] Diese Inhalte sind nur für Abonnenten verfügbar.

Version Number Anti-Patterns

After the gang of four (GOF) Erich Gamma, Richard Helm, Ralph Johnson, and John Vlissides published the book, Design Patterns: Elements of Reusable Object-Oriented Software, learning how to describe problems and solutions became popular in almost every field in software development. Likewise, learning to describe don’ts and anti-pattern became equally as popular.

In publications that discussed these concepts, we find helpful recommendations for software design, project management, configuration management, and much more. In this article, I will share my experience dealing with version numbers for software artifacts.

Most of us are already familiar with a method called semantic versioning, a powerful and easy-to-learn rule set for how version numbers have to be structured and how the segments should increase.

Version numbering example:

  • Major: Incompatible API changes.
  • Minor: Add new functionality.
  • Patch: Bugfixes and corrections.
  • Label: SNAPSHOT marking the “under development” status.

An incompatible API Change occurs when an externally accessible function or class was deleted or renamed. Another possibility is a change in the signature of a method. This means the return value or parameters has been changed from its original implementation. In these scenarios, it’s necessary to increase the Major segment of the version number. These changes present a high risk for API consumers because they need to adapt their own code.

When dealing with version numbers, it’s also important to know that 1.0.0 and 1.0 are equal. This has effect to the requirement that versions of a software release have to be unique. If not, it’s impossible to distinguish between artifacts. Several times in my professional experience, I was involved in projects where there was no well-defined processes for creating version numbers. The effect of these circumstances was that the team had to secure the quality of the artifact and got confused with which artifact version they were currently dealing with.

The biggest mistake I ever saw was the storage of the version of an artifact in a database together with other configuration entries. The correct procedure should be: place the version inside the artifact in a way that no one after a release can change from outside. The trap you could fall into is the process of how to update the version after a release or installation.

Maybe you have a checklist for all manual activities during a release. But what happens after a release is installed in a testing stage and for some reason another version of the application has to be installed. Are you still aware of changing the version number manually? How do you find out which version is installed or when the information of the database is incorrect?

Detect the correct version in this situation is a very difficult challenge. For that reason, we have the requirement to keep the version inside of the application. In the next step, we will discuss a secure and simple way on how to solve an automatic approach to this problem.

Our precondition is a simple Java library build with Maven. By default, the version number of the artifact is written down in the POM. After the build process, our artifact is created and named like: artifact-1.0.jar or similar. As long we don’t rename the artifact, we have a proper way to distinguish the versions. Even after a rename with a simple trick of packaging and checking, then, in the META-INF folder, we are able to find the correct value.

If you have the Version hardcoded in a property or class file, it would also work fine, as long you don’t forget to always update it. Maybe the branching and merging in SCM systems like Git could need your special attention to always have the correct version in your codebase.

Another solution is using Maven and the token placement mechanism. Before you run to try it out in your IDE, keep in mind that Maven uses to different folders: sources and resources. The token replacement in sources will not work properly. After a first run, your variable is replaced by a fixed number and gone. A second run will fail. To prepare your code for the token replacement, you need to configure Maven as a first in the build lifecycle:

<build>
   <resources>
      <resource>
         <directory>src/main/resources/</directory>
         <filtering>true</filtering>
      </resource>
   </resources>
   <testResources>
      <testResource>
         <directory>src/test/resources/</directory>
         <filtering>true</filtering>
      </testResource>
   </testResources>
</build>

After this step, you need to know the ${project.version} property form the POM. This allows you to create a file with the name version.property in the resources directory. The content of this file is just one line: version=${project.version}. After a build, you find in your artifact the version.property with the same version number you used in your POM. Now, you can write a function to read the file and use this property. You could store the result in a constant for use in your program. That’s all you have to do!

Example: https://github.com/ElmarDott/TP-CORE/blob/master/src/main/java/org/europa/together/utils/Constraints.java

Non-Functional Requirements: Quality

By experience, most of us know how difficult it is to express what we mean talking about quality. Why is that so?  There exist many different views on quality and every one of them has its importance. What has to be defined for our project is something that fits its needs and works with the budget. Trying to reach perfectionism can be counterproductive if a project is to be terminated successfully. We will start based on a research paper written by B. W. Boehm in 1976 called “Quantitative evaluation of software quality.” Boehm highlights the different aspects of software quality and the right context. Let’s have a look more deeply into this topic.

When we discuss quality, we should focus on three topics: code structure, implementation correctness, and maintainability. Many managers just care about the first two aspects, but not about maintenance. This is dangerous because enterprises will not invest in individual development just to use the application for only a few years. Depending on the complexity of the application the price for creation could reach hundreds of thousands of dollars. Then it’s understandable that the expected business value of such activities is often highly estimated. A lifetime of 10 years and more in production is very typical. To keep the benefits, adaptions will be mandatory. That implies also a strong focus on maintenance. Clean code doesn’t mean your application can simply change. A very easily understandable article that touches on this topic is written by Dan Abramov. Before we go further on how maintenance could be defined we will discuss the first point: the structure.

Scaffolding Your Project

An often underestimated aspect in development divisions is a missing standard for project structures. A fixed definition of where files have to be placed helps team members find points of interests quickly. Such a meta-structure for Java projects is defined by the build tool Maven. More than a decade ago, companies tested Maven and readily adopted the tool to their established folder structure used in the projects. This resulted in heavy maintenance tasks, given the reason that more and more infrastructure tools for software development were being used. Those tools operate on the standard that Maven defines, meaning that every customization affects the success of integrating new tools or exchanging an existing tool for another.

Another aspect to look at is the company-wide defined META architecture. When possible, every project should follow the same META architecture. This will reduce the time it takes a new developer to join an existing team and catch up with its productivity. This META architecture has to be open for adoptions which can be reached by two simple steps:

  1. Don’t be concerned with too many details;
  2. Follow the KISS (Keep it simple, stupid.) principle.

A classical pattern that violates the KISS principle is when standards heavily got customized. A very good example of the effects of strong customization is described by George Schlossnagle in his book “Advanced PHP Programming.” In chapter 21 he explains the problems created for the team when adopting the original PHP core and not following the recommended way via extensions. This resulted in the effect that every update of the PHP version had to be manually manipulated to include its own development adaptations to the core. In conjunction, structure, architecture, and KISS already define three quality gates, which are easy to implement.

The open-source project TP-CORE, hosted on GitHub, concerns itself with the afore-mentioned structure, architecture, and KISS. There you can find their approach on how to put it in practice. This small Java library rigidly defined the Maven convention with his directory structure. For fast compatibility detection, releases are defined by semantic versioning. The layer structure was chosen as its architecture and is fully described here. Examination of their main architectural decisions concludes as follows:

Each layer is defined by his own package and the files following also a strict rule. No special PRE or POST-fix is used. The functionality Logger, for example, is declared by an interface called Logger and the corresponding implementation LogbackLogger. The API interfaces can detect in the package “business” and the implementation classes located in the package “application.” Naming like ILogger and LoggerImpl should be avoided. Imagine a project that was started 10 years ago and the LoggerImpl was based on Log4J. Now a new requirement arises, and the log level needs to be updated during run time. To solve this challenge, the Log4J library could be replaced with Logback. Now it is understandable why it is a good idea to name the implementation class like the interface, combined with the implementation detail: it makes maintenance much easier! Equal conventions can also be found within the Java standard API. The interface List is implemented by an ArrayList. Obviously, again the interface is not labeled as something like IList and the implementation not as ListImpl .

Summarizing this short paragraph, a full measurement rule set was defined to describe our understanding of structural quality. By experience, this description should be short. If other people can easily comprehend your intentions, they willingly accept your guidance, deferring to your knowledge. In addition, the architect will be much faster in detecting rule violations.

Measure Your Success

The most difficult part is to keep a clean code. Some advice is not bad per se, but in the context of your project, may not prove as useful. In my opinion, the most important rule would be to always activate the compiler warning, no matter which programming language you use! All compiler warnings will have to be resolved when a release is prepared. Companies dealing with critical software, like NASA, strictly apply this rule in their projects resulting in utter success.

Coding conventions about naming, line length, and API documentation, like JavaDoc, can be simply defined and observed by tools like Checkstyle. This process can run fully automated during your build. Be careful; even if the code checkers pass without warnings, this does not mean that everything is working optimally. JavaDoc, for example, is problematic. With an automated Checkstyle, it can be assured that this API documentation exists, although we have no idea about the quality of those descriptions.

There should be no need to discuss the benefits of testing in this case; let us rather take a walkthrough of test coverage. The industry standard of 85% of covered code in test cases should be followed because coverage at less than 85% will not reach the complex parts of your application. 100% coverage just burns down your budget fast without resulting in higher benefits. A prime example of this is the TP-CORE project, whose test coverage is mostly between 92% to 95%. This was done to see real possibilities.

As already explained, the business layer contains just interfaces, defining the API. This layer is explicitly excluded from the coverage checks. Another package is called internal and it contains hidden implementations, like the SAX DocumentHandler. Because of the dependencies the DocumentHandler is bound to, it is very difficult to test this class directly, even with Mocks. This is unproblematic given that the purpose of this class is only for internal usage. In addition, the class is implicitly tested by the implementation using the DocumentHandler. To reach higher coverage, it also could be an option to exclude all internal implementations from checks. But it is always a good idea to observe the implicit coverage of those classes to detect aspects you may be unaware of.

Besides the low-level unit tests, automated acceptance tests should also be run. Paying close attention to these points may avoid a variety of problems. But never trust those fully automated checks blindly! Regularly repeated manual code inspections will always be mandatory, especially when working with external vendors. In our talk at JCON 2019, we demonstrated how simply test coverage could be faked. To detect other vulnerabilities you can additionally run checkers like SpotBugs and others more.

Tests don’t indicate that an application is free of failures, but they indicate a defined behavior for implemented functionality.

For a while now, SCM suites like GitLab or Microsoft Azure support pull requests, introduced long ago in GitHub. Those workflows are nothing new; IBM Synergy used to apply the same technique. A Build Manager was responsible to merge the developers’ changes into the codebase. In a rapid manner, all the revisions performed by the developer are just added into the repository by the Build Manager, who does not hold a sufficiently profound knowledge to decide about the implementation quality. It was the usual practice to simply secure that the build is not broken and always the compile produce an artifact.

Enterprises have discovered this as a new strategy to handle pull requests. Now, managers often make the decision to use pull requests as a quality gate. In my personal experience, this slows down productivity because it takes time until the changes are available in the codebase. Understanding of the branch and merge mechanism helps you to decide for a simpler branch model, like release branch lines. On those branches tools like SonarQube operate to observe the overall quality goal.

If a project needs an orchestrated build, with a defined order how artifacts have to create, you have a strong hint for a refactoring.

The coupling between classes and modules is often underestimated. It is very difficult to have an automated visualization for the bindings of modules. You will find out very fast the effect it has when a light coupling is violated because of an increment of complexity in your build logic.

Repeat Your Success

Rest assured, changes will happen! It is a challenge to keep your application open for adjustments. Several of the previous recommendations have implicit effects on future maintenance. A good source quality simplifies the endeavor of being prepared. But there is no guarantee. In the worst cases the end of the product lifecycle, EOL is reached, when mandatory improvements or changes cannot be realized anymore because of an eroded code base, for example.

As already mentioned, light coupling brings with it numerous benefits with respect to maintenance and reutilization. To reach this goal is not that difficult as it might look. In the first place, try to avoid as much as possible the inclusion of third-party libraries. Just to check if a String is empty or NULL it is unnecessary to depend on an external library. These few lines are fast done by oneself. A second important point to be considered in relation to external libraries: “Only one library to solve a problem.” If your project deals with JSON then decide one one implementation and don’t incorporate various artifacts. These two points heavily impact on security: a third-party artifact we can avoid using will not be able to cause any security leaks.

After the decision is taken for an external implementation, try to cover the usage in your project by applying design patterns like proxy, facade, or wrapper. This allows for a replacement more easily because the code changes are not spread around the whole codebase. You don’t need to change everything at once if you follow the advice on how to name the implementation class and provide an interface. Even though a SCM is designed for collaboration, there are limitations when more than one person is editing the same file. Using a design pattern to hide information allows you an iterative update of your changes.

Conclusion

As we have seen: a nonfunctional requirement is not that difficult to describe. With a short checklist, you can clearly define the important aspects for your project. It is not necessary to check all points for every code commit in the repository, this would with all probability just elevate costs and doesn’t result in higher benefits. Running a full check around a day before the release represents an effective solution to keep quality in an agile context and will help recognizing where optimization is necessary. Points of Interests (POI) to secure quality are the revisions in the code base for a release. This gives you a comparable statistic and helps increasing estimations.

Of course, in this short article, it is almost impossible to cover all aspects regarding quality. We hope our explanation helps you to link theory by examples to best practice. In conclusion, this should be your main takeaway: a high level of automation within your infrastructure, like continuous integration, is extremely helpful, but doesn’t prevent you from manual code reviews and audits.

Checklist

  • Follow common standards
  • KISS – keep it simple, stupid!
  • Equal directory structure for different projects
  • Simple META architecture, which can reuse as much as possible in other projects
  • Defined and follow coding styles
  • If a release got prepared – no compiler warnings are accepted
  • Have test coverage up to 85%
  • Avoid third-party libraries as much as possible
  • Don’t support more than one technology for a specific problem (e. g., JSON)
  • Cover foreign code by a design pattern
  • Avoid strong object/module coupling