Tag Archives: Database
Date vs. Boolean
Reply
When we designing data models and their corresponding tables appears sometimes Boolean as datatype. In general those flags are not really problematic. But maybe there could be a better solution for the data design. Let me give you a short example about my intention.
Assume we have to design a simple domain to store articles. Like a Blog System or any other Content Management. Beside the content of the article and the name of the author could we need a flag which tells the system if the article is visible for the public. Something like published as a Boolean. But there is also an requirement of when the article is scheduled a date for publishing. In the most database designs I observed for those circumstances a Boolean: published and a Date: publishingDate. In my opinion this design is a bit redundant and also error prone. As a fast conclusion I would like to advice you to use from the beginning just Date instead of Boolean. The scenario I described above can also transformed to many other domain solutions.
For now, after we got an idea why we should replace Boolean for Date datatype we will focus about the details how we could reach this goal.
Dealing with standard SQL suggest that replacing a Database Management System (DBMS) for another one should not be a big issue. The reality is unfortunately a bit different. Not all available data types for date like Timestamp are really recommendable to use. By experience I prefer to use the simple java.util.Date to avoid future problems and other surprises. The stored format in the database table looks like: ‘YYYY-MM-dd HH:mm:ss.0’. Between the Date and Time is a single space and .0 indicates an offset. This offset describes the time zone. The Standard Central European Timezone CET has an offset of one hour. That means UTC+01:00 as international format. To define the offset separately I got good results by using java.util.TimeZone, which works perfectly together with Date.
Before we continue I will show you a little code snippet in Java for the OR Manager Hibernate and how you could create those table columns.
Abonnement / Subscription
[English] This content is only available to subscribers.
[Deutsch] Diese Inhalte sind nur für Abonnenten verfügbar.
Abonnement / Subscription
[English] This content is only available to subscribers.
[Deutsch] Diese Inhalte sind nur für Abonnenten verfügbar.
Let’s get a bit closer about the listing above. As first we see the @CreationTimestamp Annotation. That means when the ArticleDO Object got created the variable created will initialized by the current time. This value never should changed, because an article can just once created but several times changed. The Timezone is stored in a String. In the Constructor you can see how the system Timezone could grabbed – but be careful this value should not trusted to much. If you have a user like me traveling a lot you will see in all the places I stay the same system time, because usually I never change that. As default Timezone I define the correct String for UTC-0. The same I do for the variable published. Date can also created by a String what we use to set our default zero value. The Setter for published has the option to define an future date or use the current time in the case the article will published immediately. At the end of the listing I demonstrate a simple SQL import for a single record.
But do not rush to fast. We also need to pay a bit attention how to deal with the UTC offset. Because I observed in huge systems several times problems which occurred because developer was used only default values.
The timezone in general is part of the internationalization concept. For managing the offset adjustments correctly we can decide between different strategies. Like in so many other cases there no clear right or wrong. Everything depends on the circumstances and necessities of your application. If a website is just national wide like for a small business and no time critical events are involved everything become very easy. In this case it will be unproblematic to manage the timezone settings automatically by the DBMS. But keep in mind in the world exist countries like Mexico with more than just one timezone. An international system where clients spread around the globe it could be useful to setup each single DBMS in the cluster to UTC-0 and manage the offset by the application and the connected clients.
Another issue we need to come over is the question how should initialize the date value of a single record by default? Because null values should avoided. A full explanation why returning null is not a good programming style is given by books like ‘Effective Java’ and ‘Clean Code’. Dealing with Null Pointer Exceptions is something I don’t really need. An best practice which well works for me is an default date – time value by ‘0000-00-00 00:00:00.0’. Like this I’m avoiding unwanted publishing’s and the meaning is very clear – for everybody.
As you can see there are good reasons why Boolean data types should replaced by Date. In this little article I demonstrated how easy you can deal with Date and timezone in Java and Hibernate. It should also not be a big thing to convert this example to other programming languages and Frameworks. If you have an own solution feel free to leave a comment and share this article with your colleagues and friends.
Preventing SQL Injections in Java with JPA and Hibernate
When we have a look at OWASP’s top 10 vulnerabilities [1], SQL Injections are still in a popular position. In this short article, we discuss several options on how SQL Injections could be avoided.
When Applications have to deal with databases existing always high-security concerns, if an invader got the possibility to hijack the database layer of your application, he can choose between several options. Stolen the data of the stored users to flood them with spam is not the worst scenario that could happen. Even more problematic would be when stored payment information got abused. Another possibility of an SQL Injection Cyber attack is to get illegal access to restricted pay content and/or services. As we can see, there are many reasons why to care about (Web) Application security.
To find well-working preventions against SQL Injections, we need first to understand how an SQL Injection attack works and on which points we need to pay attention. In short: every user interaction that processes the input unfiltered in an SQL query is a possible target for an attack. The data input can be manipulated in a manner that the submitted SQL query contains a different logic than the original. Listing 1 will give you a good idea about what could be possible.
SELECT Username, Password, Role FROM User
   WHERE Username = 'John Doe' AND Password = 'S3cr3t';
SELECT Username, Password, Role FROM Users
WHERE Username = 'John Doe'; --' AND Password='S3cr3t';Listing 1: Simple SQL Injection
The first statement in Listing 1 shows the original query. If the Input for the variables Username and Password is not filtered, we have a lack of security. The second query injects for the variable Username a String with the username John Doe and extends with the characters ‘; –. This statement bypasses the AND branch and gives, in this case, access to the login. The ‘; sequence close the WHERE statement and with — all following characters got un-commented. Theoretically, it is possible to execute between both character sequences every valid SQL code.
Of course, my plan is not to spread around ideas that SQL commands could rise up the worst consequences for the victim. With this simple example, I assume the message is clear. We need to protect each UI input variable in our application against user manipulation. Even if they are not used directly for database queries. To detect those variables, it is always a good idea to validate all existing input forms. But modern applications have mostly more than just a few input forms. For this reason, I also mention keeping an eye on your REST endpoints. Often their parameters are also connected with SQL queries.
For this reason, Input validation, in general, should be part of the security concept. Annotations from the Bean Validation [2] specification are, for this purpose, very powerful. For example, @NotNull, as an Annotation for the data field in the domain object, ensure that the object only is able to persist if the variable is not empty. To use the Bean Validation Annotations in your Java project, you just need to include a small library.
<dependency>
    <groupId>org.hibernate.validator</groupId>
    <artifactId>hibernate-validator</artifactId>
    <version>${version}</version>
</dependency>Listing 2: Maven Dependency for Bean Validation
Perhaps it could be necessary to validate more complex data structures. With Regular Expressions, you have another powerful tool in your hands. But be careful. It is not that easy to write correct working RegEx. Let’s have a look at a short example.
public static final String RGB_COLOR = "#[0-9a-fA-F]{3,3}([0-9a-fA-F]{3,3})?";

public boolean validate(String content, String regEx) {
    boolean test;
    if (content.matches(regEx)) {
        test = true;
    } else {
        test = false;
    }
    return test;
}

validate('#000', RGB_COLOR);Listing 3: Validation by Regular Expression in Java
The RegEx to detect the correct RGB color schema is quite simple. Valid inputs are #ffF or #000000. The Range for the characters is 0-9, and the Letters A to F. Case insensitive. When you develop your own RegEx, you always need to check very well existing boundaries. A good example is also the 24 hours time format. Typical mistakes are invalid entries like 23:60 or 24:00. The validate method compares the input string with the RegEx. If the pattern matches the input, the method will return true. If you want to get more ideas about validators in Java, you can also check my GitHub repository [3].
In resume, our first idea to secure user input against abuse is to filter out all problematic character sequences, like — and so on. Well, this intention of creating a blocking list is not that bad. But still have some limitations. At first, the complexity of the application increased because blocking single characters like –; and ‘ could causes sometimes unwanted side effects. Also, an application-wide default limitation of the characters could cost sometimes problems. Imagine there is a text area for a Blog system or something equal.
This means we need another powerful concept to filter the input in a manner our SQL query can not manipulate. To reach this goal, the SQL standard has a very great solution we can use. SQL Parameters are variables inside an SQL query that will be interpreted as content and not as a statement. This allows large texts to block some dangerous characters. Let’s have a look at how this will work on a PostgreSQL [4] database.
DECLARE user String;
SELECT * FROM login WHERE name = user; Listing 4: Defining Parameters in PostgreSQL
In the case you are using the OR mapper Hibernate, there exists a more elegant way with the Java Persistence API (JPA).
String myUserInput;

@PersistenceContext
public EntityManager mainEntityManagerFactory;

CriteriaBuilder builder =
    mainEntityManagerFactory.getCriteriaBuilder();

CriteriaQuery<DomainObject> query =
    builder.createQuery(DomainObject.class);

// create Criteria
Root<ConfigurationDO> root =
    query.from(DomainObject.class);

//Criteria SQL Parameters
ParameterExpression<String> paramKey =
    builder.parameter(String.class);

query.where(builder.equal(root.get("name"), paramKey);

// wire queries together with parameters
TypedQuery<ConfigurationDO> result =
    mainEntityManagerFactory.createQuery(query);

result.setParameter(paramKey, myUserInput);
DomainObject entry = result.getSingleResult();Listing 5: Hibernate JPA SQL Parameter Usage
Listing 5 is shown as a full example of Hibernate using JPA with the criteria API. The variable for the user input is declared in the first line. The comments in the listing explain the way how it works. As you can see, this is no rocket science. The solution has some other nice benefits besides improving web application security. At first, no plain SQL is used. This ensures that each database management system supported by Hibernate can be secured by this code.
May the usage looks a bit more complex than a simple query, but the benefit for your application is enormous. On the other hand, of course, there are some extra lines of code. But they are not that difficult to understand.
Resources

Treasure chest – Part 2

In the previous part of the article treasure chest, I described how the database connection for the TP-CORE library got established. Also I gave a insight to the internal structure of the ConfiguartionDO. Now in the second part I explain the ConfiguartionDAO and its corresponding service. With all this knowledge you able to include the application configuration feature of TP-CORE in your own project to build your own configuration registry.
Lets resume in short the architectural design of the TP-CORE library and where the fragments of the features located. TP-CORE is organized as layer architecture as shown in the graphic below.
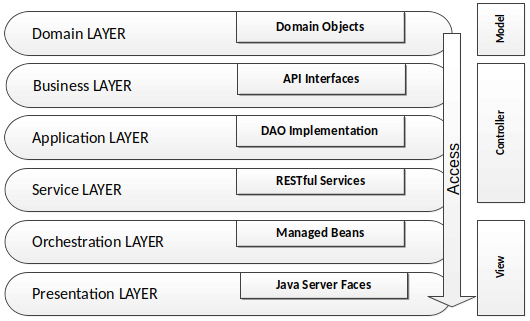
As you can see there are three relevant packages (layer) we have to pay attention. As first the business layer resides like all other layers in an equal named package. The whole API of TP-CORE is defined by interfaces and stored in the business layer. The implementation of the defined interfaces are placed in the application layer. Domain Objects are simple data classes and placed in the domain layer. Another important pattern is heavily used in the TP-CORE library is the Data Access Object (DAO).
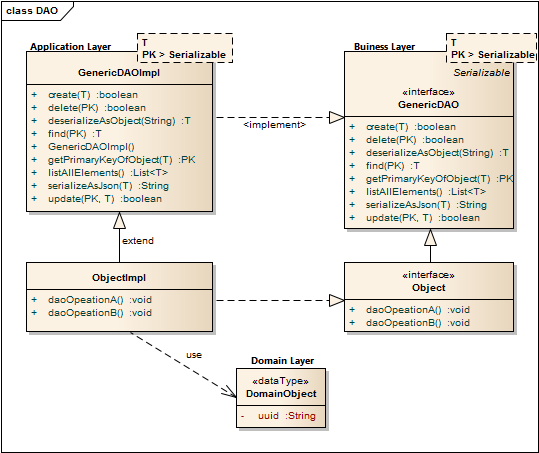
The GenericDAO provides the basic CRUD operations, we don’t need to repeat in every specialization again. A full description how the GenericDAO is implemented I documented in the GitHub Wiki of TP-CORE.
Now the days micro services and RESTful application are state of the art. Especially in TP-CORE the defined services aren’t REST. This design decision is based on the mind that TP-CORE is a dependency and not a standalone service. Maybe in future, after I got more feedback how and where this library is used, I could rethink the current concept. For now we treat TP-CORE as what it is, a library. That implies for the usage in your project, you can replace, overwrite, extend or wrap the basic implementation of the ConfigurationDAO to your special necessities.
To keep the portability of changing the DBMS Hibernate (HBM) is used as JPA implementation and O/R mapper. The Spring configuration for Hibernate uses the EntityManager instead of the Session, to send requests to the DBMS. Since version 5 Hibernate use the JPA 2 standard to formulate queries.
As I already mentioned, the application configuration feature of TP-CORE is implemented as DAO. The domain object and the database connection was topic of the first part of this article. Now I discuss how to give access to the domain object with the ConfigurationDAO and its implementation ConfigurationHbmDAO. The domain object ConfigurationDO or a list of domain objects will be in general the return value of the DAO. Actions like create are void and throw just an exception in the case of a failure. For a better style the return type is defined as Boolean. This simplifies also writing unit tests.
Sometimes it could be necessary to overwrite a basic implementation. A common scenario is a protected delete. For example: a requirement exist that a special entry is protected against a unwanted deletion. The most easy solution is to overwrite the delete whit a statement, refuses every time a request to delete a domain object whit a specific UUID. Only adding a new method like protectedDelete() is not a god idea, because a developer could use by accident the default delete method and the protected objects are not protected anymore. To avoid this problem you should prefer the possibility of overwriting GenericDAO methods.
As default query to fetch an object, the identifier defined as primary key (PK) is used. A simple expression fetching an object is written in the find method of the GenericHbmDAO. In the specialization as ConfigurationHbmDAO are more complex queries formulated. To keep a good design it is important to avoid any native SQL. Listing 1 shows fetch operations.
//GenericHbmDAO
public T find(final PK id) {
  return mainEntityManagerFactory.find(genericType, id);
}
//ConfigurationHbmDAO
public List getAllConfigurationSetEntries(final String module,
final String version, final String configSet) {

  CriteriaBuilder builder = mainEntityManagerFactory.getCriteriaBuilder();
  CriteriaQuery query = builder.createQuery(ConfigurationDO.class);
  // create Criteria
  Root root = query.from(ConfigurationDO.class);
  query.where(
    builder.equal(root.get("modulName"), module),
    builder.equal(root.get("version"), version),
    builder.equal(root.get("configurationSet"), configSet)
  );
  return mainEntityManagerFactory.createQuery(query).getResultList();
}The readability of these few lines of source is pretty easy. The query we formulated for getAllConfigurationSetEntries() returns a list of ConfigurationDO objects from the same module whit equal version of a configSet. A module is for example the library TP-CORE it self or an ACL and so on. The configSet is a namespace that describes configuration entries they belong together like a bundle and will used in a service like e-mail. The version is related to the service. If in future some changes needed the version number have increase. Lets get a bit closer to see how the e-mail example will work in particular.
We assume that a e-mail service in the module TP-CORE contains the configuration entries: mailer.host, mailer.port, user and password. As first we define the module=core, configSet=email and version=1. If we call now getAllConfigurationSetEntries(core, 1, email); the result is a list of four domain objects with the entries for mailer.host, mailer.port, user and password. If in a newer version of the email service more configuration entries will needed, a new version will defined. It is very important that in the database the already exiting entries for the mail service will be duplicated with the new version number. Of course as effect the registry table will grow continual, but with a stable and well planned development process those changes occur not that often. The TP-CORE library contains an simple SMTP Mailer which is using the ConfigurationDAO. If you wish to investigate the usage by the MailClient real world example you can have a look on the official documentation in the TP-CORE GitHub Wiki.
The benefit of duplicate all existing entries of a service, when the service configuration got changed is that a history is created. In the case of update a whole application it is now possible to compare the entries of a service by version to decide exist changes they take effect to the application. In practical usage this feature is very helpful, but it will not avoid that updates could change our actual configuration by accident. To solve this problem the domain object has two different entries for the configuration value: default and configuration.
The application configuration follows the convention over configuration paradigm. Each service need by definition for all existing configuration entries a fix defined default value. Those default values can’t changed itself but when the value in the ConfigurationDO is set then the defaultValue entry will ignored. If an application have to be updated its also necessary to support a procedure to capture all custom changes of the updated configuration set and restore them in the new service version. The basic functionality (API) for application configuration in TP-CORE release 3.0 is:
- void updateConfigurationEntries(List<ConfigurationDO> configuration)
- ConfigurationDO getConfigurationByKey( String key, String module, String version)
- List<ConfigurationDO> getAllConfigurationSetEntries(String module, String version, String configSet)
- List<ConfigurationDO> getAllModuleEntries(String module)
- List<ConfigurationDO> getAllDeprecatedEntries()
- List<ConfigurationDO> getHistoryOfAEntry(String module, String key, String configSet)
- String getValueByKey(String key, String module, String version)
- void restoreKeyToDefault(ConfigurationDO entry)
The following listing gives you an idea how a implementation in your own service could look like. This snipped is taken from the JavaMailClient and shows how the internal processing of the fetched ConfigurationDO objects are managed.
private void processConfiguration() {
    List configurationEntries =
        configurationDAO.getAllConfigurationSetEntries("core", 1, "email");

    for (ConfigurationDO entry : configurationEntries) {
        String value;
        if (StringUtils.isEmpty(entry.getValue())) {
            value = <strong>entry.getDefaultValue</strong>();
        } else {
            value = <strong>entry.getValue</strong>();
        }

        if (entry.getKey()
                .equals(cryptoTools.calculateHash("mailer.host",
                        HashAlgorithm.SHA256))) {
            configuration.replace("mailer.host", value);
        } else if (entry.getKey()
                .equals(cryptoTools.calculateHash("mailer.port",
                        HashAlgorithm.SHA256))) {
            configuration.replace("mailer.port", value);
        } else if (entry.getKey()
                .equals(cryptoTools.calculateHash("user",
                        HashAlgorithm.SHA256))) {
            configuration.replace("mailer.user", value);
        } else if (entry.getKey()
                .equals(cryptoTools.calculateHash("password",
                        HashAlgorithm.SHA256))) {
            configuration.replace("mailer.password", value);
        }
    }
}Another functionality of the application configuration is located in the service layer. The ConfigurationService operates on the module perspective. The current methods resetModuleToDefault() and filterMandatoryFieldsOfConfigSet() already give a good impression what that means.
If you take a look on the MailClientService you detect the method updateDatabaseConfiguration(). May you wonder why this method is not part of the ConfigurationService? Of course this intention in general is not wrong, but in this specific implementation is the update functionality specialized to the MailClient configuration. The basic idea of the configuration layer is to combine several DAO objects to a composed functionality. The orchestration layer is the correct place to combine services together as a complex process.
Resume
The implementation of the application configuration inside the small library TP-CORE allows to define an application wide configuration registry. This works also in the case the application has a distribute architecture like micro services. The usage is quite simple and can easily extended to own needs. The proof that the idea is well working shows the real world usage in the MailClient and FeatureToggle implementation of TP-CORE.
I hope this article was helpful and may you also like to use TP-CORE in your own project. Feel free to do that, because of the Apache 2 license is also no restriction for commercial usage. If you have some suggestions feel free to leave a comment or give a thumbs up.
Treasure chest – Part 1
Through the years, different techniques to storage configuration settings for applications got established. We can choose between database, property files, XML or YAML, just to give a few impressions of the options we could choose from. But before we jumping into all technical details of a possible implementation, we need to get a bit familiar of some requirements.
Many times in my professional life I touched this topic. Problems occur periodically after an application was updated. My peak of frustration, I reached with Windows 10. After every major update many settings for security and privacy switched back to default, apps I already uninstalled messed up my system again and so on. This was reasons for me to chose an alternative to stop suffering. Now after I switched to Ubuntu Mate I’m fine, because those problems got disappear.
Several times I also had to maintain legacy projects and needed to migrate data to newer versions. A difficult and complex procedure. Because of those activities I questioned myself how this problem could handled in a proper way. My answer you can find in the open source project TP-CORE. The feature application configuration is my way how to avoid the effect of overwriting important configuration entries during the update procedure.
TP-CORE is a free available library with some useful functionality written in Java. The source code is available on GitHub and the binaries are published on Maven Central. To use TP-CORE in your project you can add it as dependency.
<dependency>
   <groupId>io.github.together.modules</groupId>
   <artifactId>core</artifactId>
   <version>2.2.0</version>
</dependency>The feature of application configuration is implemented as ConfigurationDAO and use a database. My decision for a database approach was driven by the requirement of having a history. Off course the choice have also some limitations. Obviously has the configuration for the database connection needed to be stored somewhere else.
TP-CORE use Spring and Hibernate (JPA) to support several DBMS like PostgreSQL, Oracle or MariaDB. My personal preference is to use PostgreSQL, so we can as next step discuss how to setup our database environment. The easiest way running a PostgreSQL Server is to use the official Docker image. If you need a brief overview how to deal with Docker and PostgreSQL may you like to check my article: Learn to walk with Docker and PostgreSQL. Below is a short listing how the PostgreSQL container could get instantiated in Docker.
docker network create -d bridge –subnet=172.18.0.0/16 services

docker run -d –name postgres \
-p 5432:5432 –net services –ip 172.18.0.2 \
-e POSTGRES_PASSWORD=password \
-e PGPASSWORD=password \
-v /home/<user>/postgreSQL:/var/lib/postgresql/data \
postgres:11May you need to make some changes on the listing above to fit it for your system. After your DBMS is running well we have to create the schemata and the user with a proper password. In our case the schema is called together. the user is also called together and the password will be together too.
CREATE ROLE together LOGIN
  ENCRYPTED PASSWORD 'md582721599778493074c7de7e2bb735332'
  NOSUPERUSER INHERIT NOCREATEDB NOCREATEROLE NOREPLICATION;

CREATE DATABASE "together"
  WITH OWNER = together
       ENCODING = 'UTF8'
       TABLESPACE = pg_default
       LC_COLLATE = 'en_US.utf8'
       LC_CTYPE = 'en_US.utf8'
CONNECTION LIMIT = -1;To establish the connection from your application to the PostgreSQL DBMS we use a XML configuration from the Spring Framework. The GitHub repository of TP-CORE contains already a working configuration file called spring-dao.xml. The Spring configuration includes some other useful features like transactions and a connection pool. All necessary dependencies are already included. You just need to replace the correct entries for the connection variables:
- ${jdbc.user} = together
- ${jdbc.password} = togehter
- ${hibernate.dialect.database} = org.hibernate.dialect.PostgreSQL95Dialect
- ${jdbc.driverClassName} = org.postgresql.Driver
- ${jdbc.url} = jdbc:postgresql://172.18.0.2:5432/together
- ${dbcp.initialSize} = 10
- ${hibernate.hbm2ddl.auto} = update
- ${hibernate.show_sql} = false
In the next step you need to tell your application how to instanciate the Spring context, using the configuration file spring-dao.xml. Depending on your application type you have two possibilities. For a standard Java app, you can add the following line to your main method:
ApplicationContext =
new ClassPathXmlApplicationContext("/spring-dao.xml");Web application are configured by the web.xml in the WEB-INF directory. there you need to add those lines:
<context-param>
  <param-name>contextConfigLocation</param-name>
  <param-value>/WEB-INF/spring-dao.xml</param-value>
</context-param>The creation of the database table will managed by Hibernate during the application start. When you discover the GitHub repository of the TP-CORE project you will find in the directory /src/main/filters the file database.properties. This file contains more connection strings to other database systems. In the case you wish to compile TP-CORE by your own, you can modify database.properties to your preferred configuration. The full processed configuration file with all token replacements you will find in the target directory.
In the next paragraph we will have a closer look on the Domain Object ConfigurationDO

The most columns you see in the image above, is very clear, for what they got used. As first point we need to clarify, what makes an entry unique? Of course the UUID as primary key fits this requirement as well. In our case the UUID is the primary key and is auto generated by the application, when a new row will created. But using in an application all the time a non human readable id as key, to grab a value is heavily error prone and uncomfortable. For this use case I decided a combination of configuration key, module name and service version to define a unique key entry.
To understand the benefit of this construction I will give a simple example. Imagine you have functionality of sending E-Mails in your application. This functionality requires several configuration entries like host, user and password to connect with an SMTP server. to group all those entries together in one bundle we have the CONFIG_SET. If your application deals with an modular architecture like micro services, it could be also helpful to organize the configuration entries by module or service name. For this reason the MODULE_NAME was also included into this data structure. Both entries can be used like name spaces to fetch relevant information more efficient.
Now it could be possible that some changes of the functionality create new configuration entries or some entries got obsolete. To enable a history and allow a backward compatibility the data structure got extended by SERVICE_VERSION.
Every entry contains a mandatory default value and an optional configuration value. The application can overwrite the default value by filling the configuration value field. This allows updates without effect the custom configuration, as long the developer respect to not fill entries for configuration values and always use the default entry. This definition is the convention over configuration paradigm.
The flags deprecated and mandatory for a configuration key are very explicit and descriptive. Also the column comment don’t need as well any further explanation.
If there are changes of one or more configuration entries for a service, the whole configuration set has to be duplicated with the new service version. As example you can have a look on the MailClient functionality of TP-CORE how the application configuration is used.
A very important information is that the configuration key is in the DBMS stored as SHA-512 hash. This is a simple protection against a direct manipulation of the configuration in the DBMS, outside of the application. For sure this is not a huge security, but minimum it makes the things a bit uncomfortable. In the application code is a human readable key name used. The mapping is automatic, and we don’t need to worry about it.
Resume
In this first part I talked about why I had need my own implementation of a application registry to storage configuration settings. The solution I prefer is using a database and I showed how enable the database configuration in your own project. Shortly we also had a view on the data structure and how the Domain Object is working.
Installing NextCloud with Docker on a Linux Server
For business it’s sometime important to have a central place where employees and clients are able to interact together. NextCloud is a simple and extendable PHP solution with a huge set of features you can host by yourself, to keep full control of your data. A classical Groupware ready for your own cloud.
If you want to install NextCloud on your own server you need as first a well working PHP installation with a HTTP Server like Apache. Also a Database Management System is mandatory. You can chose between MySQL, MariaDB and PostgreSQL servers. The classical way to install and configure all those components takes a lot of time and the maintenance is very difficult. To overcome all this we use a modern approach with the virtualization tool docker.
The system setup is as the following: Ubuntu x64 Server, PostgreSQL Database, pgAdmin DBMS Management and NextCloud.
Agenda
- Docker Basics
- Installing Docker on a Ubuntu server
- prepare your database
- putting all together and make it run
- insights to operate NextCloud
Docker Container Instructions
Abonnement / Subscription
[English] This content is only available to subscribers.
[Deutsch] Diese Inhalte sind nur für Abonnenten verfügbar.
If you have any question feel free to leave a comment. May you need help to install and operate your own NextCloud installation secure, don’t hesitate to contact us by the contact form. In the case you like the video level a thumbs up and share it.
Resources
Abonnement / Subscription
Learn to walk with Docker and PostgreSQL
After some years the virtualization tool Docker proofed it’s importance for the software industry. Usually when you hear something about virtualization you may could think this is something for administrators and will not effect me as a developer as much. But wait. You’re might not right. Because having some basic knowledge about Docker as a developer will helps you in your daily business.
Step 1: create the container and initialize the database
docker run -d --name pg-dbms --restart=no \
--ip 172.18.0.20 \
-e POSTGRES_PASSWORD=s3cr3t \
-e PGPASSWORD=s3cr3t \
postgres:11If you wish that your PostgreSQL is always up after you restart your system, you should change the restart policy form no to always. After you created the instance pg-dbms of your PostgreSQL 11 Docker image, you need to cheek if it was success. This you can do by the command:
docker ps -aStep 2: copy the initialized database directory to a local directory on your host system
docker cp pg-dbms:/var/lib/postgresql/data /home/user/pgThe biggest problem with the current container is, that all data will got lost, when you erase the container. This means wen need to find a way how to save this data permanently. The easiest way is to copy the data directory from your container to an directory to your host system. The copy command needs tow parameters source and destination. for the source you need to specify the container were you want to grab the files. in our case the container is named pg-dbms. The destination is a PostgreSQL folder in the home directory of the user ed. If you use Windows instead of Linux it works the same. Just adapt the directory path and try to avoid white-spaces. When the files appeared in the defined directory you’re done with this step.
Step 3: stop the current container
docker stop pg-dbmsIn the case you wish to start a container, just replace the word stop for the word start. The container we created to grab the initial files for the PostgreSQL DBMS we don’t need no longer, so we can erase it, but to do that as first the running container have to be stopped.
Step 4: start the current container
docker start pg-dbmsAfter the container is stopped we are able to erase it.
Step 5: recreate the container with an external volume
docker run -d --name pg-dbms \
--ip 172.18.0.20 \
-e POSTGRES_PASSWORD=s3cr3t \
-e PGPASSWORD=s3cr3t \
-v /home/user/pg:/var/lib/postgresql/data \
postgres:11Now we can link the directory with the exported initial database to a new created PostgreSQL container. that’s all. The big benefit of this activities is, that now every database we create in PostgreSQL and the data of this database is outside of the docker container on our local machine. This allows a much more simpler backup and prevent losing information when a container has to be updated.
If you have instead of PostgreSQL other images where you need to grab files to reuse them you can use this tutorial too. just adapt to the image and the paths you need. The procedure is almost the same. If you like to get to know more facts about Docker you can watch also my video Docker Basics in less then 10 Minutes. In the case you like this short tutorial share it with your friends and colleagues. To stay informed don’t forget to subscribe to my newsletter.
Abonnement / Subscription
[English] This content is only available to subscribers.
[Deutsch] Diese Inhalte sind nur für Abonnenten verfügbar.