High-performance hardware under Linux for local AI applications

Anyone wanting to experiment a bit with local LLM will quickly discover its limitations. Not everyone has a massively upgraded desktop PC with 2 TB of RAM and a CPU that could fry an egg under full load. A laptop with 32 GB of RAM, or in my case, a Lenovo P14s with 64 GB of RAM, is more typical. Despite this generous configuration, it often fails to load a more demanding AI model, as 128 GB of RAM is fairly standard for many of these models. And you can’t upgrade the RAM in current laptops because the chips are soldered directly onto the motherboard. We have the same problem with the graphics card, of course. That’s why I’ve made it a habit when buying a laptop to configure it with almost all the available options, hoping to be set for 5-8 years. The quality of the Lenovo ThinkPad series, in particular, hasn’t disappointed me in this regard. My current system is about two years old and is still running reliably.

I’ve been using Linux as my operating system for years, and I’m currently running Debian 13. Compared to Windows, Linux and Unix distributions are significantly more resource-efficient and don’t use their resources for graphical animations and complex gradients, but rather provide a powerful environment for the applications they’re used in. Therefore, my urgent advice to anyone wanting to try local LLMs is to get a powerful computer and run Linux on it. But let’s take it one step at a time. First, let’s look at the individual hardware components in more detail.

Let’s start with the CPU. LLMs, CAD applications, and even computer games all perform calculations that can be processed very effectively in parallel. For parallel calculations, the number of available CPU cores is a crucial factor. The more cores, the more parallel calculations can be performed.

Of course, the processors need to be able to quickly request the data for the calculations. This is where RAM comes into play. The more RAM is available, the more efficiently the data can be provided for the calculations. Affordable laptops with 32 GB of RAM are already available. Of course, the purchase price increases exponentially with more RAM. While there are certainly some high-end gaming devices in the consumer market, I wouldn’t recommend them due to their typically short lifespan and comparatively high price.

The next logical step in the hardware chain is the hard drive. Simple SSDs significantly accelerate data transfer to RAM, but there are still improvements. NVMe cards with 2 GB of storage capacity or more can reach speeds of up to 7000 MB/s in the 4th generation.

We have some issues with graphics cards in laptops. Due to their size and the required performance, the graphics cards built into laptops are more of a compromise than a true highlight. A good graphics card would be ideal for parallel calculations, such as those performed in LLMs (Large Linear Machines). As a solution, we can connect the laptop to an external graphics card. Thanks to Bitcoin miners in the crypto community, considerable experience has already been gained in this area. However, to connect an external graphics card to the laptop, you need a port that can handle that amount of data. USB 3 is far too slow for our purposes and would severely limit the advantages of the external graphics card due to its low data rate.

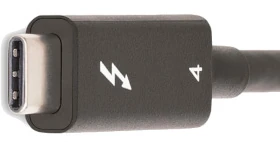
The solution to our problem is Thunderbolt. Thunderbolt ports look like USB-C, but are significantly faster. You can identify Thunderbolt by the small lightning bolt symbol (see Figure 1) on the cables or connectors. These are not the power supply connections. To check if your computer has Thunderbolt, you can use a simple Linux shell command.

ed@local: $ lspci | grep -i thunderbolt
00:07.0 PCI bridge: Intel Corporation Raptor Lake-P Thunderbolt 4 PCI Express Root Port #0
00:07.2 PCI bridge: Intel Corporation Raptor Lake-P Thunderbolt 4 PCI Express Root Port #2
00:0d.0 USB controller: Intel Corporation Raptor Lake-P Thunderbolt 4 USB Controller
00:0d.2 USB controller: Intel Corporation Raptor Lake-P Thunderbolt 4 NHI #0
00:0d.3 USB controller: Intel Corporation Raptor Lake-P Thunderbolt 4 NHI #1

In my case, my computer’s output shows that two Thunderbolt 4 ports are available.

To connect an external graphics card, we need a mounting system onto which a PCI card can be inserted. ANQUORA offers a good solution here with the ANQ-L33 eGPU Enclosure. The board can accommodate a graphics card with up to three slots. It costs between €130 and €200. A standard ATX power supply is also required. The required power supply wattage depends on the graphics card’s power consumption. It’s advisable not to buy the cheapest power supply, as the noise level might bother some users. The open design of the board provides ample flexibility in choosing a graphics card.

Selecting a graphics card is a whole other topic. Since I use Linux as my operating system, I need a graphics card that is supported by Linux. For accelerating LLMs, a graphics card with as many GPU cores as possible and a correspondingly large amount of internal memory is necessary. To make the purchase worthwhile and actually notice a performance boost, the card should be equipped with at least 8 GB of RAM. More is always better, of course, but the price of the card will then increase exorbitantly. It’s definitely worth checking the used market.

If you add up all the costs, the investment for an external GPU amounts to at least 500 euros. Naturally, this only includes an inexpensive graphics card. High-end graphics cards can easily exceed the 500-euro price point on their own. Anyone who would like to contribute their expertise in the field of graphics cards is welcome to contribute an article.

To avoid starting your shopping spree blindly and then being disappointed with the result, it’s highly advisable to consider beforehand what you want to do with the local LLM. Supporting programming requires less processing power than generating graphics and audio. Those who use LLMs professionally can save considerably by purchasing a high-end graphics card with self-hosted models compared to the costs of, for example, cloud code. The specification of LLMs depends on the available parameters. The more parameters, the more accurate the response and the more computing power is required. Accuracy is further differentiated by:

  • FP32 (Single-Precision Floating Point): Standard precision, requires the most memory. (e.g., 32 bits per parameter)
  • FP16 (Half-Precision Floating Point): Half the precision, halves the memory requirement compared to FP32, but can slightly reduce precision. (e.g., 16 bits per parameter / 4 bytes)
  • BF16 (Brain Floating Point): Another option for half-precision calculations, often preferred in deep learning due to its better performance in certain operations. (e.g., 16 bits per parameter / 2 bytes)
  • INT8/INT4 (Integer Quantization): Even lower precision, drastically reduces memory requirements and speeds up inference, but can lead to a greater loss of precision. (e.g., 8 bits per parameter / 1 byte)

Other factors influencing the hardware requirements for LLM include:

  • Batch Size: The number of input requests processed simultaneously.
  • Context Length: The maximum length of text that the model can consider in a query. Longer context lengths require more memory because the entire context must be held in memory.
  • Model Architecture: Different architectures have different memory requirements.

To estimate the memory consumption of a model, you can use the following calculation: Parameters * Accuracy = Memory consumption for the model.

7,000,000,000 parameters * 2 bytes/parameter (BF16) = 14,000,000,000 bytes = 14 GB

When considering hardware recommendations, you should refer to the model’s documentation. This usually only specifies the minimum or average requirements. However, there are general guidelines you can use.

  • Small models (up to 7 billion parameters): A GPU with at least 8 GB of VRAM should be sufficient, especially if you are using quantization.
  • Medium-sized models (7-30 billion parameters): A GPU with 16 GB to 24 GB of VRAM is recommended.
  • Large models (over 30 billion parameters): Multiple GPUs, each with at least 24 GB of VRAM, or a single GPU with a very large amount of VRAM (e.g., 48 GB, 80 GB) are required.
  • CPU-only: For small models and simple experiments, the CPU may suffice, but inference will be significantly slower than on a GPU. Here, a large amount of RAM is crucial (several GB / 32+).

We can see that using locally running LLMs can be quite realistic if you have the necessary hardware available. It doesn’t always have to be a supercomputer; however, most solutions from typical electronics retailers are off-the-shelf and not really suitable. Therefore, with this article, I have laid the groundwork for your own experiments.


Disk-Jock-Ey

Working with mass storage devices such as hard disks (HDDs), solid-state drives (SSDs), USB drives, memory cards, or network-attached storage devices (NAS) isn’t as difficult under Linux as many people believe. You just have to be able to let go of old habits you’ve developed under Windows. In this compact course, you’ll learn everything you need to master potential problems on Linux desktops and servers.

Before we dive into the topic in depth, a few important facts about the hardware itself. The basic principle here is: Buy cheap, buy twice. The problem isn’t even the device itself that needs replacing, but rather the potentially lost data and the effort of setting everything up again. I’ve had this experience especially with SSDs and memory cards, where it’s quite possible that you’ve been tricked by a fake product and the promised storage space isn’t available, even though the operating system displays full capacity. We’ll discuss how to handle such situations a little later, though.

Another important consideration is continuous operation. Most storage media are not designed to be switched on and used 24 hours a day, 7 days a week. Hard drives and SSDs designed for laptops quickly fail under constant load. Therefore, for continuous operation, as is the case with NAS systems, you should specifically look for such specialized devices. Western Digital, for example, has various product lines. The Red line is designed for continuous operation, as is the case with servers and NAS. It is important to note that the data transfer speed of storage media is generally somewhat lower in exchange for an increased lifespan. But don’t worry, we won’t get lost in all the details that could be said about hardware, and will leave it at that to move on to the next point.

A significant difference between Linux and Windows is the file system, the mechanism by which the operating system organizes access to information. Windows uses NTFS as its file system, while USB sticks and memory cards are often formatted in FAT. The difference is that NTFS can store files larger than 4 GB. FAT is preferred by device manufacturers for navigation systems or car radios due to its stability. Under Linux, the ext3 or ext4 file systems are primarily found. Of course, there are many other specialized formats, which we won’t discuss here. The major difference between Linux and Windows file systems is the security concept. While NTFS has no mechanism to control the creation, opening, or execution of files and directories, this is a fundamental concept for ext3 and ext4.

Storage devices formatted in NTFS or FAT can be easily connected to Linux computers, and their contents can be read. To avoid any risk of data loss when writing to network storage, which is often formatted as NTFS for compatibility reasons, the SAMBA protocol is used. Samba is usually already part of many Linux distributions and can be installed in just a few moments. No special configuration of the service is required.

Now that we’ve learned what a file system is and what it’s used for, the question arises: how to format external storage in Linux? The two graphical programs Disks and Gparted are a good combination for this. Disks is a bit more versatile and allows you to create bootable USB sticks, which you can then use to install computers. Gparted is more suitable for extending existing partitions on hard drives or SSDs or for repairing broken partitions.

Before you read on and perhaps try to replicate one or two of these tips, it’s important that I offer a warning here. Before you try anything with your storage media, first create a backup of your data so you can fall back on it in case of disaster. I also expressly advise you to only attempt scenarios you understand and where you know what you’re doing. I assume no liability for any data loss.

Bootable USB & Memory Cards with Disks

One scenario we occasionally need is the creation of bootable media. Whether it’s a USB flash drive for installing a Windows or Linux operating system, or installing the operating system on an SD card for use on a Raspberry Pi, the process is the same. Before we begin, we need an installation medium, which we can usually download as an ISO from the operating system manufacturer’s website, and a corresponding USB flash drive.

Next, open the Disks program and select the USB drive on which we want to install the ISO file. Then, click the three dots at the top of the window and select Restore Disk Image from the menu that appears. In the dialog that opens, select our ISO file for the Image to Restore input field and click Start Restoring. That’s all you need to do.

Repairing Partitions and MTF with Gparted

Another scenario you might encounter is that data on a flash drive, for example, is unreadable. If the data itself isn’t corrupted, you might be lucky and be able to solve the problem with GParted. In some cases, (A) the partition table may be corrupted and the operating system simply doesn’t know where to start. Another possibility is (B) the Master File Table (MFT) may be corrupted. The MTF contains information about the memory location in which a file is located. Both problems can be quickly resolved with GParted.

Of course, it’s impossible to cover the many complex aspects of data recovery in a general article.

Now that we know that a hard drive consists of partitions, and these partitions contain a file system, we can now say that all information about a partition and the file system formatted on it is stored in the partition table. To locate all files and directories within a partition, the operating system uses an index, the so-called Master File Table, to search for them. This connection leads us to the next point: the secure deletion of storage media.

Data Shredder – Secure Deletion

When we delete data on a storage medium, only the entry where the file can be found is removed from the MFT. The file therefore still exists and can still be found and read by special programs. Securely deleting files is only possible if we overwrite the free space multiple times. Since we can never know where a file was physically written on a storage medium, we must overwrite the entire free space multiple times after deletion. Specialists recommend three write processes, each with a different pattern, to make recovery impossible even for specialized labs. A Linux program that also sweeps up and deletes “data junk” is BleachBit.

Securely overwriting deleted files is a somewhat lengthy process, depending on the size of the storage device, which is why it should only be done sporadically. However, you should definitely delete old storage devices completely when they are “sorted out” and then either disposed of or passed on to someone else.

Mirroring Entire Hard Drives 1:1 – CloneZilla

Another scenario we may encounter is the need to create a copy of the hard drive. This is relevant when the existing hard drive or SSD for the current computer needs to be replaced with a new one with a higher storage capacity. Windows users often take this opportunity to reinstall their system to keep up with the practice. Those who have been working with Linux for a while appreciate that Linux systems run very stably and the need for a reinstallation only arises sporadically. Therefore, it is a good idea to copy the data from the current hard drive bit by bit to the new drive. This also applies to SSDs, of course, or from HDD to SSD and vice versa. We can accomplish this with the free tool CloneZilla. To do this, we create a bootable USB with CloneZilla and start the computer in the CloneZilla live system. We then connect the new drive to the computer using a SATA/USB adapter and start the data transfer. Before we open up our computer and swap the disks after finishing the installation, we’ll change the boot order in the BIOS and check whether our attempt was successful. Only if the computer boots smoothly from the new disk will we proceed with the physical replacement. This short guide describes the basic procedure; I’ve deliberately omitted a detailed description, as the interface and operation may differ from newer Clonezilla versions.

SWAP – The Paging File in Linux

At this point, we’ll leave the graphical user interface and turn to the command line. We’ll deal with a very special partition that sometimes needs to be expanded. It’s the SWAP file. The SWAP file is what Windows calls the swap file. This means that the operating system writes data that no longer fits into RAM to this file and can then read this data back into RAM more quickly when needed. However, it can happen that this swap file is too small and needs to be expanded. But that’s not rocket science, as we’ll see shortly.

Abonnement / Subscription

[English] This content is only available to subscribers.

[Deutsch] Diese Inhalte sind nur für Abonnenten verfügbar.

We’ve already discussed quite a bit about handling storage media under Linux. In the second part of this series, we’ll delve deeper into the capabilities of command-line programs and look, for example, at how NAS storage can be permanently mounted in the system. Strategies for identifying defective storage devices will also be the subject of the next part. I hope I’ve piqued your interest and would be delighted if you would share the articles from this blog.

Take professional screenshots

Take professional screenshots

Neo Diseno Sep 29, 2025 5 min read

Sure, you can take a screenshot with your smartphone, but creating screenshots isn’t always that easy. In this short article,…