The topic of artificial intelligence will bring about significant changes for our society. The year 2022 heralded these changes with the launch of ChatGPT for private users. Powerful A.I. based tools are now seeing the light of day almost daily. They promise higher productivity and open up new and even unimagined possibilities. Even if what these tools do seems a bit scary at first, it’s also fascinating, because most of these applications we’ve been longing for for many years.
So before I get into the details, I’d like to say a few words of caution. Because as exciting as the whole topic is, it also has its downsides, which we should not overlook despite all the euphoria. Companies in particular must be aware that all requests to A.I. are logged and used for training purposes. This can be a security risk in the case of sensitive business secrets.
Technically, the A.I. tools discussed here are so-called artificial neural networks. Tools are so-called artificial neural networks and imitate the human brain. The description of how ChatGPT works includes the term Large Vision-Language Model (LVLM). This means that they understand the context of human speech and act or react accordingly. All the A.I. systems discussed in this article are, in contrast to living beings, not self-motivated. They need, so to speak, an initial spark to become active. No matter which living being on the other hand has permanently the necessity to find food for its own energy demand. If the creature does not succeed in finding food over a longer period of time, it dies and its being is lost forever. An artificial neural network, on the other hand, can process queries as long as the computer on which it is installed. If the computer breaks down, the neural network can be installed on a new computer and it can continue to work as before. But now enough of the technical details. If you want to know more, you can listen to my podcast or have a look at the other A.I. articles in this blog.
Now, before I introduce K. I. systems for home use, I would like to discuss a few highly specialized industrial applications. I must admit that I am very impressed by the performance of these systems. This also demonstrates the enormous versatility.
PTC CREO
PTC CREO is a computer-aided design (CAD) system that can be used to create engineering design drawings. CREO can also optimize existing designs based on material and manufacturing requirements.
YOU.COM

YOU.COM is an A.I. based search engine with an integrated chatbot. In contrast to Google and Co, YOU.COM does not present long lists of results from which you have to search for what you are looking for. Rather, you get a summary of the information found in response to your query.
absci
absci uses artificial neural networks to design drugs from scratch. This extremely accelerated process will enable the development of personalized drugs tailored to the patient in the future.
PassGAN

On the free source code hosting platform GitHub you can find the tool PassGAN, a Python written A.I. based password cracker. Even though its use is complicated and PassGAN is mainly used by security researchers, it is a matter of time before capable specialists use this tool for illegal activities.
If you now have a taste for it, you should definitely take a look at hugging face. On this website, the A.I. community hangs out and all kinds of LVLM can be tried out with different data sets. Of course there is also an extensive section with current scientific publications on the subject.

After I have demonstrated the potential of neural networks in a commercial environment with a few examples, it is now time to turn to tools for home use. In this way, the tools presented below can also be used for everyday tasks.
One of the oldest domains for artificial intelligence is the field of translation.
All those who have already diligently used the Google Translator on holiday may not even know that it also uses A.I. technologies. For this, the translator also needs a connection to the internet, because even modern smartphones are not powerful enough for complex translations by neural networks. However, the Google Translator had considerable weaknesses for me in the past. Especially with complex sentences, the tool quickly reached its limits. I achieve much better results with DeepL, which I use primarily for the languages German / Spanish and English. With the browser plug-in of the same name, entire websites can also be translated. In the free version of DeepL, texts can be translated on the website with up to 1500 per request. However, if you often want to translate large documents in a short time, you can also switch to the commercial version. In this case, various formats such as PDF, DOCX etx can be uploaded to the website and in a few moments you will receive the corresponding translation. There is also an option to spice up the source text stylistically. This is particularly suitable for those who find it difficult to formulate their own texts (letters, etc.).
In turn, anyone who needed individual graphics for their homepage had to either hire a professional graphic designer or spend a long time searching for freely usable graphics on free platforms such as Pixabay. Especially in the area of A.I. supported image generation there is a considerable choice of solutions. Because currently in 2023 there are still no regulators for the copyright of the images generated by the A. I.. However, this could change in the next few years. Here we must wait and keep an eye on the current legal situation. In the private environment, of course, this is not an issue. Who should control all the decorative graphics in photo books or on invitation cards for weddings or birthdays. In the following you will find a list of different providers, which are quite identical in their basic functions, so that you can make your choice according to your personal taste and sensitivities.
- Microsoft Bing Image Creator Microsoft account required
- OpenAI DALL-E based on chat GPT.
- Midjourney is hosted on a Discord server.
- Stable Diffusion has the focus to generate photorealistic images.
Another area of application predestined for A.I. is the generation of text. If you have difficulties with this, you can generate e.g. blog posts for your homepage with A.I. support. But also on legal formulations specialized application for the production of whole contract drafts, imprint texts etc. are very interesting for simple tasks also for private users. Simple sublease agreements, sales contracts, etc. are classic areas in which one does not immediately hire a lawyer. In the following I have compiled a small list of different A.I. based text generators:
- Chat-GPT is a chatbot that can support research on new topics.
- Wordtune allows to improve own formulations stylistically and to change them according to specifications like formal expression.
- Spellbook supports lawyers in drafting contracts.
- Rytr focuses on content creators and allows to specify SEO keywords. There is also a WordPress plugin.
- BARD from Google supports the formulation of complex search queries to optimize the hit list.
If you think that we have already reached the end of possible applications with the systems already presented, you are mistaken. Another large area of application is audio / video editing. Here you don’t have to think of high quality film productions like they come from the Hollywood studios. There are many small tasks that are also relevant for home use. Extracting the text from audio or video files as an excerpt, then translating this template to create a new audio file in another language, for example. The conversion from text to audio and back again is not a novelty because it is an improvement of the quality of life especially for blind and deaf people.
- Elevenlabs offered an A.I. based text-to-speech engine whose output already sounds very realistic.
- Dadabots generates a music livestream and can imitate genres and well-known bands. Which allows the use of GEMA free music at events.
- Elai.io allows to create personalized videos with digital avatars. Areas of application include education and marketing.
- MuseNet supports musicians in composing new pieces based on given MIDI samples.
The last major application area for A. I. supported software in this list is the creation of source code. Even though code generators are not a novelty for programmers and have been speeding up the workflow for quite some time, the A. I. based approach offers much more flexibility. But also here applies as for all applications described before a watchful view of the user is inevitable. It is certainly possible to optimize existing program fragments according to specifications or to create so-called templates as templates, which can then be further elaborated manually. Most of the tools presented in the following are chargeable for commercial software development. However, there is a free version for students, teachers and open source developers on request.
- GitHub Copilot from Microsoft
- Codex by OpenAl
- CodeStarter an integration for Ubuntu Linux is specialized for web applications
- CodeWP for WordPress and allows to create own plugins or templates.
- Tabnine is an IDE extension available for Visual Studio Code, Android Studio, Eclipse und IDEA
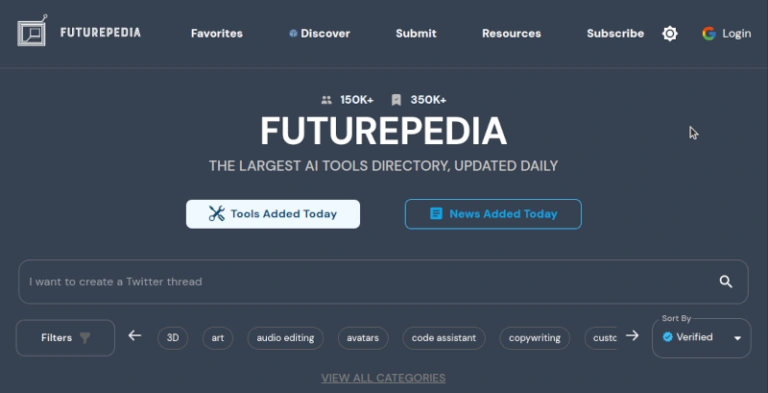
As we can see, there are countless applications that are already usable and this list is far from complete. For this reason, I would like to conclude by introducing the Futurepedia website. There, new A.I. tools are regularly listed and briefly introduced. So if you haven’t found the right tool for you in this article, take a look at Futurepedia.