Why do we even need the option to save application configurations in text files? Isn’t a database sufficient for this purpose? The answer to this question is quite trivial. The information on how an application can connect to a database is difficult to save in the database itself.
Now you could certainly argue that you can achieve such things with an embedded database such as SQLite. That may be correct in principle. Unfortunately, this solution is not really practical for highly scalable applications. And you don’t always have to use a sledgehammer to crack a nut. Saving important configuration parameters in text files has a long tradition in software development. However, various text formats such as INI, XML, JSON and YAML have now become established for this use case. For this reason, the question arises as to which format is best to use for your own project.
INI Files
One of the oldest formats are the well-known INI files. They store information according to the key = value principle. If a key appears multiple times in such an INI file, the final value is always overwritten by the last entry that appears in the file.
; Example of an INI File[Section-name]key=value ; inlinetext="text configuration with spaces and \' quotas"string='can be also like this'char=passwort# numbers & digetsnumber=123hexa=0x123octa=0123binary=0b1111float=123.12# boolean valuesvalue-1=truevalue-0=false
INI
As we can see in the small example, the syntax in INI files is kept very simple. The [section] name is used primarily to group individual parameters and improves readability. Comments can be marked with either ; or #. Otherwise, there is the option of defining various text and number formats, as well as Boolean values.
Web developers know INI files primarily from the PHP configuration, the php.ini, in which important properties such as the size of the file upload can be specified. INI files are also still common under Windows, although the registry was introduced for this purpose in Windows 95.
Properties
Another very tried and tested solution is so-called property files. This solution is particularly common in Java programs, as Java already has a simple class that can handle properties. The key=value format is borrowed from INI files. Comments are also introduced with #.
In order to ensure type safety when reading .properties in Java programs, the TP-CORE library has an extended implementation. Despite the fact that the properties are read in as strings, the values can be accessed using typing. A detailed description of how the PropertyReader class can be used can be found in the documentation.
.property files can also be used as filters for substitutions in the Maven build process. Of course, properties are not just limited to Maven and Java. This concept can also be used in languages such as Dart, nodeJS, Python and Ruby. To ensure the greatest possible compatibility of the files between the different languages, exotic notation options should be avoided.
XML
XML has also been a widely used option for many years to store configurations in an application in a changeable manner. Compared to INI and property files, XML offers more flexibility in defining data. A very important aspect is the ability to define fixed structures using a grammar. This allows validation even for very complex data. Thanks to the two checking mechanisms of well-formedness and data validation against a grammar, possible configuration errors can be significantly reduced.
Well-known application scenarios for XML can be found, for example, in Java Enterprise projects (J EE) with web.xml or the Spring Framework and Hibernate configuration. The power of XML even allows it to be used as a Domain Specific Language (DSL), as is used in the Apache Maven build tool.
Thanks to many freely available libraries, there is an implementation for almost every programming language to read XML files and access specific data. For example, PHP, a language popular with web developers, has a very simple and intuitive solution for dealing with XML with the Simple XML extension.
JavaScript Object Notation, or JSON for short, is a relatively new technology, although it has been around for several years. JSON also has a corresponding implementation for almost every programming language. The most common use case for JSON is data exchange in microservices. The reason for this is the compactness of JSON. Compared to XML, the data stream to be transferred in web services such as XML RPC or SOAP with JSON is much smaller due to the notation.
There is also a significant difference between JSON and XML in the area of validation. Basically, there is no way to define a grammar like in XML with DTD or schema on the official JSON homepage [1]. There is a proposal for a JSON grammar on GitHub [2], but there are no corresponding implementations to be able to use this technology in projects.
A further development of JSON is JSON5 [3], which was started in 2012 and has been officially published as a specification in version 1.0.0 [4] since 2018. The purpose of this development was to significantly improve the readability of JSON for people. Important functions such as the ability to write comments were added here. JSON5 is fully compatible with JSON as an extension. To get a brief impression of JSON5, here is a small example:
{// commentsunquoted:'and you can quote me on that',singleQuotes:'I can use "double quotes" here',lineBreaks:"Look, Mom! \No \\n's!",hexadecimal: 0xdecaf,leadingDecimalPoint: .8675309,andTrailing: 8675309.,positiveSign: +1,trailingComma:'in objects',andIn:['arrays',],"backwardsCompatible":"with JSON",}
JSON5
YAML
Many modern applications such as the open source metrics tool Prometheus use YAML for configuration. The very compact notation is very reminiscent of the Python programming language. YAML version 1.2 is currently published.
The advantage of YAML over other specifications is its extreme compactness. At the same time, version 1.2 has a grammar for validation. Despite its compactness, the focus of YAML 1.2 is on good readability for machines and people alike. I leave it up to each individual to decide whether YAML has achieved this goal. On the official homepage you will find all the resources you need to use it in your own project. This also includes an overview of the existing implementations. The design of the YAML homepage also gives a good foretaste of the clarity of YAML files. Attached is a very compact example of a Prometheus configuration in YAML:
global:scrape_interval:15sevaluation_interval:15srule_files:# - "first.rules"# - "second.rules"#IP: 127.0.0.1scrape_configs:-job_name:prometheusstatic_configs:-targets:['127.0.0.1:8080']# SPRING BOOT WEB APP-job_name:spring-boot-samplescrape_interval:60sscrape_timeout:50sscheme:"http"metrics_path:'/actuator/prometheus'static_configs:-targets:['127.0.0.1:8888']tls_config:insecure_skip_verify:true
YAML
Resumee
All of the techniques presented here have been tried and tested in practical use in many projects. Of course, there may be some preferences for special applications such as REST services. For my personal taste, I prefer the XML format for configuration files. This is easy to process in the program, extremely flexible and, with clever modeling, also compact and extremely readable for people.
¡Aprende a través del software! Mejora tu desempeño reflexionando sobre tu liderazgo. En este taller, desarrollará acciones concretas y adoptará hábitos de empoderamiento y un marco para gerentes de proyectos de software. ¡La casa proporciona los materiales! Si eres un profesional de TI/software y aspiras a un rol de liderazgo o quieres mejorar, este taller es para ti.
Heavy motivation to automate everything, even the automation itself, is the common understanding of the most DevOps teams. There seems to be a dire necessity to automate everything – even automation itself. This is common understanding and therefore motivation for most DevOps teams. Let’s have a look on typical Continuous Stupidities during a transformation from a pure Configuration Management to DevOps Engineer.
In my role as Configuration and Release Manager, I saw in close to every project I joined, gaps in the build structure or in the software architecture, I had to fix by optimizing the build jobs. But often you can’t fix symptoms like long running build scripts with just a few clicks. In his post I will give brief introduction about common problems in software projects, you need to overcome before you really think about implementing a DevOps culture.
Build logic can’t fix a broken architecture. A huge amount of SCM merging conflicts occur, because of missing encapsulation of business logic. A function which is spread through many modules or services have a high likelihood that a file will be touched by more than one developer.
The necessity of orchestrated builds is a hint of architectural problems.Transitive dependencies, missing encapsulation and a heavy dependency chain are typical reasons to run into the chicken and egg problem. Design your artifacts as much as possible independent.
Build logic have developed by Developers, not by Administrators. Persons which focused in Operations have different concepts to maintain artifact builds, than a software developer. A good anti pattern example of a build structure is webMethofs of Software AG. They don‘ t provide a repository server like Sonatype Nexus to share dependencies. The build always point to the dependencies inside a webMethods installation. This practice violate the basic idea of build automation, which mentioned in the book book ‚Practices of an Agile Developer‘ from 2006.
Not everything at once. Split up the build jobs to specific goals, like create artifact, run acceptance tests, create API documentation and generate reports. If one of the last steps fail you don’t need to repeat everything. The execution time of the build get dramatically reduced and it is easier to maintain the build infrastructure.
Don’t give to much flexibility to your build infrastructure. This point is strongly related to the first topic I explains. When a build manager have less discipline he will create extremely complex scripts nobody is able to understand. The JavaScript task runner Grunt is a example how a build logic can get messy and unreadable. This is one of the reason, why my favorite build tool for Java projects is always decided to Maven, because it takes governance of understandable builds.
There is no requirement to automate the automation. By definition have complex automation levels higher costs than simple tasks. Always think before, about the benefits you get of your automation activities to see if it make sens to spend time and money for it.
We do what we can, but can we what we do? Or in the words by Gardy Bloch „A fool with a tool is still a fool“. Understand the requirements of your project and decide based on that which tool you choose. If you don’t have the resources even the most professional solution can not support you. If you understood your problem you are be able to learn new professional advanced processes.
Build logic have run first on the local development environment. If your build runs not on your local development machine than don’t call it build logic. It is just a hack. Build logic have to be platform and IDE independent.
Don’t mix up source repositories. The organization of the sources into several folders inside a huge directory, creates just a complex build whiteout any flexibility. Sources should structured by technology or separate independent modules.
Many of the point I mentioned can understood by comparing the current Situation in almost every project. The solution to fix the things in a healthy manner is in the most cases not that complicated. It needs just a bit of attention and well planning. The most important advice I can give is follow the KISS principle. Keep it simple, stupid. This means follow as much as possible the standard process without modifications. You don’t need to reinvent the wheel. There are reasons why a standard becomes to a standard. Here is a short plan you can follow.
First: understand the problem.
Second: investigate about a standard solution for the process.
Third: develop a plan to apply the solution in the existing process landscape. This implies to kick out tools which not support standard processes.
If you follow step by step you own pan, without jumping to more far ten the ext point, you can see quite fast positive results.
By the way. If you think you like to have a guiding to reach a success DevOps process, don’t hesitate to contact me. I offer hands on Consulting and also training to build up a powerful DevOps team.
Linux turns more and more to a popular operating system for IT professional. One of the reasons for this movement are the server solutions. Stability and low resource consuming are some of the important characteristics for this choice. May you already played around with a Microsoft Server you will miss the graphical Desktop in a Linux Server. After a login into a Linux Server you just see the command prompt is waiting for your inputs.
In this short article I introduce you some helpful Linux programs to work with files on the command line. This allows you to gather information, for example from log files. Before I start I’d like to recommend you a simple and powerful editor named joe.
Ctrl + C – Abort the current editing of a file without saving changes Ctrl + KX – Exit the current editing and save the file Ctrl + KF – Find text in the current file Ctrl + V – Paste clipboard into document (CMD + V for Mac) Ctrl + Y – Delete current line where cursor is
To install joe on an Debian based Linux distribution you just need to type:
sudo apt-get install joe
1. When you need to find content in a huge text file GREP will be your best friend. GREP allows you to search for text pattern in files.
README files have a long tradition in software projects. These originally plain text files contained license information and instructions on how to compile the corresponding artifact from the source code or important notes on installing the program. There is no real standard how to build such a README file.
Since GitHub (acquired by Microsoft in 2018) started its triumphant march as a free code hosting platform for open source projects, there was quite early the function that the README file as the start page of the repository display. All that is required is to create a simple text file called README.md in the root directory of the repository.
In order to be able to structure the README files more clearly a possibility for a simple formatting was looked for. Quickly the markdown notation was chosen, because it is easy to use and can be rendered quite performant. Thus, the overview pages are easier to read for people and can be used as project documentation.
It is possible to link several such markdown files together as project documentation. So you get a kind of mini WIKI that is included in the project and also versioned via Git.
The whole thing became so successful that self-hosting solutions such as GitLab or the commercial BitBucket have also adopted this function.
Now, however, the question arises as to what content is best written in such a README file so that it also represents real added value for outsiders. The following points have become established over the course of time:
Short description of the project
Conditions under which the source code may be used (license)
How to use the project (e.g. instructions for compiling or how to include the library in own projects)
Who are the authors of the project and how to contact them
What to do if you want to support the project
Meanwhile, so-called badges (stickers) are very popular. These often reference external services such as the free Continuous Integration Server TravisCI. These help to assess the quality of the project.
On GitHub there are also various templates for README files. However, you also have to look a little at the actual circumstances of your own project and judge which information is really relevant for users. But such templates help a lot to find out if you might have missed a point.
The fact that pretty much every manufacturer of source control management server solutions has integrated the function to display the README.md file as the project start page for the code repository means that a README.me is also a useful thing for commercial projects.
Even if the syntax for markdown is easy to learn, it can be more comfortable to use a MARKDOWN editor directly for extensive editing of such files. You should make sure that the preview is displayed correctly and not only a simple syntax highlighting is offered.
In any case, it is worth taking a look at the GitHub page https://www.readme-templates.com. Further resources on the topic can be found here:
For more than a decade, it has been widely accepted that computer systems should be kept up to date. Those who regularly install updates reduce the risk of having security gaps on their computer that could be misused. Always in the hope that manufacturers of software always fix in their updates also security flaws. Microsoft, for example, has imposed an update requirement on its users since the introduction of Windows 10. Basically, the idea was well-founded. Because unpatched operating systems allow hackers easy access. So the thought: ‘Latest is greatest’ prevailed a very long time ago.
Windows users had little leeway here. But even on mobile devices like smartphones and tablets, automatic updates are activated in the factory settings. If you host an open source project on GitHub, you will receive regular emails about new versions for the libraries used. So at first glance, this is a good thing. However, if you delve a bit deeper into the topic, you will quickly come to the conclusion that latest is not always the best.
The best-known example of this is Windows 10 and the update cycles enforced by Microsoft. It is undisputed that systems must be regularly checked for security problems and available updates must be installed. That the maintenance of computer systems also takes time is also understandable. However, it is problematic when updates installed by the manufacturer paralyze the entire system and a new installation becomes necessary because the update was not sufficiently tested. But also in the context of security updates unasked function changes to the user to bring in I consider unreasonable. Especially with Windows, there are a lot of additional programs installed, which can quickly become a security risk due to lack of further development. That means with all consequence forced Windows updates do not make a computer safe, since here the additionally installed software is not examined for weak points.
If we take a look at Android systems, the situation is much better. However, there are enough points of criticism here as well. The applications are updated regularly, so the security is actually improved significantly. But also with Android, every update usually means functional changes. A simple example is the very popular Google StreetMaps service. With every update, the map usage becomes more confusing for me, as a lot of unwanted additional information is displayed, which considerably reduces the already limited screen.
As a user, it has fortunately not yet happened to me that application updates on Android have paralyzed the entire phone. Which also proves that it is quite possible to test updates extensively before rolling them out to users. However, this does not mean that every update was unproblematic. Problems that can be observed here regularly are things like an excessively increased battery consumption.
Pure Android system updates, on the other hand, regularly cause the hardware to become so slow after almost two years that you often decide to buy a new smartphone. Although the old phone is still in good condition and could be used much longer. I have noticed that many experienced users turn off their Android updates after about a year, before the phone is sent into obsolescence by the manufacturer.
How do you get an update muffler to keep his systems up to date and secure? My approach as a developer and configuration manager is quite simple. I distinguish between feature update and security patch. If you follow the semantic versioning in the release process and use a branch by release model for SCM systems like Git, such a distinction can be easily implemented.
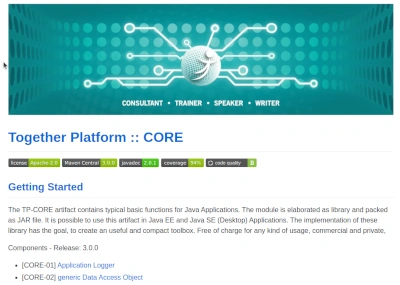
But I also dedicated myself to the question of a versionable configuration setting for software applications. For this, there is a reference implementation in the project TP-CORE on GitHub, which is described in detail in the two-part article Treasue Chest. After all, it must be clear to us that if we reset the entire configuration made by the user to factory settings during an update, as is quite often the case with Windows 10, quite unique security vulnerabilities can arise.
This also brings us to the point of programming and how GitHub motivates developers through emails to include new versions of the libraries used in their applications. Because if such an update is a major API change, the problem is the high migration effort for the developers. This is where an also fairly simple strategy has worked for me. Instead of being impressed by the notifications about updates from GitHub, I regularly check via OWASP whether my libraries contain known risks. Because if a problem is detected by OWASP, it doesn’t matter how costly an update can be. The update and the associated migration must be implemented promptly. This also applies to all releases that are still in production
However, one rule of thumb applies to avoid update hell from the start: Only install or use what you really need. The fewer programs are installed under Windows and the fewer apps there are on the smartphone, the fewer security risks there are. This also applies to program libraries. Less is more from a security perspective. Apart from that, we get a free performance measurement by dispensing with unnecessary programs.
Certainly, for many private users the question of system updates is hardly relevant. Only new unwanted functions in existing programs, performance degradations or now and then shot operating systems cause more or less strong displeasure. In the commercial surrounding field quite fast substantial costs can develop, which can affect also the straight implementing projects negatively. Companies and people who develop software can improve user satisfaction considerably if they differentiate between security patches and feature updates in their release publications. And a feature update should then also contain all known security updates.
Everyone does it, some even several times a day. But few are aware of the complex interlocking mechanisms that make up a complete software release. This is why it sometimes happens that a package gets in the way of the automated processing chain. With a bit of theory and a typical example from the Java universe, I show how you can take a little pressure out of the software development process in order to achieve lean, slightly automated processes.
To deal with standards in your own projects is not something bad. A well define release process based on common standards increase your productivity. Learn in this talk how you are able to simplify your daily work.
El manejo de excepciones debe ser un conocimiento básico para los desarrolladores de Java. Pero un uso seguro no es tan fácil como parece en un primer momento. También varios libros recomiendan no usar excepciones para evitar problemas de rendimiento. En el medio, nuestro propio código está luchando por las excepciones y tenemos que encontrar el punto exacto de donde proviene el problema. No siempre es una tarea fácil. Porque la posición en la que se detectó la excepción a menudo debe mejorarse para recopilar información relevante. En esta charla comparto mi experiencia sobre cómo tratar en general las excepciones. Explico con ejemplos cómo tratar las excepciones y cuándo es mejor evitar el uso de excepciones. Después de esta presentación, la cantidad de información en sus mensajes de error no aumenta, porque obtendremos la información importante para solucionar el problema donde ocurra.
El flujo del programa no solo se define mediante sentencias if-else. Las excepciones le permiten manejar los problemas antes de que ocurran, si lo hace bien. Aprenda cómo recopilar información sobre las excepciones lanzadas y vea la práctica que debe evitar.
Abstract:In the last decades, many standards were established to increase productivity during Software Lifecycle Management. All these techniques and methodologies promise a higher success rate in software projects which could affirm themselves in the case the involved protagonists are willing to follow the instances recommended. Semantic Versioning, for example, addresses the information leak between functional changes, BugFixes and compatibility of existing and future releases of artifacts. Diving deeper into the daily craftsmanship of software projects enables us to identify the Source Control Management Systems (SCM) as a big treasure box. Much information can be extracted from these repositories, which are currently ignored for project analyzing. Expressions on SCM Commit Messages represent a new formalism that is both human-readable and machine-processable. Such a standard also forms a bridge between the code base and the requirements management and release management, since these activities are identified by a freely expandable vocabulary in the SCM. Another advantage of this strategy is the clear and compact expressiveness for development teams. A very practical aspect of my proposal is the easy applicability of the presented solution in real software development projects. As with the Semantic Versioning methodology already mentioned, there are no additional technical requirements to be met, since commit messages are a fundamental function of SCM systems. This paper discuss the option to improve data collection for controlling software projects and knowledge sharing in collaborative teams.
To cite this article: Marco Schulz. Expressions for Source Control Management Systems. American Journal of Software Engineering and Applications. Vol. 11, No. 2, 2022, pp. 22-30. doi: 10.11648/j.ajsea.20221102.11
Download the PDF: https://www.sciencepg.com/journal/paperinfo?journalid=137&doi=10.11648/j.ajsea.20221102.11
1. Introduction
Thinking about SCM systems we have to keep in mind, that since the first roll out of CVS in the early 1990‘s and today, many things have changed. Searching the free online encyclopedia Wikipedia, presents a page ”Comparison of Version Control Software” which contains an overview of version control software of more than 30 SCM tools. This gives an idea why software companies usually have around three or more different SCM systems in work – of course the real amount depends on how many years they are in business.
The possibility to attach every revision in SCM Systems with a commit message allows the developer to inform other users with a short explanation of his work. This feature is extremely helpful by browsing the history manually in search of special code changes. If these commit messages well structured there exist a possibility to grab automated information of project growth. In this paper on expressions is introduced as solution for structured commit messages which could processed by software and also helps developers to resume their work more efficient.
The list of research on SCM is quite overwhelming and covers multiple aspects. The work of Walter F. Tichy on RCS [2] presents a deep fundamental insight into technical aspects of SCM systems. Abdullah Uz Tansel et al. gives in his research a brief history and builds a bridge to nowadays SCM systems [11]. The paper of Christian Bird et al. describes the ideas why companies deal with various SCM solutions [12]. Many existing papers like the one from Filip Van Rysselberghe and Serge Demeyer already identified SCM repositories as a significant information storage [5], which contains more than a simple history of source code. The approach from Louis Glassy to observe the growth of students in the software development process by using SCM techniques [6] demonstrates another method to grab implicit information from SCM. Alongside the fundamental research in software engineering, there exists a great resource of Blogs, articles and books from people who are directly involved in the topic. They describe experiences and best practice to make the next release come true, as referred towards the web resources in the footnotes. A small selection of related practitioners books is also included in the reference list.
Let us take a closer look at how processes for SCM could be improved. For this reason, section II defines the terminology of this paper and talks in detail about merging and branching strategies. Section III remind some basic knowledge on SCM and gives a simple idea about how complex build and deploy pipelines interact. Following this quick journey, section IV draws a picture about real problems that occur in software development projects and explains possible Points of Interest (POI) inside an SCM repository. These fundamentals allow a definition of the vocabulary we introduce in section V. A real world example will demonstrate in VI the cardinality of the expression and gives ideas about its usage. After all, section VII will reflect and summarize these thoughts. The last section talks about ideas how future work could be continued.
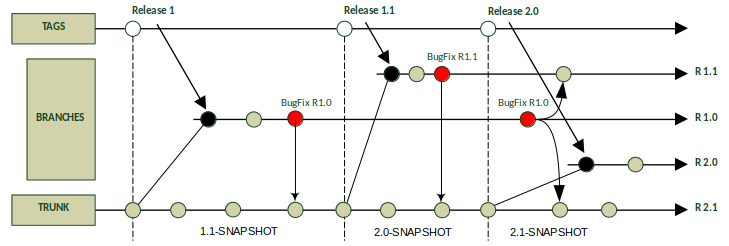
Figure 1: Branch and Merge.
The definitions in this section are based on the English dictionary Merriam Webster with a contextual relation to SCM systems. The term Source Control Management System (SCM) is applied in this paper to describe tools like CVS, Subversion (SVN) or Git. Many other names have appeared over the years in literature for this type of tools. All these terms like Version Control System (VCS) or Revision Control System (RCS) are considered as equal to each other.
Artifact “A USUALLY SIMPLE OBJECT (SUCH AS A TOOL OR ORNAMENT) SHOWING HUMAN WORKMANSHIP OR MODIFICATION AS DISTINGUISHED FROM A NATURAL. OBJECT; “ESPECIALLY: AN OBJECT REMAINING FROM A PARTICULAR PERIOD”. In the context of SCM, an artifact is a binary result of the build process. Artifacts can be libraries, applications and so on.
Repository “A PLACE, ROOM, OR CONTAINER WHERE IS DEPOSITED OR STORED”. In software engineering a repository denotes a managed storage. We can distinguish repositories for source code and for binary artifacts.
Revision “A CHANGE OR A SET OF CHANGES THAT CORRECTS OR IMPROVES SOMETHING”. Each successful commit from a user to the SCM represents a change of the internal state in the SCM. These different states are revisions. Subversion for example increments an internal number after each commit [18]. This unique identifier is called revision number. Git on the other hand manages the revision number smarter and creates SHA-1 Hashes from each commit as an identifier [15]. This brings more flexibility for dealing with branches.
Release “TO GIVE PERMISSION FOR PUBLICATION, PERFORMANCE, EXHIBITION, OR SALE OF; ALSO: TO MAKE AVAILABLE TO THE PUBLIC”. A release defines a set of functional assertions for an artifact. When all functions are implemented, a test procedure is started to exclude as many failures as possible. After the termination of testing and corrections, the artifact gets packed for delivery. To distinguish the different versions of an artifact, it gets labeled by a unique version number. By convention, it is not allowed to have more than one artifact with the same version number.
Tag “A DESCRIPTIVE OR IDENTIFYING EPITHET”. -A Tag is a label to a special revision, like a release, and is used as bookmark.
Trunk “THE CENTRAL PART OF ANYTHING”. A trunk is a common convention and means the main branch, where the current development happens [17]. In Git this branch is called master for the local repository and orgin in the remote repository. Branching and Merging is one of the major feature in SCM systems and also a high sophisticated operation. It is not so unusual that developers and also Configuration Managers struggle with this. The paper of Shaun Phillips et al. contains a developer comment about the dealing with SCM and the pain of merging [10].
“We are a team of four senior developers (by which I mean we’re all over 40 with 20+ years each of development experience) and not one of us has had a positive experience in the past with branching the mainline… The branch is easy – it’s the merge at the end that’s painful.”
This shows that even persons with many years of experience need a detailed explanation of a seemingly trivial procedure. A simple understanding how branches typically have to be used and how they represent the evolution of a real software project is of high relevance for this paper. Figure 1 explains the optimal interaction between branches and the trunk which is described by Chuck Walrad and Darrel Strom as Branch by Release Model [3]. In addition to the context of branching and merging there is a version tree sample graph explained by Yongchang Ren et al. in their paper [8].
In order to give a comprehensive explanation of the process we assume a simple Java library project. As build tool Apache Maven is chosen which is successfully used for years by many different commercial and Open Source projects. Maven defines many standards for the software development process and implements them. Its success feature is a highly efficient dependency management.
The information about the artifact version number is managed in the pom.xml, the Maven build file. For this reason the POM has our special attention. In the context of Maven a versions number is labeled SNAPSHOT while it is still under development. This convention allows in collaborative teams the sharing of non official published artifacts. After removing the label SNAPSHOT the artifact is released. By convention it is not possible to have more than one artifact with the same version number. In section III this topic is discussed in more detail. For the moment it is necessary to know that this convention takes effect in collaborative processes. The correct way to share artifacts is the usage of a Repository Manager. The most common Repository Manager is Sonatype Nexus OSS which is used for Maven Central [19] to deliver dependencies. Nexus will refuse the request if a developer tries to publish an already existing release of an artifact. With this infrastructure it is not necessary to transfer binary artifacts to the SCM. This tool chain is a simple example for a highly complex infrastructure to build and deliver software in large companies.
In figure 1 the development starts with version 1.0-SNAPSHOT. After the release of this version, the development of the next version 1.1-SNAPSHOT continues in trunk. The revision of the released version 1.0 gets branched to fix some bugs. The branch will not be created automatically during the release, rather it gets created when there is a need, for example BugFixes. The branch will be named by its minor version 1.0 to stay flexible for further corrections. After a correct BugFix the changes get merged back to trunk and so on. It is very important to keep in mind, that after a release, no new functionality can be added to the versions 1.0.X, only corrections are allowed.
The merging of failure corrections can lead to complications if there already exist deployed versions. When a bug is detected down to an existing version it will be necessary to fix all following versions and increment their version number as part of the correction. For example if there exist released versions 1.0.2, 1.1.1, 1.2.3 & 2.0.1. and the fix has been done in version 1.0.2 it will have to be renamed 1.0.3 for release. The merge direction is always from the lower to the higher version which means that the version numbers of all following involved artifacts have to be increased. By this it can be assured that only fixes will be exchanged and no functionality is moving form an higher to a lower version within the merging process.
In this model the case of parallel feature development is missing. This happens when a very complex functionality is planned and the implementation cannot be finished in one release cycle. This especially often occurs in agile projects with a short time line between releases. Feature Branches address this requirement as well. The process is a simple extension of the Branch by Release Model. The Feature Branch will be created from the trunk and will be named like the feature. To test compatibility this branch at least needs to be merged from the trunk after each release. A merge can also be performed if the trunk provides important new features – whenever necessary.
A very useful advanced usage of branches is the stash command, that comes as build-in with Git. Indeed this feature is not so common but simple and powerful. Imagine a developer is working on some implementation with the urgency of having to deliver a BugFix for another release. He needs to switch his workspace to this branch but the current work needs to be saved without a direct commit to the trunk. The solution is create a branch and check in the current work and hence switch the branch for the fix. After all is done he will have to switch to the stashed branch, finish the work and merge the result to the trunk. An often observed procedure for developers are simultaneous checkouts of different branches and just switching the IDE workspace. By experience in large companies, this is very time consuming and error prone. By the law of Murphy, the only needed branch is the one not present in a local checkout collection.
To get in touch with branch models more profoundly, the website of the Git SCM [20] presents different branching workflows. Also at [21] exists a very detailed explanation for Git branch and merge best practices.
3. Quick Survey on SCM Basics
As described, there exists a huge amount of Source Control Management solutions. Even just picking out the most popular systems, we are able to identify many differences in detail. These may be the reasons why some tools have become more popular than others. Naturally, all of these systems do the job and are based on common ideas. A very early and fundamental work on SCM systems done by Tichy gives a deep insight about the Theory on how an SCM should be constructed [2]. Today, based on the approach of how things are done, we can classify them. Directory and file based systems, like Microsoft Visual Source Safe, are part of the less effective group of SCM. In commercial environments this group has low relevance because quite often it causes inconsistencies of the repository. This leads us to the category of Client-Server solutions. Client-Server SCM systems have two manifestations: centralizedand distributed. SVN is the most famous representative for centralized solutions. In new projects the choice of the day will very often be Git, a very popular distributed SCM tool. In “Transition from Centralized to Decentralized Version Control Systems” the authors describes why decentralized SCM systems are favored by developers [12]. Interviews of developers have shown the benefits and risks of applicated SCM systems. They deliver a well elaborated explanation why distributed SCM has a higher learning curve. This finding is a important principle for dealing with SCM.
SCM systems are designed to handle plain text files, like those used for source code. After a file has undergone configuration management and had an initial transfer into the repository, the system stores only a delta of the changes for every new transaction. With this requirement the repository is more efficient and needs less disk storage. This implies binary files like office documents should not be stored in SCM repositories because the system cannot calculate a delta and will always store a complete new copy of the file, if it has been changed. A solution for dealing with binaries, like dependencies or third party libraries, are Repository Managers which were introduced in section II.
Figure 2: Changes in the POM, based on Semantic Versioning.
At this point some performance issues for SCM have to be taken in consideration. This is of outstanding importance, because it defines how a repository should be organized. Large projects with a code repository up to 1 GB take a long time for a checkout, even though there is only a small subset of files that are chosen. 20 minutes and more are very common. The reason for this effect is the size of the repository itself. When it contains a lot of files it takes more time to calculate the internal tree. The best solution for a high performance repository is: Only text files and just one independent project or module per repository.
In continuation surges question how files are represented in a SCM. As an example we remember the small Java library project with the Maven build logic. The build logic is represented as an XML file and contains the entry <version>. This entry defines the version number of the artifact and starts with an initialization of 1.0.0-SNAPSHOT. The procedure to increase the version number strictly follows the Semantic Versioning. Figure 2 visualizes several steps between two releases. For each revision a label describes the process and the version number show the value in the POM file. This graphic is an extension with a detailed view of figure 1.
In reality things are never like explained in theory. Initial assumption often create a big dilemma in automation processes when it comes to execution. It is very easy to claim, that in a repository, the entry for version in the POM for releases is unique. For example, it means that there should not exist two revisions with a released version 1.0. But where humans work, mistakes will happen. For this reason we have the option to create tags into the SCM. Every revision in the SCM which represents a deployed release, will be tagged with the correct version number. Deployed releases are defined by a successful transfer of the binary artifact into the Repository Manager for collaborative usage.
4. Scenarios on Real Problems
We should focus our activities on special points in respect to the evolution of software projects. It is not useful to pay attention on each single revision. Let us highlight the Points of Interest (POI) and why they are special. In real projects with collaborative teams, it is quite common that a developer breaks the current build. The good news are: when Continuous Integration (CI) is applied in the process, these kind of problems will be detected very quickly and can be solved at the instance of them appearing [16]. But how a developer is able to break a build? This occurs when the changes get committed into the repository and some files are not included in the commit. A repair can easily and fast be done by adding a new commit with the missing files needed. In this case it is very important to realize that only the one who delivered an incomplete package is able to add the missing parts. Problems arise when this happens on a Friday evening and the person responsible is leaving the office for vacations the next two or tree weeks without checking that everything is in order, causing unnecessary pain in the continuation of the project. These things happen much more often than anyone would expect.
Another effect is called fast shots. These small and often repeated commits typically change only a few lines in just one or two files. This happens when a user for some reason is not able to test his code or settings locally on his own machine. A simple scenario could be the manipulation of the CI Server build output without direct access.
A work flow for developers is the usage of particular commits in order to preserve intermediate steps of the work and allow an easy rollback. This procedure is only applicable in distributed systems or in environments without collaboration. The effect is quit similar. It will produce many revisions inside the SCM, which could get summarized to a single revision.
The Continuous Delivery approach for modern Web Applications is a quite different method compared to the classical release process [14]. This technique requires special strategies like the Feature Toggle Pattern [22] and a highly automated deploy pipeline. Also the usage of the SCM system is very advanced. Each feature is developed in its own branch and the Configuration- or Build Manager creates for each deployment a proper Integration Branch. The biggest challenge in this methodology are fast responses towards urgent problems arising. In the worst case it could be necessary to push out very quickly a new deployment with a full or partial rollback. During deployments database changes are very critical. This aspect could be discussed in a further paper. Databases are not implicitly part of the SCM, but there also exist techniques [23] to keep them under configuration management.
Figure 3: Structure of a commit naming.
As mentioned before, a release R inside an SCM is defined by several commits to the SCM. These commits are identified by the revision r. The lowest amount of revisions between two release is one, but there is no limit concerning to the upper boundary. Special Points of Interests inside an SCM are released revisions which can formally defined by (2).
R := {r 1, r 2, r 3, r n+1,…, r x } (1)
POI:= ∆ Release (R; R + 1) (2)
By this interpretation we are able to develop metrics which show a real project growth and do not just produce an output [13]. The paper of P. Kaur and H. Singh contains a collection of metrics related to their VVCT SCM [9]. An adapted suggestion for possibilities to compare project evolution is:
the amount of BugFix releases in a minor branch,
an count of revisions between two release,
the growth between minor and major release (e.g. Line of Codes),
a direct comparison between the current trunk and a previous release,
two selected releases,
a comparison of an release R and its replacement.
For example the amount of BugFix releases for a minor release allows a conclusion about the quality situation of a project. It is very important to understand the reasons to improve program stability and reduce the number of BugFixes. A classification for changes is described by Swanson [1]. An overview of the project based on these classifications of BugFixes should detect the issues that have to be changed to accomplish high quality.
5. A Vocabulary for SCM Commit Messages
In the early times SCM systems were used for synchronizing source code between developers. Typically users were not paying too much attention to write well formulated explanations about their changes. In many instances they were not leaving any description about what they did. Another extreme was that comments like update build logic frequently appeared in the history. An explanation of everything and nothing without saying what was changed or why. It could either be a version update of an existing library or the addition of a new dependency leading to a heavy time-consuming work in order to identify the points of interest in the commit history. Manual checks between the version with a Diff Tool would be necessary to locate the Line of Code that may have to be changed again. Guidelines have been introduced on how to write a well formulated commit message to solve this problems. A short selection of these guides published on the internet: [24, 25, 26] It was discovered by companies that the approach to apply well formulated descriptions of SCM revisions can improve productivity in teams. By exploring new projects on Source Code Hosting Services like GitHub or Sourceforge the quality of commit messages was increasing in the last years.
Based on these recommendations and the experience gained as of today, a vocabulary should be introduced for writing easier and more efficient commit messages. This simple-to-use standardization could help to visualize the evolution of a project more clearly. By very precise and short explanation of every revision readers do not get flooded with information. This allows analysts to see patterns of process leaks more quickly and increases the team productivity. The usage of a defined structure also allows an automatism to parse the commit messages. The result can generate programmatic presentations of diagrams readable by humans. Naturally this approach is not only limited to SCM. Another usage could be for communication in meetings with strict time limitations, for example in the agile method Scrum.
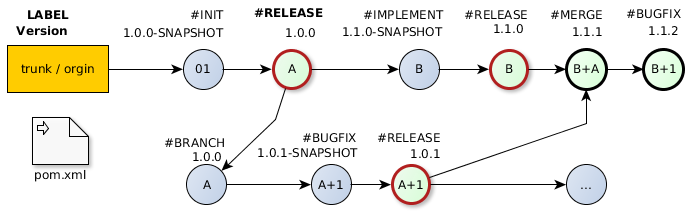
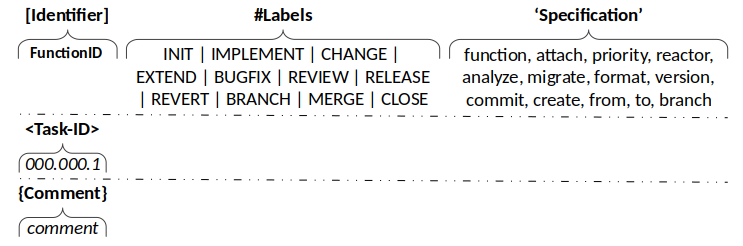
The vocabulary for SCM Commit Messages follows a defined structure which is shown in figure 3. The composition contains a mandatory first line and includes a FunctionID, label and a short specification. The second and third line is optional and contains the TaskID from the Issue Management System and a description of the more detailed explanation. Our suggestion for the vocabulary covers most SCM work flows. It may will be that some companies need adoptions to implement this solution in their processes. For this reason the definition is flexible and allows extensions.
#INIT – the repository or a release.
repro:documentation / configuration…
archetype:jar / war / ear / pom / zip…
version:<version>
#IMPLEMENT – a functionality.
function:<clazz>
#CHANGE – a functionality.
function:<clazz>
#EXTEND – a functionality.
function:<clazz>
attach:<clazz>
#BUGFIX – a functionality.
priority:critical / medium / low / design
#REVIEW – an implementation.
refactor:<function>
analyze:<quality>migrate:<function>
format:<source>
#RELEASE – an artifact.
version:<version>
#REVERT – a commit.
commit:<id>
#BRANCH – create.
create:<name>
stash:<branch>
#MERGE – from another branch.
from:<branch>
to:<branch>
#CLOSE – a branch.
branch:<name>
As first entry a FunctionID is recommended and not the TaskID of the Issue Management. This decision is based on the experience that functionality could spread in different tasks. In longtime projects it could happen that for some reason the Issue Management System needs to be replaced by another one. Not all projects are connected to Issue Management, especially when they are small or just a prototype. These circumstances proved to be decisive to define the TaskId as optional and move it to the second line. With a FunctionID it is easier to identify parts that should be linked. Sometimes there exist transfers into the repository that cannot be assigned to a dedicated function. These commits are often related to activities of the Build- and Configuration Manager. As best practice an ID should be established which corresponds to these activities. Some examples related to the defined labels are:
[CM-00] INIT;
[CM-10] REVIEW;
[CM-20] BRANCH;
[CM-30] MERGE;
[CM-40] RELEASE;
[CM-50] build management.
The mightiness of this approach is its simplicity and how it can be included in existing projects. The rule set does not contain any additional complexity and the process is quite easy to understand. A short example will demonstrate the usage and a full example is provided in section VI. A change in the POM file to update the version of the test framework could be commented as follows:
[CM-50] #CHANGE ’function:pom’ <QS-23231> {Change version number of the dependency JUnit from 4 to 5.0.2}
6. Release Process
The sample project in section II is not only fictive. The Together Platform (TP) available on GitHub [26] was initiated to study techniques on real conditions. Hence Git is the SCM tool of the choice. As client SmartGit is recommended because of platform independence and it offers plentiful advanced functionality.
For better comprehension of our approach of writing commit expressions we use the TP-CORE project, from initialization of the repository to its first release. No TaskIDs for the revisions exist due to the project not being connected to an Issue Management System. We use an excerpt of TP-CORE to demonstrate the approach because between the initial commit and the first published release 1.0.2 exist over 70 revisions in the repository. The project also contains a set of 12 functions which do not need to be included completely in our sample. Only three functions were selected for demonstration:
CORE-01 Logger;
CORE-02 genericDAO;
CORE-05 ApplicationConfiguration.
This cuts the revisions in half and shows enough complexity avoiding readers falling asleep.
The condition for a first release was the implementation of all 12 functionalities. The overall test coverage has reached more than 85%. Code smells detected with checks by Findbugs, Checkstyle, PMD et cetera have been removed. For an facilitate explanation, we add a revision number before the FunctionID. TP-CORE Commit Messages:
01  [CM-00] #INIT ’archtype:jar’
{Initial the repository for Java JAR library.}
02  [CORE-01] #IMPLEMENT ’function:Logger’
{Application wide standard logger.}
03  [CORE-02] #IMPLEMENT
{Generic Data Access Object Pattern for centralized database access.}
04  [CORE-05] #IMPLEMENT ’function:AppConfigDO’
{Domain Object for application configuration.}
05  [CM-10] #REVIEW ’analyze:quality’
{Formatting, fix Checkstyle hints, JavaDoc & test coverage}
06  [CORE-05] #IMPLEMENT ’function:ConfigurationDAO’
{Add the ConfigurationDAO implementation.}
07  [CORE-05] #EXTEND ’attach:tests’
{Create test cases for Bean Validation.}
08  [CORE-01] #EXTEND ’function:Logger’
{Add new Method to detect the configured LogLevel.}
09  [CORE-05] #EXTEND ’function:AppConfigDO’
{Change Primary Key to UUID and extend tests.}
10  [CORE-05] #CHANGE ’function:AppConfigDO’
{Rename to ConfigurationDO and define table indexes.}
11  [CORE-02] #EXTEND ’function:GenericDAO’
{Add flushTable, countEnties and optimize.}
12  [CORE-05] #EXTEND ’attach:tests’
{Update test cases for application configuration.}
13  [CORE-05] #EXTEND ’function:ConfigurationDAO’
{Update the implementation for ConfigurationDAOImpl.}
14  [CORE-01] #EXTEND ’function:Logger’
{Add method for exception handling.}
15  [CORE-05] #EXTEND ’function:ConfigurationDO’
{Add field mandatory.}
16  [CM-10] #REVIEW ’migrate:JUnit’
{Migrate Test cases from JUnit4 to JUnit5.}
17  [CM-10] #REVIEW ’analyze:quality’
{Fix JavaDoc, Checkstyle & Findbugs.}
18  [CM-50] #EXTEND ’function:POM’
{Update SCM connection to GitHub.}
19  [CM-50] #EXTEND ’attach:APIguards’
{Attach annotation for API documentation.}
20  [CORE-05] #REVIEW ’refactor:ConfigurationDO’
{FindBugs: optimize constructor parameters.}
21  [CORE-02] #BUGFIX ’priority:design’
{Fix FindBugs hint: visible modifier.}
22  [CM-50] #EXTEND ’attach:site’
{Extend MVN site configuration.}
23  [CORE-02] #BUGFIX ’priority:high’
{Fix spring DAO configuration.}
24  [CORE-05] #IMPLEMENT ’function:ConfigurationService’
{Implement basic functionality for
ConfigurationService.}
25  [CM-10] #REVIEW ’analyze:quality’
{Remove all compiler warnings, FindBugs,
Checkstyle & PMD Hits.}
26  [CORE-05] #EXTEND
’attach:ConfigurationService’
{A  dd JGiven test scenarios.}
27  [CM-40] #RELEASE ’version:1.0’
{Release artifact to version 1.0}
28  [CM-40] #RELEASE ’version:1.0.1’
{Change POM GroupId to Maven Central conventions.}
29  [CM-00] #INIT ’version:1.1’
{Start implementation of version 1.1.0.}
30  [CM-50] #MERGE ’from:1.0.1’
{Integrate GAV POM changes to trunk.}
31  [CM-40] #RELEASE ’version:1.0.2’
{Include PGP signing.}
32  [CM-20] #CHANGE ’function:Constraints’
{Add Constraints.VERSION to 1.1}
33  [CORE-01] #EXTEND ’function:Logger’
{Default loader for logback.xml configuration files in the application DIR.}
Considering the previous example, we see that a limitation to around 80 – 100 characters for the first line is recommendable. Displaying the history with any client could get very messy if the first line has no size restrictions. The log output of the commit messages does not display the branch and tag operation, a behavior of Git. These revisions do not appear in any history list by browsing GitHub. Revision 28 is a branch based on revision 27. The branch is named as 1.0. Releases are published in consonance with the convention to be labeled, revision 31 tagged as Release 1.0.2. The revisions 28 and 31 are part of branch 1.0.
In this constellation we are able to see an important detail for dealing with branches. A branch will only be created when it is necessary. Usually BugFix branches do not have their own build plans on CI Servers and are managed manually. The primary arguments for this practice are to reduce the administrative overhead for the CI Servers. Companies that orchestrate their applications by web services or modules loose capacities by binding their recourses in this kind of activities.
7. Conclusion
“There is nothing permanent except change.” – Heraclitus
The whole infrastructure of commercial software projects contains a lot of independent fragments which share information over all development cycle. In projects we are overloaded by documentation production processes. The high amount of all this information inhibits profoundly comprehension and handling capabilities. Applications are getting more complex and bigger resulting in the necessity to establish more efficient ways to deal with information accumulation. There exists a giant overhead of managing documents like release notes, release plan, issue management, quality reports, statistics & metrics, documentation, architectural documents and BugFix lists. Typically each tool stores its data in its own structure. This makes changes to other tools, that might fit better, risky and expensive.
Companies know the effect that developers feel uncomfortable having to track their work in Issue Management tools like JIRA resulting in them trying to hide their part of the work flow as much as possible. Tasks will be opened up when they are almost done or already finished. The information on how many project days were spent for a function covers more the expectations and less the reality with the intent that developers can escape a bit from the daily pressure of productivity. Often developers are forced to spend their time with data acquisition for management controlling instead of programming resulting in low cost efficiency of a project and even additional and unplanned costs. Developers dislike this kind of activities because it keeps them away from their actual work: development. This is what makes the simple approach towards human readable and machine processable commit messages attractive and more convenient. The most important fact is that no extra costs are generated applying this method to existing processes.
We are enabled to generate several reports based on real data if SCM repositories can be populated with additional information. Impact assessments could be more efficient and accurate when they are created by facts and not emotionally blended.
Future Work
The idea to make information inside SCM systems more transparent is not just limited to commit messages. Another obvious point for future research is the history command. In the paper of Abram Hindle and Daniel M. German a query language for source control is introduced [7]. The idea of SCM Language could be picked up and transformed applying it to a specific solution. This work would use the Domain Driven Development paradigm to model an own SCM language based on Domain Specific Language (DSL) concepts – leading to the discovery of real world DSL solutions allowing for quick construction of a viable prototype or application based upon certain specifications.
Also a point which boldly comes to mind after reading the paper of Fischer et al., is the inclusion of released information into SCM [4]. This approach should not fully be automated due to its requirement of an advanced knowledge about branching and merging. A small self written extension could be a probable solution. A short tutorial 17 for Git suggests certain possibilities.
Acknowledgements
Special thanks to Joachim Reiter and Harald Kaufmann for spending their time to review this document. Their feedback was very productive.
References
[1] E. Burton Swanson, 1978, The Dimension of Maintenance. [2] Walter F. Tichy, 1985, RCS – A System for Version Control. [3] Chuck Walrad and Darrel Strom, 2002, The Importance of Branching Models in SCM. [4] Michael Fischer, Martin Pinzger, Harald Gall, 2003, Populating a Release History Database from Version Control and Bug Tracking Systems. [5] Filip Van Rysselberghe and Serge Demeyer, 2004, Mining Version Control Systems for FACs (Frequently Applied Changes). [6] Louis Glassy, 2005, Using version control to observe student software development processes. [7] Abram Hindle and Daniel M. German, 2005, SCQL: a formal model and a query language for source control. [8] Yongchang Ren, Tao Xing, Qiang Quan, Ying Zhao, 2010, Software Configuration Management of Version Control Study Based on Baseline. [9] Parminder Kaur and Hardeep Singh, 2011, A Model for Versioning Control Mechanism in Component- Based Systems [10] Shaun Phillips, Jonathan Sillito, Rob Walker, 2011, Branching and merging: an investigation into current version control practices. [11] Abdullah Uz Tansel and Ali Koc, 2011, A Survey of Version Control Systems. [12] Christian Bird et al., 2014, Transition from Centralized to Decentralized Version Control Systems A Case Study on Reasons, Barriers, and Outcomes. [13] Norman E. Fenton and Shari Lawrence Pfieeger, 1997, PWS Publishing Company, Software Metrics – A Rigorous and Practical Approach 2nd Edition, ISBN O·534·95425·1. [14] Jez Humble and David Farley, 2010, Addison-Wesley, Continuous Delivery: Reliable Software Releases through Build, Test, and Deployment Automation, ISBN 0-321-60191-2. [15] Scott Chacon and Ben Straub, 2014, Apress, Pro Git 2nd Edition, ISBN 978-1-4842-0077-3. [16] Mike Clark, 2004, The Pragmatic Bookshelf, Pragmatic Project Automation, ISBN 0-9745140-3-9. [17] Dave Thomas and Andy Hunt, 2003, The Pragmatic Bookshelf, Pragmatic Version Control with CVS, ISBN 0-9745140-0-4. [18] Mike Mason, 2010, The Pragmatic Bookshelf, Pragmatic Guide to Subversion, ISBN 1-934356-61-1. [19] https://search.maven.org [20] https://git-scm.com/book/en/v2/Git-Branching-Branching-Workflows [21] https://nvie.com/posts/a-successful-git-branching-model/ [22] https://www.martinfowler.com/articles/feature-toggles.html [23] https://flywaydb.org [24] https://chris.beams.io/posts/git-commit/ [25] http://who-t.blogspot.mx/2009/12/on-commit-messages.html [26] https://github.com/ElmarDott/TP-CORE/
Biography
Marco Schulz, also kown by his online identity Elmar Dott is an independent consultant in the field of large Web Application, generally based on the JavaEE environment. His main working field is Build-, Configuration- & Release-Management as well as software architecture. In addition his interests cover the full software development process and the discovery of possibilities to automate them as much as possible. Over the time of the last ten years he has authored a variety of technical articles for different publishers and speaks on various software development conferences. He is also the aut
In the previous part of the article treasure chest, I described how the database connection for the TP-CORE library got established. Also I gave a insight to the internal structure of the ConfiguartionDO. Now in the second part I explain the ConfiguartionDAO and its corresponding service. With all this knowledge you able to include the application configuration feature of TP-CORE in your own project to build your own configuration registry.
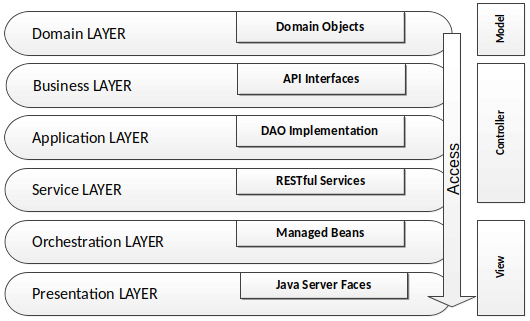
Lets resume in short the architectural design of the TP-CORE library and where the fragments of the features located. TP-CORE is organized as layer architecture as shown in the graphic below.
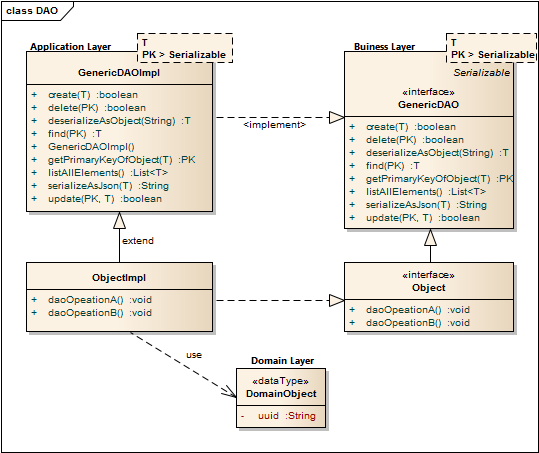
As you can see there are three relevant packages (layer) we have to pay attention. As first the business layer resides like all other layers in an equal named package. The whole API of TP-CORE is defined by interfaces and stored in the business layer. The implementation of the defined interfaces are placed in the application layer. Domain Objects are simple data classes and placed in the domain layer. Another important pattern is heavily used in the TP-CORE library is the Data Access Object (DAO).
Now the days micro services and RESTful application are state of the art. Especially in TP-CORE the defined services aren’t REST. This design decision is based on the mind that TP-CORE is a dependency and not a standalone service. Maybe in future, after I got more feedback how and where this library is used, I could rethink the current concept. For now we treat TP-CORE as what it is, a library. That implies for the usage in your project, you can replace, overwrite, extend or wrap the basic implementation of the ConfigurationDAO to your special necessities.
To keep the portability of changing the DBMS Hibernate (HBM) is used as JPA implementation and O/R mapper. The Spring configuration for Hibernate uses the EntityManager instead of the Session, to send requests to the DBMS. Since version 5 Hibernate use the JPA 2 standard to formulate queries.
As I already mentioned, the application configuration feature of TP-CORE is implemented as DAO. The domain object and the database connection was topic of the first part of this article. Now I discuss how to give access to the domain object with the ConfigurationDAO and its implementation ConfigurationHbmDAO. The domain object ConfigurationDO or a list of domain objects will be in general the return value of the DAO. Actions like create are void and throw just an exception in the case of a failure. For a better style the return type is defined as Boolean. This simplifies also writing unit tests.
Sometimes it could be necessary to overwrite a basic implementation. A common scenario is a protected delete. For example: a requirement exist that a special entry is protected against a unwanted deletion. The most easy solution is to overwrite the delete whit a statement, refuses every time a request to delete a domain object whit a specific UUID. Only adding a new method like protectedDelete() is not a god idea, because a developer could use by accident the default delete method and the protected objects are not protected anymore. To avoid this problem you should prefer the possibility of overwriting GenericDAO methods.
As default query to fetch an object, the identifier defined as primary key (PK) is used. A simple expression fetching an object is written in the find method of the GenericHbmDAO. In the specialization as ConfigurationHbmDAO are more complex queries formulated. To keep a good design it is important to avoid any native SQL. Listing 1 shows fetch operations.
The readability of these few lines of source is pretty easy. The query we formulated for getAllConfigurationSetEntries() returns a list of ConfigurationDO objects from the same module whit equal version of a configSet. A module is for example the library TP-CORE it self or an ACL and so on. The configSet is a namespace that describes configuration entries they belong together like a bundle and will used in a service like e-mail. The version is related to the service. If in future some changes needed the version number have increase. Lets get a bit closer to see how the e-mail example will work in particular.
We assume that a e-mail service in the module TP-CORE contains the configuration entries: mailer.host, mailer.port, user and password. As first we define the module=core, configSet=email and version=1. If we call now getAllConfigurationSetEntries(core, 1, email); the result is a list of four domain objects with the entries for mailer.host, mailer.port, user and password. If in a newer version of the email service more configuration entries will needed, a new version will defined. It is very important that in the database the already exiting entries for the mail service will be duplicated with the new version number. Of course as effect the registry table will grow continual, but with a stable and well planned development process those changes occur not that often. The TP-CORE library contains an simple SMTP Mailer which is using the ConfigurationDAO. If you wish to investigate the usage by the MailClient real world example you can have a look on the official documentation in the TP-CORE GitHub Wiki.
The benefit of duplicate all existing entries of a service, when the service configuration got changed is that a history is created. In the case of update a whole application it is now possible to compare the entries of a service by version to decide exist changes they take effect to the application. In practical usage this feature is very helpful, but it will not avoid that updates could change our actual configuration by accident. To solve this problem the domain object has two different entries for the configuration value: default and configuration.
The application configuration follows the convention over configuration paradigm. Each service need by definition for all existing configuration entries a fix defined default value. Those default values can’t changed itself but when the value in the ConfigurationDO is set then the defaultValue entry will ignored. If an application have to be updated its also necessary to support a procedure to capture all custom changes of the updated configuration set and restore them in the new service version. The basic functionality (API) for application configuration in TP-CORE release 3.0 is:
The following listing gives you an idea how a implementation in your own service could look like. This snipped is taken from the JavaMailClient and shows how the internal processing of the fetched ConfigurationDO objects are managed.
privatevoidprocessConfiguration(){ListconfigurationEntries=configurationDAO.getAllConfigurationSetEntries("core",1,"email");for(ConfigurationDOentry: configurationEntries){Stringvalue;if(StringUtils.isEmpty(entry.getValue())){ value =<strong>entry.getDefaultValue</strong>();}else{ value =<strong>entry.getValue</strong>();}if(entry.getKey().equals(cryptoTools.calculateHash("mailer.host",HashAlgorithm.SHA256))){configuration.replace("mailer.host", value);}elseif(entry.getKey().equals(cryptoTools.calculateHash("mailer.port",HashAlgorithm.SHA256))){configuration.replace("mailer.port", value);}elseif(entry.getKey().equals(cryptoTools.calculateHash("user",HashAlgorithm.SHA256))){configuration.replace("mailer.user", value);}elseif(entry.getKey().equals(cryptoTools.calculateHash("password",HashAlgorithm.SHA256))){configuration.replace("mailer.password", value);}}}
Java
Another functionality of the application configuration is located in the service layer. The ConfigurationService operates on the module perspective. The current methods resetModuleToDefault() and filterMandatoryFieldsOfConfigSet() already give a good impression what that means.
If you take a look on the MailClientService you detect the method updateDatabaseConfiguration(). May you wonder why this method is not part of the ConfigurationService? Of course this intention in general is not wrong, but in this specific implementation is the update functionality specialized to the MailClient configuration. The basic idea of the configuration layer is to combine several DAO objects to a composed functionality. The orchestration layer is the correct place to combine services together as a complex process.
Resume
The implementation of the application configuration inside the small library TP-CORE allows to define an application wide configuration registry. This works also in the case the application has a distribute architecture like micro services. The usage is quite simple and can easily extended to own needs. The proof that the idea is well working shows the real world usage in the MailClient and FeatureToggle implementation of TP-CORE.
I hope this article was helpful and may you also like to use TP-CORE in your own project. Feel free to do that, because of the Apache 2 license is also no restriction for commercial usage. If you have some suggestions feel free to leave a comment or give a thumbs up.
Cookie Consent
[EN] We use cookies to improve your experience on our site. By using our site, you consent to cookies.
[DE] Wir verwenden Cookies, um Ihre Erfahrungen auf unserer Website zu verbessern. Durch die Nutzung unserer Website stimmen Sie Cookies zu.
This website uses cookies
Websites store cookies to enhance functionality and personalise your experience. You can manage your preferences, but blocking some cookies may impact site performance and services.
Essential cookies enable basic functions and are necessary for the proper function of the website.
Name
Description
Duration
Cookie Preferences
This cookie is used to store the user's cookie consent preferences.
30 days
These cookies are needed for adding comments on this website.
Name
Description
Duration
comment_author
Used to track the user across multiple sessions.
Session
comment_author_email
Used to track the user across multiple sessions.
Session
comment_author_url
Used to track the user across multiple sessions.
Session
These cookies are used for managing login functionality on this website.
Name
Description
Duration
wordpress_logged_in
Used to store logged-in users.
Persistent
wordpress_sec
Used to track the user across multiple sessions.
15 days
wordpress_test_cookie
Used to determine if cookies are enabled.
Session
Statistics cookies collect information anonymously. This information helps us understand how visitors use our website.
Matomo is an open-source web analytics platform that provides detailed insights into website traffic and user behavior.