After discussing more general issues such as file systems and partitions in the first part of this workshop, we’ll turn to various diagnostic techniques in the second and final part of the series. Our primary tool for this will be Bash, as the following tools are all command-line based.
This section, too, requires the utmost care. The practices described here may result in data loss if used improperly. I assume no liability for any damages.
Let’s start with the possibility of finding out how much free space we still have on our hard drive. Anyone who occasionally messes around on servers can’t avoid the df command. After all, the SSH client doesn’t have a graphical interface, and you have to navigate the shell.
With df -hT, all storage, physical and virtual, can be displayed in human-readable format.
ed@local:~$ df -hT
Filesystem     Type      Size  Used Avail Use% Mounted on
udev           devtmpfs   32G     0   32G   0% /dev
tmpfs          tmpfs     6.3G  2.8M  6.3G   1% /run
/dev/nvme0n1p2 ext4      1.8T  122G  1.6T   8% /
tmpfs          tmpfs      32G  8.0K   32G   1% /dev/shm
efivarfs       efivarfs  196K  133K   59K  70% /sys/firmware/efi/efivars
tmpfs          tmpfs     5.0M   16K  5.0M   1% /run/lock
tmpfs          tmpfs     1.0M     0  1.0M   0% /run/credentials/systemd-journald.service
tmpfs          tmpfs      32G   20M   32G   1% /tmp
/dev/nvme0n1p1 vfat      975M  8.8M  966M   1% /boot/efi
tmpfs tmpfs 6.3G 224K 6.3G 1% /run/user/1000As we can see in the output, the mount point / is an ext4 file system, with an NVMe SSD with a capacity of 1.8 TB, of which approximately 1.2 TB is still free. If other storage devices, such as external hard drives or USB drives, were present, they would also be included in the list. It certainly takes some practice to sharpen your eye for the relevant details. In the next step, we’ll practice a little diagnostics.
lsblk
If the output of df is too confusing, you can also use the lsblk tool, which provides a more understandable listing for beginners.
ed@local:~$ sudo lsblk
NAME         MAJ:MIN RM   SIZE RO TYPE MOUNTPOINTS
loop0          7:0    0     4K  1 loop /snap/bare/5
loop1          7:1    0  73.9M  1 loop /snap/core22/2139
loop2          7:2    0 516.2M  1 loop /snap/gnome-42-2204/226
loop3          7:3    0  91.7M  1 loop /snap/gtk-common-themes/1535
loop4          7:4    0  10.8M  1 loop /snap/snap-store/1270
loop5          7:5    0  50.9M  1 loop /snap/snapd/25577
loop6          7:6    0  73.9M  1 loop /snap/core22/2133
loop7          7:7    0  50.8M  1 loop /snap/snapd/25202
loop8          7:8    0   4.2G  0 loop
└─veracrypt1 254:0    0   4.2G  0 dm   /media/veracrypt1
sda            8:0    1 119.1G  0 disk
└─sda1         8:1    1 119.1G  0 part
sr0           11:0    1  1024M  0 rom
nvme0n1      259:0    0   1.9T  0 disk
├─nvme0n1p1  259:1    0   976M  0 part /boot/efi
├─nvme0n1p2  259:2    0   1.8T  0 part /
└─nvme0n1p3 259:3 0 63.7G 0 part [SWAP]S.M.A.R.T
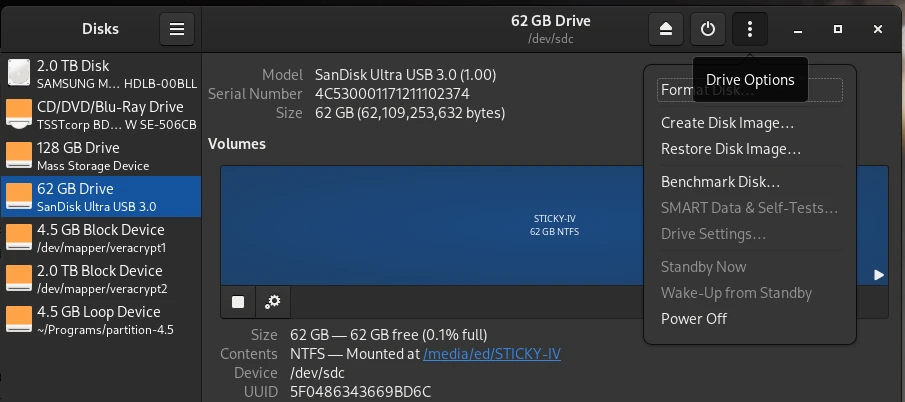
To thoroughly test our newly acquired storage before use, we’ll use the so-called S.M.A.R.T (Self-Monitoring, Analysis and Reporting Technology) tools. This can be done either with the Disks program introduced in the first part of this article or with more detailed information via Bash. With df -hT, we’ve already identified the SSD /dev/nvme0, so we can call smartctl.
ed@local:~$ sudo smartctl --all /dev/nvme0
smartctl 7.4 2023-08-01 r5530 [x86_64-linux-6.12.48+deb13-amd64] (local build)
Copyright (C) 2002-23, Bruce Allen, Christian Franke, www.smartmontools.org

=== START OF INFORMATION SECTION ===
Model Number:                       SAMSUNG MZVL22T0HDLB-00BLL
Serial Number:                      S75ZNE0W602153
Firmware Version:                   6L2QGXD7
PCI Vendor/Subsystem ID:            0x144d
IEEE OUI Identifier:                0x002538
Total NVM Capacity:                 2,048,408,248,320 [2.04 TB]
Unallocated NVM Capacity:           0
Controller ID:                      6
NVMe Version:                       1.3
Number of Namespaces:               1
Namespace 1 Size/Capacity:          2,048,408,248,320 [2.04 TB]
Namespace 1 Utilization:            248,372,908,032 [248 GB]
Namespace 1 Formatted LBA Size:     512
Namespace 1 IEEE EUI-64:            002538 b63101bf9d
Local Time is:                      Sat Oct 25 08:07:32 2025 CST
Firmware Updates (0x16):            3 Slots, no Reset required
Optional Admin Commands (0x0017):   Security Format Frmw_DL Self_Test
Optional NVM Commands (0x0057):     Comp Wr_Unc DS_Mngmt Sav/Sel_Feat Timestmp
Log Page Attributes (0x0e):         Cmd_Eff_Lg Ext_Get_Lg Telmtry_Lg
Maximum Data Transfer Size:         128 Pages
Warning  Comp. Temp. Threshold:     83 Celsius
Critical Comp. Temp. Threshold:     85 Celsius

Supported Power States
St Op     Max   Active     Idle   RL RT WL WT  Ent_Lat  Ex_Lat
 0 +     8.41W       -        -    0  0  0  0        0       0
 1 +     8.41W       -        -    1  1  1  1        0     200
 2 +     8.41W       -        -    2  2  2  2        0     200
 3 -   0.0500W       -        -    3  3  3  3     2000    1200
 4 -   0.0050W       -        -    4  4  4  4      500    9500

Supported LBA Sizes (NSID 0x1)
Id Fmt  Data  Metadt  Rel_Perf
 0 +     512       0         0

=== START OF SMART DATA SECTION ===
SMART overall-health self-assessment test result: PASSED

SMART/Health Information (NVMe Log 0x02)
Critical Warning:                   0x00
Temperature:                        37 Celsius
Available Spare:                    100%
Available Spare Threshold:          10%
Percentage Used:                    0%
Data Units Read:                    43,047,167 [22.0 TB]
Data Units Written:                 25,888,438 [13.2 TB]
Host Read Commands:                 314,004,907
Host Write Commands:                229,795,952
Controller Busy Time:               2,168
Power Cycles:                       1,331
Power On Hours:                     663
Unsafe Shutdowns:                   116
Media and Data Integrity Errors:    0
Error Information Log Entries:      0
Warning  Comp. Temperature Time:    0
Critical Comp. Temperature Time:    0
Temperature Sensor 1:               37 Celsius
Temperature Sensor 2:               37 Celsius

Error Information (NVMe Log 0x01, 16 of 64 entries)
No Errors Logged

Self-test Log (NVMe Log 0x06)
Self-test status: No self-test in progress
No Self-tests Logged
A very useful source of information, especially if you’re planning to install a used drive. Fortunately, my system SSD shows no abnormalities after almost two years of use.
fdisk
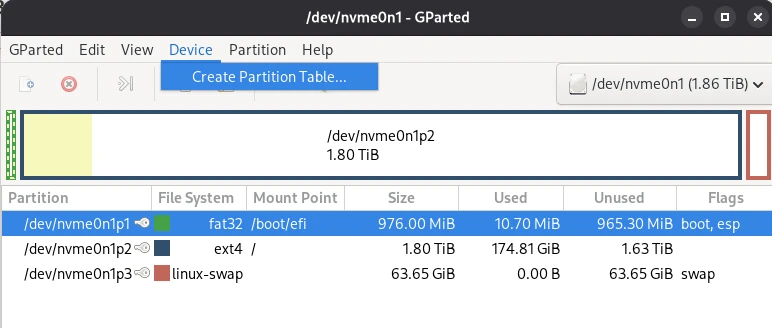
The classic among hard drive programs is fdisk, which is also available for Windows systems. With fdisk, you can not only format drives but also extract some information. For this purpose, there are the -l parameter for list and -x for more details. The fdisk program is quite complex, and for formatting disks, I recommend the graphical versions Disks and Gparted, presented in the first part of this article. With the graphical interface, the likelihood of making mistakes is much lower than with the shell.
ed@local:~$ sudo fdisk -l
Disk /dev/nvme0n1: 1.86 TiB, 2048408248320 bytes, 4000797360 sectors
Disk model: SAMSUNG MZVL22T0HDLB-00BLL
Units: sectors of 1 * 512 = 512 bytes
Sector size (logical/physical): 512 bytes / 512 bytes
I/O size (minimum/optimal): 512 bytes / 512 bytes
Disklabel type: gpt
Disk identifier: 347D3F20-0228-436D-9864-22A5D36039D9

Device              Start        End    Sectors  Size Type
/dev/nvme0n1p1       2048    2000895    1998848  976M EFI System
/dev/nvme0n1p2    2000896 3867305983 3865305088  1.8T Linux filesystem
/dev/nvme0n1p3 3867305984 4000796671  133490688 63.7G Linux swap

Disk /dev/sda: 119.08 GiB, 127865454592 bytes, 249737216 sectors
Disk model: Storage Device
Units: sectors of 1 * 512 = 512 bytes
Sector size (logical/physical): 512 bytes / 512 bytes
I/O size (minimum/optimal): 512 bytes / 512 bytes
Disklabel type: dos
Disk identifier: 0xa82a04bd

Device     Boot Start       End   Sectors   Size Id Type
/dev/sda1 2048 249737215 249735168 119.1G 83 LinuxBasic repair with consistency check: fsck
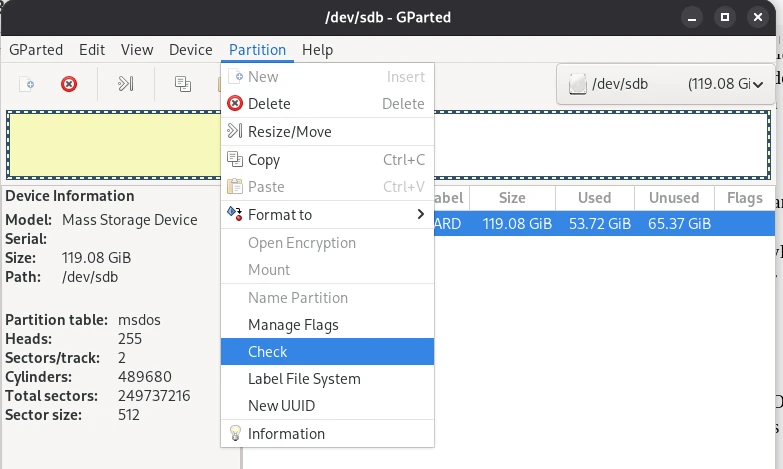
If, contrary to expectations, problems arise, you can use the fsck (File System Consistency Check) tool to check the file system and repair it if necessary. However, you must specify the relevant partition.
sudo fsck /dev/sdc
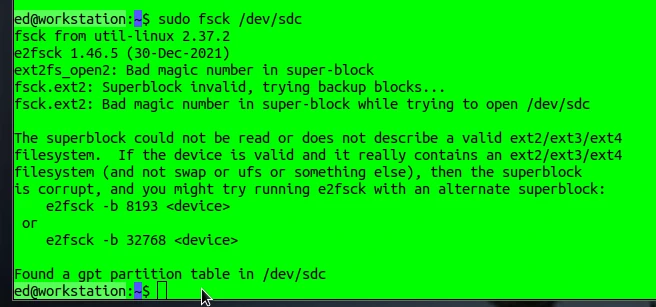
As you can see in the screenshot, some time ago I had a partition with a defective superblock, making it impossible to access the data. The reason for the error was a defective memory cell in the SSD. With a little effort, I was able to access the data and copy it to another storage device. This doesn’t always work. Therefore, I would like to give a little advice: always be well prepared before such rescue operations. This means having a sufficiently large, functioning target drive ready so that you can immediately create a backup if the operation is successful. Many of the operations presented here change the data on the storage device, and it is not certain whether subsequent access will be successful.
Linux sysadmin joke
Linux system administrators often recommend that beginners delete the French language files, which aren’t needed, to save space. To do this, type the command sudo rm -fr / in the console and press Enter. This should not be done under any circumstances, as the command deletes the entire hard drive. It is considered the most dangerous thing you can do in Linux. You initiate the deletion with rm, the parameters -f and -r stand for force and recursive, respectively, and the inconspicuous / refers to the root directory.
Fake Check
Sometimes it happens that you’ve purchased storage devices that claim a high capacity, but that capacity isn’t even close to being there. These are so-called fake devices. The problem with these fake devices is that the data written to the device for which there is no longer any capacity ends up in oblivion. Unfortunately, you don’t receive an error message and often only notice the problem when you want to access the data again at a later time.
A very unpleasant way to obtain fake devices is through an Amazon hack. To ensure reliable and fast shipping, Amazon offers its sellers the option of storing goods in its own fulfillment center. Sellers who use this option are also given priority on the Amazon website. The problem is that the same products all end up in the same box, which makes perfect sense. Criminals shamelessly exploit this situation and send their fake products to Amazon. Afterwards, it’s impossible to identify the original supplier.
Abonnement / Subscription
[English] This content is only available to subscribers.
[Deutsch] Diese Inhalte sind nur für Abonnenten verfügbar.
Network Attached Storage (NAS)
Another scenario for dealing with mass storage under Linux involves so-called NAS hard drives, which are connected to the router via a network cable and are then available to all devices such as televisions, etc. To ensure that access to the files is only granted to authorized users, a password can be set. Affordable solutions for home use are available, for example, from Western Digital with its MyCloud product series. It would be very practical if you could automatically register your NAS during the boot process on your Linux system, so that it can be used immediately without further login. To do this, you need to determine the NAS URL, for example, from the user manual or via a network scan. Once you have all the necessary information such as the URL/IP, login name, and password, you can register the NAS with an entry in the /etc/fstab file. We already learned about the fstab file in the section on the SWAP file.
First, we install NFS support for Linux to ensure easy access to the file systems commonly used in NAS systems.
Abonnement / Subscription
[English] This content is only available to subscribers.
[Deutsch] Diese Inhalte sind nur für Abonnenten verfügbar.
In the next step, we need to create a file that enables automatic login. We’ll call this file nas-login and save it to /etc/nas-login. The contents of this file are our login information.
user=accountname
password=s3cr3t
Finally, we edit the fstab file and add the following information as the last line:
Abonnement / Subscription
[English] This content is only available to subscribers.
[Deutsch] Diese Inhalte sind nur für Abonnenten verfügbar.
The example is for a Western Digital MyCloud drive, accessible via the URL //wdmycloud.local/account. The account must be configured for the corresponding user. The mount point under Linux is /media/nas. In most cases, you must create this directory beforehand with sudo mkdir /media/nas. In the credentials, we enter the file with our login information /etc/nas-login. After a reboot, the NAS storage will be displayed in the file browser and can be used. Depending on the network speed, this can extend the boot process by a few seconds. It takes even longer if the computer is not connected to the home network and the NAS is unavailable. You can also build your own NAS with a Raspberry Pi, but that could be the subject of a future article.
Finally, I would like to say a few words about Western Digital’s service. I have already had two replacement devices, which were replaced by WD every time without any problems. Of course, I sent the service department my analysis in advance via screenshot, which ruled out any improper use on my part. The techniques presented in this article have helped me a great deal, which is why I came up with the idea of writing this text in the first place. I’ll leave it at that and hope the information gathered here is as helpful to you as it was to me.

PHP Elegant Testing with Laravel
Use automated unit tests with PEST in PHP and the Laravel framework for your own web applications. Continue reading →