
Treasure chest – Part 1

Through the years, different techniques to storage configuration settings for applications got established. We can choose between database, property files, XML or YAML, just to give a few impressions of the options we could choose from. But before we jumping into all technical details of a possible implementation, we need to get a bit familiar of some requirements.

Many times in my professional life I touched this topic. Problems occur periodically after an application was updated. My peak of frustration, I reached with Windows 10. After every major update many settings for security and privacy switched back to default, apps I already uninstalled messed up my system again and so on. This was reasons for me to chose an alternative to stop suffering. Now after I switched to Ubuntu Mate I’m fine, because those problems got disappear.

Several times I also had to maintain legacy projects and needed to migrate data to newer versions. A difficult and complex procedure. Because of those activities I questioned myself how this problem could handled in a proper way. My answer you can find in the open source project TP-CORE. The feature application configuration is my way how to avoid the effect of overwriting important configuration entries during the update procedure.

TP-CORE is a free available library with some useful functionality written in Java. The source code is available on GitHub and the binaries are published on Maven Central. To use TP-CORE in your project you can add it as dependency.

<dependency>
   <groupId>io.github.together.modules</groupId>
   <artifactId>core</artifactId>
   <version>2.2.0</version>
</dependency>
XML

The feature of application configuration is implemented as ConfigurationDAO and use a database. My decision for a database approach was driven by the requirement of having a history. Off course the choice have also some limitations. Obviously has the configuration for the database connection needed to be stored somewhere else.

TP-CORE use Spring and Hibernate (JPA) to support several DBMS like PostgreSQL, Oracle or MariaDB. My personal preference is to use PostgreSQL, so we can as next step discuss how to setup our database environment. The easiest way running a PostgreSQL Server is to use the official Docker image. If you need a brief overview how to deal with Docker and PostgreSQL may you like to check my article: Learn to walk with Docker and PostgreSQL. Below is a short listing how the PostgreSQL container could get instantiated in Docker.

docker network create -d bridge –subnet=172.18.0.0/16 services

docker run -d –name postgres \
-p 5432:5432 –net services –ip 172.18.0.2 \
-e POSTGRES_PASSWORD=password \
-e PGPASSWORD=password \
-v /home/<user>/postgreSQL:/var/lib/postgresql/data \
postgres:11
Bash

May you need to make some changes on the listing above to fit it for your system. After your DBMS is running well we have to create the schemata and the user with a proper password. In our case the schema is called together. the user is also called together and the password will be together too.

CREATE ROLE together LOGIN
  ENCRYPTED PASSWORD 'md582721599778493074c7de7e2bb735332'
  NOSUPERUSER INHERIT NOCREATEDB NOCREATEROLE NOREPLICATION;

CREATE DATABASE "together"
  WITH OWNER = together
       ENCODING = 'UTF8'
       TABLESPACE = pg_default
       LC_COLLATE = 'en_US.utf8'
       LC_CTYPE = 'en_US.utf8'
       CONNECTION LIMIT = -1;
SQL

To establish the connection from your application to the PostgreSQL DBMS we use a XML configuration from the Spring Framework. The GitHub repository of TP-CORE contains already a working configuration file called spring-dao.xml. The Spring configuration includes some other useful features like transactions and a connection pool. All necessary dependencies are already included. You just need to replace the correct entries for the connection variables:

  • ${jdbc.user} = together
  • ${jdbc.password} = togehter
  • ${hibernate.dialect.database} = org.hibernate.dialect.PostgreSQL95Dialect
  • ${jdbc.driverClassName} = org.postgresql.Driver
  • ${jdbc.url} = jdbc:postgresql://172.18.0.2:5432/together
  • ${dbcp.initialSize} = 10
  • ${hibernate.hbm2ddl.auto} = update
  • ${hibernate.show_sql} = false

In the next step you need to tell your application how to instanciate the Spring context, using the configuration file spring-dao.xml. Depending on your application type you have two possibilities. For a standard Java app, you can add the following line to your main method:

ApplicationContext =
   new ClassPathXmlApplicationContext("/spring-dao.xml");
Java

Web application are configured by the web.xml in the WEB-INF directory. there you need to add those lines:

<context-param>
  <param-name>contextConfigLocation</param-name>
  <param-value>/WEB-INF/spring-dao.xml</param-value>
</context-param>
XML

The creation of the database table will managed by Hibernate during the application start. When you discover the GitHub repository of the TP-CORE project you will find in the directory /src/main/filters the file database.properties. This file contains more connection strings to other database systems. In the case you wish to compile TP-CORE by your own, you can modify database.properties to your preferred configuration. The full processed configuration file with all token replacements you will find in the target directory.

In the next paragraph we will have a closer look on the Domain Object ConfigurationDO

The most columns you see in the image above, is very clear, for what they got used. As first point we need to clarify, what makes an entry unique? Of course the UUID as primary key fits this requirement as well. In our case the UUID is the primary key and is auto generated by the application, when a new row will created. But using in an application all the time a non human readable id as key, to grab a value is heavily error prone and uncomfortable. For this use case I decided a combination of configuration keymodule name and service version to define a unique key entry.

To understand the benefit of this construction I will give a simple example. Imagine you have functionality of sending E-Mails in your application. This functionality requires several configuration entries like host, user and password to connect with an SMTP server. to group all those entries together in one bundle we have the CONFIG_SET. If your application deals with an modular architecture like micro services, it could be also helpful to organize the configuration entries by module or service name. For this reason the MODULE_NAME was also included into this data structure. Both entries can be used like name spaces to fetch relevant information more efficient.

Now it could be possible that some changes of the functionality create new configuration entries or some entries got obsolete. To enable a history and allow a backward compatibility the data structure got extended by SERVICE_VERSION.

Every entry contains a mandatory default value and an optional configuration value. The application can overwrite the default value by filling the configuration value field. This allows updates without effect the custom configuration, as long the developer respect to not fill entries for configuration values and always use the default entry. This definition is the convention over configuration paradigm.

The flags deprecated and mandatory for a configuration key are very explicit and descriptive. Also the column comment don’t need as well any further explanation.

If there are changes of one or more configuration entries for a service, the whole configuration set has to be duplicated with the new service version. As example you can have a look on the MailClient functionality of TP-CORE how the application configuration is used.

A very important information is that the configuration key is in the DBMS stored as SHA-512 hash. This is a simple protection against a direct manipulation of the configuration in the DBMS, outside of the application. For sure this is not a huge security, but minimum it makes the things a bit uncomfortable. In the application code is a human readable key name used. The mapping is automatic, and we don’t need to worry about it.

Resume

In this first part I talked about why I had need my own implementation of a application registry to storage configuration settings. The solution I prefer is using a database and I showed how enable the database configuration in your own project. Shortly we also had a view on the data structure and how the Domain Object is working.

In the second part of this article I give a introduction to the Data Access Object (DAO) and his corresponding service. With this information you are able to extend or adapt the application configuration implementation to your own needs.

Backup and Transfer your Thunderbird Profile to another Computer

As an IT service provider, we often have to support our clients to reinstall old Windows systems. The most often challenge we have to face by this activity is to backup old files and restore them on the new system. Not only private persons, also companies using the email client Thunderbird. So we decided to publish this short guide how your Thunderbird profile can be backup and restore. To prevent a data loss – you should do backups regularly in the case your hardware or operating system got fully crashed.

backup

  1. Connect an pen drive or hard disk (USB medium) on your computer.
  2. Create a directory of your choice on the USB medium to back up your profile. Choose a name you are able to recognize later the content. (e.g. 2022-01-19_Thunderbird-profile)
  3. Keep the „Explorer window“ open and make sure, that the directory is active.
  4. Open Thunderbird on the computer you want to backup.
  5. To find the old profile, click on the “three bars” in the top right-hand corner.
  6. In the next windows that opens, click on the „Open Folder“.
  7. A new “Explorer window” pop up and shows you all the files in your profile.
  8. Mark all files by clicking – click on the “1st file”, then hold down the <Shift> key on your keyboard and at the same time press the “Arrow down” key until the grey „scroll bar“ in the window reaches the bottom. Once all files are selected (marked in blue), click with the “right mouse button” on any file and select the menu item “Copy“.
  9. Go back to your other “Explorer window“, click the right mouse button and then “Paste“.
  10. Once the copying process is complete, you can close your Thunderbird.

restore

  1. Connect your „USB medium“ to the computer (destination) where you like to transfer your Thunderbird profile.
  2. Open the “Explorer” and create the following directories: „Data“ ➡️ „ Thunderbird“ ➡️ „Post-Office xxx“ (C:\Data\Thunderbird\Post-Office xxx\ „xxx“ you need to replace for your Thunderbird profile name)
  3. Hence your directories are created you can copy your profile data from your USB medium into the newly created directory „Post-Office xxx“.
  4. After completing the copying process, you still need to set up your new profile directory in Thunderbird.
  5. Press the keys <Windows Key>+<R> on your keyboard. The “Run” dialogue opens. Enter the following command: thunderbird -p  as you can see in the screenshot and press “OK“.
  6. In the newly opened Popup “Thunderbird – Choose User Profile“, click on “Create Profile…” to start the wizard.
  7. In the 1st window of the “Profile Wizard – Welcome” click on “Next“.
  8. In the 2nd window of the “Profile Wizard – Finish” enter the “Profile Name” (Post-Office xxx) under “1” you can see in the screenshot. Under “2” select the profile path by clicking on “Choose Folder“. (C:\Data\Thunderbird\Post-Office xxx)”.
  9. To finish the process,you just have to press the “Finish” button.

You can now start Thunderbird normally from the start bar – all your emails & settings are restored. If you have questions or suggestions you can write us an e-mail or leave a comment. If you like this guide feel free to share this article

Network spy protection with AdGuard Home on a Raspberry Pi & Docker

Maybe you have bought you like me an Raspberry Pi4 with 4GB RAM and think about what nice things you could do with it. Since the beginning I got the idea to use it as an lightweight home server. Of course you can easily use a mini computer with more power and obviously more energy consumption too. Not a nice idea for a device is running 24/7. As long you don’t plan to mine your own bitcoins or host a high frequented shop system, a PI device should be sufficient.

I was wanted to increase the network security for my network. For this reason I found the application AdGuard which blocks many spy software from internet services you use on every device is connected to the network where AdGuard is running. Sounds great and is not so difficult to do. Let me share with you my experience.

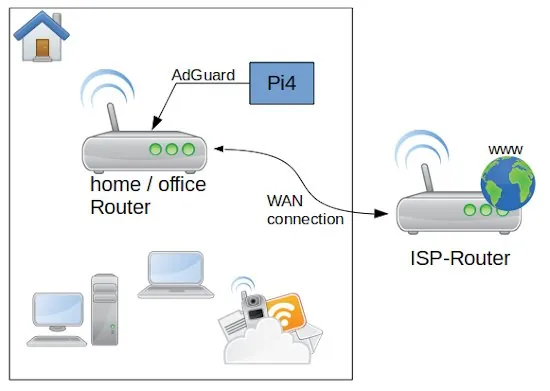
As first let’s have a look to the overall system and perquisites. After the Router from my Internet Service Provider I connected direct by wire my own Network router an Archer C50. On my Rapsbery PI4 with 4GB RAM run as operation system Ubuntu Linux Server x64 (ARM Architecture). The memory card is a 64 GB ScanDisk Ultra. In the case you need a lot of storage you can connect an external SSD or HDD with an USB 3 – SATA adapter. Be aware that you use a storage is made for permanent usage. Western Digital for example have an label called NAS, which is made for this purpose. If you use standard desktop versions they could get broken quite soon. The PI is connected with the router direct by LAN cable.

The first step you need to do is to install on the Ubuntu the Docker service. this is a simple command: apt-get install docker. if you want to get rid of the sudo you need to add the user to the docker group and restart the docker service. If you want to get a bit more familiar with Docker you can check my video Docker basics in less than 10 minutes.

sudo apt-get install docker
sudo gpasswd -a <user> docker
sudo dockerd

After this is done you need to create a network where the AdGuard container is reachable from your router to a static IP address on your PI.

docker network create -d macvlan -o parent=eth0 \
--subnet=192.168.0.0/16 \ 
--ip-range=192.168.0.4/25 \
--gateway=192.168.0.1 \
lan

Before you just copy and past the listing above, you need to change the IP addresses to the ones your network is using. for all the installation, this is the most difficult part. As first the network type we create is macvlan bounded to the network card eth0. eth0 is for the PI4 standard. The name of the network we gonna to create is lan. To get the correct values for subnet, ip-range and gateway you need to connect to your router administration.

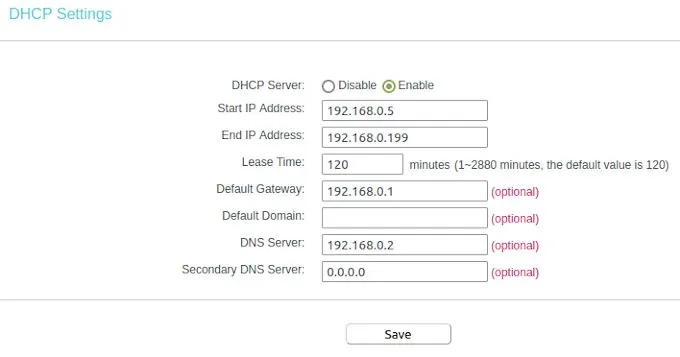
To understand the settings, we need a bit of theory. But don’t worry is not much and not that complicated. Mostly your router is reachable by an IP address similar to 192.168.0.1 – this is a static address and something equal we want to have for AdGuard on the PI. The PI itself is in my case reachable by 192.168.0.12, but this IP we can not use for AdGuard. The plan is to make the AdGuard web interface accessible by the IP 192.168.0.2. OK let’s do it. First we have to switch on our router administration to the point DHCP settings. In the Screenshot you can see my configuration. After you changed your adaptions don’t forget to reboot the router to take affect of the changes.

I configured the dynamic IP range between 192.168.0.5 to 192.168.0.199. This means the first 4 numbers before 192.168.0.5 can be used to connect devices with a static IP. Here we see also the entry for our default gateway. Whit this information we are able to return to our network configuration. the subnet IP is like the gateway just the digits in the last IP segment have to change to a zero. The IP range we had limited to the 192.168.0.4 because is one number less than where we configured where the dynamic IP range started. That’s all we need to know to create our network in Docker on the PI.

Now we need to create in the home directory of our PI the places were AdGuard can store the configuration and the data. This you can do with a simple command in the ssh shell.

mkdir /home/ubuntu/adguard/work 
mkdir /home/ubuntu/adguard/conf

As next we have to pull the official AdGuard container from the Docker Hub and create a image. This we do by just one command.

docker run -d --name adguard --restart=always \ 
-p 3000:3000/tcp --net lan --ip 192.168.0.2 \
-p 53/tcp -p 53/udp -p 67/udp -p 68/udp -p 80/tcp \
-p 784/udp -p 8853/udp \
-p 443/tcp -p 443/udp \
-p 853/tcp -p 853/udp \
-p 5443/tcp -p 5443/udp \
-v /home/ubuntu/adguard/work:/opt/adguardhome/work \
-v /home/ubuntu/adguard/conf:/opt/adguardhome/conf \
adguard/adguardhome:latest

The container we create is called adguard and we connect this image to our own created network lan with the IP address 192.168.0.2. Then we have to open a lot of ports AdGuard need to do the job. And finally we connect the two volumes for the configuration and data directory inside of the container. As restart policy we set the container to always, this secure that the service is up again after the server or docker was rebooted.

After the execution of the docker run command you can reach the AdGuard configuration page with your browser under: http://192.168.0.2:3000. Here you can create the primary setup to create a login user and so on. After the first setup you can reach the web interface by http://192.168.0.2.

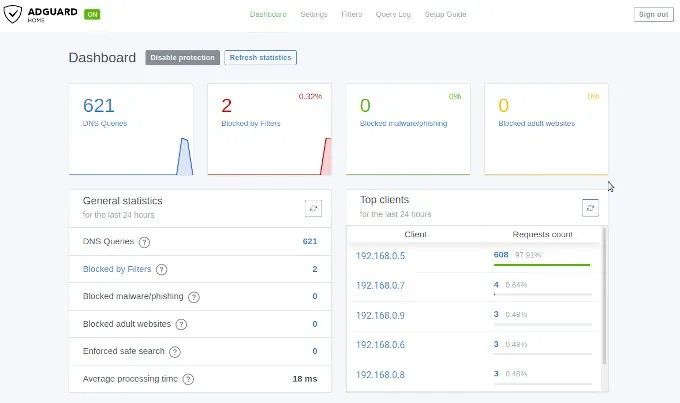
The IP address 192.168.0.2 you need now to past into the field DNS Server for the DHCP settings. Save the entries and restart your router to get all changes working. When the router is up open on your browser any web page from the internet to see that everything is working fine. After this you can login into the AdGuard web console to see if there appearing data on the dashboard. If this is happened then you are don e and your home or office network is protected.

If you think this article was helpful and you like it, you can support my work by sharing this post or leave a like. If you have some suggestions feel free to drop a comment.

Installing NextCloud with Docker on a Linux Server

For business it’s sometime important to have a central place where employees and clients are able to interact together. NextCloud is a simple and extendable PHP solution with a huge set of features you can host by yourself, to keep full control of your data. A classical Groupware ready for your own cloud.

If you want to install NextCloud on your own server you need as first a well working PHP installation with a HTTP Server like Apache. Also a Database Management System is mandatory. You can chose between MySQL, MariaDB and PostgreSQL servers. The classical way to install and configure all those components takes a lot of time and the maintenance is very difficult. To overcome all this we use a modern approach with the virtualization tool docker.

The system setup is as the following: Ubuntu x64 Server, PostgreSQL Database, pgAdmin DBMS Management and NextCloud.

Agenda

  • Docker Basics
  • Installing Docker on a Ubuntu server
  • prepare your database
  • putting all together and make it run
  • insights to operate NextCloud

Docker Container Instructions

Abonnement / Subscription

[English] This content is only available to subscribers.

[Deutsch] Diese Inhalte sind nur für Abonnenten verfügbar.

If you have any question feel free to leave a comment. May you need help to install and operate your own NextCloud installation secure, don’t hesitate to contact us by the contact form. In the case you like the video level a thumbs up and share it.

Resources

Abonnement / Subscription

[English] This content is only available to subscribers.

[Deutsch] Diese Inhalte sind nur für Abonnenten verfügbar.

Learn to walk with Docker and PostgreSQL

After some years the virtualization tool Docker proofed it’s importance for the software industry. Usually when you hear something about virtualization you may could think this is something for administrators and will not effect me as a developer as much. But wait. You’re might not right. Because having some basic knowledge about Docker as a developer will helps you in your daily business.

Step 1: create the container and initialize the database

docker run -d --name pg-dbms --restart=no \
--ip 172.18.0.20 \
-e POSTGRES_PASSWORD=s3cr3t \
-e PGPASSWORD=s3cr3t \
postgres:11

If you wish that your PostgreSQL is always up after you restart your system, you should change the restart policy form no to always. After you created the instance pg-dbms of your PostgreSQL 11 Docker image, you need to cheek if it was success. This you can do by the command:

docker ps -a

Step 2: copy the initialized database directory to a local directory on your host system

docker cp pg-dbms:/var/lib/postgresql/data /home/user/pg

The biggest problem with the current container is, that all data will got lost, when you erase the container. This means wen need to find a way how to save this data permanently. The easiest way is to copy the data directory from your container to an directory to your host system. The copy command needs tow parameters source and destination. for the source you need to specify the container were you want to grab the files. in our case the container is named pg-dbms. The destination is a PostgreSQL folder in the home directory of the user ed. If you use Windows instead of Linux it works the same. Just adapt the directory path and try to avoid white-spaces. When the files appeared in the defined directory you’re done with this step.

Step 3: stop the current container

docker stop pg-dbms

In the case you wish to start a container, just replace the word stop for the word start. The container we created to grab the initial files for the PostgreSQL DBMS we don’t need no longer, so we can erase it, but to do that as first the running container have to be stopped.

Step 4: start the current container

docker start pg-dbms

After the container is stopped we are able to erase it.

Step 5: recreate the container with an external volume

docker run -d --name pg-dbms \
--ip 172.18.0.20 \
-e POSTGRES_PASSWORD=s3cr3t \
-e PGPASSWORD=s3cr3t \
-v /home/user/pg:/var/lib/postgresql/data \
postgres:11

Now we can link the directory with the exported initial database to a new created PostgreSQL container. that’s all. The big benefit of this activities is, that now every database we create in PostgreSQL and the data of this database is outside of the docker container on our local machine. This allows a much more simpler backup and prevent losing information when a container has to be updated.

If you have instead of PostgreSQL other images where you need to grab files to reuse them you can use this tutorial too. just adapt to the image and the paths you need. The procedure is almost the same. If you like to get to know more facts about Docker you can watch also my video Docker Basics in less then 10 Minutes. In the case you like this short tutorial share it with your friends and colleagues. To stay informed don’t forget to subscribe to my newsletter.

Abonnement / Subscription

[English] This content is only available to subscribers.

[Deutsch] Diese Inhalte sind nur für Abonnenten verfügbar.


Docker Basics in less than 10 minutes

This short tutorial covers the most fundamental steps to use docker in your development tool chain. After we introduced the basic theory, we will learn how to install docker on a Linux OS (Ubuntu Mate). When this is done we have a short walk through to download an image and instantiate the container. The example use the official PHP 7.3 image with an Apache 2 HTTP Server.