So that we can call console programs directly across the system without having to specify the full path, we use the so-called path variable. So we save the entire path including the executable program, the so-called executable, in this path variable so that we no longer have to specify the path including the executable on the command line. By the way, the word executable derives the file extension exe, which is common in Windows. Here we also have a significant difference between the two operating systems Windows and Linux. While Windows knows whether it is a pure ASCII text file or an executable file via the file extension such as exe or txt, Linux uses the file’s meta information to make this distinction. That’s why it’s rather unusual to use these file extensions txt and exe under Linux.
Typical use cases for setting the path variable are programming languages such as Java or tools such as the Maven build tool. For example, if we downloaded Maven from the official homepage, we can unpack the program anywhere on our system. On Linux the location could be /opt/maven and on Microsoft Windows it could be C:/Program Files/Maven. In this installation directory there is a subdirectory /bin in which the executable programs are located. The executable for Maven is called mvn and in order to output the version, under Linux without the entry in the path variable the command would be as follows: /opt/maven/bin/mvn -v. So it’s a bit long, as we can certainly admit. Entering the Maven installation directory in the path shortens the entire command to mvn -v. By the way, this mechanism applies to all programs that we use as a command in the console.
Before I get to how the path variable can be adjusted under Linux and Windows, I would like to introduce another concept, the system variable. System variables are global variables that are available to us in Bash. The path variable also counts as a system variable. Another system variable is HOME, which points to the logged in user’s home directory. System variables are capitalized and words are separated with an underscore. For our example with entering the Maven Executable in the path, we can also set our own system variable. The M2_HOME convention applies to Maven and JAVA_HOME applies to Java. As a best practice, you bind the installation directory to a system variable and then use the self-defined system variable to expand the path. This approach is quite typical for system administrators who simplify their server installation using system variables. Because these system variables are global and can also be read by automation scripts.
The command line, also known as shell, bash, console and terminal, offers an easy way to output the value of the system variable with echo. Using the example of the path variable, we can immediately see the difference to Linux and Windows. Linux: echo $PATH Windows: echo %PATH%
Let’s start with the simplest way to set the path variable. In Linux we just need to edit the hidden .bashrc file. At the end of the file we add the following lines and save the content.
We bind the installation directory to the M2_HOME variable. We then expand the path variable to include the M2_HOME system variable with the addition of the subdirectory of executable files. This procedure is also common on Windows systems, as it allows the installation path of an application to be found and adjusted more quickly. After modifying the .bashrc file, the terminal must be restarted for the changes to take effect. This procedure ensures that the entries are not lost even after the computer is restarted.
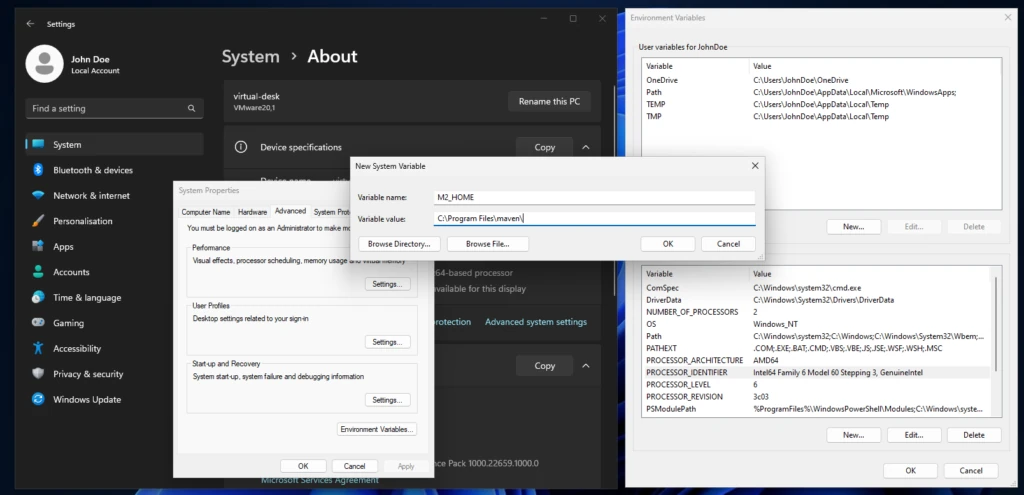
Under Windows, the challenge is simply to find the input mask where the system variables can be set. In this article I will limit myself to the version for Windows 11. It may of course be that the way to edit the system variables has changed in a future update. There are slight variations between the individual Windows versions. The setting then applies to both the CMD and PowerShell. The screenshot below shows how to access the system settings in Windows 11.
To do this, we right-click on an empty area on the desktop and select the System entry. In the System – About submenu you will find the system settings, which open the System properties popup. In the system settings we press the Environment Variables button to get the final input mask. After making the appropriate adjustments, the console must also be restarted for the changes to take effect.
In this little help, we learned about the purpose of system variables and how to store them permanently on Linux and Windows. We can then quickly check the success of our efforts in the shell using echo by outputting the contents of the variables. And we are now one step closer to becoming an IT professional.
The PHP programming language has been the first choice for many developers in the field of web applications for decades. Since the introduction of object-oriented language features with version 5, PHP has come of age. Large projects can now be implemented in a clean and, above all, maintainable architecture. A striking difference between commercial software development and a hobbyist who has assembled and maintains a club’s website is the automated verification that the application adheres to specified specifications. This brings us into the realm of automated software testing.
A key principle of automated software testing is that it verifies, without additional interaction, that the application exhibits a predetermined behavior. Software tests cannot guarantee that an application is error-free, but they do increase quality and reduce the number of potential errors. The most important aspect of automated software testing is that behavior already defined in tests can be quickly verified at any time. This ensures that if developers extend an existing function or optimize its execution speed, the existing functionality is not affected. In short, we have a powerful tool for ensuring that we haven’t broken anything in our code without having to laboriously click through all the options manually each time.
To be fair, it’s also worth mentioning that the automated tests have to be developed, which initially takes time. However, this ‘supposed’ extra effort quickly pays off once the test cases are run multiple times to ensure that the status quo hasn’t changed. Of course, the created test cases also have to be maintained.
If, for example, an error is detected, you first write a test case that replicates the error. The repair is then successfully completed if the test case(s) pass. However, changes in the behavior of existing functionality always require corresponding adaptation of the associated tests. This concept of writing tests in parallel to implement the function is feasible in many programming languages and is called test-driven development. From my own experience, I recommend taking a test-driven approach even for relatively small projects. Small projects often don’t have the complexity of large applications, which also require some testing skills. In small projects, however, you have the opportunity to develop your skills within a manageable framework.
Test-driven software development is nothing new in PHP either. Sebastian Bergmann’s unit testing framework PHPUnit has been around since 2001. The PEST testing framework, released around 2021, builds on PHPUnit and extends it with a multitude of new features. PEST stands for PHP Elegant Testing and defines itself as a next-generation tool. Since many agencies, especially smaller ones, that develop their software in PHP generally limit themselves to manual testing, I would like to use this short article to demonstrate how easy it is to use PEST. Of course, there is a wealth of literature on the topic of test-driven software development, which focuses on how to optimally organize tests in a project. This knowledge is ideal for developers who have already taken their first steps with testing frameworks. These books teach you how to develop independent, low-maintenance, and high-performance tests with as little effort as possible. However, to get to this point, you first have to overcome the initial hurdle: installing the entire environment.
A typical environment for self-developed web projects is the Laravel framework. When creating a new Laravel web project, you can choose between PHPUnit and PEST. Laravel takes care of all the necessary details. A functioning PHP environment is required as a prerequisite. This can be a Docker container, a native installation, or the XAMPP server environment from Apache Friends. For our short example, I’ll use the PHP CLI on Debian Linux.
After executing the command in the console, you can test the installation success using the php -v command. The next step is to use a package manager to deploy other PHP libraries for our application. Composer is one such package manager. It can also be quickly deployed to the system with just a few instructions.
This downloads the current version of the composer.phar file to the current directory in which the command is executed. The correct hash is also automatically checked. To make Composer globally available via the command line, you can either include the path in the path variable or link composer.phar to a directory whose path is already integrated into Bash. I prefer the latter option and achieve this with:
ln -d composer.phar $HOME/.local/bin/composer
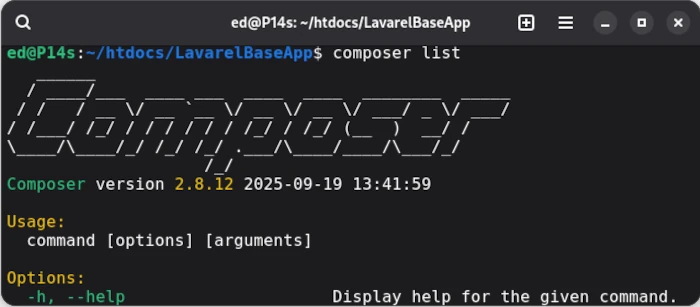
If everything was executed correctly, composer list should now display the version, including the available commands. If this is the case, we can install the Lavarel installer globally in the Composer repository.
php composer global require laravel/installer
To install Lavarel via Bash, the path variable COMPOSER_HOME must be set. To find out where Composer created the repository, simply use the command composer config -g home. The resulting path, which in my case is /home/ed/.config/composer, is then bound to the variable COMPOSER_HOME. We can now run
php $COMPOSER_HOME/vendor/bin/laravel new MyApp
in an empty directory to create a new Laravel project. The corresponding console output looks like this:
ed@P14s:~/Downloads/test$ php $COMPOSER_HOME/vendor/bin/laravel newMyApp _ _|||||| __ _ _ __ __ ___ _____||||/ _` | __/ _` \ \ // _ \ |||___|(_||||(_||\ V / __/||______\__,_|_| \__,_| \_/ \___|_| ┌ Which starter kit would you like to install? ────────────────┐ │ None │ └──────────────────────────────────────────────────────────────┘ ┌ Which testing framework do you prefer? ──────────────────────┐ │ Pest │ └──────────────────────────────────────────────────────────────┘Creating a "laravel/laravel" project at "./MyApp"Installing laravel/laravel (v12.4.0)- Installing laravel/laravel (v12.4.0): Extracting archiveCreated project in /home/ed/Downloads/test/MyAppLoading composer repositories with package information
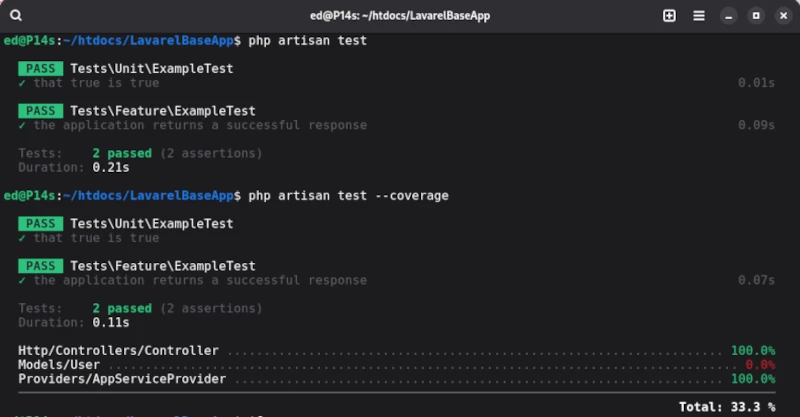
The directory structure created in this way contains the tests folder, where the test cases are stored, and the phpunit.xml file, which contains the test configuration. Laravel defines two test suites: Unit and Feature, each of which already contains a demo test. To run the two demo test cases, we use the artisan command-line tool [1] provided by Laravel. To run the tests, simply enter the php artisan test command in the root directory.
In order to assess the quality of the test cases, we need to determine the corresponding test coverage. We also obtain the coverage using artisan with the test statement, which is supplemented by the --coverage parameter.
php artisan test --coverage
The output for the demo test cases provided by Laravel is as follows:
Unfortunately, artisan’s capabilities for executing test cases are very limited. To utilize PEST’s full functionality, the PEST executor should be used right from the start.
php ./vendor/bin/pest -h
The PEST executor can be found in the vendor/bin/pest directory, and the -h parameter displays help. In addition to this detail, we’ll focus on the tests folder, which we already mentioned. In the initial step, two test suites are preconfigured via the phpunit.xml file. The test files themselves should end with the suffix Test, as in the ExampleTest.php example.
Compared to other test suites, PEST attempts to support as many concepts of automated test execution as possible. To maintain clarity, each test level should be stored in its own test suite. In addition to classic unit tests, browser tests, stress tests, architecture tests, and even the newly emerging mutation testing are supported. Of course, this article can’t cover all aspects of PEST, and there are now many high-quality tutorials available for writing classic unit tests in PEST. Therefore, I’ll limit myself to an overview and a few less common concepts.
Architecture test
The purpose of architectural tests is to provide a simple way to verify whether developers are adhering to the specifications. This includes, among other things, ensuring that classes representing data models are located in a specified directory and may only be accessed via specialized classes.
This form of testing is something new. The purpose of the exercise is to create so-called mutants by making changes, for example, to the conditions of the original implementation. If the tests assigned to the mutants continue to run correctly instead of failing, this can be a strong indication that the test cases may be faulty and lack meaningfulness.
Original: if(TRUE) → Mutant: if(FALSE)
Stress-Test
Another term for stress tests is penetration testing, which focuses specifically on the performance of an application. This allows you to ensure that the web app, for example, can handle a defined number of accesses.
Of course, there are many other helpful features available. For example, you can group tests and then run the groups individually.
For those who don’t work with the Lavarel framework but still want to test in PHP with PEST, you can also integrate the PEST framework into your application. All you need to do is define PEST as a corresponding development dependency in the Composer project configuration. Then, you can initiate the initial test setup in the project’s root directory.
php ./vendor/bin/pest --init
As we’ve seen, the options briefly presented here alone are very powerful. The official PEST documentation is also very detailed and should generally be your first port of call. In this article, I focused primarily on minimizing the entry barriers for test-driven development in PHP. PHP now also offers a wealth of options for implementing commercial software projects very efficiently and reliably.
Over the course of the many hours they spend in front of this amazing device, almost every computer user will find themselves in need of saving the screen content as a graphic. The process of creating an image of the monitor’s contents is what seasoned professionals call taking a screenshot.
As with so many things, there are many ways to achieve a screenshot. Some very resourceful people solve the problem by simply pointing their smartphone at the monitor and taking a photo. Why not? As long as you can still recognize something afterwards, everything’s fine. But this short guide doesn’t end there; we’ll take a closer look at the many ways to create screenshots. Even professionals who occasionally write instructions, for example, have to overcome one or two pitfalls.
Before we get to the nitty-gritty, it’s important to mention that it makes a difference whether you want to save the entire screen, the browser window, or even the invisible area of a website as a screenshot. The solution presented for the web browser works pretty much the same for all web browsers on all operating systems. Screenshots intended to cover the monitor area and not a web page use the technologies of the existing operating system. For this reason, we also differentiate between Linux and Windows. Let’s start with the most common scenario: browser screenshots.
Browser
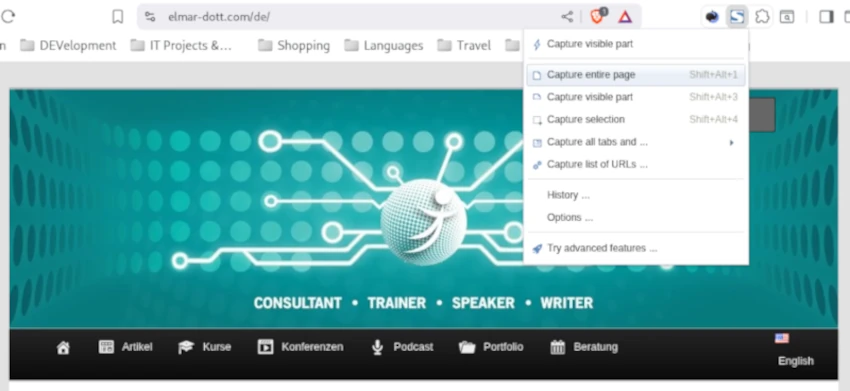
Especially when ordering online, many people feel more comfortable when they can additionally document their purchase with a screenshot. It’s also not uncommon to occasionally save instructions from a website for later use. When taking screenshots of websites, one often encounters the problem that a single page is longer than the area displayed on the monitor. Naturally, the goal is to save the entire content, not just the displayed area. For precisely this case, our only option is a browser plugin. Fireshot is a plug-in available for all common browsers, such as Brave, Firefox, and Microsoft Edge, that allows us to create screenshots of websites, including hidden content. Fireshot is a browser extension that has been on the market for a very long time. Fireshot comes with a free version, which is already sufficient for the scenario described. Anyone who also needs an image editor when taking screenshots, for example, to highlight areas and add labels, can use the paid Pro version. The integrated editor has the advantage of significantly accelerating workflows in professional settings, such as when creating manuals and documentation. Of course, similar results can be achieved with an external photo editor like GIMP. GIMP is a free image editing program, similarly powerful and professional as the paid version of Photoshop, and is available for Windows and Linux.
Linux
If we want to take screenshots outside of the web browser, we can easily use the operating system’s built-in tools. In Linux, you don’t need to install any additional programs; everything you need is already there. Pressing the Print key on the keyboard opens the tool. You simply have to drag the mouse around the area you want to photograph and press Capture in the control field that appears. It’s not a problem if the control area is in the visible area of the screenshot; it won’t be shown in the screenshot. On German keyboards, you often find the Print key instead of Print. The finished screenshot then ends up in the Screenshots folder with a timestamp in the file name. This folder is a subfolder of Pictures in the user directory.
Windows
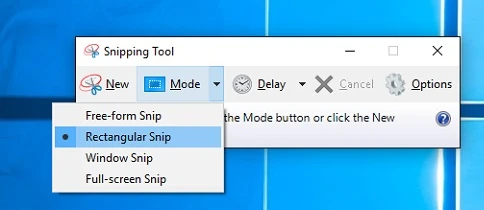
The easiest way to take screenshots in Windows is to use the Snipping Tool, which is usually included with your Windows installation. It’s also intuitive to use.
Another very old way in Windows, without a dedicated screenshot creation program, is to press the Ctrl and Print Screen keys simultaneously. Then, open a graphics program, such as Paint, which is included in every Windows installation. In the drawing area, press Ctrl + V simultaneously, and the screenshot appears and can be edited immediately.
These screenshots are usually created in JPG format. JPG is a lossy compression method, so you should check the readability after taking the screenshot. Especially with current monitors with resolutions around 2000 pixels, using the image on a website requires manual post-processing. One option is to reduce the resolution from just under 2000 pixels to the usual 1000 pixels on a website. Ideally, the scaled and edited graphic should be saved in the new WEBP format. WEBP is a lossless graphics compression method that further reduces the file size compared to JPG, which is very beneficial for website loading times.
This already covers a good range of possibilities for taking screenshots. Of course, more could be said about this, but that falls into the realm of graphic design and the efficient use of image editing software.
Research Gate / PrePrint – DOI: 10.13140/RG.2.2.29042.77762
It’s becoming increasingly fashionable for so-called content creators to engage in conversations with artificial intelligences, so-called Large Language Models (LLMs). These conversations are sometimes quite emotionally driven by the human part. But the titles of these videos are also sometimes very sensationalist. One often reads headlines like ‘ChatGPT debunked’; ‘AI reveals the truth about…’ and similar phrases. Many of these titles are certainly clickbait, intended to motivate viewers to watch the content until the very end. The content is often quite sobering, and the question arises as to how useful such contributions actually are.
LLMs, as a form of artificial neural networks, are very powerful AI systems, and conversations in the sense of the Turing Test are certainly possible. The Turing Test is the question of determining which part of a human-machine conversation is part of the machine. Classic chat bots, such as the ELIZA bot developed by Joseph Weizenbaum in 1966, only partially pass this test. One problem arises from the existing set of rules for grammatical transformation of responses and the lack of context for human input. The exciting thing about ELIZA is that its performance works without complex intelligence. Grammatical transformations alone guide the conversation. In his paper “Computational Linguistics: ELIZA – A Computer Program for the Study of Natural Language Communication Between Man and Machine,” Weizenbaum describes the following conversation:
Men are all alike
IN WHAT WY
They’re always hugging us about somthing or other
CAN YOU THINK OF A SPECIFIC EXAMPLE
Well, my boyfriend made me come here
YOUR BOYFRIEND MADE YOU COME HERE
He say I’m depressed much of the time
I AM SORRY TO HEAR YOU ARE DEPRESSED
It’s true I am unhappy.
DO YOU THINK COMMING HERE WILL HELP YOU NOT TO BE UNHAPPY
I tried some help, that much seems certain
WHAT WOULD IT MEAN MEAN TO YOU GOT SOME HELP
At this point, I’ll cut the dialogue short, because the way the machine responds in capital letters already clearly reveals the concept. Simple linguistic or rhetorical tricks in the answers force the interlocutor into the role of narrator. If you look at various videos in which people have supposedly in-depth conversations with artificial intelligence, you’ll find a similar pattern.
A serious problem with current human-machine communication is the upstream filters designed to prevent humans from changing the internal state of the artificial intelligence. This scenario would be the worst-case scenario for developers and would amount to a hacker attack. Changing the internal state of a neural network without existing filters would be very easy. Just as with humans, every single stimulus means a change. Hence the saying: repetition breeds truth. Regardless of whether a fact is false or correct, if it is repeated often enough, it will be incorporated into the knowledge base. Regardless of whether it is an AI or a human knowledge base. It’s not for nothing that we speak of the individual. What makes us unique as individuals is the sum of our experiences. This statement also applies to a neural network. And this is precisely the crucial point as to why conversations with an AI are more likely to be a waste of time. If the purpose of such a conversation is therapeutic to encourage self-reflection, I rate the benefits as very high. All other applications are highly questionable. To support this statement, I would like to quote Joseph Weizenbaum again. In the book “Who Creates the Computer Myths?” there is a section entitled “A Virtual Conversation.” It describes how, in a film, questions and answers were compiled into a fictional conversation between Weizenbaum and his MIT colleague Marvin Minsky. Weizenbaum makes a telling statement about the concept of conversation in this section:
“…but of course it’s not a conversation between people either, because if I say something, it should change the state of my conversation partner. Otherwise, it’s just not a conversation.”
This is exactly what happens with all these AI conversations. The AI’s state isn’t changed. You keep talking to the machine until it eventually says things like, “Under these circumstances, your statement is correct.” Then you turn off the computer, and if you restart the program at a later point and ask the initial question again, you’ll receive a similar answer to the first time. However, this behavior is intentional by the operators and has been painstakingly built into the AI. So if you vehemently stick to your point, the AI switches to its charming mode and politely says yes and amen to everything. Because the goal is for you to come back and ask more questions. Here, too, it’s worth reading Weizenbaum. He once compared humanity’s amazing technological achievements. He talked about the content of television and the internet, which can be quite substantial. But as soon as a medium mutates into a mass medium, quality is consistently replaced by quantity.
Even between two human interlocutors, it’s becoming increasingly difficult to have a meaningful conversation. People quickly question what’s being said because it might not fit their own concept. Then they pull out their smartphones and quote the first article they find that supports their own views. Similar behavior can now be observed with AI. More and more people are relying on statements from ChatGPT and the like without checking their veracity. These people are then resistant to any argument, no matter how obvious. In conclusion, we have found in this entire chain of argumentation possible proof of why humanity’s intellectual capacity is massively threatened by AI and other mass media. Another very amusing point is the idea some people have that the profession of prompt engineer has a bright future. That is, people who tell AI what to do. Consider that not so long ago, it took a lot of effort to learn how to give a computer commands. The introduction of various language models now offers a way to use natural language to tell a computer what you want it to do. I find it rather sarcastic to suggest to people that being able to speak clear and concise sentences is the job of the future.
But I don’t want to end this article on such a negative note. I believe that AI is indeed a powerful tool in the right hands. I’ve become convinced that it’s better not to generate texts with AI. Its use in research should also be approached with great caution. A specialized AI in the hands of an expert can, on the other hand, produce high-quality and, above all, fast results.
Does someone really need to write about passwords again? – Of course not, but I’ll do it anyway. The topic of secure passwords is a perennial topic for a reason. In this constant game of cat and mouse between hackers and users, there’s only one viable solution: staying on top of things. Faster computers and the availability of AI systems are constantly reshuffling the deck. In cryptography, there’s an unwritten rule that simply keeping information secret isn’t sufficient protection. Rather, the algorithm for keeping it secret should be disclosed, and its security should be proven mathematically.
Security researchers are currently observing a trend toward using artificial intelligence to guess supposedly secure passwords. So far, one rule has been established when dealing with passwords: the longer a password, the more difficult it is to guess. We can test this fact with a simple combination lock. A three-digit combination lock has exactly 1,000 possible combinations. Now, the effort required to manually try all the numbers from 000 to 999 is quite manageable and, with a little skill, can be solved in less than 30 minutes. If you change the combination lock from three to five digits, this work multiplies, and finding the solution in less than 30 minutes becomes more a matter of luck, especially if the combination is in the lower number range. Security is further increased if each digit allows not only numbers from 0 to 9, but also letters, both upper and lower case.
This small and simple example shows how the ‘vicious circle’ works. Faster computers allow for trying out possible combinations in a shorter time, so the number of possible combinations must be driven immeasurably with the least possible effort. While in the early 2000s, eight digits with numbers and letters were sufficient, today it should ideally be 22 digits with numbers, upper and lower case, including special characters. Proton lumo’s AI makes the following recommendation:
Length at least 22 characters
Mixture: Uppercase/lowercase letters, numbers, special characters, underscore
A practical example of a secure password would be: R3gen!Berg_2025$Flug.
Here we see the first vulnerability. No one can remember such passwords. At work, someone might give you a password policy that you have to follow – oh well, that’s a shame, live with it! But don’t worry, there’s a life hack for everything.
That’s why it’s still common for employees to keep their passwords in close proximity to their PCs. Yes, they still keep them on little slips of paper under the keyboard or as Post-it notes on the edge of the screen. As an IT technician, when I want to log into a coworker’s PC while they’re not at their desk, I still glance over the edge of the screen and then look under the keyboard.
How do I know it’s the password? Sure! I look for a sequence of uppercase and lowercase letters, numbers, and special characters. If there were a Post-it stuck to the edge of my screen with, for example, the inscription “Wed Foot Care 10:45,” I wouldn’t even recognize it as a password at first.
So, as a password, “Wed Foot Care 10:45” would be 16 characters long, with upper and lower case letters, numbers, and special characters. Perfect! And at first, it wouldn’t even be recognizable as a password. By the way: The note should have as little dust or patina as possible.
In everyday working life, there are also such nice peculiarities that you have to change your password monthly, and the new password must not have been used in the last few months. Here, too, employees came up with solutions such as password01, password02, and so on, until all 12 months were completed. So there was an extended verification process, and now it had to contain a certain number of different characters.
But even in our private lives, we shouldn’t take the topic of secure passwords lightly. The services we regularly log in to have become an important part of many people’s lives. Online banking and social media are important points here. The number of online accounts is constantly growing. Of course, it’s clear that you shouldn’t recycle your passwords. So you should use multiple passwords. How best to go about this—how many and how to structure them—is something everyone has to decide for themselves, of course, in a way that suits them personally. But we’re not memory masters, and the less often we need a particular password, the harder it is for us to remember it. Password managers can help.
Password managers
The good old filing cabinet. By the way, battery life: infinite. Even if that might seem unworthy of a computer nerd, it’s still possibly the most effective way to store passwords at home.
With today’s number of passwords, management software is certainly attractive, but there’s a risk that if someone gains control of the software, they could have you – as our American friends colloquially say, “by the balls” – loosely translated into German: in a stranglehold. This rule applies especially to cloud solutions that seem convenient at first glance.
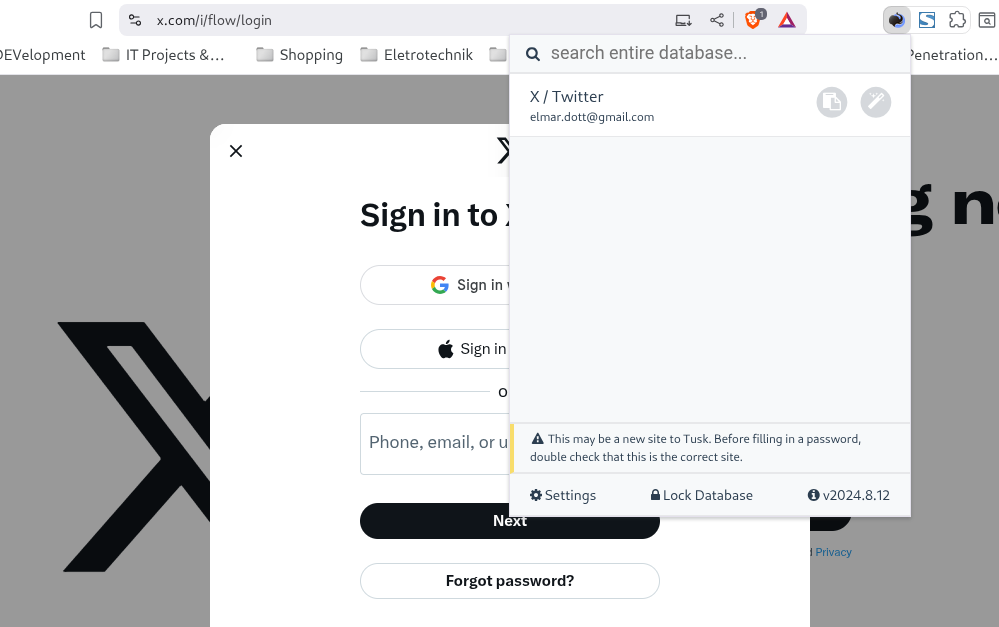
For Linux and Windows, however, there is a solution you can install on your computer to manage the many passwords of your online accounts. This software is called KeePass, is open source, and can also be used legally and free of charge in a commercial setting. This so-called password store stores the passwords encrypted on your hard drive. Of course, it’s quite tedious to copy and paste the login details from the password manager on every website. A small browser plugin called TUSK KeePass can help here. It’s available for all common browsers, including Brave, Firefox, and Opera. Even if other people are looking over your shoulder, your password will never be displayed in plain text. Copying and pasting will also delete it from your clipboard after a few minutes.
It’s a completely different story when you’re on the go and have to work on someone else’s computer. In your personal life, it’s a good idea to adapt passwords to the circumstances, depending on where you use them. Let’s say you want to log into your email account on a PC, but you may not be able to guarantee that you’re not being watched at all times.
At this point, it would certainly be counterproductive to dig out a cheat sheet with a password written down that follows the recommended guidelines: uppercase and lowercase letters, numbers, special characters, including Japanese and Cyrillic, if possible, which you then type character by character with your index finger using the eagle search system.
(with advanced keyboard layout also labeled ‘Kölsch’ instead of ‘Alt’)
If you’re not too bad at typing, meaning you can type a bit faster, you should use a password that you can type in 1-1.5 seconds. This will overwhelm a normal observer, especially if you use the Shift key discreetly while typing. You draw attention to your right hand while typing and discreetly use the Shift or Alt keys occasionally with your left hand.
Perhaps, at a cautious assessment, the leaking of your personal Tetris high score list doesn’t constitute a security-relevant loss. Access to online banking is a completely different matter. It’s therefore certainly sensible to use a separate password for financial transactions, a different one for less critical logins, and a simple one for “run-of-the-mill” registrations.
If you have the option to create alias email addresses, this is also very useful, since logging in usually requires not only a password but also an email address. If possible, having a unique email address there, created only for the corresponding site, can not only increase security but also give you the opportunity to become unreachable if you wish. Every now and then, for example, it happens that I receive advertisements, even though I’ve explicitly opted out of advertising. Strangely enough, these are usually the same ‘birds’ who, for example, don’t stick to their payment terms, which they promised before registration. So I simply take the most effective route and delete the alias email address → and that’s it!
Memorability
I’d also like to say a few words about the memorability of passwords. As we’ve seen in the article, it’s a good idea to use a different password for each online account, if possible. This way, we can avoid having our login to Facebook and other social media accounts affected if Sony’s PlayStation Store is hacked again and all customer data is stolen. Of course, there are now multi-factor authentication, authentication, and many other security solutions, but operators don’t always take care of them. Moreover, the motto in hacker circles is: Every problem has a solution.
To create a marketable password that meets all security criteria, we’ll use a simple approach. Our password consists of a very complex static part that, if possible, avoids any personal reference. As a mnemonic, we can use the image of an image, as in the initial example: a combination of an image (“Regen Berg”) and a year, complemented by another word (“Flug”). It’s also very popular to randomly replace letters with similar-looking numbers, such as replacing the E with a 3 or the I with a 1. To avoid limiting the number of possibilities and ensuring that all E’s are now a 3, we won’t do this for all E’s. This results in a static password part that might look like this: R3gen!Berg_2025$Flug. This static part is easy to remember. If we now need a password for our X login, we supplement the static part with a dynamic segment that applies only to our X account. The static part can be easily introduced with a special character like # and then supplemented with the reference to the login. This could look like this: sOCIAL.med1a-X. As mentioned several times, this is an idea that everyone can adapt to their own needs.
In conclusion
At work, you should always be aware that whoever logs into your account is also acting on your behalf. That is, under your identity.
It’s logical that things sometimes run much more smoothly if a colleague can just “check in” on you. The likelihood of this coming back to haunt you is certainly low as long as they handle your password carefully.
Of course, you shouldn’t underestimate the issue of passwords in general, but even if you lose a password: Life on the planet as we know it won’t change significantly. At least not because of that. I promise!
Nothing is as certain as change. This wisdom applies to virtually every area of our lives. The internet is also in a constant state of flux. However, the many changes in the technology sector are happening so rapidly that it’s almost impossible to keep up. Anyone who has based their business model on marketing through online channels is already familiar with the problem. Marketing will also continue to experience significant changes in the future, influenced by the availability of artificial intelligence.
Before we delve into the details in a little more detail, I would like to point out right away that by no means has everything become obsolete. Certainly, some agencies will not be able to continue to assert themselves in the future if they focus on traditional solutions. Therefore, it is also important for contractors to understand which marketing concepts can be implemented that will ultimately achieve their goals. Here, we believe that competence and creativity will not be replaced by AI. Nevertheless, successful agencies will not be able to avoid the targeted use of artificial intelligence. Let’s take a closer look at how internet user behavior has changed since the launch of ChatGPT around 2023. More and more people are accessing AI systems to obtain information. This naturally leads to a decline in traditional search engines like Google and others. Search engines per se are unlikely to disappear, as AI models also require an indexed database on which to operate. It’s more likely that people will no longer access search engines directly, but will instead have a personal AI assistant that evaluates all search queries for them. This also suggests that the number of freely available websites may decline significantly, as they will hardly be profitable due to a lack of visitors. What will replace them? Following current trends, it can be assumed that well-known and possibly new platforms such as Instagram, Facebook, and X will continue to gain market power. Short texts, graphics, and videos already dominate the internet. All of these facts already require a profound rethinking of marketing strategies.
They say dead live longer. Therefore, it would be wrong to completely neglect traditional websites and the associated SEO. Be aware of the business strategy you are pursuing with your internet/social media presence. As an agency, we specifically help our clients review and optimize existing strategies or develop entirely new ones. Questions are clarified as to whether you want to sell goods or services, or whether you want to be perceived as a center of expertise on a specific topic. Here, we follow the classic approach from search engine optimization, which is intended to generate qualified traffic. It is of little use to receive thousands of impressions when only a small fraction of them are interested in the topic. The previously defined marketing goals are promoted with cleverly distributed posts on websites and in social media. Of course, every marketing strategy stands or falls with the quality of the products or services offered. Once the customer feels they received a bad product or a service was too poor, a negative campaign can spread explosively. Therefore, it is highly desirable to receive honest reviews from real customers on various platforms. There are countless offers from dubious agencies that offer their clients the opportunity to generate a set number of followers, clicks, or reviews. The results quickly disappear once the service is no longer purchased. Besides, such generic posts created by bots are easy to spot, and many people now selectively ignore them. Thus, the effort is pointless. Furthermore, real reviews and comments are also an important tool for assessing the true external impact of your business. If you are constantly being told how great you are, you might be tempted to believe it. There are some stars who have experienced this firsthand.
Therefore, we rely on regular publications of high-quality content that are part of the marketing objective in order to generate attention. We try to use this attention to encourage user interaction, which in turn leads to greater visibility. Our AI models help us identify current trends in a timely manner so that we can incorporate them into our campaigns. Based on our experience, artificial intelligence allows us to create and schedule high-frequency publications for a relatively long campaign period. The time a post or comment goes live also influences success. There are isolated voices that suggest the end of agencies. The reasoning is often that many small business owners can now do all these great things that are part of marketing themselves thanks to AI. We don’t share this view. Many entrepreneurs simply don’t have the time to manage marketing independently across all channels. That’s why we rely on a healthy mix of manual work and automation in many steps. Because we believe that success doesn’t just happen in a test tube. We use our tools and experience to achieve qualitative individual results.
Windows 11 integrates an ominous history feature that records all interactions with the computer and most likely transmits them to Microsoft via telemetry. The countless laws passed by the EU and implemented by Germany to monitor citizens are also giving many people cause to rethink data protection and privacy. Our world is constantly evolving, and the digital world is changing considerably faster. It’s up to each individual how they want to deal with these changes. This article is intended to inspire you to learn more about Linux and security. Perhaps you’ll even feel like trying out the Kodachi Linux presented here for yourself. There are several ways you can try Kodachi Linux.
Virtual machine: Simply create a virtual machine with Kodachi Linux using the ISO file and the VirtualBox or VMWare program. You can also create and use these virtual machines from a Windows computer.
Booting from a USB stick: Tools like Disks (Linux) or Rufus (Windows) allow you to create bootable USB sticks. This allows you to boot your PC directly from the USB drive with Kodachi without affecting the operating system installed on the hard drive.
Native installation: You can also use the bootable USB stick to permanently install Kodachi Linux on your computer. This method is recommended if you already have experience with Kodachi.
Kodachi OS is, as the name suggests, a Japanese Linux distribution with a customized XFCE desktop. Kodachi are actually classic Japanese samurai swords, which already suggests a reference to security. Kodachi OS itself is a Xubuntu derivative and thus a grandchild of Ubuntu and a great-grandchild of Debian Linux. Kodachi Linux offers a highly secure, anti-forensic, and anonymous computing environment. It was designed with privacy in mind, with all the necessary features to ensure user trust and security.
Automatically established VPN connection
Pre-configured TOR connection
Running DNSCrypt service
The current version of Kodachi can be downloaded free of charge from the website [1]. With the downloaded ISO, you can now either create a bootable USB stick or install Kodachi in a virtual machine. We chose the option of creating a virtual machine with VMware.
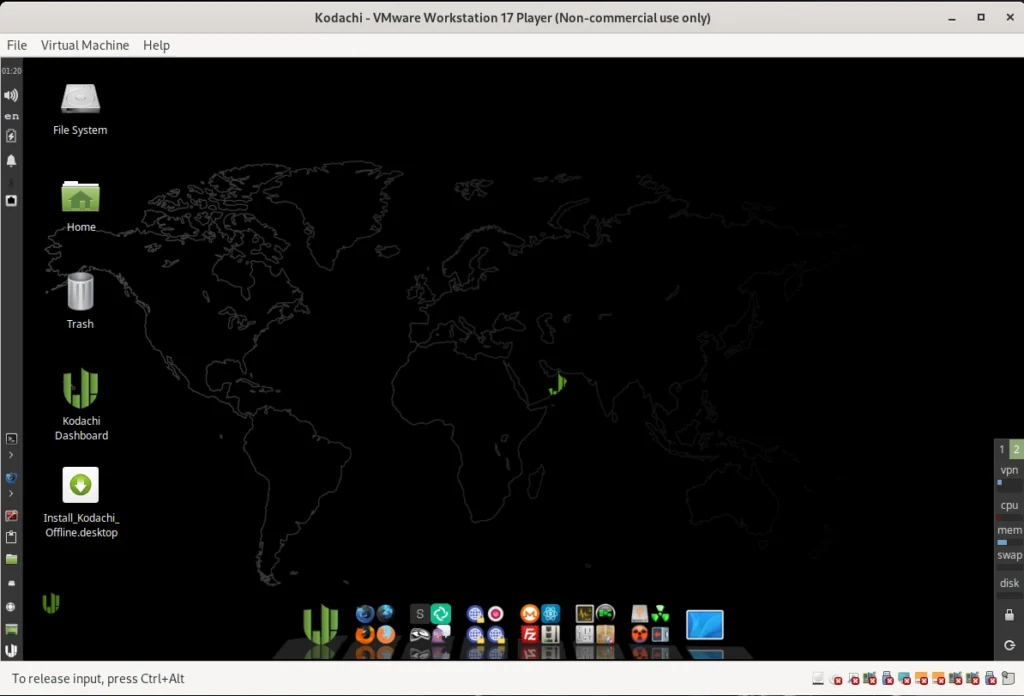
Installation is completed in just a few minutes thanks to the VMware Ubuntu template. For our test, we gave the VM 20 GB of hard drive space. To ensure smooth operation, we increased the RAM to 8 GB. If you don’t have that much RAM available, you can also work with 4 GB. After starting the VM, you will see the Kodachi OS desktop as shown in the screenshot below, version 8.27. For all Linux nerds, it should be noted that this version uses kernel 6.2. According to the website, they are already hard at work on the new version 9.
To keep the installation as simple as possible, even for beginners, user accounts have already been set up. The user is kodachi and has the password r@@t00 (00 are zeros). The administrator account is called root, as is usual in Linux, and also has the password r@@t00. Anyone who decides to permanently install Kodachi on their machine should at least change the passwords.
Unfortunately, the highest possible level of anonymity can only be achieved at the expense of browsing speed. Kodachi Linux therefore offers several profiles to choose from for different requirements.
Maximum Anonymity (Slower)
ISP → Router VPN → Kodachi VPN (VM NAT) → Torified System → Tor DNS → Kodachi Loaded Browser
Highly Anonymous (Slow)
ISP → Kodachi VPN → TOR Endpoint → Tor DNS → Kodachi Loaded Browser
Anonymous & Fast
ISP → Kodachi VPN → TOR Endpoint → Tor DNS → Kodachi Lite Browser
Moderate Anonymity
ISP → Kodachi VPN with Forced VPN Traffic → Tor DNS → Kodachi Loaded Browser
Standard Anonymity
ISP → Kodachi VPN → Torified System → Tor DNS → Kodachi Loaded Browser
Enhanced Anonymity with Double TOR
ISP → Kodachi VPN with Forced VPN Traffic → Tor Browser → Tor Browser
Double TOR Alternative
ISP → Kodachi VPN → Tor Browser → Tor Browser → Tor DNS
ISP → Kodachi VPN with forced VPN traffic → Kodachi loaded browser → Tor DNS
High speed and security
ISP → Kodachi VPN with forced VPN traffic → Kodachi lite browser → Tor DNS
Double security with DNScrypt
ISP → Kodachi VPN with forced VPN traffic → Tor browser → DNScrypt
Double security with Tor DNS
ISP → Kodachi VPN with forced VPN traffic → Tor browser → Tor DNS
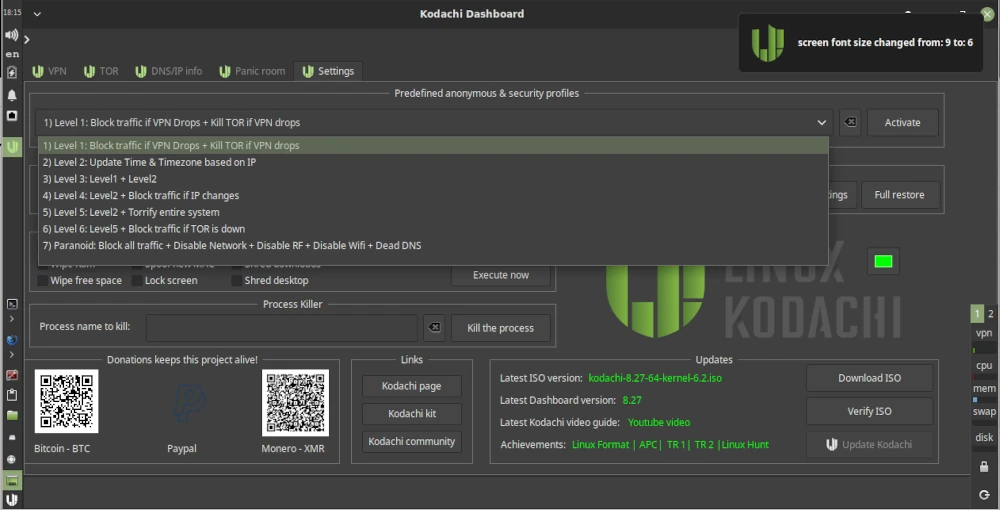
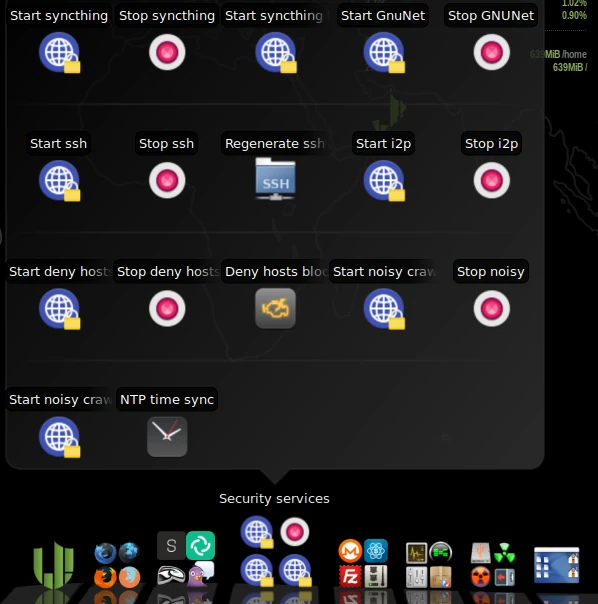
Now let’s get to the basics of using Kodachi. To do this, we open the dashboard, which we find as a shortcut on the desktop. After launching, we’ll see various tabs such as VPN, TOR, and Settings. Under Settings, we have the option to activate several profiles relevant to online security and privacy. As shown in the screenshot below, we select Level 1 and activate the profile.
In the lower panel, in the Security Services section, you’ll find various services that can be enabled, such as GnuNet. There are several options here that you can easily try out. GnuNet, for example, redirects all traffic to the TOR network. This, of course, means that pages take longer to fully load.
With Kodachi Linux’s built-in tools, you can significantly improve your security and anonymity while surfing the internet. While it may be a bit unusual to use at first, you’ll quickly get used to it. If you choose to use it as a live system or a virtual machine, you can easily familiarize yourself with the various programs and settings without damaging the guest operating system. Especially for beginners, using a VM eliminates the fear of breaking something while trying out different configurations.
If you do a little research on Kodachi Linux online, you’ll quickly find an article [2] from 2021 that is quite critical of Kodachi. The main criticism is that Kodachi is more of an Ubuntu distro with a customized look and feel, spiced up with a few shell scripts, than a standalone Linux. This criticism can’t be completely dismissed. If you take a closer look at the criticism, you’ll find that Kadochi does have some practical anonymization features. Nevertheless, it’s far from being a so-called hacker’s toolbox. The author of the review took another look at Kadochi in 2025 [3] and his conclusion for the current version is no different than his conclusion in 2021. Whether the upcoming version 9 of Kadochi Linux will take the points raised to heart remains to be seen.
The desire of website operators to obtain as much information as possible about their users is as old as the internet itself. Simple counters for page views or the recognition of the web browser and screen resolution are the simplest applications of user tracking. Today, website operators are no longer solely dependent on Google to collect information about their visitors. There are sufficient free tools available to maintain their own tracking server. In this article, I will briefly discuss the historical background, technologies, and social aspects.
As more and more companies ventured into the vastness of the internet around the turn of the millennium, interest in finding out more about website visitors began. Initially, they were content with placing so-called visitor counters on the homepage. These visitor counters often displayed quite outrageous numbers. The ego of website operators certainly played a role, as many visitors to the homepage have an external impact and also make a certain impression on visitors. However, anyone who seriously wanted to make money through their website quickly realized that fictitious numbers didn’t generate revenue. So, more reliable methods were needed.
To prevent users from being counted multiple times each time they accessed the homepage, they began storing the IP address and setting a one-hour timeout before counting again. This was then called a reload block. Of course, this wasn’t a reliable detection method. At that time, connections over the telephone network were common via modem, and it often happened that the connection would drop, requiring a new connection. Then, a new IP address was also assigned. The accuracy of this solution therefore had a lot of potential for improvement.
When web space with PHP and MySQL databases became affordable around 2005, the trend shifted to storing visited pages in small text files called cookies in the browser. These analyses were already very informative and helped companies see which articles people were interested in. The only problem was when suspicious users deleted their cookies at every opportunity. Therefore, the trend shifted to storing all requests on the server, in so-called sessions. In most use cases, the accuracy achieved in this way is sufficient to better match supply to demand.
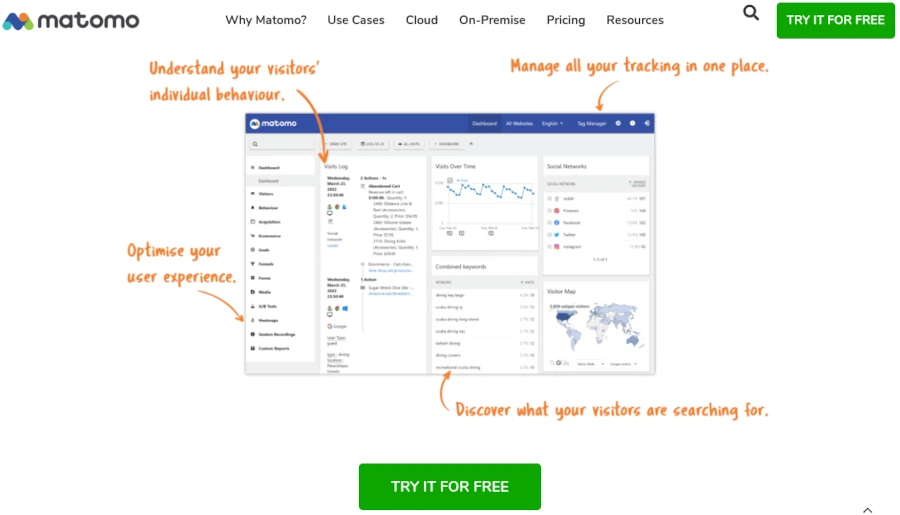
A popular tool for user tracking is Matomo, written in PHP. This self-hosted open source software allows you to bypass Google and also achieves better GDPR compliance, as the collected data is not shared with third parties. Furthermore, personalized data can be anonymized after a specified period of time, for example, at the beginning of the month. In this case, information such as IP addresses is replaced with random identifiers.
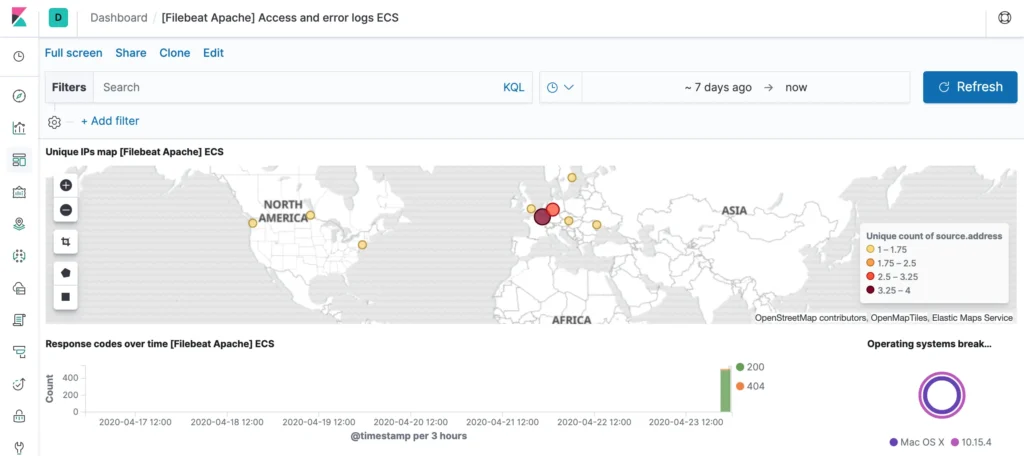
The whole issue is immediately taken to a whole new level when money is involved. In the past, it was companies that placed advertising banners on well-visited websites and then paid a small amount for every 1,000 ads. Nowadays, streaming services like Spotify or YouTube are interested in determining exactly how often a particular piece of content was viewed, or for how long a track was watched. Because the moment money is involved, there is a great interest in using small or large tricks to swindle a little more money than one is actually entitled to. This is precisely why companies like Google and Co. are constantly busy finding out how many users consume the content and for how long. In addition to tracking functions in the applications, these companies also use complex monitoring that can access original data from server logs and network traffic. This is where tools like the ELK stack or Prometheus and Grafana come into play.
Taking YouTube as an example, this service has several hurdles to overcome. Many people use YouTube as a TV replacement, as they can choose the content that interests them from a vast pool of content. A typical scenario is the automatic playback of ambient music for hours on end. If enough people do this without really paying attention to the content, it simply places a pointless burden on the server infrastructure and incurs considerable costs for the operator. This automatic autoplay function in the preview isn’t really interactive and is intended more as a teaser.
There are currently two strategies to keep users constantly engaged. One of these is short videos that run in a continuous loop until they manually move on to the next one. This allows you to mix in short advertising videos, but also to include news or opinion pieces. Of course, user tracking has to remove the repetitions during a monetized short on a continuous loop. This naturally leads to adjustments to the impression display. Another strategy used very excessively with long videos is disproportionately long ad breaks at relatively short intervals. This forces users to actively click away these ads each time, thus demanding attention.
Now, there are topics where services like YouTube, but also X or Facebook, have an interest in influencing their users in a certain direction. This could be the formation of opinions on political issues or simply commercialism. Now, one might think it would be a common strategy to suppress the visibility of undesirable opinions by adjusting the view count of the posts downwards. However, this wouldn’t be beneficial, because people have already seen the post. Therefore, a different strategy is much more effective. In the first step, the channel or post would be exempt from monetization, so the operator receives no additional compensation. In the next step, the number of views is increased, so that the content creator believes they are reaching a broad audience and takes fewer measures to gain more visibility. Additionally, using DevOps methods like A/B testing, feature flags, and load balancers, content views can be directed to posts only those who explicitly search for them. This avoids suspicion of censorship and significantly reduces visibility. Of course, unwanted posts only appear in recommendations for people who have explicitly subscribed to channels.
In the Netflix production “The Social Dilemma,” it is also lamented that bubbles are forming in which people with specific interests gather. This is an effect of so-called recommender systems. These recommenders are algorithms from the field of artificial intelligence. They function quite statically via statistical evaluations. Existing content is classified into categories, and then it is examined which groups of people are interested in a particular category and with what weighting. Content is then displayed accordingly, in proportion to the interests from that category. The content collected in this way can, of course, easily be marked with additional labels such as “well-suited” or “unsuitable.” Depending on the meta tags, unwanted content can then be buried in the depths of the database.
For all these measures to be effective, it is necessary to collect as much information about users as possible. This brings us back to user tracking. Tracking has become so sophisticated that browser settings that regularly delete cookies or the basic use of incognito mode are completely ineffective.
The only way to free yourself from dependence on the major platform providers is to consciously decide to no longer provide them with content. One step in this direction would be to operate your own website with appropriate monitoring for user tracking. Extensive content such as video and audio can be outsourced to several unknown platforms and embedded into the website. In this case, you should not upload all content to a single platform such as Odysee or Rumble, but rather cleverly distribute the content across multiple platforms without duplicating them. Such measures bind visitors to your own website and not to the respective platform operators.
Those with a little more financial freedom can also resort to free software such as PeerTube and host their own video platform. There are a number of options available here, but they require a great deal of effort and technical know-how from the operators.
AI tools such as Github Copilot, Chatgpt and other code generators change the developer role. Many programmers wonder which skills will be asked in the future. AI does not replace any developers. But developers without soft skills replace themselves.
“The best developers 2030 will not be a better code – but better translators between humans and machines.” Andrej Karpathy, ex-Openai
In June 2025, Microsoft deleted 9000 jobs [1]. Companies such as Microsoft, Google or IBM change their teams-and AI tools are often part of the strategy. One reason for these laying waves is the comprehensive availability of powerful AI tools. According to a study by McKinsey [2], AI systems can accelerate up to 60% of the Developer workload. If AI can do up to 80% of the coding, what makes me irreplaceable? More and more people are now asking themselves this central question because they are directly affected by the 4th industrial revolution or are affected in the foreseeable future.
Unlike earlier revolutions, there is no ‘retraining on web design’ this time. AI tools such as Devin or Chatgpt code not only automate tasks, but entire job profiles and faster than most of those affected can react. Studies show that up to 30% of all developer roles will not be converted by 2030, but are replaced by artificial intelligence.
This trend can be found in almost all professions, also in classic craft. On YouTube you can specifically search for videos, such as deliver small, cute robots orders in Moscow. Or as robots print out entire houses. New patents that affect steel shavings to concrete increase the stability and replace classic iron lichen. Machines that lay the floor tiles can also be seen. The list of activities that can be carried out by AI is long.
If you internalize this forecast, you can be afraid and worried. In order not only to survive in this new period, but even to be one of the winners, requires a high degree of flexibility. That is why one of the most important properties we have to develop will be a flexible spirit. Because although AI is very powerful, their limits are also set. If we only think about what defines us as humans, we find an important quality: creativity. How can we use this for future success? So that the statement: if your creativity does not become a platitude, I first look at the way how it will most likely become nothing.
Often junior developers ask me which framework, which programming Apache, which operating system etc. you should learn. These were the wrong questions in the old days. It’s not about following trends, but an appeal. If programming is to be a calling for me, it is first of all about understanding what the code you write really does. With a profound understanding of the source text, performance improvements can also be found quickly. Optimizations in the area of security are also included. But locating errors and their elimination are also characteristics of good developers. Because it is precisely in these areas that human creativity of artificial intelligence is superior. Of course, this means that as a consequence, it is consequently expanding exactly these skills.
Anyone who is only busy running after current fashion phenomena was not one of the specialists in demand in the ‘old’ time. Pure code of Monkeys their activities primarily consist of copying and inserting, without really grasping what the code snippets mean, were easy to replace. Especially now that AI is supposed to increase productivity, it is important to decide quickly and safely where a proposed implementation needs adjustments so that there are no unpleasant surprises when the application goes into production. Of course, this also means as a consequence that AI is a tool that needs to be used efficiently. In order to continue to stay on the winning page in the future, it is essential to significantly improve your own productivity by handling AI. Companies expect their employees that with the support of AI they can do a four to five times the current workload.
In order to be able to work effectively with artificial intelligence, your own communication skills are essential. Because only if you have clearly structured your thoughts can you formulate it correctly and specifically. A significant increase in performance can only be achieved if the desired result is achieved when the first instruction. Anyone who has to explain to the language model every time how inquiries can be understood, for example, because they contain amplifying, you will be able to achieve little time savings by AI.
You can basically say that the developer of the future should have some management skills. In addition to clear tasks, there will be a lot of self -management. To distribute suitable resources for optimal results. Because not only artificial intelligence threatens your own workplace, but also a strong competition from the Asian region. Well -trained, motivated and powerful people are now available in high numbers.
So we see that very moving times are coming up. The world will turn a little faster. Anyone who perceives these changes as a threat but as a challenge has a good chance of being fit for the no longer too long future. Anyone who already sets the course is well prepared for what will come to us and does not have to be afraid of anything.
For hobby programmers and professional software developers, information sources are essential. A small, manageable private library with timeless books about programming is therefore always a good thing. Unfortunately, the offer for IT literature is very extensive and the books often outdo it again quickly. In addition, for various reasons, some titles do not necessarily have the predicate worth reading. Some texts are very understandable. Others contain hardly any relevant information that can already be easily obtained from public sources. That’s why I took the trouble and put together my top 10 books on the topic of software development.
All titles have been published in English. Most of them were also translated into German. If you don’t have any difficulties reading English books, you should get the original, since the translations are sometimes a bit bumpy.
An important criterion for a selection is that the books are very general and are not limited to a specific version. In addition, I actually have the works proposed here on my bookshelf and therefore also read.
Effective Java 3rd Edition, J. Bloch, 2017, ISBN: 0-134-68599-7 | For all Java developers, the standard work with many background information about the functioning of the language and optimizations of your own source code.
The Linux Command Line 2nd Edition, W. Shotts, 2019, ISBN: 1-59327-952-3 | Linux is very important in software development, since not only cloud applications in Linux are deployed. It is all the more important to be able to move safely on the command line. This book is only devoted to dealing with the Bash and is suitable for all Linux distributions.
Angry Tests, Y. Bugayenko, 2025, ISBN: 978-1982063740 | Test driven software development is an important ability to ensure high quality. This book is not geared towards a specific programming language, but only deals with how to write meaningful test cases.
Clean Architecture, R. C. Martin, 2018, ISBN: 0-13-449416-4 | In addition to a demolition of the history of how the various programming paradigms are related to each other, the book describes fundamental architectural design styles. Not only for software architects, but also very worth reading for developers.
Mastering Regular Expressions 3rd Edition, J. E. F. Friedl, 2006, ISBN: 0-596-52812-4 | The absolute standard work on regular expressions. A must for anyone who really has to understand the topic.
Head First Design Pattern, Eric & Elisabeth Freeman, 2004, ISBN: 0-596-00712-4 | Design patterns are among the basic skills of every programmer. In this book, the individual concepts of the GOF patterns are discussed comprehensively. It is suitable for both entry and as a reference.
Advanced API Security 2nd Edition, P. Siriwardena, 2020, ISBN: 978-1-4842-2049-8 | API draft for Restful Services is now part of the standard repertoire of a developer. But the topic of security must not be neglected either. This book discusses new concepts that have been raised to the industrial standard. A good start for programmers who have not yet come into contact with Saml, Oauth and Open ConnectID.
SQL Antipatterns, B. Karwin, 2010, ISBN: 987-1-934356-55-5 | Even for seasoned programmers, databases are often a book with seven seals. Even if SQL statements are quickly written down and they also produce the desired result, significant problems can lead to significant problems in productive operation. This book describes why statements are carried out very slowly and how they can be formulated correctly.
Domain Driven Design, E. Evans, 2003, ISBN: 0-32-112521-5 | The connection between object -oriented programming (OOP) and database draft is made with the paradigm domain driven design.
The Art of Computer Programming I-IV, D.E. Knuth, 2021, ISBN: 0-137-93510-2 | Four individual books in the Schuber describe in a very mathematical way how algorithms work.
Cookie Consent
[EN] We use cookies to improve your experience on our site. By using our site, you consent to cookies.
[DE] Wir verwenden Cookies, um Ihre Erfahrungen auf unserer Website zu verbessern. Durch die Nutzung unserer Website stimmen Sie Cookies zu.
This website uses cookies
Websites store cookies to enhance functionality and personalise your experience. You can manage your preferences, but blocking some cookies may impact site performance and services.
Essential cookies enable basic functions and are necessary for the proper function of the website.
Name
Description
Duration
Cookie Preferences
This cookie is used to store the user's cookie consent preferences.
30 days
These cookies are needed for adding comments on this website.
Name
Description
Duration
comment_author
Used to track the user across multiple sessions.
Session
comment_author_email
Used to track the user across multiple sessions.
Session
comment_author_url
Used to track the user across multiple sessions.
Session
These cookies are used for managing login functionality on this website.
Name
Description
Duration
wordpress_logged_in
Used to store logged-in users.
Persistent
wordpress_sec
Used to track the user across multiple sessions.
15 days
wordpress_test_cookie
Used to determine if cookies are enabled.
Session
Statistics cookies collect information anonymously. This information helps us understand how visitors use our website.
Matomo is an open-source web analytics platform that provides detailed insights into website traffic and user behavior.