If you plan to get in touch with Java Enterprise, may in the beginning it’s a bit overwhelmed and confusing. But don’t worry It’s not so worst like it seems. To start with it, you just need to know some basics about the ideas and concepts.
The Java Series
last changed:
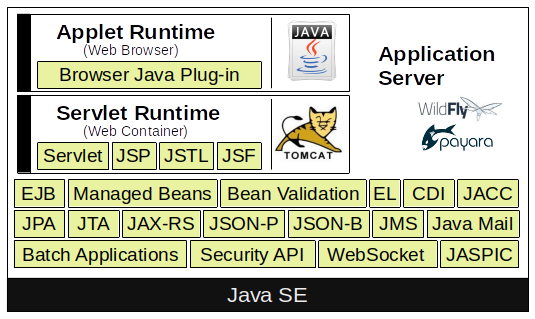
As first Java EE is not a tool nor a compiler you download and use it in the same manner like Java Development Kit (JDK) also known as Software Development Kit (SDK). Java Enterprise is a set of specifications. Those specifications are supported by an API and the API have a reference implementation. The reference implementation is a bundle you can download and it’s called Application Server.
Since Java EE 8 the Eclipse Foundation maintain Java Enterprise. Oracle and the Eclipse Foundation was not able to find a common agreement for the usage of the Java Trademark, which is owned by Oracle. The short version of this story is that the Eclipse Foundation renamed JavaEE to JakartaEE. This has also an impact to old projects, because the package paths was also changed in Jakarta EE 9 from javax to jakarta. Jakarta EE 9.1 upgrade all components from JDK 8 to JDK 11.
If you want to start with developing Jakarta Enterprise [1] applications you need some prerequisites. As first you have to choose the right version of the JDK. The JDK already contains the runtime environment Java Vitual Machine (JVM) in the same version like the JDK. You don’t need to install the JVM separately. A good choice for a proper JDK is always the latest LTS Version. Java 17 JDK got released 2021 and have support for 3 years until 2024.
If you wish to overcome the Oracle license restrictions you may could switch to an free Open Source implementation of the JDK. One of the most famous free available variant of the JDK is the OpenJDK from adoptium [2]. Another interesting implementation is GraalVM [3] which is build on top of the OpenJDK. The enterprise edition of GraalVM can speed up your application 1.3 times. For production system a commercial license of the enterprise edition is necessary. GraalVM includes also an own Compiler.
| Version | Year | JSR | Servlet | Tomcat | JavaSE |
| J2EE – 1.2 | 1999 | ||||
| J2EE – 1.3 | 2001 | JSR 58 | |||
| J2EE – 1.4 | 2003 | JSR 151 | |||
| Java EE 5 | 2006 | JSR 244 | |||
| Java EE 6 | 2009 | JSR 316 | |||
| Java EE 7 | 2013 | JSR 342 | |||
| Java EE 8 | 2017 | JSR 366 | |||
| Jakarta 8 | 2019 | 4.0 | 9.0 | 8 | |
| Jakarta 9 | 2020 | 5.0 | 10.0 | 8 & 11 | |
| Jakarta 9.1 | 2021 | 5.0 | 10.0 | 11 | |
| Jakarta 10 | 2022 | 6.0 | 10.1 | 11 | |
| Jakarta 11 | 2023 | 6.1 | 11.0 | 17 | |
| Jakarta 12 | under development | 6.2 | 21 |
The table above is not complete but the most important current versions are listed. Feel free to send me an message if you have some additional information are missing in this overview.
You need to be aware, that the Jakarta EE Specification needs a certain Java SDK and the Application Server maybe need as a runtime another Java JDK. Both Java Versions don’t have to be equal.
Dependencies (Maven):
<dependency>
    <groupId>jakarta.platform</groupId>
    <artifactId>jakarta.jakartaee-api</artifactId>
    <version>${version}</version>
    <scope>provided</scope>
</dependency>
<dependency>
<groupId>org.eclipse.microprofile</groupId>
<artifactId>microprofile</artifactId>
<version>${version}</version>
<type>pom</type>
<scope>provided</scope>
</dependency>In the next step you have to choose the Jakarta EE environment implementation. This means decide for an application server. It’s very important that the application server you choose can operate on the JVM version you had installed on your system. The reason is quite simple, because the application server is implemented in Java. If you plan to develop a Servlet project, it’s not necessary to operate a full application server, a simple Servlet Container like Apache Tomcat (Catalina) or Jetty contains everything is required.
Jakarta Enterprise reference implementations are: Payara (fork of Glassfish), WildFly (formerly known as JBoss), Apache Geronimo, Apache TomEE, Apache Tomcat, Jetty and so on.
May you heard about Microprofile [4]. Don’t get confused about it, it’s not that difficult like it seems in the beginnin. In general you can understand Microprofiles as a subset of JakartaEE to run Micro Services. Microprofiles got extended by some technologies to trace, observe and monitor the status of the service. Version 5 was released on December 2021 and is full compatible to JakartaEE 9.
Core Technologies
Plain Old Java Beans
POJOs are simplified Java Objects without any business logic. This type of Java Beans only contains attributes and its corresponding getters and setters. POJOs do not:
- Extend pre-specified classes: e. g. public class Test extends javax.servlet.http.HttpServlet is not considered to be a POJO class.
- Contain pre-specified annotations: e. g. @javax.persistence.Entity public class Test is not a POJO class.
- Implement pre-specified interfaces: e. g. public class Test implements javax.ejb.EntityBean is not considered to be a POJO class.
(Jakarta) Enterprise Java Beans
An EJB component, or enterprise bean, is a body of code that has fields and methods to implement modules of business logic. You can think of an enterprise bean as a building block that can be used alone or with other enterprise beans to execute business logic on the Java EE server.
Enterprise beans are either (stateless or stateful) session beans or message-driven beans. Stateless means, when the client finishes executing, the session bean and its data are gone. A message-driven bean combines features of a session bean and a message listener, allowing a business component to receive (JMS) messages asynchronously.
(Jakarta) Servlet
Java Servlet technology lets you define HTTP-specific Servlet classes. A Servlet class extends the capabilities of servers that host applications accessed by way of a request-response programming model. Although Servlets can respond to any type of request, they are commonly used to extend the applications hosted by web servers.
(Jakarta) Server Pages
JSP is a UI technology and lets you put snippets of Servlet code directly into a text-based document. JSP files transformed by the compiler to a Java Servlet.
(Jakarta) Server Pages Standard Tag Library
The JSTL encapsulates core functionality common to many JSP applications. Instead of mixing tags from numerous vendors in your JSP applications, you use a single, standard set of tags. JSTL has iterator and conditional tags for handling flow control, tags for manipulating XML documents, internationalization tags, tags for accessing databases using SQL, and tags for commonly used functions.
(Jakarta) Server Faces
JSF technology is a user interface framework for building web applications. JSF was introduced to solve the problem of JSP, where program logic and layout was extremely mixed up.
(Jakarta) Managed Beans
Managed Beans, lightweight container-managed objects (POJOs) with minimal requirements, support a small set of basic services, such as resource injection, lifecycle callbacks, and interceptors. Managed Beans represent a generalization of the managed beans specified by Java Server Faces technology and can be used anywhere in a Java EE application, not just in web modules.
(Jakarta) Persistence API
The JPA is a Java standards–based solution for persistence. Persistence uses an object/relational mapping approach to bridge the gap between an object-oriented model and a relational database. The Java Persistence API can also be used in Java SE applications outside of the Java EE environment. Hibernate and Eclipse Link are some reference Implementation for JPA.
(Jakarta) Transaction API
The JTA provides a standard interface for demarcating transactions. The Java EE architecture provides a default auto commit to handle transaction commits and rollbacks. An auto commit means that any other applications that are viewing data will see the updated data after each database read or write operation. However, if your application performs two separate database access operations that depend on each other, you will want to use the JTA API to demarcate where the entire transaction, including both operations, begins, rolls back, and commits.
(Jakarta) API for RESTful Web Services
The JAX-RS defines APIs for the development of web services built according to the Representational State Transfer (REST) architectural style. A JAX-RS application is a web application that consists of classes packaged as a servlet in a WAR file along with required libraries.
(Jakarta) Dependency Injection for Java
Dependency Injection for Java defines a standard set of annotations (and one interface) for use on injectable classes like Google Guice or the Sprig Framework. In the Java EE platform, CDI provides support for Dependency Injection. Specifically, you can use injection points only in a CDI-enabled application.
(Jakarta) Contexts & Dependency Injection for Java EE
CDI defines a set of contextual services, provided by Java EE containers, that make it easy for developers to use enterprise beans along with Java Server Faces technology in web applications. Designed for use with stateful objects, CDI also has many broader uses, allowing developers a great deal of flexibility to integrate different kinds of components in a loosely coupled but typesafe way.
(Jakarta) Bean Validation
The Bean Validation specification defines a metadata model and API for validating data in Java Beans components. Instead of distributing validation of data over several layers, such as the browser and the server side, you can define the validation constraints in one place and share them across the different layers.
(Jakarta) Message Service API
JMS API is a messaging standard that allows Java EE application components to create, send, receive, and read messages. It enables distributed communication that is loosely coupled, reliable, and asynchronous.
(Jakarta) EE Connector Architecture
The Java EE Connector Architecture is used by tools vendors and system integrators to create resource adapters that support access to enterprise information systems that can be plugged in to any Java EE product. A resource adapter is a software component that allows Java EE application components to access and interact with the underlying resource manager of the EIS. Because a resource adapter is specific to its resource manager, a different resource adapter typically exists for each type of database or enterprise information system.
The Java EE Connector Architecture also provides a performance-oriented, secure, scalable, and message-based transactional integration of Java EE platform–based web services with existing EISs that can be either synchronous or asynchronous. Existing applications and EISs integrated through the Java EE Connector Architecture into the Java EE platform can be exposed as XML-based web services by using JAX-WS and Java EE component models. Thus JAX-WS and the Java EE Connector Architecture are complementary technologies for enterprise application integration (EAI) and end-to-end business integration.
(Jakarta) Mail API
Java EE applications use the JavaMail API to send email notifications. The JavaMail API has two parts:
- An application-level interface used by the application components to send mail
- A service provider interface
The Java EE platform includes the JavaMail API with a service provider that allows application components to send Internet mail.
(Jakarta) Authorization Contract for Containers
The JACC specification defines a contract between a Java EE application server and an authorization policy provider. All Java EE containers support this contract. The JACC specification defines java.security.Permission classes that satisfy the Java EE authorization model. The specification defines the binding of container-access decisions to operations on instances of these permission classes. It defines the semantics of policy providers that use the new permission classes to address the authorization requirements of the Java EE platform, including the definition and use of roles.
(Jakarta) Authentication Service Provider Interface for Containers
The JASPIC specification defines a service provider interface (SPI) by which authentication providers that implement message authentication mechanisms may be integrated in client or server message-processing containers or runtimes. Authentication providers integrated through this interface operate on network messages provided to them by their calling containers. The authentication providers transform outgoing messages so that the source of each message can be authenticated by the receiving container, and the recipient of the message can be authenticated by the message sender. Authentication providers authenticate each incoming message and return to their calling containers the identity established as a result of the message authentication.
(Jakarta) EE Security API
The purpose of the Java EE Security API specification is to modernize and simplify the security APIs by simultaneously establishing common approaches and mechanisms and removing the more complex APIs from the developer view where possible. Java EE Security introduces the following APIs:
- SecurityContext interface: Provides a common, uniform access point that enables an application to test aspects of caller data and grant or deny access to resources.
- HttpAuthenticationMechanism interface: Authenticates callers of a web application, and is specified only for use in the servlet container.
- IdentityStore interface: Provides an abstraction of an identity store and that can be used to authenticate users and retrieve caller groups.
(Jakarta) Java API for WebSocket
WebSocket is an application protocol that provides full-duplex communications between two peers over TCP. The Java API for WebSocket enables Java EE applications to create endpoints using annotations that specify the configuration parameters of the endpoint and designate its lifecycle callback methods.
(Jakarta) Java API for JSON Processing
The JSON-P enables Java EE applications to parse, transform, and query JSON data using the object model or the streaming model.
JavaScript Object Notation (JSON) is a text-based data exchange format derived from JavaScript that is used in web services and other connected applications.
(Jakarta) Java API for JSON Binding
The JSON-B provides a binding layer for converting Java objects to and from JSON messages. JSON-B also supports the ability to customize the default mapping process used in this binding layer through the use of Java annotations for a given field, JavaBean property, type or package, or by providing an implementation of a property naming strategy. JSON-B is introduced in the Java EE 8 platform.
(Jakarta) Concurrency Utilities for Java EE
Concurrency Utilities for Java EE is a standard API for providing asynchronous capabilities to Java EE application components through the following types of objects: managed executor service, managed scheduled executor service, managed thread factory, and context service.
(Jakarta) Batch Applications for the Java Platform
Batch jobs are tasks that can be executed without user interaction. The Batch Applications for the Java Platform specification is a batch framework that provides support for creating and running batch jobs in Java applications. The batch framework consists of a batch runtime, a job specification language based on XML, a Java API to interact with the batch runtime, and a Java API to implement batch artifacts.
Resources
- [1] https://jakarta.ee
- [2] https://adoptopenjdk.net
- [3] https://www.graalvm.org
- [4] https://microprofile.io
- [5] https://tomcat.apache.org/whichversion.html
Notice: I try to keep this post up to date, but mistakes could happen. Please feel free to drop me a message, if you detected some mistakes or if you have some suggestions. If you like this article it would be great to leave a thumbs up and share with friends and colleges.


![jConf Peru 2021 [2]](https://elmar-dott.com/wp-content/uploads/2021-JCONF-Peru-Deploy-MVN-Central.webp)