So that we can call console programs directly across the system without having to specify the full path, we use the so-called path variable. So we save the entire path including the executable program, the so-called executable, in this path variable so that we no longer have to specify the path including the executable on the command line. By the way, the word executable derives the file extension exe, which is common in Windows. Here we also have a significant difference between the two operating systems Windows and Linux. While Windows knows whether it is a pure ASCII text file or an executable file via the file extension such as exe or txt, Linux uses the file’s meta information to make this distinction. That’s why it’s rather unusual to use these file extensions txt and exe under Linux.
Typical use cases for setting the path variable are programming languages such as Java or tools such as the Maven build tool. For example, if we downloaded Maven from the official homepage, we can unpack the program anywhere on our system. On Linux the location could be /opt/maven and on Microsoft Windows it could be C:/Program Files/Maven. In this installation directory there is a subdirectory /bin in which the executable programs are located. The executable for Maven is called mvn and in order to output the version, under Linux without the entry in the path variable the command would be as follows: /opt/maven/bin/mvn -v. So it’s a bit long, as we can certainly admit. Entering the Maven installation directory in the path shortens the entire command to mvn -v. By the way, this mechanism applies to all programs that we use as a command in the console.
Before I get to how the path variable can be adjusted under Linux and Windows, I would like to introduce another concept, the system variable. System variables are global variables that are available to us in Bash. The path variable also counts as a system variable. Another system variable is HOME, which points to the logged in user’s home directory. System variables are capitalized and words are separated with an underscore. For our example with entering the Maven Executable in the path, we can also set our own system variable. The M2_HOME convention applies to Maven and JAVA_HOME applies to Java. As a best practice, you bind the installation directory to a system variable and then use the self-defined system variable to expand the path. This approach is quite typical for system administrators who simplify their server installation using system variables. Because these system variables are global and can also be read by automation scripts.
The command line, also known as shell, bash, console and terminal, offers an easy way to output the value of the system variable with echo. Using the example of the path variable, we can immediately see the difference to Linux and Windows. Linux: echo $PATH Windows: echo %PATH%
Let’s start with the simplest way to set the path variable. In Linux we just need to edit the hidden .bashrc file. At the end of the file we add the following lines and save the content.
We bind the installation directory to the M2_HOME variable. We then expand the path variable to include the M2_HOME system variable with the addition of the subdirectory of executable files. This procedure is also common on Windows systems, as it allows the installation path of an application to be found and adjusted more quickly. After modifying the .bashrc file, the terminal must be restarted for the changes to take effect. This procedure ensures that the entries are not lost even after the computer is restarted.
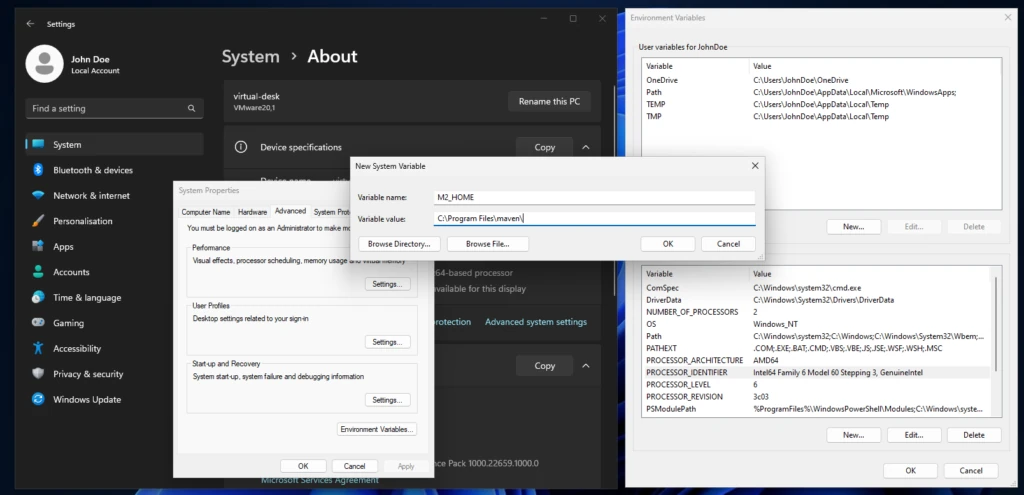
Under Windows, the challenge is simply to find the input mask where the system variables can be set. In this article I will limit myself to the version for Windows 11. It may of course be that the way to edit the system variables has changed in a future update. There are slight variations between the individual Windows versions. The setting then applies to both the CMD and PowerShell. The screenshot below shows how to access the system settings in Windows 11.
To do this, we right-click on an empty area on the desktop and select the System entry. In the System – About submenu you will find the system settings, which open the System properties popup. In the system settings we press the Environment Variables button to get the final input mask. After making the appropriate adjustments, the console must also be restarted for the changes to take effect.
In this little help, we learned about the purpose of system variables and how to store them permanently on Linux and Windows. We can then quickly check the success of our efforts in the shell using echo by outputting the contents of the variables. And we are now one step closer to becoming an IT professional.
The PHP programming language has been the first choice for many developers in the field of web applications for decades. Since the introduction of object-oriented language features with version 5, PHP has come of age. Large projects can now be implemented in a clean and, above all, maintainable architecture. A striking difference between commercial software development and a hobbyist who has assembled and maintains a club’s website is the automated verification that the application adheres to specified specifications. This brings us into the realm of automated software testing.
A key principle of automated software testing is that it verifies, without additional interaction, that the application exhibits a predetermined behavior. Software tests cannot guarantee that an application is error-free, but they do increase quality and reduce the number of potential errors. The most important aspect of automated software testing is that behavior already defined in tests can be quickly verified at any time. This ensures that if developers extend an existing function or optimize its execution speed, the existing functionality is not affected. In short, we have a powerful tool for ensuring that we haven’t broken anything in our code without having to laboriously click through all the options manually each time.
To be fair, it’s also worth mentioning that the automated tests have to be developed, which initially takes time. However, this ‘supposed’ extra effort quickly pays off once the test cases are run multiple times to ensure that the status quo hasn’t changed. Of course, the created test cases also have to be maintained.
If, for example, an error is detected, you first write a test case that replicates the error. The repair is then successfully completed if the test case(s) pass. However, changes in the behavior of existing functionality always require corresponding adaptation of the associated tests. This concept of writing tests in parallel to implement the function is feasible in many programming languages and is called test-driven development. From my own experience, I recommend taking a test-driven approach even for relatively small projects. Small projects often don’t have the complexity of large applications, which also require some testing skills. In small projects, however, you have the opportunity to develop your skills within a manageable framework.
Test-driven software development is nothing new in PHP either. Sebastian Bergmann’s unit testing framework PHPUnit has been around since 2001. The PEST testing framework, released around 2021, builds on PHPUnit and extends it with a multitude of new features. PEST stands for PHP Elegant Testing and defines itself as a next-generation tool. Since many agencies, especially smaller ones, that develop their software in PHP generally limit themselves to manual testing, I would like to use this short article to demonstrate how easy it is to use PEST. Of course, there is a wealth of literature on the topic of test-driven software development, which focuses on how to optimally organize tests in a project. This knowledge is ideal for developers who have already taken their first steps with testing frameworks. These books teach you how to develop independent, low-maintenance, and high-performance tests with as little effort as possible. However, to get to this point, you first have to overcome the initial hurdle: installing the entire environment.
A typical environment for self-developed web projects is the Laravel framework. When creating a new Laravel web project, you can choose between PHPUnit and PEST. Laravel takes care of all the necessary details. A functioning PHP environment is required as a prerequisite. This can be a Docker container, a native installation, or the XAMPP server environment from Apache Friends. For our short example, I’ll use the PHP CLI on Debian Linux.
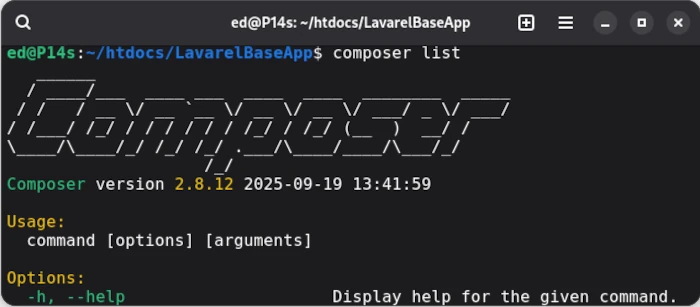
After executing the command in the console, you can test the installation success using the php -v command. The next step is to use a package manager to deploy other PHP libraries for our application. Composer is one such package manager. It can also be quickly deployed to the system with just a few instructions.
This downloads the current version of the composer.phar file to the current directory in which the command is executed. The correct hash is also automatically checked. To make Composer globally available via the command line, you can either include the path in the path variable or link composer.phar to a directory whose path is already integrated into Bash. I prefer the latter option and achieve this with:
ln -d composer.phar $HOME/.local/bin/composer
If everything was executed correctly, composer list should now display the version, including the available commands. If this is the case, we can install the Lavarel installer globally in the Composer repository.
php composer global require laravel/installer
To install Lavarel via Bash, the path variable COMPOSER_HOME must be set. To find out where Composer created the repository, simply use the command composer config -g home. The resulting path, which in my case is /home/ed/.config/composer, is then bound to the variable COMPOSER_HOME. We can now run
php $COMPOSER_HOME/vendor/bin/laravel new MyApp
in an empty directory to create a new Laravel project. The corresponding console output looks like this:
ed@P14s:~/Downloads/test$ php $COMPOSER_HOME/vendor/bin/laravel newMyApp _ _|||||| __ _ _ __ __ ___ _____||||/ _` | __/ _` \ \ // _ \ |||___|(_||||(_||\ V / __/||______\__,_|_| \__,_| \_/ \___|_| ┌ Which starter kit would you like to install? ────────────────┐ │ None │ └──────────────────────────────────────────────────────────────┘ ┌ Which testing framework do you prefer? ──────────────────────┐ │ Pest │ └──────────────────────────────────────────────────────────────┘Creating a "laravel/laravel" project at "./MyApp"Installing laravel/laravel (v12.4.0)- Installing laravel/laravel (v12.4.0): Extracting archiveCreated project in /home/ed/Downloads/test/MyAppLoading composer repositories with package information
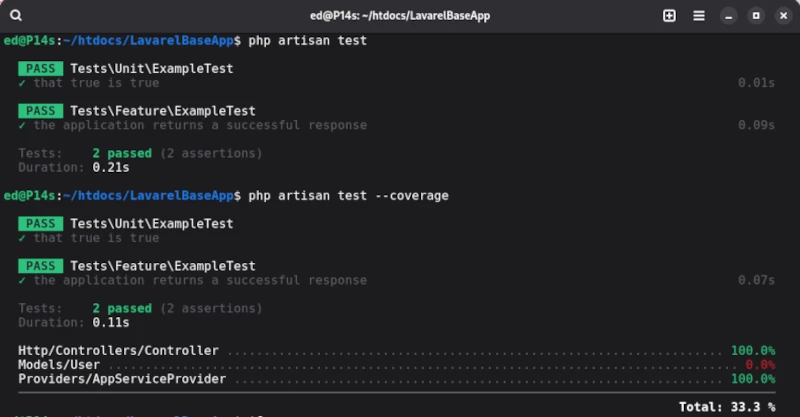
The directory structure created in this way contains the tests folder, where the test cases are stored, and the phpunit.xml file, which contains the test configuration. Laravel defines two test suites: Unit and Feature, each of which already contains a demo test. To run the two demo test cases, we use the artisan command-line tool [1] provided by Laravel. To run the tests, simply enter the php artisan test command in the root directory.
In order to assess the quality of the test cases, we need to determine the corresponding test coverage. We also obtain the coverage using artisan with the test statement, which is supplemented by the --coverage parameter.
php artisan test --coverage
The output for the demo test cases provided by Laravel is as follows:
Unfortunately, artisan’s capabilities for executing test cases are very limited. To utilize PEST’s full functionality, the PEST executor should be used right from the start.
php ./vendor/bin/pest -h
The PEST executor can be found in the vendor/bin/pest directory, and the -h parameter displays help. In addition to this detail, we’ll focus on the tests folder, which we already mentioned. In the initial step, two test suites are preconfigured via the phpunit.xml file. The test files themselves should end with the suffix Test, as in the ExampleTest.php example.
Compared to other test suites, PEST attempts to support as many concepts of automated test execution as possible. To maintain clarity, each test level should be stored in its own test suite. In addition to classic unit tests, browser tests, stress tests, architecture tests, and even the newly emerging mutation testing are supported. Of course, this article can’t cover all aspects of PEST, and there are now many high-quality tutorials available for writing classic unit tests in PEST. Therefore, I’ll limit myself to an overview and a few less common concepts.
Architecture test
The purpose of architectural tests is to provide a simple way to verify whether developers are adhering to the specifications. This includes, among other things, ensuring that classes representing data models are located in a specified directory and may only be accessed via specialized classes.
This form of testing is something new. The purpose of the exercise is to create so-called mutants by making changes, for example, to the conditions of the original implementation. If the tests assigned to the mutants continue to run correctly instead of failing, this can be a strong indication that the test cases may be faulty and lack meaningfulness.
Original: if(TRUE) → Mutant: if(FALSE)
Stress-Test
Another term for stress tests is penetration testing, which focuses specifically on the performance of an application. This allows you to ensure that the web app, for example, can handle a defined number of accesses.
Of course, there are many other helpful features available. For example, you can group tests and then run the groups individually.
For those who don’t work with the Lavarel framework but still want to test in PHP with PEST, you can also integrate the PEST framework into your application. All you need to do is define PEST as a corresponding development dependency in the Composer project configuration. Then, you can initiate the initial test setup in the project’s root directory.
php ./vendor/bin/pest --init
As we’ve seen, the options briefly presented here alone are very powerful. The official PEST documentation is also very detailed and should generally be your first port of call. In this article, I focused primarily on minimizing the entry barriers for test-driven development in PHP. PHP now also offers a wealth of options for implementing commercial software projects very efficiently and reliably.
Over the course of the many hours they spend in front of this amazing device, almost every computer user will find themselves in need of saving the screen content as a graphic. The process of creating an image of the monitor’s contents is what seasoned professionals call taking a screenshot.
As with so many things, there are many ways to achieve a screenshot. Some very resourceful people solve the problem by simply pointing their smartphone at the monitor and taking a photo. Why not? As long as you can still recognize something afterwards, everything’s fine. But this short guide doesn’t end there; we’ll take a closer look at the many ways to create screenshots. Even professionals who occasionally write instructions, for example, have to overcome one or two pitfalls.
Before we get to the nitty-gritty, it’s important to mention that it makes a difference whether you want to save the entire screen, the browser window, or even the invisible area of a website as a screenshot. The solution presented for the web browser works pretty much the same for all web browsers on all operating systems. Screenshots intended to cover the monitor area and not a web page use the technologies of the existing operating system. For this reason, we also differentiate between Linux and Windows. Let’s start with the most common scenario: browser screenshots.
Browser
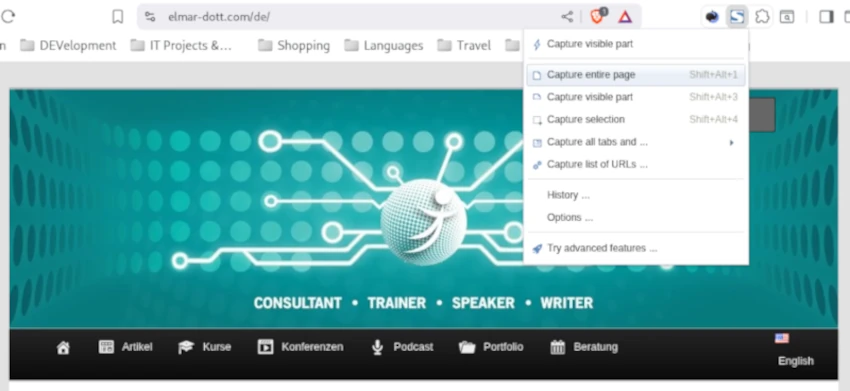
Especially when ordering online, many people feel more comfortable when they can additionally document their purchase with a screenshot. It’s also not uncommon to occasionally save instructions from a website for later use. When taking screenshots of websites, one often encounters the problem that a single page is longer than the area displayed on the monitor. Naturally, the goal is to save the entire content, not just the displayed area. For precisely this case, our only option is a browser plugin. Fireshot is a plug-in available for all common browsers, such as Brave, Firefox, and Microsoft Edge, that allows us to create screenshots of websites, including hidden content. Fireshot is a browser extension that has been on the market for a very long time. Fireshot comes with a free version, which is already sufficient for the scenario described. Anyone who also needs an image editor when taking screenshots, for example, to highlight areas and add labels, can use the paid Pro version. The integrated editor has the advantage of significantly accelerating workflows in professional settings, such as when creating manuals and documentation. Of course, similar results can be achieved with an external photo editor like GIMP. GIMP is a free image editing program, similarly powerful and professional as the paid version of Photoshop, and is available for Windows and Linux.
Linux
If we want to take screenshots outside of the web browser, we can easily use the operating system’s built-in tools. In Linux, you don’t need to install any additional programs; everything you need is already there. Pressing the Print key on the keyboard opens the tool. You simply have to drag the mouse around the area you want to photograph and press Capture in the control field that appears. It’s not a problem if the control area is in the visible area of the screenshot; it won’t be shown in the screenshot. On German keyboards, you often find the Print key instead of Print. The finished screenshot then ends up in the Screenshots folder with a timestamp in the file name. This folder is a subfolder of Pictures in the user directory.
Windows
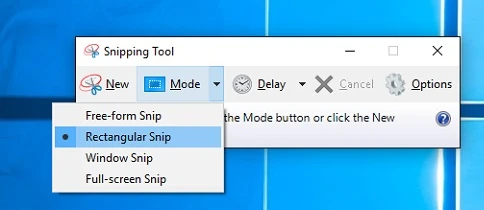
The easiest way to take screenshots in Windows is to use the Snipping Tool, which is usually included with your Windows installation. It’s also intuitive to use.
Another very old way in Windows, without a dedicated screenshot creation program, is to press the Ctrl and Print Screen keys simultaneously. Then, open a graphics program, such as Paint, which is included in every Windows installation. In the drawing area, press Ctrl + V simultaneously, and the screenshot appears and can be edited immediately.
These screenshots are usually created in JPG format. JPG is a lossy compression method, so you should check the readability after taking the screenshot. Especially with current monitors with resolutions around 2000 pixels, using the image on a website requires manual post-processing. One option is to reduce the resolution from just under 2000 pixels to the usual 1000 pixels on a website. Ideally, the scaled and edited graphic should be saved in the new WEBP format. WEBP is a lossless graphics compression method that further reduces the file size compared to JPG, which is very beneficial for website loading times.
This already covers a good range of possibilities for taking screenshots. Of course, more could be said about this, but that falls into the realm of graphic design and the efficient use of image editing software.
Does someone really need to write about passwords again? – Of course not, but I’ll do it anyway. The topic of secure passwords is a perennial topic for a reason. In this constant game of cat and mouse between hackers and users, there’s only one viable solution: staying on top of things. Faster computers and the availability of AI systems are constantly reshuffling the deck. In cryptography, there’s an unwritten rule that simply keeping information secret isn’t sufficient protection. Rather, the algorithm for keeping it secret should be disclosed, and its security should be proven mathematically.
Security researchers are currently observing a trend toward using artificial intelligence to guess supposedly secure passwords. So far, one rule has been established when dealing with passwords: the longer a password, the more difficult it is to guess. We can test this fact with a simple combination lock. A three-digit combination lock has exactly 1,000 possible combinations. Now, the effort required to manually try all the numbers from 000 to 999 is quite manageable and, with a little skill, can be solved in less than 30 minutes. If you change the combination lock from three to five digits, this work multiplies, and finding the solution in less than 30 minutes becomes more a matter of luck, especially if the combination is in the lower number range. Security is further increased if each digit allows not only numbers from 0 to 9, but also letters, both upper and lower case.
This small and simple example shows how the ‘vicious circle’ works. Faster computers allow for trying out possible combinations in a shorter time, so the number of possible combinations must be driven immeasurably with the least possible effort. While in the early 2000s, eight digits with numbers and letters were sufficient, today it should ideally be 22 digits with numbers, upper and lower case, including special characters. Proton lumo’s AI makes the following recommendation:
Length at least 22 characters
Mixture: Uppercase/lowercase letters, numbers, special characters, underscore
A practical example of a secure password would be: R3gen!Berg_2025$Flug.
Here we see the first vulnerability. No one can remember such passwords. At work, someone might give you a password policy that you have to follow – oh well, that’s a shame, live with it! But don’t worry, there’s a life hack for everything.
That’s why it’s still common for employees to keep their passwords in close proximity to their PCs. Yes, they still keep them on little slips of paper under the keyboard or as Post-it notes on the edge of the screen. As an IT technician, when I want to log into a coworker’s PC while they’re not at their desk, I still glance over the edge of the screen and then look under the keyboard.
How do I know it’s the password? Sure! I look for a sequence of uppercase and lowercase letters, numbers, and special characters. If there were a Post-it stuck to the edge of my screen with, for example, the inscription “Wed Foot Care 10:45,” I wouldn’t even recognize it as a password at first.
So, as a password, “Wed Foot Care 10:45” would be 16 characters long, with upper and lower case letters, numbers, and special characters. Perfect! And at first, it wouldn’t even be recognizable as a password. By the way: The note should have as little dust or patina as possible.
In everyday working life, there are also such nice peculiarities that you have to change your password monthly, and the new password must not have been used in the last few months. Here, too, employees came up with solutions such as password01, password02, and so on, until all 12 months were completed. So there was an extended verification process, and now it had to contain a certain number of different characters.
But even in our private lives, we shouldn’t take the topic of secure passwords lightly. The services we regularly log in to have become an important part of many people’s lives. Online banking and social media are important points here. The number of online accounts is constantly growing. Of course, it’s clear that you shouldn’t recycle your passwords. So you should use multiple passwords. How best to go about this—how many and how to structure them—is something everyone has to decide for themselves, of course, in a way that suits them personally. But we’re not memory masters, and the less often we need a particular password, the harder it is for us to remember it. Password managers can help.
Password managers
The good old filing cabinet. By the way, battery life: infinite. Even if that might seem unworthy of a computer nerd, it’s still possibly the most effective way to store passwords at home.
With today’s number of passwords, management software is certainly attractive, but there’s a risk that if someone gains control of the software, they could have you – as our American friends colloquially say, “by the balls” – loosely translated into German: in a stranglehold. This rule applies especially to cloud solutions that seem convenient at first glance.
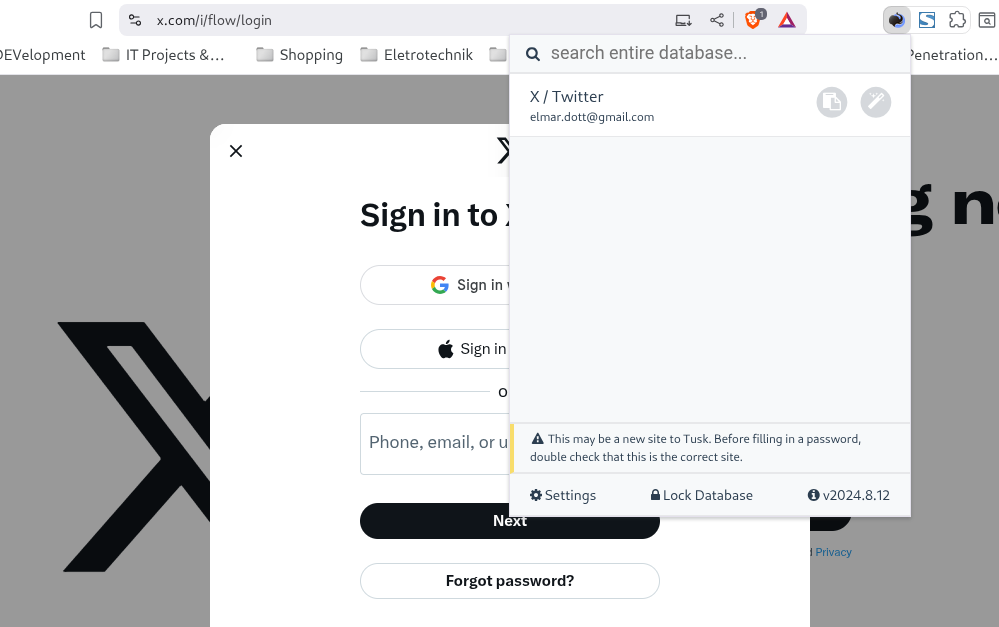
For Linux and Windows, however, there is a solution you can install on your computer to manage the many passwords of your online accounts. This software is called KeePass, is open source, and can also be used legally and free of charge in a commercial setting. This so-called password store stores the passwords encrypted on your hard drive. Of course, it’s quite tedious to copy and paste the login details from the password manager on every website. A small browser plugin called TUSK KeePass can help here. It’s available for all common browsers, including Brave, Firefox, and Opera. Even if other people are looking over your shoulder, your password will never be displayed in plain text. Copying and pasting will also delete it from your clipboard after a few minutes.
It’s a completely different story when you’re on the go and have to work on someone else’s computer. In your personal life, it’s a good idea to adapt passwords to the circumstances, depending on where you use them. Let’s say you want to log into your email account on a PC, but you may not be able to guarantee that you’re not being watched at all times.
At this point, it would certainly be counterproductive to dig out a cheat sheet with a password written down that follows the recommended guidelines: uppercase and lowercase letters, numbers, special characters, including Japanese and Cyrillic, if possible, which you then type character by character with your index finger using the eagle search system.
(with advanced keyboard layout also labeled ‘Kölsch’ instead of ‘Alt’)
If you’re not too bad at typing, meaning you can type a bit faster, you should use a password that you can type in 1-1.5 seconds. This will overwhelm a normal observer, especially if you use the Shift key discreetly while typing. You draw attention to your right hand while typing and discreetly use the Shift or Alt keys occasionally with your left hand.
Perhaps, at a cautious assessment, the leaking of your personal Tetris high score list doesn’t constitute a security-relevant loss. Access to online banking is a completely different matter. It’s therefore certainly sensible to use a separate password for financial transactions, a different one for less critical logins, and a simple one for “run-of-the-mill” registrations.
If you have the option to create alias email addresses, this is also very useful, since logging in usually requires not only a password but also an email address. If possible, having a unique email address there, created only for the corresponding site, can not only increase security but also give you the opportunity to become unreachable if you wish. Every now and then, for example, it happens that I receive advertisements, even though I’ve explicitly opted out of advertising. Strangely enough, these are usually the same ‘birds’ who, for example, don’t stick to their payment terms, which they promised before registration. So I simply take the most effective route and delete the alias email address → and that’s it!
Memorability
I’d also like to say a few words about the memorability of passwords. As we’ve seen in the article, it’s a good idea to use a different password for each online account, if possible. This way, we can avoid having our login to Facebook and other social media accounts affected if Sony’s PlayStation Store is hacked again and all customer data is stolen. Of course, there are now multi-factor authentication, authentication, and many other security solutions, but operators don’t always take care of them. Moreover, the motto in hacker circles is: Every problem has a solution.
To create a marketable password that meets all security criteria, we’ll use a simple approach. Our password consists of a very complex static part that, if possible, avoids any personal reference. As a mnemonic, we can use the image of an image, as in the initial example: a combination of an image (“Regen Berg”) and a year, complemented by another word (“Flug”). It’s also very popular to randomly replace letters with similar-looking numbers, such as replacing the E with a 3 or the I with a 1. To avoid limiting the number of possibilities and ensuring that all E’s are now a 3, we won’t do this for all E’s. This results in a static password part that might look like this: R3gen!Berg_2025$Flug. This static part is easy to remember. If we now need a password for our X login, we supplement the static part with a dynamic segment that applies only to our X account. The static part can be easily introduced with a special character like # and then supplemented with the reference to the login. This could look like this: sOCIAL.med1a-X. As mentioned several times, this is an idea that everyone can adapt to their own needs.
In conclusion
At work, you should always be aware that whoever logs into your account is also acting on your behalf. That is, under your identity.
It’s logical that things sometimes run much more smoothly if a colleague can just “check in” on you. The likelihood of this coming back to haunt you is certainly low as long as they handle your password carefully.
Of course, you shouldn’t underestimate the issue of passwords in general, but even if you lose a password: Life on the planet as we know it won’t change significantly. At least not because of that. I promise!
We already have a guide with GPT4all on how to run your own local LLM. Unfortunately, the previous solution has a small limitation. It cannot process documents such as PDFs. In this new workshop, we will install AnythingLLM with Ollama to be able to analyze documents.
The minimum requirement for this workshop is a computer with 16 GB of RAM, ideally with Linux (Mint, Ubuntu, or Debian) installed. With a few adjustments, this guide can also be followed on Windows and Apple computers. The lower the hardware resources, the longer the response times.
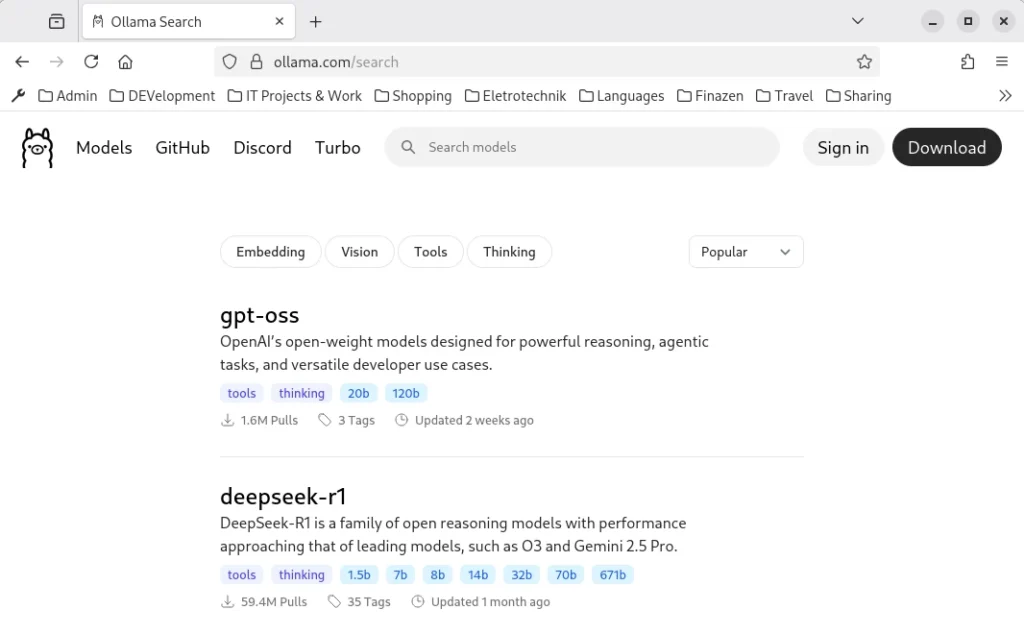
Let’s start with the first step and install Ollama. To do this, open Bash and use the following command: sudo curl -fsSL https://ollama.com/install.sh | sh. This command downloads Ollama and executes the installation script. For the installation to begin, you must enter the administrator password. Ollama is a command-line program that is controlled via the console. After successful installation, a language model must be loaded. Corresponding models can be found on the website https://ollama.com/search.
Proven language models include:
lama 3.1 8B: Powerful for more demanding applications.
Phi-3-5 3B: Well-suited for logical reasoning and multilingualism.
Llama 3.3 2B: Efficient for applications with limited resources.
Phi 4 14B: State-of-the-art model with increased hardware requirements but performance comparable to significantly larger models.
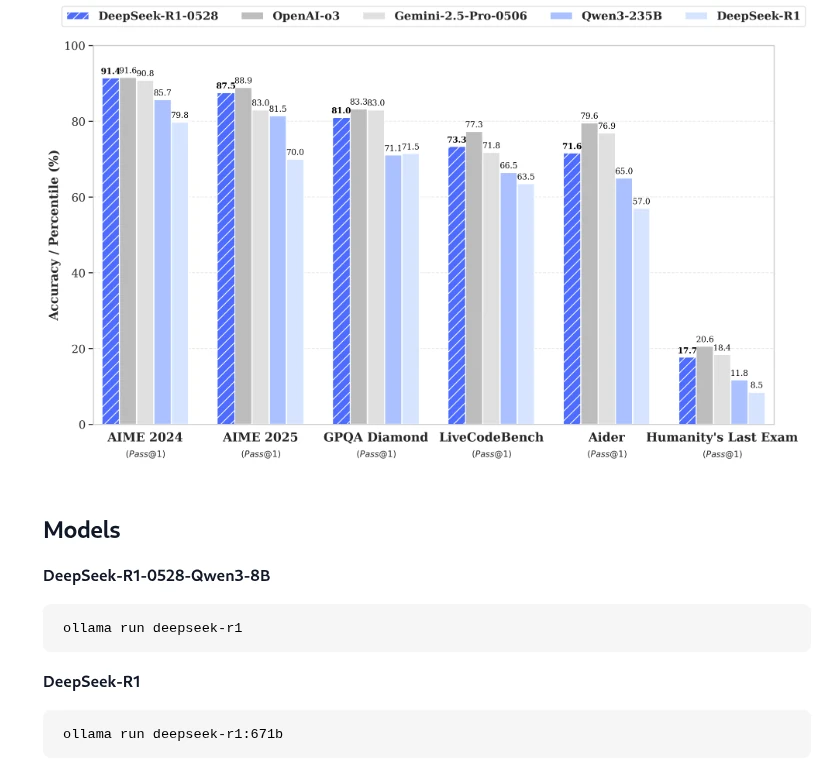
Once you’ve chosen a language model, you can copy the corresponding command from the overview and enter it into the terminal. For our example, this will be DeepSeek R1 for demonstration purposes.
As shown in the screenshot, the corresponding command we need to install the model locally in Ollama is: ollama run deepseek-r1. Installing the language model may take some time, depending on your internet connection and computer speed. Once the model has been installed locally in Ollama, we can close the terminal and move on to the next step: installing AnythingLLM.
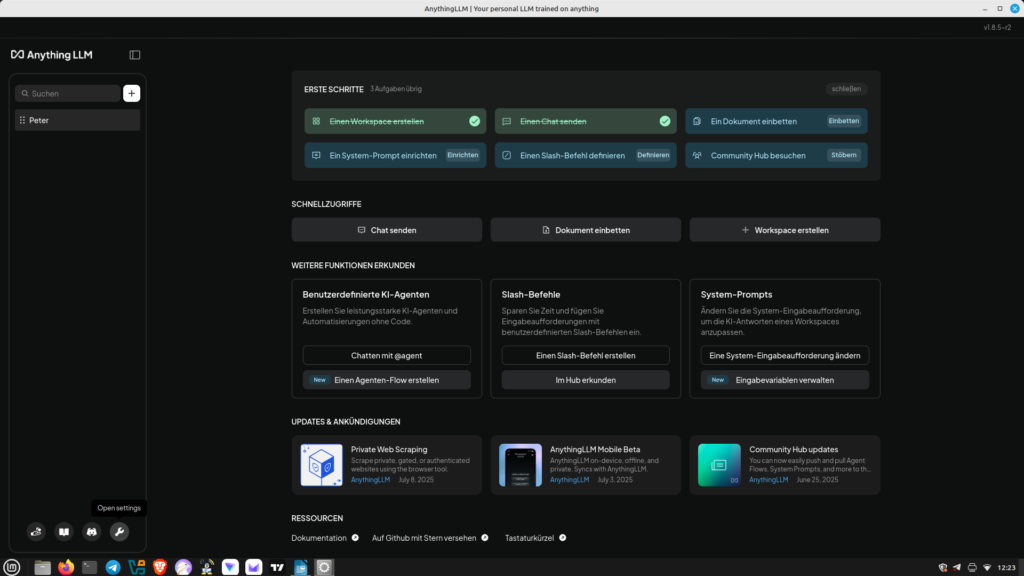
Installing AnythingLLm is similar to installing Ollama. To do so, open the terminal and enter the following command: curl -fsSL https://cdn.anythingllm.com/latest/installer.sh | sh. Once the installation is complete, you can change to the installation directory, which is usually /home//AnythingLLMDesktop. There, navigate to the start link and make it executable (right-click and select Properties). Additionally, you can create a shortcut on the desktop. Now you can conveniently launch AnythingLLM from the desktop, which we’ll do right now.
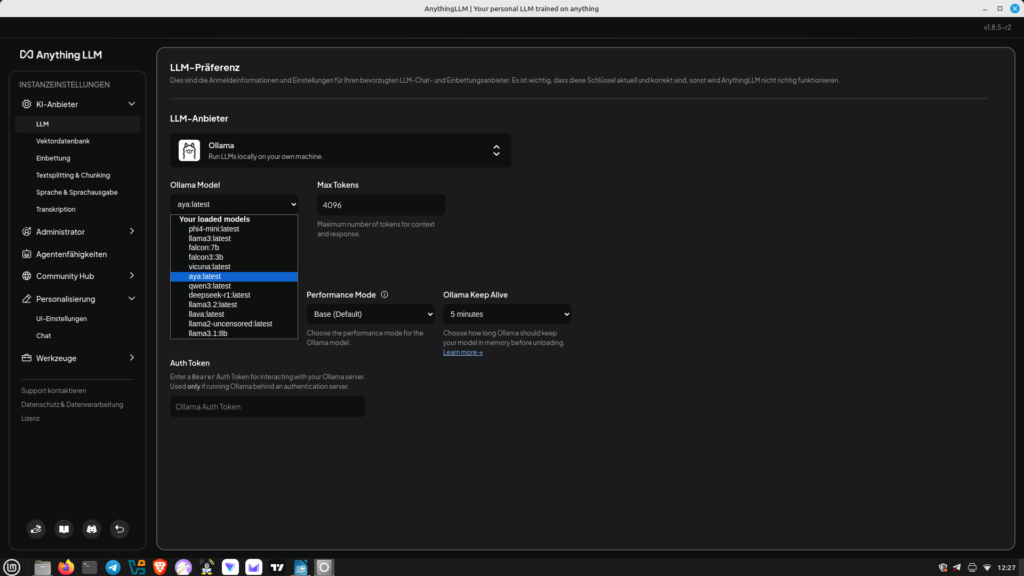
After defining the workspace, we can now link Anything with Ollama. To do this, we go to the small wrench icon (Settings) in the lower left corner. There, we select LLM and then Ollama. We can now select the language model stored for Ollama. Save our settings. Now you can switch to chat mode. Of course, you can change the language model at any time. Unlike previous workshops, we can now upload PDF documents and ask questions about the content. Have fun.
Artificial intelligence is a very broad field in which it’s easy to lose track. Large Language Models (LLMs), such as ChatGPD, process natural language and can solve various problems depending on the data set. In addition to pleasant conversations, which can be quite therapeutic, LLM can also handle quite complex tasks. One such scenario would be drafting official letters. In this article, we won’t discuss how you can use AI, but we’ll explain how you can install your own AI locally on your computer.
Before we get into the nitty-gritty, we’ll answer the question of what the whole thing is actually useful for. You can easily access AI systems, some of which are available online for free.
What many people aren’t aware of is that all requests sent to ChatGPT, DeepSeek, and the like are logged and permanently stored. We can’t answer the details of this logging, but the IP address and user account with the prompt request are likely among the minimal data collected. However, if you have installed your own AI on your local computer, this information will not be transmitted to the internet. Furthermore, you can interact with the AI as often as you like without incurring any fees.
For our project of installing our own artificial intelligence on your own Linux computer, we don’t need any fancy hardware. A standard computer is perfectly sufficient. As mentioned before, we are using Linux as the operating system because it is much more resource-efficient than Windows 10 or Windows 11. Any Debian-derived Linux can be used for the workshop. Debian derivatives include Ubuntu and Linux Mint.
At least 16 GB of RAM is required. The more RAM, the better. This will make the AI run much more smoothly. The CPU should be at least a current i5/i7 or AMD Ryzen 5+. If you also have an SSD with 1 TB of storage, we have the necessary setup complete. Computers/laptops with this specification can be purchased used for very little money. Without wanting to advertise too much, you can browse the used Lenovo ThinkPad laptops. Other manufacturers with the minimum hardware requirements also provide good services.
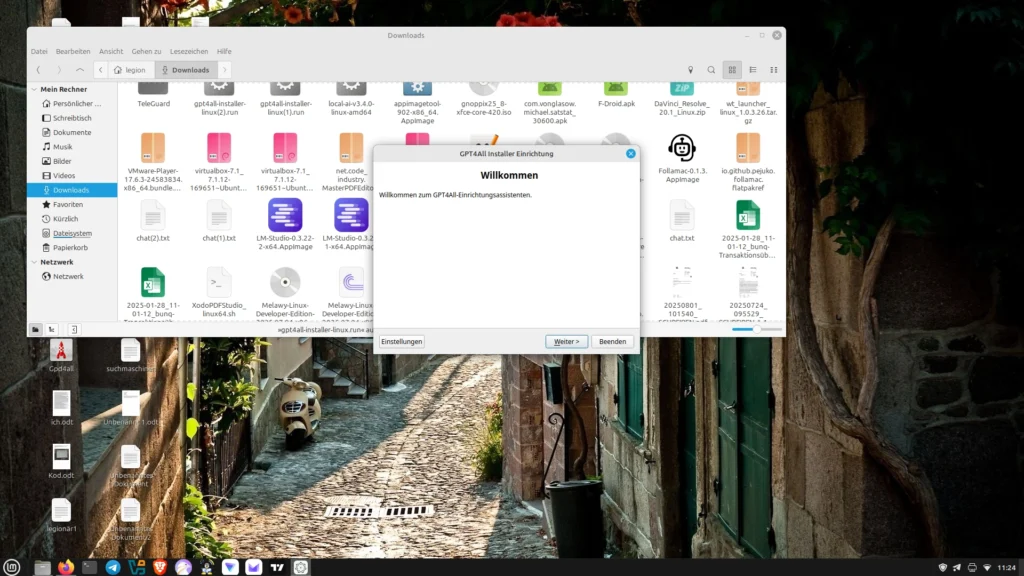
After clarifying the necessary requirements, we’ll first install GPT4all on our computer. Don’t worry, it’s quite easy, even for beginners. No special prior knowledge is necessary. Let’s start by downloading the gpd4all.run file from the homepage (https://gpt4all.io/index.html?ref=top-ai-list). Once this is done, we’ll make the file executable.
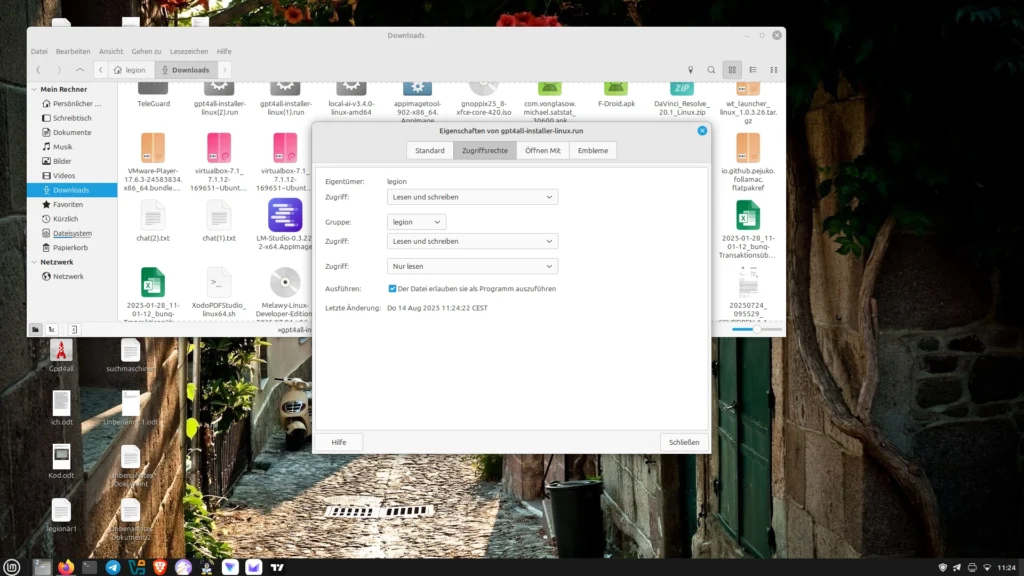
As shown in the screenshot, we right-click on the downloaded file and select Properties from the menu. Under the Permissions tab, we then check the Execute box. Now you can run the file with the usual double-click, which we do immediately.
Now the installation process begins, where we can, among other things, select where GPT4all will be installed. On Linux, self-installed programs usually go to the /opt directory.
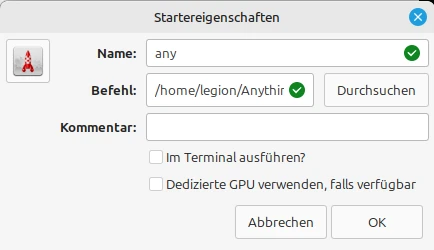
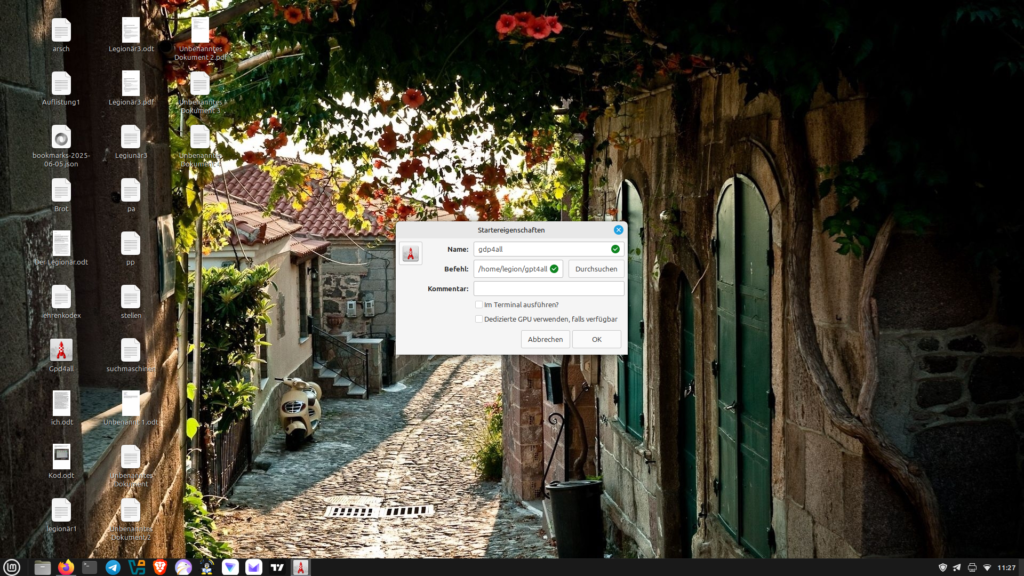
In the next step, we can create a desktop shortcut. To do this, right-click on the empty desktop and select “Create Shortcut.” In the pop-up window, enter a name for the shortcut (e.g., GPT 4 all) and set the path to the executable file (bin/chat), then click OK. Now we can conveniently launch GPT4all from our desktop.
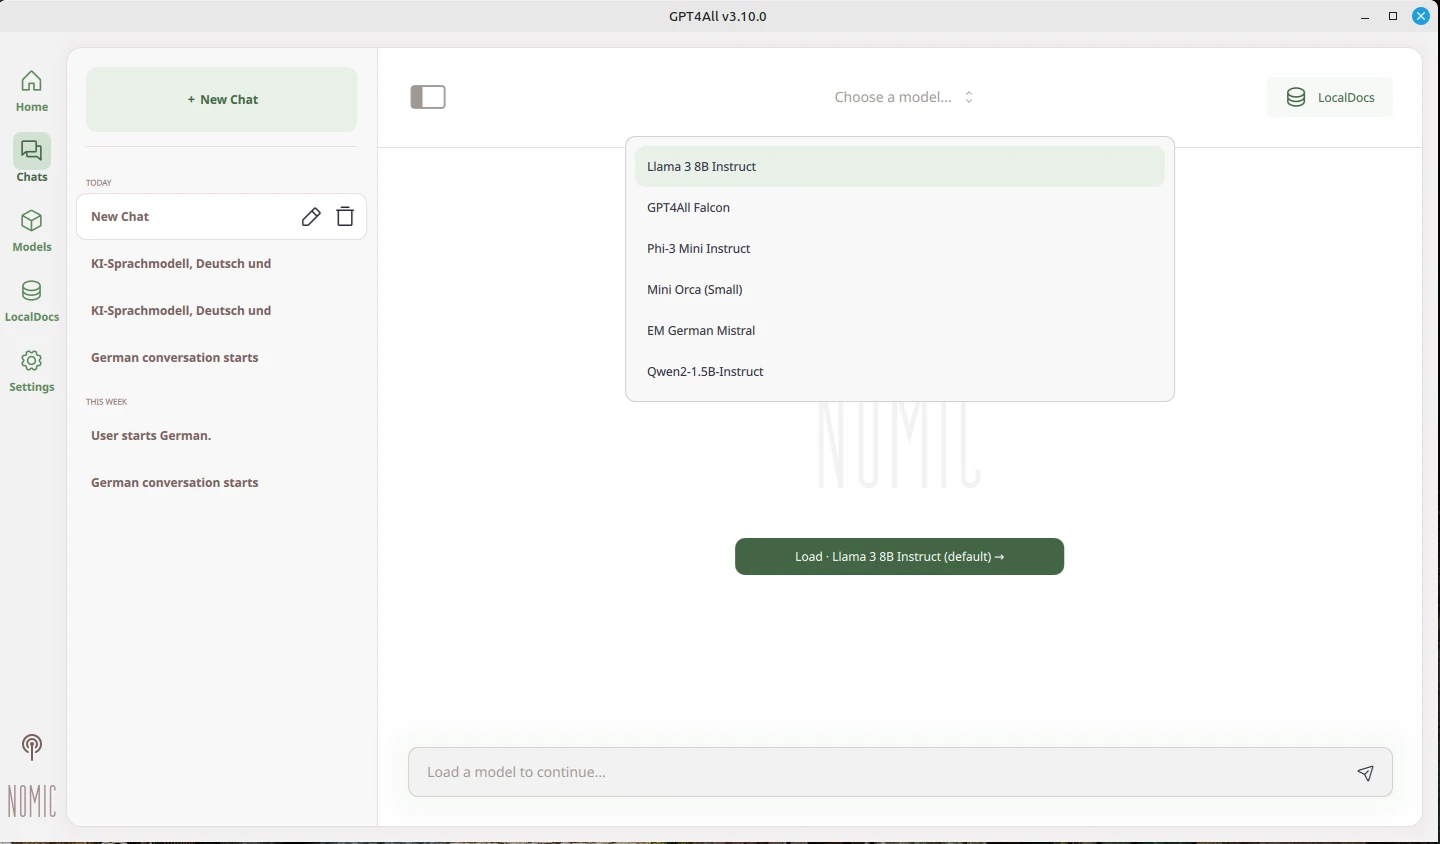
For GPT4all to work, a model must be loaded. As you can see in the screenshots, several models are available. The model must be reselected each time the program is started. The AI can now be used locally on your computer.
Image gallery:
Other AI systems include:
Llama 3 8B Instruct: an all-rounder with good language skills
Mistral 7B: efficient, fast, and precise
Phi 3 Mini: very small and runs even with little RAM
Windows 11 integrates an ominous history feature that records all interactions with the computer and most likely transmits them to Microsoft via telemetry. The countless laws passed by the EU and implemented by Germany to monitor citizens are also giving many people cause to rethink data protection and privacy. Our world is constantly evolving, and the digital world is changing considerably faster. It’s up to each individual how they want to deal with these changes. This article is intended to inspire you to learn more about Linux and security. Perhaps you’ll even feel like trying out the Kodachi Linux presented here for yourself. There are several ways you can try Kodachi Linux.
Virtual machine: Simply create a virtual machine with Kodachi Linux using the ISO file and the VirtualBox or VMWare program. You can also create and use these virtual machines from a Windows computer.
Booting from a USB stick: Tools like Disks (Linux) or Rufus (Windows) allow you to create bootable USB sticks. This allows you to boot your PC directly from the USB drive with Kodachi without affecting the operating system installed on the hard drive.
Native installation: You can also use the bootable USB stick to permanently install Kodachi Linux on your computer. This method is recommended if you already have experience with Kodachi.
Kodachi OS is, as the name suggests, a Japanese Linux distribution with a customized XFCE desktop. Kodachi are actually classic Japanese samurai swords, which already suggests a reference to security. Kodachi OS itself is a Xubuntu derivative and thus a grandchild of Ubuntu and a great-grandchild of Debian Linux. Kodachi Linux offers a highly secure, anti-forensic, and anonymous computing environment. It was designed with privacy in mind, with all the necessary features to ensure user trust and security.
Automatically established VPN connection
Pre-configured TOR connection
Running DNSCrypt service
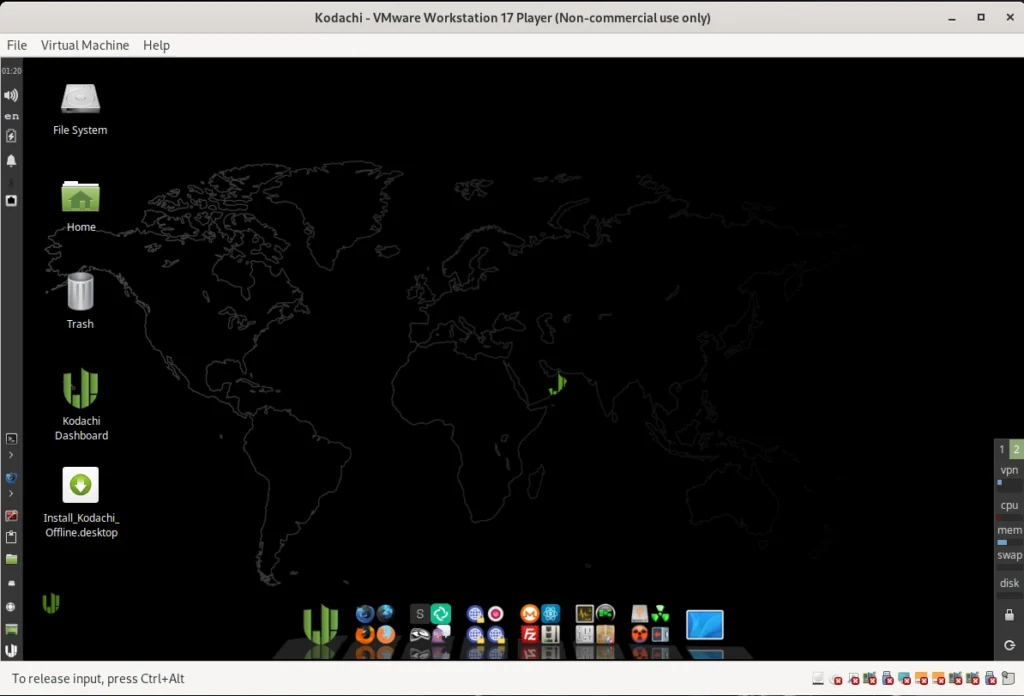
The current version of Kodachi can be downloaded free of charge from the website [1]. With the downloaded ISO, you can now either create a bootable USB stick or install Kodachi in a virtual machine. We chose the option of creating a virtual machine with VMware.
Installation is completed in just a few minutes thanks to the VMware Ubuntu template. For our test, we gave the VM 20 GB of hard drive space. To ensure smooth operation, we increased the RAM to 8 GB. If you don’t have that much RAM available, you can also work with 4 GB. After starting the VM, you will see the Kodachi OS desktop as shown in the screenshot below, version 8.27. For all Linux nerds, it should be noted that this version uses kernel 6.2. According to the website, they are already hard at work on the new version 9.
To keep the installation as simple as possible, even for beginners, user accounts have already been set up. The user is kodachi and has the password r@@t00 (00 are zeros). The administrator account is called root, as is usual in Linux, and also has the password r@@t00. Anyone who decides to permanently install Kodachi on their machine should at least change the passwords.
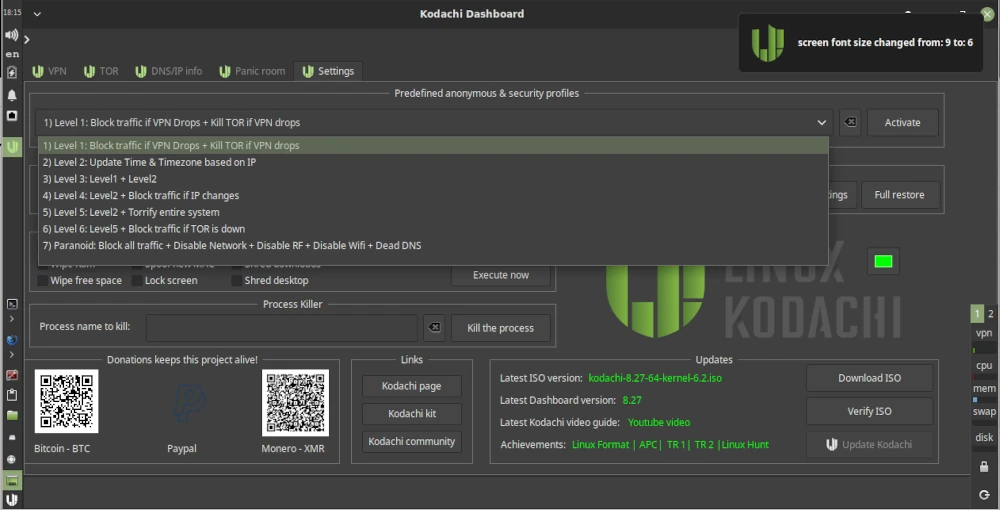
Unfortunately, the highest possible level of anonymity can only be achieved at the expense of browsing speed. Kodachi Linux therefore offers several profiles to choose from for different requirements.
Maximum Anonymity (Slower)
ISP → Router VPN → Kodachi VPN (VM NAT) → Torified System → Tor DNS → Kodachi Loaded Browser
Highly Anonymous (Slow)
ISP → Kodachi VPN → TOR Endpoint → Tor DNS → Kodachi Loaded Browser
Anonymous & Fast
ISP → Kodachi VPN → TOR Endpoint → Tor DNS → Kodachi Lite Browser
Moderate Anonymity
ISP → Kodachi VPN with Forced VPN Traffic → Tor DNS → Kodachi Loaded Browser
Standard Anonymity
ISP → Kodachi VPN → Torified System → Tor DNS → Kodachi Loaded Browser
Enhanced Anonymity with Double TOR
ISP → Kodachi VPN with Forced VPN Traffic → Tor Browser → Tor Browser
Double TOR Alternative
ISP → Kodachi VPN → Tor Browser → Tor Browser → Tor DNS
ISP → Kodachi VPN with forced VPN traffic → Kodachi loaded browser → Tor DNS
High speed and security
ISP → Kodachi VPN with forced VPN traffic → Kodachi lite browser → Tor DNS
Double security with DNScrypt
ISP → Kodachi VPN with forced VPN traffic → Tor browser → DNScrypt
Double security with Tor DNS
ISP → Kodachi VPN with forced VPN traffic → Tor browser → Tor DNS
Now let’s get to the basics of using Kodachi. To do this, we open the dashboard, which we find as a shortcut on the desktop. After launching, we’ll see various tabs such as VPN, TOR, and Settings. Under Settings, we have the option to activate several profiles relevant to online security and privacy. As shown in the screenshot below, we select Level 1 and activate the profile.
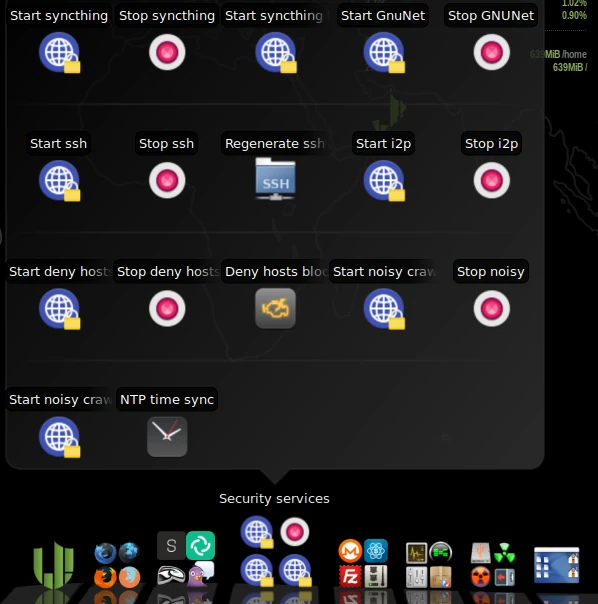
In the lower panel, in the Security Services section, you’ll find various services that can be enabled, such as GnuNet. There are several options here that you can easily try out. GnuNet, for example, redirects all traffic to the TOR network. This, of course, means that pages take longer to fully load.
With Kodachi Linux’s built-in tools, you can significantly improve your security and anonymity while surfing the internet. While it may be a bit unusual to use at first, you’ll quickly get used to it. If you choose to use it as a live system or a virtual machine, you can easily familiarize yourself with the various programs and settings without damaging the guest operating system. Especially for beginners, using a VM eliminates the fear of breaking something while trying out different configurations.
If you do a little research on Kodachi Linux online, you’ll quickly find an article [2] from 2021 that is quite critical of Kodachi. The main criticism is that Kodachi is more of an Ubuntu distro with a customized look and feel, spiced up with a few shell scripts, than a standalone Linux. This criticism can’t be completely dismissed. If you take a closer look at the criticism, you’ll find that Kadochi does have some practical anonymization features. Nevertheless, it’s far from being a so-called hacker’s toolbox. The author of the review took another look at Kadochi in 2025 [3] and his conclusion for the current version is no different than his conclusion in 2021. Whether the upcoming version 9 of Kadochi Linux will take the points raised to heart remains to be seen.
If you want to use your Git repository for collaborative editing of source code, you need a Git server. The Git server enables multiple developers to collaborate on the same code base. Installing the Git client on a Linux server is a first step towards your own server solution, but it is far from sufficient. In order to allow multiple people to access a code repository, we need access authorization. After all, the repository should be publicly accessible via the Internet. We want to use user management to prevent unauthorized people from reading and changing the contents of the repositories.
There are many excellent and convenient solutions for operating a Git server that should be preferred to a native server solution. The administration of a native Git server requires Linux knowledge and is carried out exclusively via the command line. Solutions such as the SCM-Manager have a graphical user interface and come with many useful tools for administering the server. These tools are not available with a native installation.
Why should you install Git as a native server? This question is quite easy to answer. The reason is when the server on which the code repository is to be made available has only a few hardware resources. RAM in particular is always a bit of a problem in this context. This is often the case with rented virtual private servers (VPS) or a small RaspberryPI. So we can see that it can make sense to want to run a native Git server.
As a prerequisite, we need a Linux server on which we can install the Git server. This can be a Debian or Ubuntu server. If you use CentOs or other Linux distributions, you must use your distribution’s package manager instead of APT to install the software.
In the first step, we start by updating the packages and installing the Git client.
Now, in the third step, we can create our Git repositories in the newly created home directory of the git user. These differ from the local workspace in that they do not have the source code checked out.
Unfortunately, we are not quite finished with our project yet. In the fourth step, we have to set the user authorization for the created repository. This is done by storing the public key on the Git server for SSH access. To do this, we copy the contents of our private key file into the /home/git/.ssh/authorized_keys file in a separate line. If you now want to deny existing users access, simply comment out the private key number with a #.
If everything has been done correctly, you can access the repository using the following command line command: git clone ssh://git@<IP>/~/<repo>
Replace with the actual server IP. For our example, the correct path for is project.git, so it is the directory we created for the Git repository.
Multiple repositories can be created on the native Git server. It is important to note that all authorized users have read and write access to all repositories created in this way. This can only be restricted by creating multiple users on the operating system of the Linux server that provides our Git repositories, to whom the repositories are then assigned.
We see that a native Git server installation can be implemented quickly, but it is not sufficient for commercial software development. If you like to experiment, you can create a virtual machine and try out this workshop in it.
Why do we even need the option to save application configurations in text files? Isn’t a database sufficient for this purpose? The answer to this question is quite trivial. The information on how an application can connect to a database is difficult to save in the database itself.
Now you could certainly argue that you can achieve such things with an embedded database such as SQLite. That may be correct in principle. Unfortunately, this solution is not really practical for highly scalable applications. And you don’t always have to use a sledgehammer to crack a nut. Saving important configuration parameters in text files has a long tradition in software development. However, various text formats such as INI, XML, JSON and YAML have now become established for this use case. For this reason, the question arises as to which format is best to use for your own project.
INI Files
One of the oldest formats are the well-known INI files. They store information according to the key = value principle. If a key appears multiple times in such an INI file, the final value is always overwritten by the last entry that appears in the file.
; Example of an INI File[Section-name]key=value ; inlinetext="text configuration with spaces and \' quotas"string='can be also like this'char=passwort# numbers & digetsnumber=123hexa=0x123octa=0123binary=0b1111float=123.12# boolean valuesvalue-1=truevalue-0=false
INI
As we can see in the small example, the syntax in INI files is kept very simple. The [section] name is used primarily to group individual parameters and improves readability. Comments can be marked with either ; or #. Otherwise, there is the option of defining various text and number formats, as well as Boolean values.
Web developers know INI files primarily from the PHP configuration, the php.ini, in which important properties such as the size of the file upload can be specified. INI files are also still common under Windows, although the registry was introduced for this purpose in Windows 95.
Properties
Another very tried and tested solution is so-called property files. This solution is particularly common in Java programs, as Java already has a simple class that can handle properties. The key=value format is borrowed from INI files. Comments are also introduced with #.
In order to ensure type safety when reading .properties in Java programs, the TP-CORE library has an extended implementation. Despite the fact that the properties are read in as strings, the values can be accessed using typing. A detailed description of how the PropertyReader class can be used can be found in the documentation.
.property files can also be used as filters for substitutions in the Maven build process. Of course, properties are not just limited to Maven and Java. This concept can also be used in languages such as Dart, nodeJS, Python and Ruby. To ensure the greatest possible compatibility of the files between the different languages, exotic notation options should be avoided.
XML
XML has also been a widely used option for many years to store configurations in an application in a changeable manner. Compared to INI and property files, XML offers more flexibility in defining data. A very important aspect is the ability to define fixed structures using a grammar. This allows validation even for very complex data. Thanks to the two checking mechanisms of well-formedness and data validation against a grammar, possible configuration errors can be significantly reduced.
Well-known application scenarios for XML can be found, for example, in Java Enterprise projects (J EE) with web.xml or the Spring Framework and Hibernate configuration. The power of XML even allows it to be used as a Domain Specific Language (DSL), as is used in the Apache Maven build tool.
Thanks to many freely available libraries, there is an implementation for almost every programming language to read XML files and access specific data. For example, PHP, a language popular with web developers, has a very simple and intuitive solution for dealing with XML with the Simple XML extension.
JavaScript Object Notation, or JSON for short, is a relatively new technology, although it has been around for several years. JSON also has a corresponding implementation for almost every programming language. The most common use case for JSON is data exchange in microservices. The reason for this is the compactness of JSON. Compared to XML, the data stream to be transferred in web services such as XML RPC or SOAP with JSON is much smaller due to the notation.
There is also a significant difference between JSON and XML in the area of validation. Basically, there is no way to define a grammar like in XML with DTD or schema on the official JSON homepage [1]. There is a proposal for a JSON grammar on GitHub [2], but there are no corresponding implementations to be able to use this technology in projects.
A further development of JSON is JSON5 [3], which was started in 2012 and has been officially published as a specification in version 1.0.0 [4] since 2018. The purpose of this development was to significantly improve the readability of JSON for people. Important functions such as the ability to write comments were added here. JSON5 is fully compatible with JSON as an extension. To get a brief impression of JSON5, here is a small example:
{// commentsunquoted:'and you can quote me on that',singleQuotes:'I can use "double quotes" here',lineBreaks:"Look, Mom! \No \\n's!",hexadecimal: 0xdecaf,leadingDecimalPoint: .8675309,andTrailing: 8675309.,positiveSign: +1,trailingComma:'in objects',andIn:['arrays',],"backwardsCompatible":"with JSON",}
JSON5
YAML
Many modern applications such as the open source metrics tool Prometheus use YAML for configuration. The very compact notation is very reminiscent of the Python programming language. YAML version 1.2 is currently published.
The advantage of YAML over other specifications is its extreme compactness. At the same time, version 1.2 has a grammar for validation. Despite its compactness, the focus of YAML 1.2 is on good readability for machines and people alike. I leave it up to each individual to decide whether YAML has achieved this goal. On the official homepage you will find all the resources you need to use it in your own project. This also includes an overview of the existing implementations. The design of the YAML homepage also gives a good foretaste of the clarity of YAML files. Attached is a very compact example of a Prometheus configuration in YAML:
global:scrape_interval:15sevaluation_interval:15srule_files:# - "first.rules"# - "second.rules"#IP: 127.0.0.1scrape_configs:-job_name:prometheusstatic_configs:-targets:['127.0.0.1:8080']# SPRING BOOT WEB APP-job_name:spring-boot-samplescrape_interval:60sscrape_timeout:50sscheme:"http"metrics_path:'/actuator/prometheus'static_configs:-targets:['127.0.0.1:8888']tls_config:insecure_skip_verify:true
YAML
Resumee
All of the techniques presented here have been tried and tested in practical use in many projects. Of course, there may be some preferences for special applications such as REST services. For my personal taste, I prefer the XML format for configuration files. This is easy to process in the program, extremely flexible and, with clever modeling, also compact and extremely readable for people.
[EN] We use cookies to improve your experience on our site. By using our site, you consent to cookies.
[DE] Wir verwenden Cookies, um Ihre Erfahrungen auf unserer Website zu verbessern. Durch die Nutzung unserer Website stimmen Sie Cookies zu.
This website uses cookies
Websites store cookies to enhance functionality and personalise your experience. You can manage your preferences, but blocking some cookies may impact site performance and services.
Essential cookies enable basic functions and are necessary for the proper function of the website.
Name
Description
Duration
Cookie Preferences
This cookie is used to store the user's cookie consent preferences.
30 days
These cookies are needed for adding comments on this website.
Name
Description
Duration
comment_author
Used to track the user across multiple sessions.
Session
comment_author_email
Used to track the user across multiple sessions.
Session
comment_author_url
Used to track the user across multiple sessions.
Session
These cookies are used for managing login functionality on this website.
Name
Description
Duration
wordpress_logged_in
Used to store logged-in users.
Persistent
wordpress_sec
Used to track the user across multiple sessions.
15 days
wordpress_test_cookie
Used to determine if cookies are enabled.
Session
Statistics cookies collect information anonymously. This information helps us understand how visitors use our website.
Matomo is an open-source web analytics platform that provides detailed insights into website traffic and user behavior.